
What should I do if I dont find the deleted iPhone XS files after scanning? | Stellar
What should I do if I don’t find the deleted iPhone files after scanning?
Stellar Data Recovery for iPhone is an efficient software to recover all kinds of lost data from iPhone, iTunes, and iCloud.
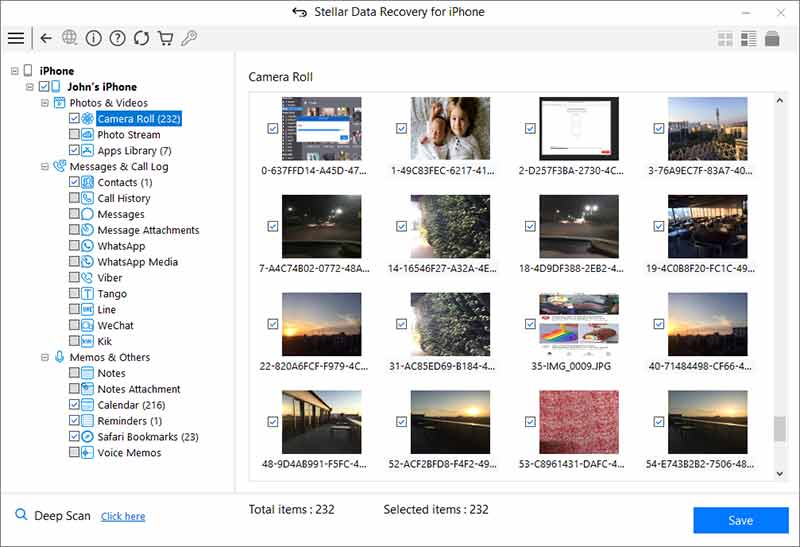
In case you are unable to find the lost data after quick scan through Stellar Data Recovery for iPhone , choose to perform Deep Scan.
Deep scan is a next level of aggressive scanning. It involves thorough scan of the device and the backups (iTunes and iCloud) using advanced algorithms. Deep Scan recovers as much data as possible from the selected device or backup. It searches for lost files on the basis of file signature. This recovery option recovers everything that is found in the selected source. This option is especially helpful in case of severely deleted and corrupted iPhone data.
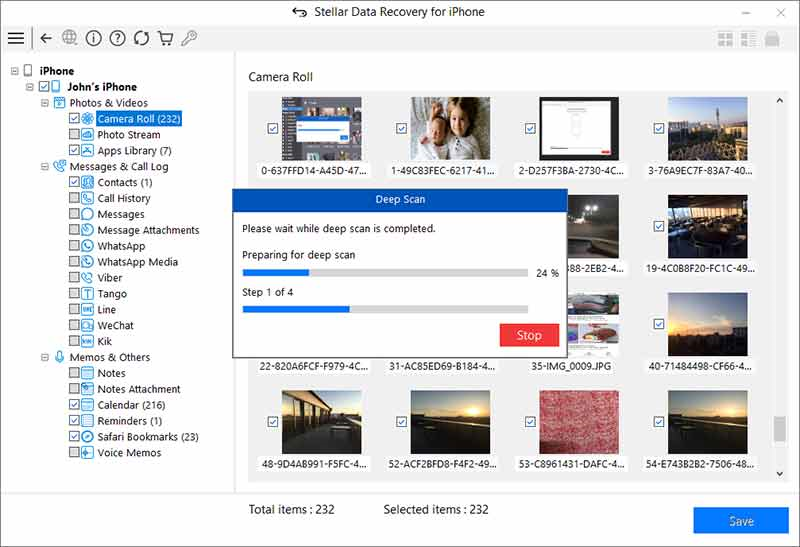
How to perform Deep Scan?
Once quick scan is completed, in the preview window choose Click Here option at the bottom left of the window to start Deep Scan.
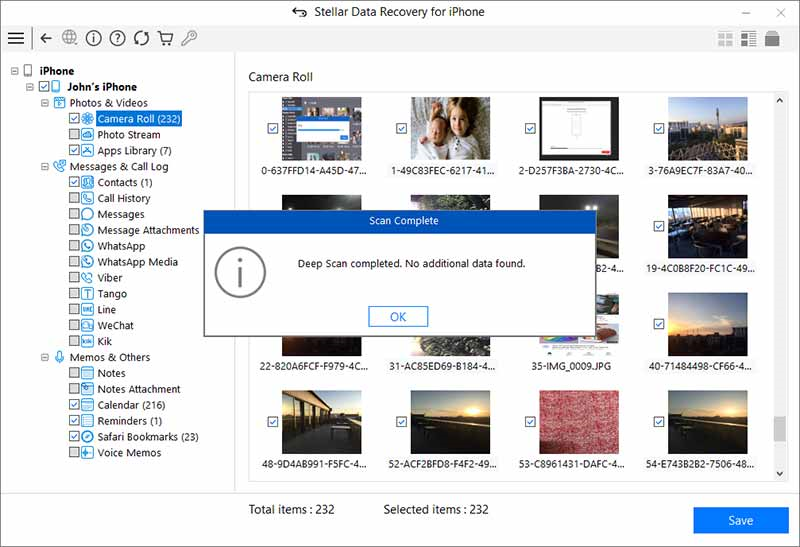
When the scanning process is completed, a dialog box displaying the message ‘Deep Scan completed’ is displayed.
In case the additional data is not recovered through Deep Scan, the dialog box displays the message ‘Deep Scan completed. No additional data found.’
Files found during Deep Scan can be viewed in the preview window and saved at any desired location.
Stellar Data Recovery for iPhone® Stellar Data Recovery for iPhone® is the best DIY software to recover missing or accidentally deleted Contacts, Messages, Calendar, Photos, Videos, Call History etc directly from iPhone or iPad.
Solved: Mac Doesn’t Recognize my iPhone
Summary: Is your Mac not recognizing the iPhone? Learn the 9 ways to fix iPhone not showing up on Mac. You can apply these methods for all iPhone models not recognized by macOS Ventura, Monterey, Catalina, Big Sur, High Sierra and below versions.

You may want to backup iPhone data or transfer favorite photos, music, or videos to Mac. But sometimes your Mac computer doesn’t detect the iPhone when you try to connect it. There are so many complaints such as iPhone not showing up in Finder in Ventura, Monterey, Catalina or Macbook not recognizing iPhone 14. Some also reported an unknown error or a 0xE error when trying to connect iPhone to Mac computer. The situation is frustrating as it prevents you to sync iPhone to macOS and access iPhone data on Mac.
No worries. There are methods, which can fix the issue and let you again access your iPhone on Mac. But, first you should be aware why Mac fails to recognize your iPhone as this helps in troubleshooting the problem.
Why your iPhone not detected by Mac computer?
Mac does not detect your iPhone due to many reasons, such as
- iPhone is not ‘on’ when connected to Mac.
- iPhone is damaged.
- The USB cable or USB port is not working.
- Software updates are pending including iOS, iTunes, and macOS.
- Third-party software conflict wherein 2 programs arecompeting for the same memory, peripheral device etc., on your Mac.
- Firewall or Antivirus software is preventing Mac to recognize iPhone.
- Mac settings don’t allow to view iPhone in Finder.

1. Check your iPhone
Before you connect your iPhone to Mac, make sure the iOS device is unlocked and on the Home screen.
2. Fix USB connection
When Mac computer doesn’t recognize iPhone, first check your USB connection. The USB cable or the port can be faulty. Try to connect iPhone to Mac using another Apple USB 2.0 cable. If that doesn’t work try with the different port. Plus, disconnect other USB devices from Mac except your iPhone.
3. Restart your iPhone
Restarting the iOS device would resolve any issue between your iPhone programs and iTunes. To restart hold volume/side/ top button depending on your iPhone model. Slide the red power off slider on your iPhone. Wait for your iPhone to turn off. After a few seconds, again restart iPhone. Now Mac should recognize your iPhone.
4. Restart your Mac
Restarting Mac clears the cache and memory of your system giving it a fresh start. It also installs pending updates.
5. Update your macOS
When iPhone is not showing up on Mac Finder but you can see it under USB Device Tree, update the macOS to the latest version. Make sure there are no pending software installs.
To check the USB Device Tree on Mac follow the below steps:
- Click on Apple icon followed by About This Mac.
- Click the System Report button.
- Under Hardware, select USB.


Figure: USB Device Tree
- On the right pane, you will see USB Device Tree. If you see your iPhone in the list, then update to the latest macOS.
6. Update iTunes
Older versions of iTunes can create conflict with normal Mac functions. Hence, Apple recommends installing the latest iTunes updates.
To install the latest iTunes, open iTunes. From the menu bar choose Help > Check for Updates and follow the prompts to install the latest version.
Now, check if your Mac recognizes the iPhone or not.
7. Disable antivirus on Mac
One of the reason cited for iPhone not detected by Mac is anti-virus or firewall protection on your system. So disable the antivirus or firewall and then try to connect your iPhone to Mac.
8. Enable iOS device in Mac Preferences
When iPhone is not showing on Mac Finder, check if your Mac Preferences allows to view iOS devices in Finder. To enable iOS device in Finder follow the below steps:
- Go to Finder > Preferences.
- Click on the Sidebar button in Finder Preferences box.
- Check in CDs, DVDs and iOS Devices.

Figure: Finder Preferences
This should fix iPhone not showing up in Finder on Mac.
9. Connect iPhone to a different Mac machine
Try by connecting your iPhone to another Mac. If you receive a message asking to ‘Trust this computer’, click on ‘Trust’ to access your iPhone data on the new computer. Make sure to backup iPhone to avoid data loss situation.
Tip: Have you lost or accidentally deleted Camera Roll, Contacts, Photos Stream, Voice Memos, or more while transferring iPhone data to Mac? No need to worry. Restore the deleted photos, videos, messages, contacts, etc., with the help of an efficient Stellar Data Recovery for iPhone for Mac.

FAQ
1. Can I connect iPhone with Mac wirelessly?
You can sync your Mac and iPhone over the same Wi-Fi network.
- Connect your iPhone to Mac using a USB cable.
- Open Finder on Mac and select your iPhone in the sidebar.
- Click on the General tab.
- Check in Show this iPhone when on Wi-Fi.
- Click Apply.
2. How to fix my iPhone cannot connect to iTunes?
If iPhone is not showing up in iTunes, restart your devices and ensure macOS, iTunes, and iOS are updated. To know more methods, read How fix iPhone unable to connect to iTunes problem.
3. How to connect iPhone to the latest MacBook Pro 2021 that doesn’t have USB A port?
The new MacBook has USB Type-C port. You can use USB-C to Lightning cable to connect iPhone XR, SE, 11, and above to the new MacBook. If you have iPhone X or below use USB-A to Lightning cable.
4. Can I use the methods to fix iPhone 14 not recognized by macOS Ventura?
Yes, you can apply the above methods to fix any iPhone not detected by macOS Ventura, Monterey, Big Sur, Catalina, or below.
5. Will I lose any data when syncing iPhone and Mac?
No, you won’t lose data by syncing iPhone to Mac. Syncing helps to access your iPhone data on Mac anytime from anywhere. However, if you accidentally delete iPhone data, use an iPhone Data Recovery software to restore it.
Wrapping Up
Syncing iOS device to macOS has so many advantages but if Mac is not recognizing your iPhone, you cannot transfer, back up, or access iPhone data on Mac. This post has shared 9 methods to fix the syncing issue of Mac and iPhone. One of them should resolve Mac not detecting your iPhone.
Apple will delete your photos in July. Here’s what you should do
Apple has recently announced that it will permanently delete photos from its users’ ‘My Photo Stream’ this month. This news has come as a surprise to the Apple community, as users struggle to understand the implications of this announcement and what necessary precautions can be taken. In this blog post, we will get into the details of this new move by Apple, explore the reasons behind it, and provide tips on how iPhone/iPad/Mac users can safeguard their precious photos.
The Announcement
_”_My Photo Stream is scheduled to be shut down on July 26, 2023. As part of this transition, new photo uploads to My Photo Stream from your devices will stop one month before, on June 26, 2023.
The photos in My Photo Stream are already stored on at least one of your devices, so as long as you have the device with your originals, you won’t lose any photos as part of this process. If a photo you want isn’t already in your Library on a particular iPhone, iPad, or Mac, make sure that you save it to your Library on that device…” Read more
What is Apple’s My Photo Stream?
My Photo Stream, launched in 2011, was designed to sync photos across multiple Apple devices such as iPhone, iPad, or Mac.
This feature automatically stores your most recent pictures (up to 1000) for approx. 30 days so you can view and download them easily from other Apple devices. After this period, photos are removed from My Photo Stream but remain in your device’s Photos app. However, this only shows photos and not your live images or videos.
How to Protect Your ‘My Photo Stream’ Pictures?
Apple, known for its commitment to user privacy and data security, has recommended several preventive measures to mitigate the risk of losing any important photo due to this update.
1. Move My Photo Stream images to your Library
Even if the pictures in My Photo Stream are already there on at least one of your Apple devices, you must save these pictures to your Photo Library to avoid losing them**.** Here’s how to copy My Photo Stream pictures to your Photo Library:
On your iPhone, iPad, or iPod Touch:
- Open the Photos app and tap Albums.
- Tap on My Photo Stream > Select.
- Select all the photos you want to save, then tap the Share button > Save Image.
On your Mac:
- Open the Photos app and then open the My Photo Stream
- Select the photos you want to save which aren’t currently in your photo library.
- Drag and drop them from the My Photo Stream album into your Library.
2. Move to iCloud Photos
To preserve your My Photo Stream images in their original and high-resolution version, you can transfer them to iCloud Photos.
If you already have an iCloud account, just enable iCloud Photos to automatically upload & sync every photo and video you capture on the device, making them accessible from anywhere.
To use the iCloud Photos service, you will require the following:
- iPhone running iOS 8.3 or later version.
- iPad with iPadOS 8.3 or later version.
- Mac running OS X Yosemite or later version.
How to set up iCloud Photos on your iPhone, iPad, or iPod touch?
- On your iPhone, iPad, or iPod touch, go to Settings.
- Next, click on [Your Name] > iCloud.
- Tap on Photos and do the following:
For iOS 16, iPadOS 16, or later versions: Toggle on the ‘Sync this [device]‘ option.
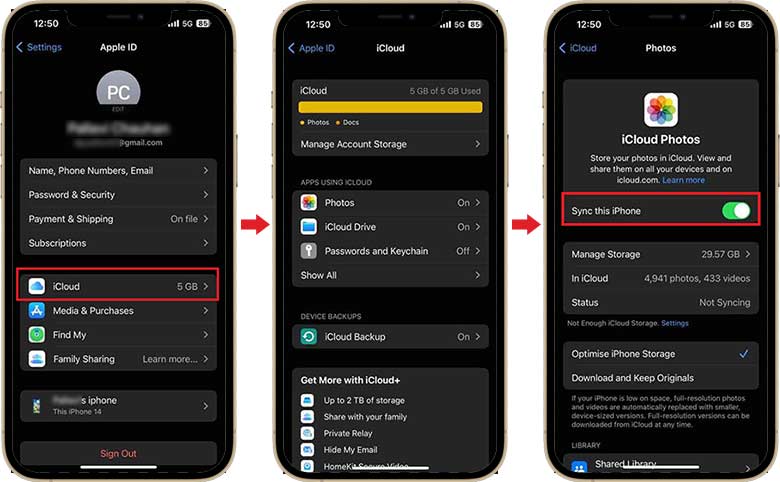
For iOS 15, iPadOS 15, or earlier versions: Turn on the iCloud Photos
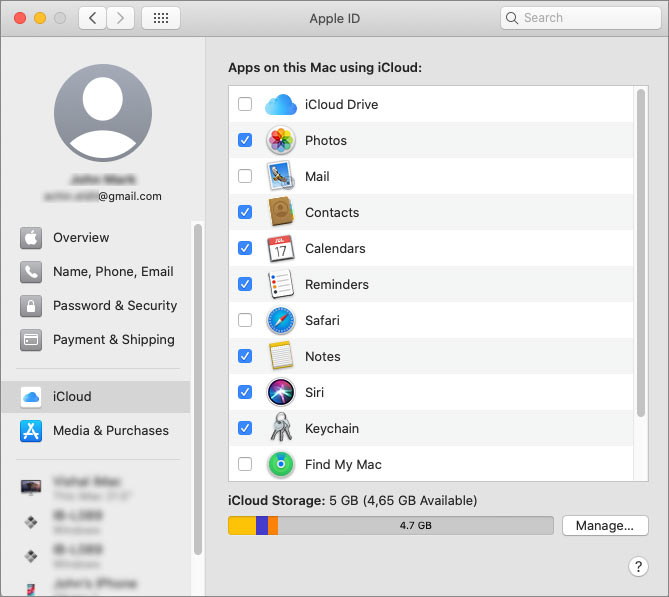
How to set up iCloud Photos on your Mac?
- On your Mac, go to Apple Menu and click on System Preferences.
- Click Apple ID and then select iCloud in the sidebar.
- Now, select Photos and turn on the switch next to Sync this Mac.
**
**
Don’t want to use iCloud Photos?
While iCloud Photos is a convenient option for many Apple users, it’s important to acknowledge that it is not the best fit for everyone. Limited free storage of 5GB or lack of cross-platform compatibility can compel Apple users to look for other alternatives.
Storage options, such as Google Photos, Microsoft OneDrive, Dropbox, external hard drives, etc., are available to ensure your iPhone Photos are safe and easily accessible.
The Bottom Line
Apple’s announcement of the potential discontinuation of My Photo Stream has understandably caused worry among its users. While a specific reason for this action remains undisclosed, they are actively addressing the issue to prevent data loss. In the meantime, iPhone users must take precautionary measures to safeguard their photos. They can simply move the My Photo Stream images to the Photo Library, iCloud Photos, or other backup folders.
How to find lost iPhone Backup files on Windows PC?
Summary: You have to restore iPhone data. But you cannot find backup files saved on your Windows PC or the backup files are unreadable. This post guides you to find iPhone backup on Windows PC and methods to restore it on your device.

You may get into a terrible iPhone data loss situation after a factory reset, stolen iPhone, jailbreak or physical damage to your device, etc. Backup is your only resort. But another shocker is waiting for you. You cannot find iPhone backup files once saved on your Windows PC.
Your backup files are not readable, and you have no clue how to access them.
In such a situation, keep calm and do not worry. If you have ever saved your iPhone backup on a Windows computer and are now unable to locate or access it, this post guides you to find an iPhone backup on a PC and how to restore it on your device.
Where are iPhone backups stored on Windows PC?
iPhone backups are safe copies of your complete device information. iTunes saves iPhone backup in the Users folder on a Windows computer. These backup files are not in a readable format. You can copy them but should never try to move files to a different drive, edit, rename or extract content. All such activities can ruin the backup files. However, you can make copies of your backup or delete backup that you do not require anymore.
Steps to find iPhone backup files on Windows PC:
- In the Search bar, enter %appdata% or %USERPROFILE% (if you downloaded iTunes from the Microsoft Store)
- Press Return
- Double-click these folders: Apple Computer > MobileSync > Backup
You can also locate iPhone backup in Windows 7, 8, 10 or 11 by following Users > (username) > AppData > Roaming > Apple Computer > MobileSync > Backup.
Cannot locate iPhone backup on Windows PC? Find and Restore data with iPhone data recovery software.
If you cannot find your iPhone backup data on your PC or cannot access the backup files, take refuge in third-party software – Stellar Data Recovery for iPhone.
How can Stellar Data Recovery for iPhone help you?
You can find, access, and restore lost iPhone backup files with Stellar Data Recovery for iPhone. It is a secure tool that efficiently scans the computer to find your iPhone backup. The recovered iPhone backup files are in readable form, and you can either save them on your PC or iPhone.
When you can use the Stellar iPhone data recovery solution
- You are unable to locate your iPhone backup files
- Your backup files are either lost or deleted.
- You cannot access iPhone backup files on Windows PC
- Not able to restore backup on your old/new iPhone
How can Stellar Data Recovery for iPhone recover lost backup files from PC?
The iPhone Data Recovery Tool by Stellar is a do-it-yourself software that quickly recovers complete iPhone data in a readable form from your Windows PC.
You can recover all your lost photos, videos, contacts, messages, Safari bookmarks, Call history, Reminders, Voice memos, Notes, WhatsApp, Kik, WeChat, Viber messages, etc.
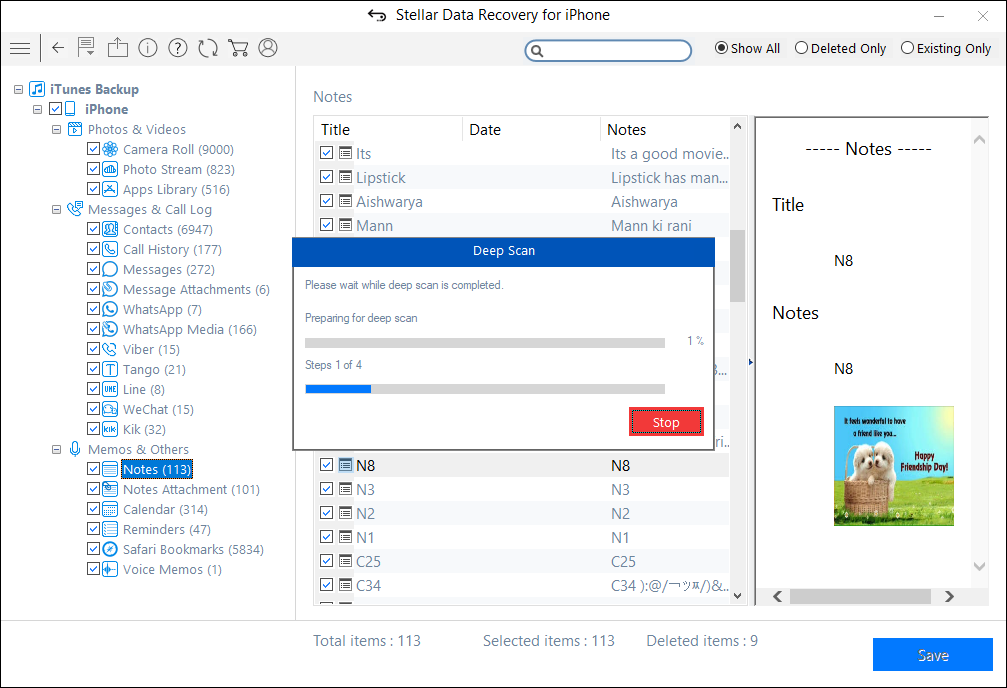
It also offers a Deep Scan if your desired iPhone information is not recovered after the first scan. A deep scan does a comprehensive scan of the selected device or backup to recover every bit of lost or deleted backup information.
Benefits of Stellar iPhone Data Recovery
- Recovery of deleted or lost backup files
- Recovers data in a readable format
- Option to restore only that data from backup which you want to be in your iPhone
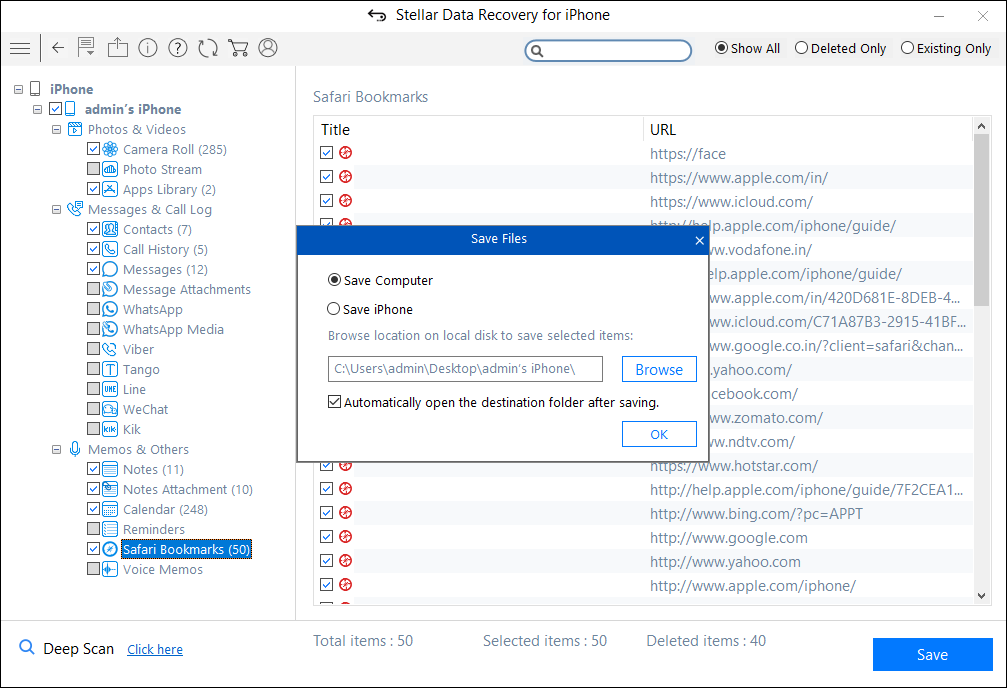
- Allows to save recovered backup on computer or iPhone
Step-by-step recovery of lost iPhone backup on Windows PC with Stellar Data Recovery for iPhone
Step 1: Connect your iPhone to your computer and launch the software.
Step 2: On the home screen, select Recover from iPhone. The scanning process begins.
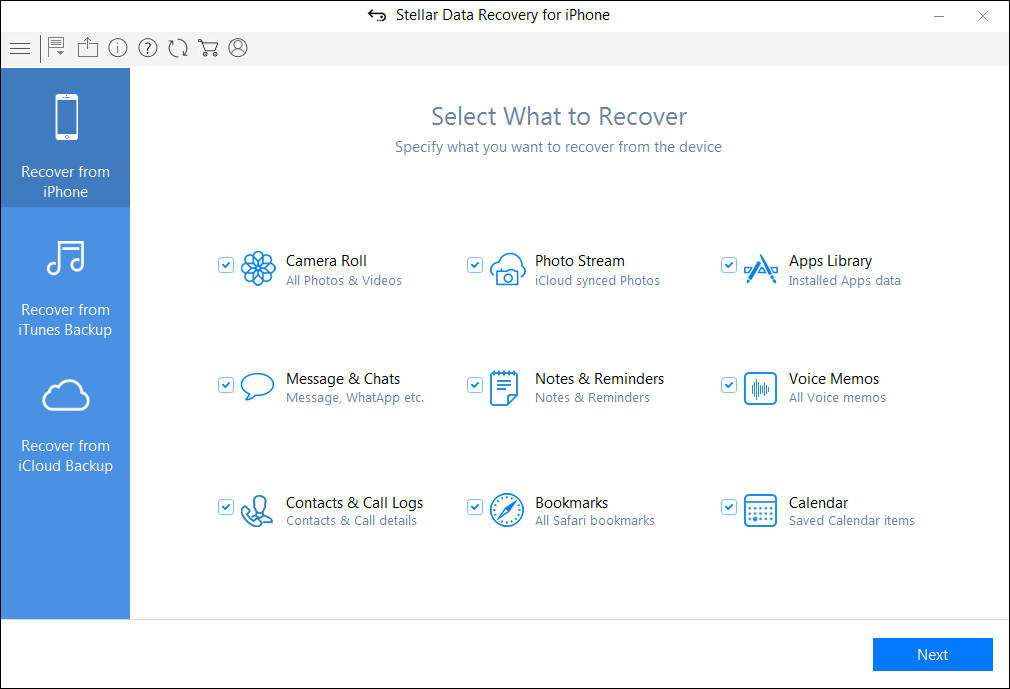
Step 3: After scanning, all the files on your iPhone are listed.

If you do not see the required files in the list, choose Deep Scan. It will scan for the backup stored on your computer system.
Step 4: Select and save the recovered iPhone data at your desired location. You can save it on your iPhone if you want to restore backup data on your device or save it on your computer.
Wrapping Up
Losing iPhone data after factory reset, jailbreak, being stuck in a boot loop or physical damage, etc., can get messier when you cannot find or retrieve information from iPhone backup files saved on your computer. Stellar Data Recovery for iPhone significantly relieves such data loss situations.
This iPhone utility not only finds the lost iPhone backup files on Windows PC, but it also makes them readable and allows you to save/restore them to your iPhone or computer. Moreover, it lets you selectively transfer iPhone data on your iPhone rather than complete a backup.
You can download the free trial version to evaluate its performance. It is undoubtedly not going to disappoint you.
Also read:
- [New] 2024 Approved Guardians of the Screen - The Best Webcam Cover Options
- [New] Learn to Craft Striking Pfps on Discord with Ease for 2024
- [Updated] Adjust Twitter Video Excerpt
- [Updated] Premium 10 Volume Enhancers Windows, Apple, Android
- Complete Guide to Hard Reset Your Motorola G54 5G | Dr.fone
- How to Change Location on TikTok to See More Content On your Realme C67 5G | Dr.fone
- How to Factory Reset Oppo A79 5G in 5 Easy Ways | Dr.fone
- How to Recover Apple iPhone 12 Data From iOS iTunes? | Dr.fone
- How to Soft Reset Oppo Find X6 Pro phone? | Dr.fone
- How To Transfer Data From Apple iPhone 7 Plus To Other iPhone 15 devices? | Dr.fone
- How to Upgrade Apple iPhone 8 Plus to the Latest iOS/iPadOS Version? | Dr.fone
- In 2024, Hassle-Free Ways to Remove FRP Lock on Realme GT 5with/without a PC
- Pokemon Go Error 12 Failed to Detect Location On Apple iPhone 8 Plus? | Dr.fone
- Reviewing Multiple Cameras Are There Upgrades?
- The Complete PowerDirector 2024 User's Handbook
- Three Solutions to Hard Reset Honor Magic 5? | Dr.fone
- Video File Repair - How to Fix Corrupted video files of Realme 11 Pro+ on Windows?
- Title: What should I do if I dont find the deleted iPhone XS files after scanning? | Stellar
- Author: Ian
- Created at : 2024-11-01 22:28:27
- Updated at : 2024-11-03 17:30:41
- Link: https://techidaily.com/what-should-i-do-if-i-dont-find-the-deleted-iphone-xs-files-after-scanning-stellar-by-stellar-data-recovery-ios-iphone-data-recovery/
- License: This work is licensed under CC BY-NC-SA 4.0.