
What should I do if I dont find the deleted iPhone 14 Plus files after scanning? | Stellar
What should I do if I don’t find the deleted iPhone files after scanning?
Stellar Data Recovery for iPhone is an efficient software to recover all kinds of lost data from iPhone, iTunes, and iCloud.
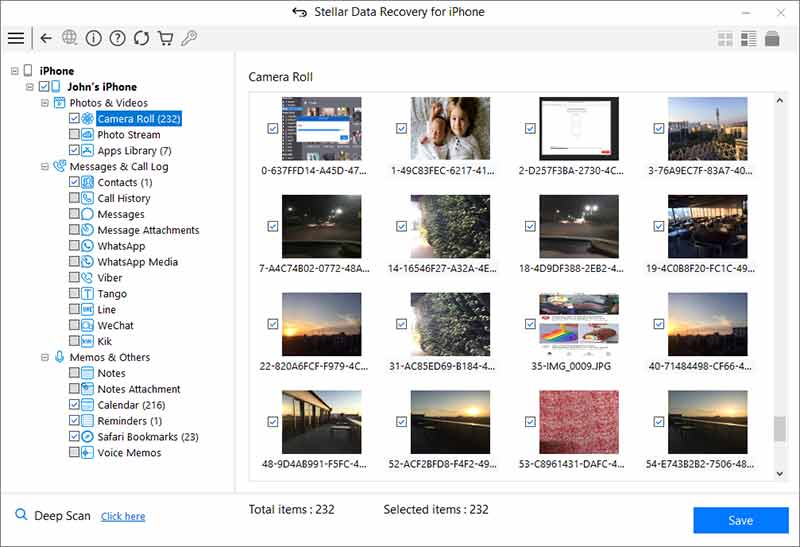
In case you are unable to find the lost data after quick scan through Stellar Data Recovery for iPhone , choose to perform Deep Scan.
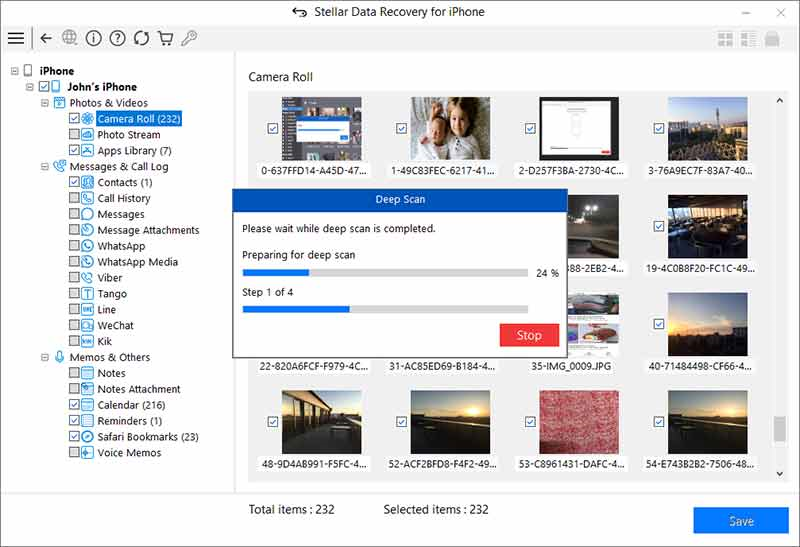
Deep scan is a next level of aggressive scanning. It involves thorough scan of the device and the backups (iTunes and iCloud) using advanced algorithms. Deep Scan recovers as much data as possible from the selected device or backup. It searches for lost files on the basis of file signature. This recovery option recovers everything that is found in the selected source. This option is especially helpful in case of severely deleted and corrupted iPhone data.
How to perform Deep Scan?
Once quick scan is completed, in the preview window choose Click Here option at the bottom left of the window to start Deep Scan.
When the scanning process is completed, a dialog box displaying the message ‘Deep Scan completed’ is displayed.
In case the additional data is not recovered through Deep Scan, the dialog box displays the message ‘Deep Scan completed. No additional data found.’
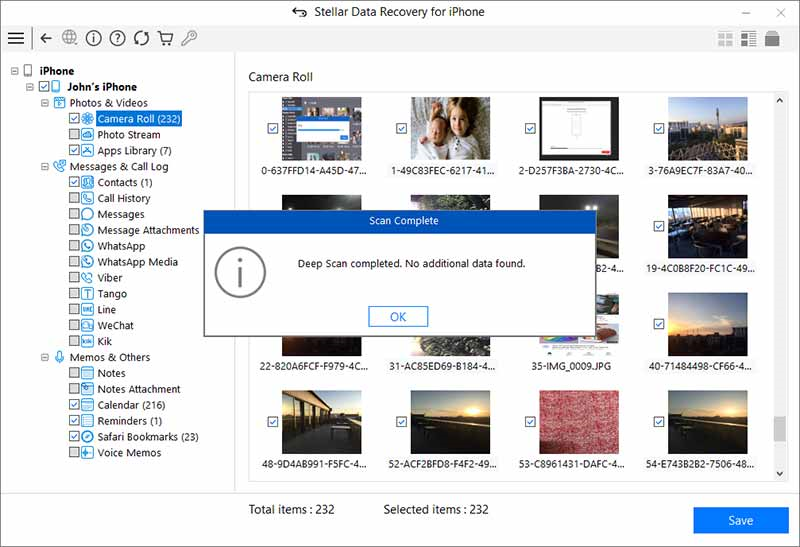
Files found during Deep Scan can be viewed in the preview window and saved at any desired location.
Stellar Data Recovery for iPhone® Stellar Data Recovery for iPhone® is the best DIY software to recover missing or accidentally deleted Contacts, Messages, Calendar, Photos, Videos, Call History etc directly from iPhone or iPad.
How to fix error 1015 while restoring iPhone
Summary: Error 1015 appears during iPhone restore through iTunes. If you are getting this error, its probably due to attempts of jailbreak or iPhone downgrade. This post shares 7 ways to fix iPhone restore error 1015 on iPhone 7, 8, XS, XR, SE, 11, 12, and above models.
Are you receiving iPhone error 1015 during restore with iTunes as below?
Case 1: _I have an old iPhone 3G stuck in Recovery Mode. I am trying to restore it through iTunes. But at the end of the restore, I get unknown error 1015. How can I fix error 1015 on my own?
_
Case 2: I tried to restore my iPhone in iTunes. It won’t finish because of this error 1015 code. I have the latest software. I’ve restarted and updated my iPhone too. Still the same error message appears.
Have you used tools like TinyUmbrella to restore firmware that Apple no longer supports?
Did you try to jailbreak your iPhone by using applications like Redsn0w or Pwnage?
If yes, that’s the reason behind the problem. The error 1015 is typically caused by attempts of jailbreak or downgrade on the iOS device. Such activities are a violation of the iOS end-user software license agreement. They can make your iPhone vulnerable to malware and prone to errors like 1015.
Naturally, Apple wouldn’t encourage jailbreak or downgrading to an older iOS version. Thus, you are bound to face problems when trying the unauthorized iOS modifications on your iPhone or iPad.
Thus, the probable reasons for the iPhone restore error 1015 are:
- Downgrade of iOS
- Jailbreak
- Outdated software
- Third-party tools on your computer
This post shares all the possible solutions to fix iPhone restore error 1015.
You can apply these solutions on all iPhones including 3G, 4, 5, 6, 6s, 7, 8, X and above models using any iOS version.
1. I****nstall the latest version of iTunes
Make sure your computer has the latest iTunes before restoring iPhone using iTunes.
On Windows PC, update iTunes by following Help > Check for Updates in the top menu bar of iTunes.
On Mac, go to App Store > Updates > click Install, if you see any iTunes updates.
2. Update iOS
iOS updates usually fix error 1015 which appears while restoring iPhone with iTunes.
On your iPhone, go to Settings > General > Software Update and tap Download and Install.

3. Update Windows or macOS
System update ensures smooth and error-free performance of your computer.
If you are using Windows PC, follow Start > Settings > Update & Security > Windows Update.
On Mac, click on Apple icon and select S****oftware Update and click on updates available.
4. Uninstall third-party software on PC/ Mac
Third-party software often create conflict among programs while performing iPhone restore or update with iTunes. You may not receive the error 1015, after uninstalling such programs.
On Windows computer go to Start > All apps. Find the third-party software and right-click on it. Choose Uninstall.
On Mac, in the Finder window, go to Applications. Find and select the third-party software. In the top menu bar, go to File and select Move to Trash. Next, click on Empty Trash.
5. Put your iPhone in Recovery Mode and restore
Before you put your iPhone on Recovery Mode, ensure you are using the latest version of iTunes. Next, follow the below steps to restore iPhone using the Recovery Mode.
- Connect your iPhone to computer
- Open iTunes
- Force restart your iPhone while it is still connected to the computer, until you see the iTunes logo (To force restart use home and/or volume button depending on your iPhone version)

- On your computer, you will receive a dialog box asking to either Update or Restore.

- Click Update
After the Update process completes, you can restore your iPhone from iTunes or iCloud backup without facing the error 1015.
Note: If you are unable to enter Recovery Mode on your iPhone due to jailbreak, you may use programs like RecBoot, which are used to enter and exit the Recovery Mode on iPhone, iPad or iPod touch.
6. Delete the IPSW file on your computer
Files with .ipsw extensions on your computer are backups and temporary files of your iOS updates. Many iPhone users who were receiving error 1015 while restoring iPhone were able to fix the problem by deleting these files on their PC or Mac.
Deleting these backup files doesn’t impact your iTunes or iPhone function.
Note: You can get rid of the old IPSW files and keep the most recent ones.
Location of .IPSW files on your computer:
On Windows XP: C:\Documents and Settings\[username]\Application Data\Apple Computer\iTunes\iPhone Software Update
On Windows Vista/7: C:\Users\[username]\AppData\Roaming\Apple Computer\iTunes\iPhone Software Updates
On Mac OS X: ~/Library/iTunes/iPhone Software Updates
7. Restore your iPhone into DFU Mode
When no other method is helpful, choose to put your iPhone in DFU (Device Firmware Update) mode. Whether you are receiving the iPhone error 1015 due to jailbreaking your iOS device or not, the DFU mode solution is your last resort to fix error 1015.
As in Recovery Mode, bringing your iOS device to DFU mode will lead to loss of iPhone data. Thus, before you attempt this, make sure you have iCloud or iTunes backup.
Steps to DFU mode for iPhone 7, 6s and below users:
- Connect your iPhone to computer (even if your iPhone is off)
- For 8 seconds, press and hold the Sleep button and Home button (iPhone 6s and below users) or the volume down button (iPhone 7). Next, release the Sleep button but continue to hold the Home button or the volume down button until iTunes shows message _‘iTunes has detected an iPhone in recovery mode._’

- Leave the Home button or volume down button. The iPhone screen turns black indicating the device has entered DFU mode
- Next, you can restore your iPhone using iTunes
Steps to DFU mode for iPhone X, 8, or 8 Plus users
- Connect your iPhone to computer (even if your iPhone is off)
- Quickly press and release the volume up button, quickly press and release the volume down button, and press and hold the side button until your iPhone screen turns black
- Press and hold the volume down button while continue holding the side button for 5 seconds
- Release the side button and continue holding the volume down button until your iPhone shows up in iTunes.
- Next, release the volume button. Your iPhone is in DFU mode
Now restore iPhone with iTunes. You can exit DFU Mode by force restarting your iPhone.
| Unable to restore iPhone from iTunes after Recovery Mode or DFU Mode?
If after putting your iOS device to Recovery or DFU mode you are unable to restore iPhone, download Stellar Data Recovery for iPhone The DIY software for Mac and PC can easily restore the data from iPhone, iCloud, and iTunes.


|
| — |
To Sum Up
Naturally, the error code 1015 is annoying when you quickly want to restore your iPhone using iTunes.
The error usually appears when your software is not updated, you have attempted jailbreak or downgraded your iPhone’s iOS.
The post shares 7 different ways you can try to fix the problem. Begin with the simpler troubleshooting such as updating your iOS, Windows/ macOS and iTunes. Uninstalling third-party security software or deleting the IPSW files on your computer has also worked for many in resolving the error 1015.
In case these methods don’t work, then go for the tougher solutions like bringing iPhone to Recovery Mode or DFU Mode which lead to iPhone data loss. They are the harsher solutions to the problem, but assure you don’t receive error 1015 while restoring from iTunes. But make sure you have iCloud and iTunes backup before attempting these two methods. Else you would need an iPhone data recovery software such as Stellar Data Recovery for iPhone to restore your lost iPhone data. The software is quick and efficient way to get back lost data in cases of jailbreak, downgrade of iOS and restore errors.
How to Recover Deleted Photos, Videos & Music Files from iPhone
Summary: Learn how to recover deleted photos, videos and music files from iPhone using the best recovery software —Stellar Data Recovery for iPhone.
There are zillions of tutorials one can find on how to take incredible photos with the A10 fusion chipped smartphone; however, few know how to recover deleted photos from iPhone. As a coin has two sides, through this post, we will explore the other untouched, unexplored side.
iPhone has been the epitome of perfection ever since it entered the smartphone realm. With stellar features and functionality, iPhone has become the highest selling property. There are some hidden iPhone camera features that users can utilize and take amazing photos and videos which leave a lasting impression.
Get Started Here!!!
Recovering deleted photos from iPhone is a straightforward process and do not involve much complexity, provided the right steps are implemented in the right manner.
Without much ado, you can recover deleted iPhone photos or videos with these simple steps. Let’s delve into it in detail.
Solution 1:
Apple has made it easy to recover deleted iPhone photos. Here’s what you need to follow:
- Go to the Albums and access your photos.
- Scroll down and select ‘Recently Deleted’ folder.
- In this folder, you will find all the photos that have been deleted.
- Simply tap the photo you want to recover and press “Recover.”
- To permanently delete a photo, press “Delete”.
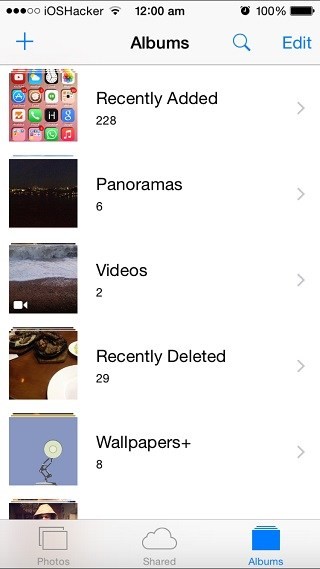
Figure 1 represents how to recover photos from Recently Deleted folder
**Important: In the ‘Recently Deleted’ folder, you’ll find photos, video & music files that have been deleted within the last 30 days only. To recover them before that period, either you have to restore from iTunes or iCloud backups or use iPhone photo recovery software .
Solution 2:
iCloud Photo Library to Your Rescue:
You can recover iPhone photos or videos through iCloud Photo Library. iCloud Photo Library securely stores your photos and videos on iCloud. It automatically saves all your photos and videos in iCloud so that you can access the library from any device.
Follow these steps to turn on the iCloud Photo Library:
- Go to settings < [your name] < iCloud < Photos, then turn on iCloud Photo Library (iOS 10.3 or later).
- In iOS 10.2 or earlier, go to Settings < iCloud < Photos.
**Important: Ensure that you’re signed in to iCloud with the same Apple ID as on all of your devices. Things can be complicated as iCloud Photo Library is synced with your different Apple devices which means there could be multiple copies and if a photo, video or music file is deleted from a device, it will not be available on the other devices as well. Deletion sync across all the devices.
Solution 3:
iTunes Backup is there to recover all your photos.
- Click File menu, select Devices < Restore from Backup.
Or
- Open the iOS device’s Summary tab. There are two ways to access this:
- Click the device button in the upper right corner.
- In iTunes tab, click the View menu and select Show Sidebar. Select your iOS device in iTunes under Devices.
- Click the Restore Backup button.
Solution 4:
Use Stellar Data Recovery for iPhone:
iPhone Data Recovery Software by Stellar is an ideal tool to recover lost data from your Apple devices. Utilizing its advanced algorithm, you can scan and recover data (photos, videos, calendar, notes, messages, call history, etc.) from your device. Furthermore, you can recover data from iCloud and iTunes backup as well.
- Connect your iPhone to your system and launch “Stellar Data Recovery for iPhone” software.
- Select “Recover from iPhone” and the software will scan your device for the contents.
- Click on any file to see its preview.
- Finally, click “Save” to save the recovered file to the preferred location.
The Final Word
Apple reflects perfection in its design and innovation; therefore, it constantly thrives to provide its consumers with the best platform. One such feature is that iOS can back up your photos on cloud services automatically so that you have access to them at any given time.
Moreover, there are iTunes backup, iCloud backup options available along with iPhone Data Recovery Software as well; but, it is advisable to backup your iPhone photos or videos timely and manually to avoid unnecessary issues.
How to Restore iPhone from Backup when iTunes Backup is Corrupt or not compatible
Summary: Are you receiving the error, ‘iTunes backup was corrupt or not compatible’ while trying to restore iPhone? iPhone recovery is not possible from a corrupt backup file. This post shares how you can resolve corrupt iTunes backup file issue and restore iPhone’s lost data.
‘I dropped my iPhone and broke it. I got it repaired and formatted to factory settings to fix the various issues caused due to the fall. Since I had a backup in iTunes, so was not worried about my data. But had least idea that my iTunes backup file was corrupted! As I tried to restore iPhone from iTunes, a message appeared –: ‘iTunes backup was corrupt or Not compatible.’ Now I don’t know how to restore my iPhone. Please help.’ – Simon, UK

It’s not new when users get bowled over by iTunes when trying to restore their iPhone. iTunes sometimes shows a message that it could not restore iPhone because the backup was corrupt or not compatible with the iPhone that was being restored.
It may be because iTunes does incremental backup by updating the previous backup. It’s possible that some old backup data was corrupt, which results in the error message.
Whatsoever, it’s a fact that there’s no recovery possible from a corrupt backup file.
So how to fix such corrupt iPhone backup in iTunes and restore iPhone in such cases?
Here we share the best ways to fix corrupt iTunes backup file and efficient methods to restore iPhone’s lost data.
You can apply these methods on all iPhone models including series of iPhone 15, 14, 13, 12, 11, XS, XS Max, XR, X, 8 Plus, 8, 7 Plus, 7, 6S Plus, 6S, 6 Plus, 6, 5S, 5c, 5, 4S and 4 with latest iOS 16.x.
What you can do to fix ‘iTunes backup was corrupt or Not compatible’
Since you can’t repair or recover from a corrupt or incompatible iTunes backup file, it is best to delete such corrupt files and next try to create a new backup in iTunes.
How to delete your corrupt iPhone backup file in iTunes
- Launch iTunes on your PC or Mac
- Windows users click Edit > Preferences (on Windows PC). Mac users click iTunes Menu > Preferences
- Select Find your iPhone backups
- Select the corrupt or incompatible backup. Click Delete Backup
- Close the iTunes Preferences window
How to delete the old iTunes backup files manually
If you don’t see the old backup in iTunes, then delete the backup manually.
- In iTunes, under Summary click on Serial Number. You will see the iPhone’s UDID. Note it down.
- Navigate to the iTunes backups folder on your computer.
On Mac follow: Finder > Option> Go menu> Library> Application Support >MobileSync> Backup
On Windows 11/10/8 follow: In Search box type %appdata%\Apple Computer\MobileSync\Backup. Press Enter key
If you installed iTunes from the Microsoft Store, follow: In Search box type %userprofile%\Apple\MobileSync\Backup. Press Enter key.
- You will see the backup folders named by your device UDID
- Select the folders with your device UDID and delete them
- Next go to iTunes and take the backup again
How to backup iPhone in iTunes again
- Connect your iPhone to computer via lightning cable
- Launch iTunes
- Click on Back Up Now The backup process begins.
| Did you get a message — iTunes can’t back up your iPhone because an error occurred? Here’s what you should do…
• Update your iOS to the latest version
• Update your iTunes to the latest version
• Disable antivirus software on your computer
• Now create backup in iTunes
|
| — |
How to restore iPhone when iTunes backup file is corrupt
Method 1: Restore iPhone from iCloud backup
Method 2: Recover from iCloud backup without erasing existing data
Method 3: Restore lost data directly from iPhone/ iPad
Method 1: Recover from iCloud backup
Instead of iTunes, you can restore iPhone by using the alternative backup solution, iCloud.
Steps to restore iPhone with iCloud
- Click to follow Settings > General > Reset> Erase all Contents and Settings

- A dialog box pops up, choose Erase Now
- Follow the instructions until you get on to the Apps & Data screen
- Tap Restore from iCloud Backup

- Sign in to your iCloud account
- Choose the recent backup and click Restore
Method 2: Recover specific files from iCloud without losing existing iPhone data
In case you want to restore specific data from backup, instead of complete backup, use an iPhone recovery software.
Steps to restore specific files from iCloud:
Download and launch Stellar Data Recovery for iPhone on your computer.
Select Recover from iCloud Backup on main screen of software.

- Select what you want to recover. Click Next
- Enter the Apple ID and password
- Select the relevant iCloud backup and click Scan

- Select the data in the iCloud backup files list on left and preview

- Click Save
- In the dialog box select computer or iPhone to save the recovered data. To save directly onto your iPhone, connect your iPhone to the computer.

Method 3: Recover data from iPhone
If iTunes could not restore iPhone or iPad because the backup was corrupt and neither iCloud is able to restore backup, recover data from the device directly. You can easily restore lost photos, videos, messages, calendar, voice memos, Safari bookmarks, etc., with this method. It works in cases of broken/ water-damaged iPhone, factory reset, iOS crash etc.
Steps to recover lost data from iPhone/ iPad
- Connect your iPhone to computer
- Launch Stellar Data Recovery for iPhone
- On the home screen select Recover from iPhone

- Select the data you want to restore
- Click Next

- Preview the data and click Save. You can save the recovered data on computer or iPhone
Conclusion
You cannot repair or recover data from corrupt iTunes backup file that gives — ‘iTunes backup was corrupt or Not compatible’ message.
However, the situation can be tackled by deleting the corrupt backup file and creating a fresh new backup in iTunes.
To restore iPhone, you may use either the new iTunes backup or bypass iTunes by using alternative recovery methods. Other than iTunes, iCloud or Stellar Data Recovery for iPhone are the effective ways to restore lost data on your iPhone. Among these too, if you wish to restore specific data like photos, videos, voice memos, or contacts etc., Stellar Data Recovery for iPhone would be the best solution.
Also read:
- [New] Unbeatable Video Splitters to Match Xplit for 2024
- [Updated] Breaking Down Sync A Thorough Review of LG's UHD68 Display
- [Updated] In 2024, How to Maximize Video Reach with Effective Tags, Titles
- [Updated] Transform SRT to Video - Top 10 FREE Subtitle Tools
- 2024 Approved Dive Deep Into the Digital World Adding Panoramic Photos to Your Feed
- All Things You Need to Know about Wipe Data/Factory Reset For Oppo Find N3 Flip | Dr.fone
- How Can Huawei Nova Y91Mirror Share to PC? | Dr.fone
- How to Factory Reset Motorola Moto G13 in 5 Easy Ways | Dr.fone
- In 2024, Syncing Your Soundtrack Import Music Into InShot
- Inside TruthGPT: Revolutionary AI Revealed Alongside Major Police Operation on Mullvad VPN, Top Free Gaming Experiences for PC Enthusiasts & Insightful Guide to Mechanical Keyboard Usage
- Remove Motorola Razr 40 Ultra unlock screen
- Undelete lost messages from Nubia
- Unlock iPhone 6 lock with iTunes
- Unrivaled Tale Composers Hub
- Update your hardware drivers with Device Manager in Windows 11/10/7
- Title: What should I do if I dont find the deleted iPhone 14 Plus files after scanning? | Stellar
- Author: Ian
- Created at : 2024-09-25 20:12:39
- Updated at : 2024-09-30 22:44:33
- Link: https://techidaily.com/what-should-i-do-if-i-dont-find-the-deleted-iphone-14-plus-files-after-scanning-stellar-by-stellar-data-recovery-ios-iphone-data-recovery/
- License: This work is licensed under CC BY-NC-SA 4.0.