
:max_bytes(150000):strip_icc():format(webp)/iPad-Pro_creative-sketch_10302018-5be0773ac9e77c0051d5d51c.jpg)
Unable to Save Excel 2021 Workbook Issue Fix 2024 | Stellar
‘Unable to Save Excel Workbook’ Issue [Fix 2024]
Summary: You may unable to save your Excel Workbooks due to several reasons. Many users have reported this issue on the Tech Forums. This blog will discuss a few instances when users cannot save their Excel files. It lists the causes behind the issue and their possible solutions. It also mentions the Stellar Repair for Excel to fix the saving error if it is due to corruption in the Excel file.

It is easy to work with Microsoft Excel but sometimes, the application may create issues thereby hampering the smooth functioning of the workbook. One such issue is “unable to Save Excel Workbook”.
Let’s take a look at the issue of Unable to Save Excel Workbook
Instance 1:
In an organization, users connected to one of the servers (Windows 2008 R2) using Citrix – a Terminal Server configured with Windows 2008 R2 –and accessed their data through a File Server, also configured with Windows 2008R2. Since the connectivity to Shared Drive was established through a Terminal server, any conflict amongst the server configuration may create conflict in shared file.
This issue was discussed at length at one of the Tech Forums , where the users were unable to access their workbooks stored on the shared drive. The File menu did not work. As a result, the users were forced to save the workbook by creating quick access shortcuts or locally on the desktop. In many cases, the saving option was ruled out completely.
Instance 2:
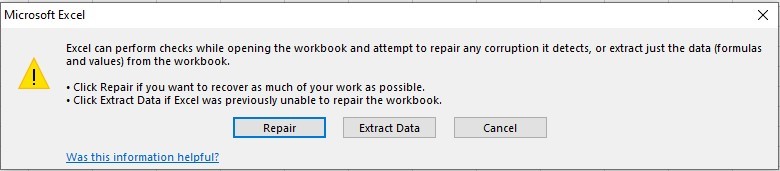
A similar problem was reported, wherein the users received an error when saving an Excel workbook after inserting a chart in an existing workbook (previously saved) or copying values from an existing workbook. A system is configured with Windows 7 and Microsoft Office 10 configuration. The issue arises when the user is unable to save the changes after editing in a saved spreadsheet. The following message displays on the screen:

Figure: Unable to Save Excel WorkBook Issue
Further, if the user clicks ‘Continue’, the following error message is received:
“Excel encountered errors during save. However, Excel was able to minimally save your file to <**filename.xlsx**>”.
Note: This issue impacts build Version 1707 (Build 8326.2086) and later, and also only occurs with files that are stored locally, such as on the desktop. This problem does not occur if you manually enter values or insert a chart in a newly created workbook.
Plausible reasons for the ‘Unable to save Excel workbook’ Issue
- The issue was detected in Microsoft Office Professional Plus 2010 32-bit, Service Pack 14.0.6029.1000.
- Excel version on the user system may or may not match with Excel version on File server.
- The issue of ‘Unable to Save Excel Workbook’ impacts only the Build Version 1707 (Build 8326.2086) and later.
- In case of Issue 2, the problem surfaces when the user adds files, tables or charts in the locally saved excel files, such as on the desktop.
Methods to fix the ‘Unable to Save Excel Workbook’ Issue
There may be an issue with the Build version or the Registry Values settings may not be appropriate, which does not allow the Excel workbooks to save.
But, before starting to resolve the issue, verify the following:
- The location where the file is to be saved may not have enough space to save the Excel file: Check the available space and save again. You may also use the option of ‘Save As’ to save the file at a new location.
- Excel file may be a shared one where edits are not allowed by a specific user: There are restrictions attached to documents and other files shared over the network. Check for these restrictions.
- Antivirus may interrupt in during file saving: Antivirus in the system may not allow saving of the files. Request the system administrator to uninstall the antivirus and reinstall after saving.
- The file is not saved within 218 characters: If the file is not saved due to the naming issue, then check the character length and try again.
- Differences in Windows versions of the local system and those on network drive may cause excel not saved issues. Check that all the systems have the same configuration and are updated to the recently available versions.
- Excel spreadsheet is corrupt: If none of the above factors have not caused hindrance in saving the file, then there may be a probability of corruption in the Excel spreadsheet .
Once verified, look for a healthy and restorable backup. If backup is missing, resolve the issue of “Unable to open Excel File” with manual settings on local system or through a reliable Excel repair software.
Method 1: Modify Registry Entries
If multiple users are unable to access their workbooks stored on the shared drive and facing unable to save Excel file problem (see Instance 1 above), then follow the below steps:
- Go to ‘Registry Entry’. To do this, type ‘regedit’ in the Start Search box, and press ENTER

Figure: Edit Registry
- You are prompted for the administrator password or for a confirmation, type the password, or click Continue
- Locate the following registry subkey, and right-click it: HKEY_LOCAL_MACHINE\System\CurrentControlSet\Services\CSC

Figure: CSC Location
- Point the cursor to New, and click Key

Figure: Create new key
- Type ‘File Parameters’ in the available box

Figure: File parameters
- Right-click Parameters, point the cursor to New, and click DWORD (32-bit) Value

Figure: File parameter (DWORD – 32 bit) value
- Type ‘FormatDatabase’, and press ‘ENTER’. Right-click ‘FormatDatabase’, and click ‘Modify’

Figure: Modify format database
- In the Value data box, type ‘1’, and click ‘OK’

Figure: Value data
- Exit ‘Registry Editor’
- Restart the system and verify if the files can be saved now
Method 2: Try Google Uploads
If the user is unable to save the changes after editing in a locally saved spreadsheet (see Instance 2 above), then follow these steps:
- Upload the unsaved Excel file to Google Docs. Ensure that the file gets converted to Google Sheets format.
- Check if all the formulae are active and working.
- Make changes to the Google Sheet and verify that all the changes are working fine.
- Use the Google Sheets export feature to download the file in Excel format.
Method 3: Resolve manually with Open and Repair
If the Excel file is found to have corruption, try out the Excel Open and Repair utility:
- Open a blank Excel File. Go to File and Click Open.
- Go to Computers and click Browse.
- Access the Location and Folder and click the arrow icon beside Open followed by Open and Repair.

Figure: Illustrates Steps to use ‘Open and Repair’ method
The Open and Repair utility is not competitive enough and may not fix corruption in severely corrupted files. Hence, if you are unable to save Excel workbook after applying the manual methods, then you can search for a useful software-based repair utility.
Method 4: Excel File Repair Software
Specifically meant to resolve Excel file corruption. Stellar Repair for Excel helps you to repair every single object including charts, tables, their formatting, shared formulae and rules and more.
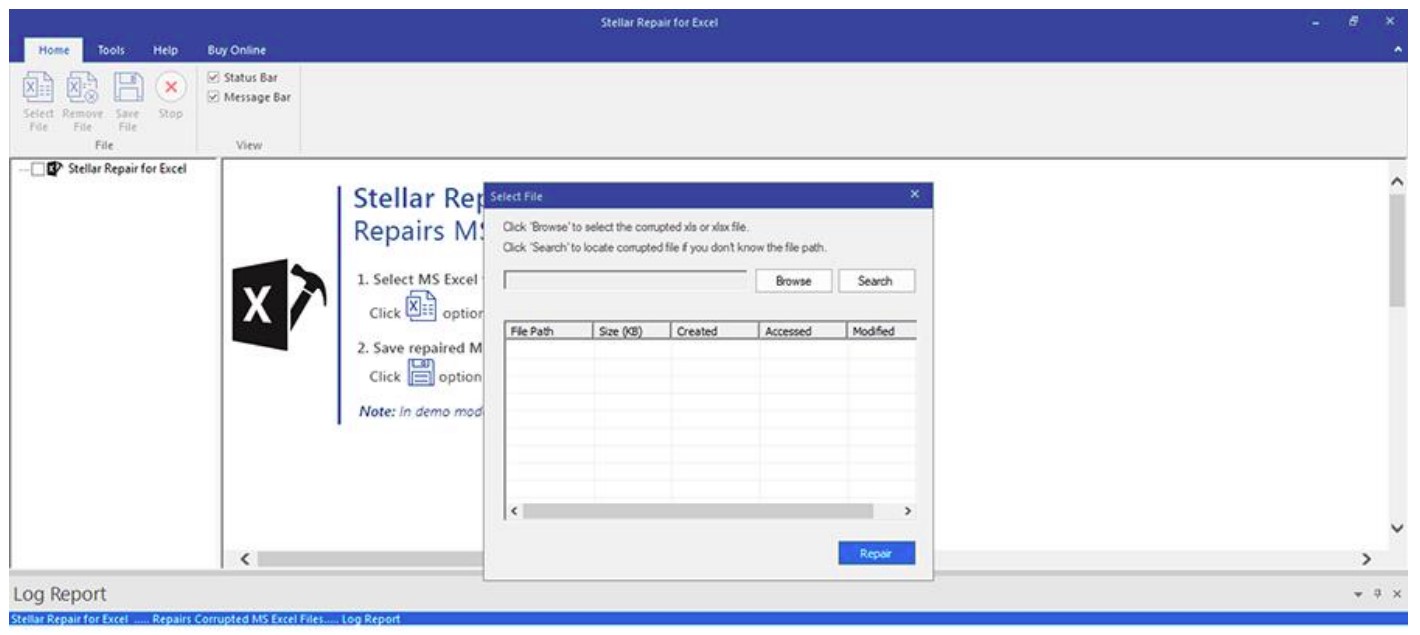
- Install and Open the software and select the corrupt Excel File. You can also click the Find option if the file location is not known.
- Click Scan and allow the software to scan and repair the corrupt Excel file.
- Once repaired, the software displays the fixed file components to verify its content.
- Click Save to save the file data in a blank new file as ‘Recovered_abc.xls’, where abc.xls is the name of the original file.
See the working of the software which has been declared as a tool that provides 100% integrity and precision.
The Excel repair software takes care to save the repaired data in a new file to minimize the chances of further corruption.
Conclusion
‘Unable to save Excel file’ is a generic problem that may appear due to various reasons. In this blog post, we presented some of the actual instances reported by users on community forums.
Windows updates, the Build versions, the Service Packs of the local systems and those on the network drive must be either similar or in sync with each other. Any deviation may cause issues in accessing or saving the Microsoft files, as reported in Instance 1 is caused where user is unable to save Microsoft Excel file on the Network Drive. In case, the user is unable to save the file on network drive then the problem lies with the Registry value.
Another case is when the users receive an error while saving an Excel workbook after they insert a chart in an existing workbook or copying values from an existing workbook. This issue is known to affect build Version 1707 (Build 8326.2086) and later, and only occurs with locally stored files.
When a user is unable to save a specific Excel file, then the problem can be resolved using the manual methods or the software based utility. The mode of repair depends upon the level of corruption in Excel file.
Hence, it is suggested to analyze the nature of the problem and decide an appropriate resolution method.
[Fixed] Excel Cannot Open the File Because the File Format or File Extension Is Not Valid
When opening an older version of an Excel file in a newer version, you may encounter the “Excel cannot open the file because the extension is not valid” error. This happens if you have accidentally renamed the file with a different file format or an incorrect file extension. Also, you may get the ‘Excel cannot open the file’ error if the file has become unreadable or corrupted.
This is how the complete Excel error message looks like:
“Excel cannot open the file filename.xlsx because the file format or file extension is not valid. Verify that the file has not been corrupted and that the file extension matches the format of the file.”

Check out this video for a quick demonstration of how to fix “Excel Cannot Open the File Because the File Format or File Extension Is Not Valid”
How to Fix the ‘Excel Cannot Open the File Because the File Format or Extension Is Not Valid’ Error?
Try any of these workarounds to fix the error and regain access to your Excel file data:
Workaround 1 – Change the Default File Format
By default, an Excel file is saved in .xlsx or .xls file format. Trying to open the file with a different or incorrect extension may cause the ‘Excel cannot open the file because the extension is not valid’ error. To fix the error, try changing the Excel default file format by following these steps:
Note: Take a backup of the Excel file that you cannot open and try the steps on the backup copy.
- In Excel 2010 and newer versions, click on the File menu.
Note: For Excel 2007 and earlier versions, click on the Office button.
- On the left panel, click on Options.
- In ‘Excel Options’ window, under Save workbooks section, click on the Save files in this file format: drop-down. Select a file format (i.e., the one supported by your Excel version).
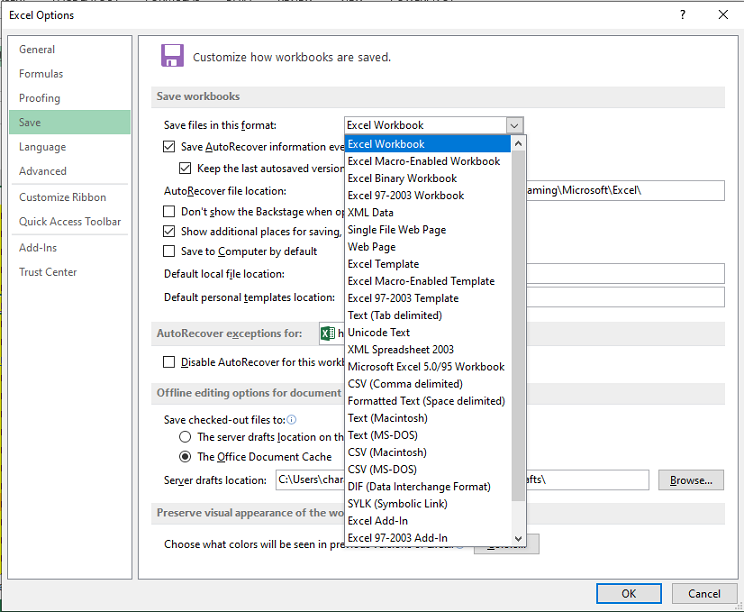
- Click OK.
Check if you can open your Excel file. If not, try the next workaround.
Workaround 2 – Edit the Excel File Permissions
You may receive the ‘Excel file format or file extension is not valid’ error if you lack sufficient permissions to open the file. Usually this happens when you try to open an Excel file received from some other user. Follow these steps to change the file permissions and see if it fixes the problem:
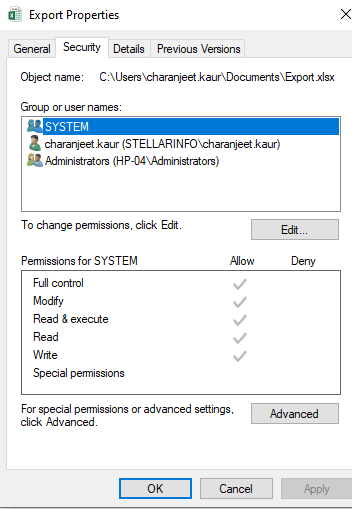
- Right-click on the file that won’t open and click Properties.
- In the file properties dialog box, click the Security tab and then hit the Edit button.
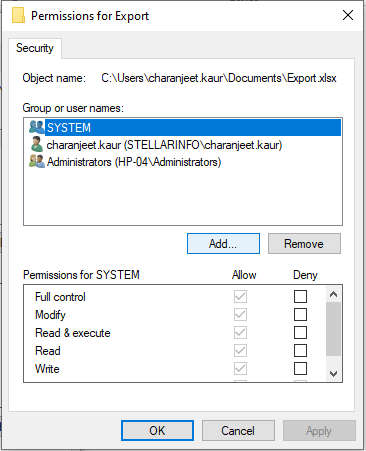
- When the file’s permissions dialog box appears, click on the Add button.
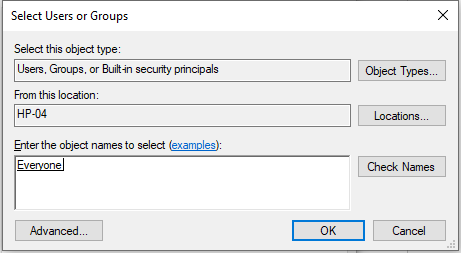
- Click on the Advanced button from the ‘Select Users or Groups’ window.
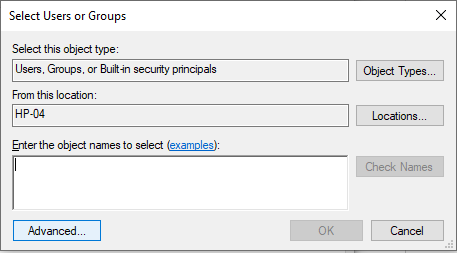
- Select Find Now. A list of all users and groups will get displayed in a search results box. Choose Everyone group from the list and hit OK.

- You can see the ‘Everyone’ group in the ‘Enter the object names to select’ textbox. Click OK once again to return to the file’s permission dialog box.
- Click Everyone from the Group or user names: box and check all the checkboxes under Allow.
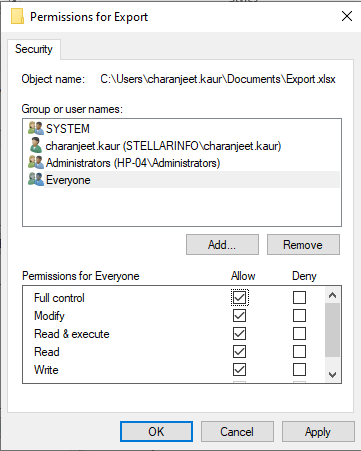
- Click on Apply and then OK.
Now try to open the Excel file. If you’re still getting the Excel file cannot open error, use the following workaround.
Workaround 3 – Recover Unsaved Workbook
If the ‘Excel file extension not valid error’ occurs when attempting to open an unsaved workbook, do the following to recover the unsaved workbook:
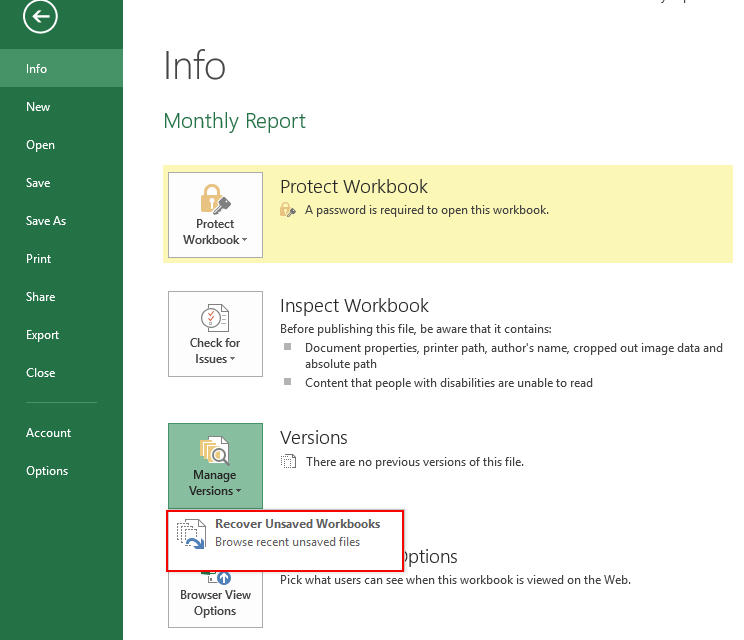
- In Excel, click File.
- From the Info screen, under Manage Versions, click Recover Unsaved Workbooks.
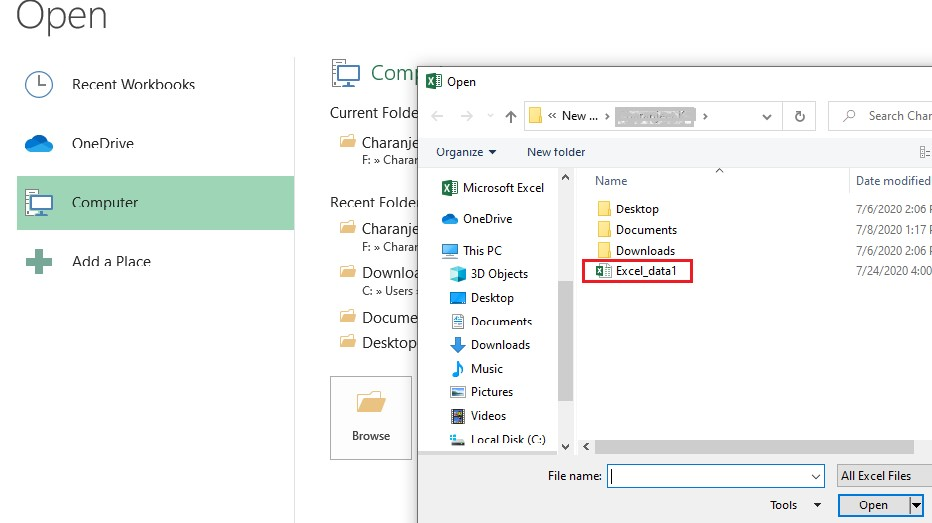
Excel will list any unsaved files. Try opening the file and save it. If this doesn’t work, skip to the next workaround.
Workaround 4 – Repair the Workbook
If none of the above workarounds has worked for you, chances are that the Excel file has become corrupted. Try to repair the file using the Excel inbuilt ‘Open and Repair’ utility by following these steps:
- In your Excel application, click on File > Open.
- In the ‘Open’ dialog box that pops-up, select the Excel file you want to repair and click the arrow next to the Open button.
- From the dropdown list, select Open and Repair.
- Excel will ask you to attempt to repair the file or extract data from it. Click Repair to retrieve maximum data. If the Repair option fails, click on Extract Data to recover the data without formulas and values.
If the ‘Open and Repair’ utility doesn’t help fix the corrupted file and/or recover the data, use an Excel repair tool such as Stellar Repair for Excel to regain access to your file and its data.

Stellar Repair for Excel software can help repair severely corrupted XLS and XLSX files. Also, it helps recover all the file components, including tables, pivot tables, cell comments, charts, chart sheets, images, formulas, etc., without impacting the original structure of the Excel file.
To learn how the software works, read this: How to repair corrupt Excel file using Stellar Repair for Excel?
Conclusion
You may encounter the error ‘Excel cannot open the file because the extension is not valid’ when opening a workbook with a different file format or an incorrect file extension. Also, the error may occur if the Excel file has turned corrupt. This article has covered some of the most effective workarounds to resolve the error. But if nothing works, you can try to repair the Excel file and retrieve its data using the Stellar Repair for Excel software.
[Fixed] Excel Found a Problem with One or more Formula
Summary: The error ‘Excel found a problem with one or more formula references in this worksheet’ may appear while saving the Excel workbook. It occurs when Excel found a problem with the formula used in the sheet. However, it may also occur when the Excel workbook gets damaged or corrupt. In this guide, we’ve explained the reasons that may lead to this Excel error and methods to resolve the error, by using various Excel options and a third-party Excel file repair software.
If you are experiencing the ‘Excel found a problem with one or more formula references in this worksheet’ error message in the Excel workbook, it indicates that the Excel file is corrupt or partially damaged. However, it may also occur due to incorrect reference to a wrong cell or object linking, which is not working. The complete error message says,
‘Excel found a problem with one or more formula references in this worksheet. Check that the cell references, range names, defined names, and links to other workbooks in your formulas are all correct.’

In any case, resolving the error is critical as it doesn’t let you save the file and may result in loss of information from the Excel workbook.
Reasons for Excel Formula References Error
A few reasons that may lead to such error are as follows,
- Wrong formula or reference cell
- Incorrect object linking or link embedding OLE
- Empty or no values in named or range cells
- Multiple Excel files (not common)
Methods to Resolve ‘Excel Found a Problem with One or More Formula References in this Worksheet’ Error
Following are a few methods that you can follow to fix Excel file that can’t be saved due to problems with one or more formula references in the worksheet.
Method 1: Check Formulas
If the problem has occurred in a large Excel workbook with multiple sheets, it’s quite hard to pinpoint the problem cell. In such cases, you can use the Error Checking option that runs a scan and checks for a problem with formulas used in the worksheet.
To run Error Checking in the Excel sheet, follow these steps,
- Go to Formulas and click on the ‘Error Checking’ button

- This runs a scan on the sheet and displays the issues, if any. If no issue is found, it displays the following message,
The error check is completed for the entire sheet.
In such a case, you can try saving the Excel file again. If the error message persists, proceed to the next method.
Method 2: Check Individual Sheet
The problem may also occur due to an issue with one of the sheets in the workbook. To find the faulty sheet and fix the problem, you can copy each sheet content in a new Excel file and then try to save the Excel file.
This will help you find the faulty sheet from the workbook that you can review. This method makes the entire process of troubleshooting Excel formula reference error quite easy and convenient.
In case the error is not fixed, you can back up the faulty sheet content and remove it from the workbook to save the Excel file.
Method 3: Check Links
When the Excel file contains external links with errors, MS Excel may display such error messages. To check and confirm if external links are causing the error, follow these steps,
- Navigate to Data Tab > Queries & Connections > Edit Links
- Check the links. If you find any faulty link, remove it and then save the sheet
Method 4: Review Charts
You can review the charts to check if they are causing the formula reference error in Excel. It may take a while based on the size of the Excel file. Sometimes, it’s not practically possible to track down which Excel chart object is causing the error. Thus, you need to check specific locations, such as:
- Check horizontal axis formula inside Select Data Source dialog box
- Check Secondary Axis
- Check linked Data Labels, Axis Labels, or Chart Title
Method 5: Check Pivot Tables
To check Pivot Tables, follow these steps,
- Navigate to PivotTable Tools > Analyze > Change Data Source > Change Data Source…

- Check if any of the formula used is problematic. Sometimes small typo, such as misplaced comma, can lead to such problems in Excel. Thus, check each formula thoroughly and correct the formulas wherever needed.
Method 6: Use Excel Repair Software
When none of the methods resolve the error, then you can rely on advanced Excel repair software , such as Stellar Repair for Excel. It’s a powerful tool that is recommended by several MVPs and IT administrators for resolving common Excel errors, such as ‘Excel found a problem with one or more formula references in this worksheet.’

It repairs corrupt or damaged Excel (.xls/.xlsx) files, recovers Pivot tables, charts, etc., and save them in a new Excel worksheet. It helps Excel users, facing formula reference error, restore their Excel file without any risk of data loss, while preserving the sheet properties and formatting with 100% precision.
Conclusion
Although the error ‘Excel found a problem with one or more formula references in this worksheet’ can be resolved by using various options in MS Excel, it may lead to a partial loss of information. Thus, you must perform these operations after taking a backup of the Excel worksheet. Also, if the MS Excel options fail to resolve the problem, you can use an Excel file repair software, such as Stellar Repair for Excel. The software helps fix Excel file corruption and restores the information and data from corrupt or damaged Excel files (.xls/.xlsx) to a new worksheet.
Fix Cannot Paste the Data Error in Microsoft Excel
When copying and pasting the cell contents or attributes from one workbook to another, you can encounter the “Cannot paste the data” error. The error indicates that the values you are trying to paste do not match the cell format (Currency, Date, Text, etc.) used in the column. The error can occur if you are attempting to paste information into a merged cell. You can also get this error if the data you are trying to paste contains more columns than the destination worksheet can accept or if the copy area and paste area aren’t the same size.
Why you cannot Paste the Data in Microsoft Excel?
You can experience the “Excel cannot paste the data” error due to one of the following reasons:
- Locked cells
- Data size limitation
- Formatting issues
- The file size is too large
- Overloaded clipboard
- Data type mismatch
- Invalid range
- Lack of permissions
- Excel file is corrupted
- Compatibility issues
- While pasting the merged cells
Methods to Fix MS Excel Cannot Paste the Data Error
The “Microsoft Excel cannot paste the data” error usually appears when copying and pasting data within the spreadsheet. It primarily affects the copy-and-paste feature within the Excel file. However, the impact of this error may vary with the data you are working with. When this error occurs, first try restarting the Excel application. Ensure that you’ve saved all your important data before restarting the application to prevent data loss. If, after performing this basic step, you still face the issue, then try the following troubleshooting methods.
Method 1: Check and Unlock Cells in Excel
You can get the Excel cannot paste the data error if the cells you are trying to paste in the Excel file are locked. You can check and unlock the specific cells in the Excel file using the below steps:
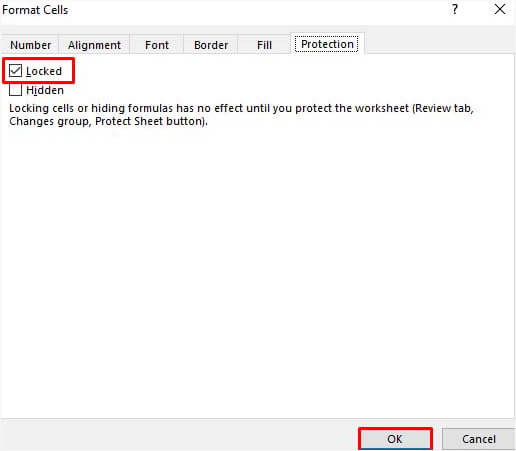
- Go to the Home tab in your Excel file and click Format Cell Font popup launcher.

- In the Format Cells dialog box, click Protection.
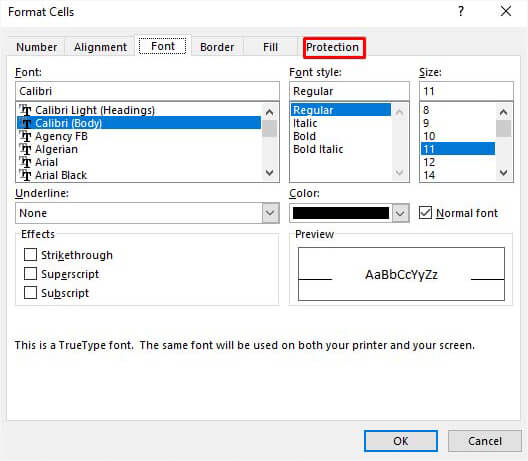
- Under the Protection option, unselect the locked field and then click OK.
Method 2: Check and Fix the Cell Format
Sometimes, you can get the “Cannot paste the data” error in Excel if there is an issue with the formatting of the cells in the column (in which you are trying to paste the data). You can check whether the cell formats of the columns of the source file (from where you are copying data) match the destination file (in which you are pasting the cell data). If not, then change the cell format. Here’s how to do so:
- In the Excel file, click on the affected column heading (whose cells you need to modify).
- Navigate to the Home tab and click the General dropdown menu.

- Click on the desired cell format that matches the values you are trying to paste into the column.
Method 3: Check Copy and Paste Area Size
The “data cannot be pasted” issue can also occur if Excel detects the copy area of the range of cells is not of the same size and shape as that of the paste area. So, make sure the size of the range of cells for the paste area is same as the copied area. To ensure this, you can try the following:
- Use Upper-left Cell
You can select the upper-left cell instead of the complete range to paste.
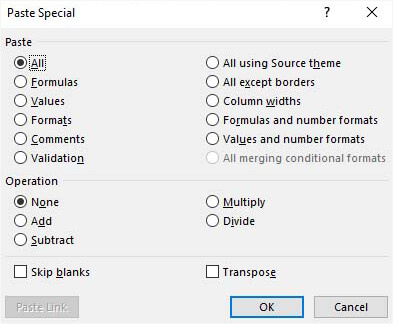
Use Paste Special Option
You can use the Paste Special option to paste the data. To use this option, go to Home > Paste Special.
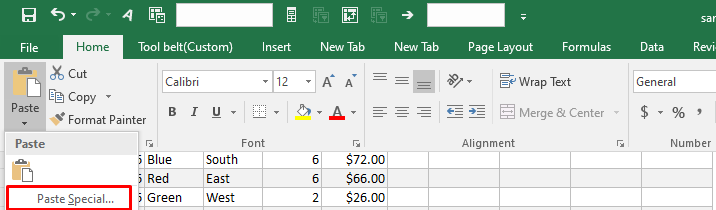
- You can choose from the different options, such as paste all, formulas, operations, Transpose, skip blanks, etc. to take control over how the data is pasted.
Method 4: Check and Unmerge Cells
The merged cells in the workbook can create discrepancies when copying and pasting data. These can create mismatch between the source and destination cell areas, resulting in errors. Make sure you are not pasting the data copied from merged cells. You can check and unmerge the cells using the below steps:
- Open the Excel file (in which you are copying data) and go to the Home tab.
- Click Merge & Center > Unmerge Cells.

Method 5: Unselect the Excel DDE (Dynamic Data Exchange) Option
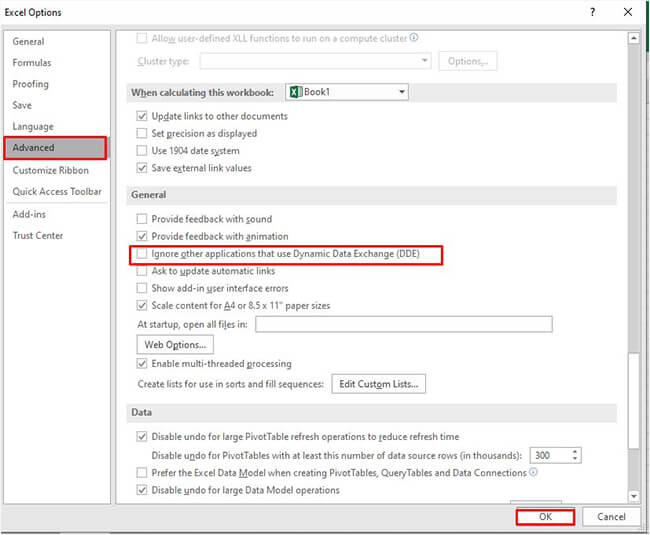
Sometimes, you can get the Excel cannot paste the data error while copying and pasting data from Excel file to external data sources or applications. It usually appears if you have established DDE links between them. To resolve this, you can uncheck the “Ignore other applications that use Dynamic Data Exchange (DDE)” option. Follow the below steps to do so:
- Open your Excel file.
- Go to File > Options.
In Excel Options, click Advanced and unselect “Ignore other applications that use Dynamic Data Exchange (DDE). Click OK.
Here are some additional solutions you can try to fix the “Cannot paste the data” error in Excel
Check the Excel File Format
Sometimes, the copy and paste error can occur if you try to move data from an older version of Excel file (XLS) into a newer version file (XLSX) or vice versa. You can try to change or convert the file format to resolve the issue.
Clear Clipboard
Too many items on the clipboard can prevent you from copying and pasting the data. You can empty your clipboard by deleting all clips. To do this, go to Home and click the Clipboard option.
Change the Column’s Cell Format
You can get the “Cannot paste the data” error when the information you need to paste does not match the cell format in the column. In such a case, you can change the column’s cell format. To do this, navigate to the Home option and then click on the General menu arrow. Then, change the cell format suitable to the type of information you are trying to paste in that column.
Add Columns
The copy-and-paste error in Excel can also occur if there are not enough columns to accept the data that you are trying to paste. You can insert more columns and then try copying and pasting data. To insert additional columns, click on the column heading, click Home, and then select Insert.
Remove Incompatible Add-ins
Sometimes, incompatible or faulty add-ins can also create conflicts with Excel’s clipboard operations, leading to the error. To check if add-ins are causing the issue, open the Excel file in safe mode. In safe mode, if you are able to paste the data, then check and uninstall the incompatible Excel Add-ins.
What to do if Nothing Works?
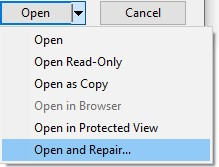
If the above methods do not work, then corruption in the Excel file could be the cause of the “Cannot paste the data” error. In such a case, you can use Excel’s built-in Open and Repair utility to repair the corrupted file. Here’s how to use this utility to repair the Excel file:
- Open your Excel application.
- Navigate to File and then click Open.
- Click the Browse option to select the affected Excel file.
- The Open dialog box opens up. Click on the corrupted file.
- From the Open dropdown, select the Open and Repair option.
- The Excel will prompt you to choose one of the below options:
- Repair
- Extract
- Cancel
- Select the Repair option to extract maximum data from the file. If the Repair option fails, choose the Extract option to recover the data, excluding formulas and values.
The Open and Repair utility may not be able to repair your Excel file if it is severely corrupted. In such a situation, the best possible way out is to use a professional Excel repair software to repair the file. You can try Stellar Repair for Excel. It can repair highly damaged or corrupted Excel (.xls, .xlsx, .xltm, .xltx, or .xlsm) file and recover all the objects from the file by maintaining the original formatting. The tool supports 2007 and higher editions of MS Excel. You can download the demo version of the software to preview the repaired objects and verify its functionality.
Conclusion
The “Excel cannot paste the data” error in Excel can occur due to different factors. You can check and clear the clipboard, unmerge the cells, unlock the cells, and use various other methods mentioned above to troubleshoot the error. If you fail to copy and paste the data due to file corruption, then opt for an advanced Excel repair software, like Stellar Repair for Excel. It is a reliable tool that can help you repair highly damaged/corrupted Excel files. It enables you to recover all the objects from the corrupted Excel file, with complete integrity.
How to fix Pivot Table Field Name is not Valid error in Excel?
The Pivot Table field name is not valid error can occur while creating, modifying, or refreshing data fields in the pivot table. It can also appear when using VBA code to modify the pivot table. It usually occurs when there is an issue with the field name in a code or if there is a hidden or empty column in the pivot table. However, there could be many other reasons behind this error.
Why the “Pivot Table Field Name is not Valid” Error Occurs?
You can get the “Pivot Table field name not valid” error in Excel due to several reasons. Some possible causes are:
- Excel file is corrupted
- Damaged fields in the pivot table
- Pivot table is corrupted/damaged
- Hidden columns in the pivot table
- Macro (referring to the pivot table) is corrupted
- Preserve formatting option is enabled
- Missing or incorrect fields in the VBA code
- Issue with workbook.RefreshAll method syntax (if using)
- Pivot Table contains empty columns
- Header values or header column is missing in the Pivot Table
- Pivot table is created without headers
- Columns/rows are deleted from the Pivot Table
Methods to Fix Pivot Table Field Name is not Valid Error in Excel
You can get this error if you have selected the complete data sheet and then trying to create the Pivot Table. Make sure you choose only the data fields that you want to insert in the Pivot Table. If this is not the case, then follow the troubleshooting methods mentioned below.
Method 1: Check the Header Value in the Pivot Table
The “Pivot table field name is not valid” error can occur if you have not set up the pivot table correctly. All the columns having data in them should have header and header values. A pivot table without a header value can create issues. You can check the header and its value from the Formula bar. Change the header if the header value is too lengthy or if it contains special characters.
Method 2: Check and Change the Data Range in the Pivot Table
The “Pivot Table field name is not valid” can occur while modifying a field in Pivot Table. It usually occurs if you’re trying to add or modify the field by selecting an incorrect data range in the Create PivotTable dialog box. The “Create PivotTable“ feature helps define how data would be displayed within the pivot table.
Let’s take a scenario to understand this. Open the Excel file with PivotTable. Click on the fields (you want to add), go to the Insert option, and click PivotTable.

If you select an incorrect range, i.e. A1:E18, instead of correct range - “Expenses**!$A$3:Expenses!$A$4**,” you will immediately get the error message.
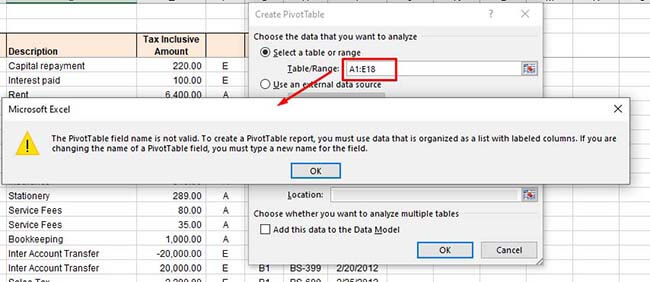
So, type the correct range under the Select a table or range option and click OK.
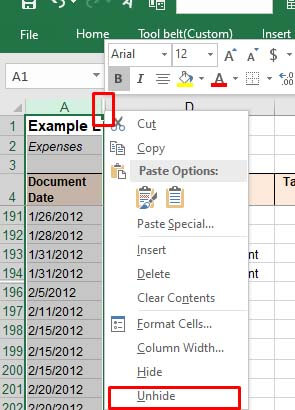
Method 3: Unhide Excel Columns/Rows
The error can also occur if some columns/rows of the Pivot Table’s data source are hidden. When you try to add a hidden column as a field in the PivotTable, the Excel application will fail to read the data of the hidden column. You can check and unhide the Excel columns by following these steps:
Open the Excel file.
Locate the hidden column number.
Move your cursor on the hidden column number and right-click on the space between the columns. Click Unhide.

Method 4: Check and Delete Empty Excel Columns
Sometimes, you can get the “Pivot Table field name is not valid” error if you are trying to use an empty column as a field in your Pivot Table. Check the columns with no values in all cells. If found, then delete the empty columns. This method is ideal for small-size Excel files. However, for large-sized files, it is a time-consuming process.
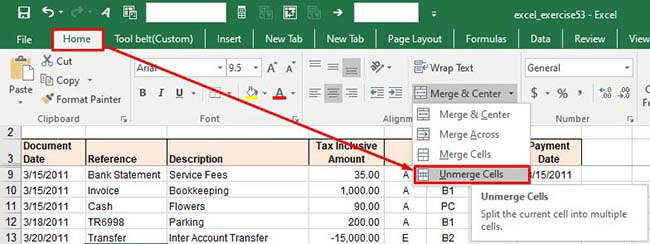
Method 5: Unmerge the Column Header (If Merged)
The “Pivot Table field name is not valid” error can also occur due to merged column headers. The pivot table references headers to identify the data inside the rows or columns. The merged headers can sometimes create data inconsistencies. You can try unmerging the column headers to fix the issue. Follow these steps:
In the Excel file, go to the Home
Click the Merge & Center option and select Unmerge Cells from the dropdown.
Method 6: Disable the Background Refresh Option
If the “background refresh” option in the Excel file is enabled, it may also create issues with Pivot Table. The Excel updates all the pivot tables in the background even after a small change if the background refresh option is enabled. This may create issues if the Excel file is large with too many tables. You can try turning off the “background refresh” option in the Excel file to troubleshoot the issue. Here is how to do so:
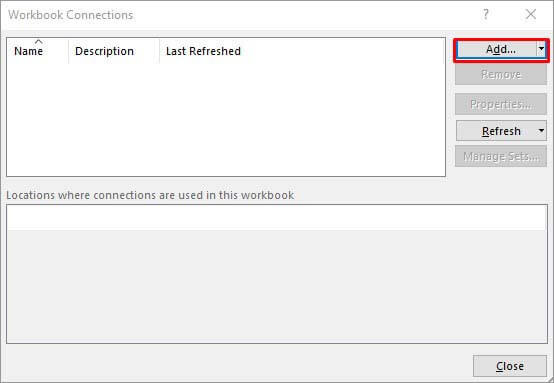
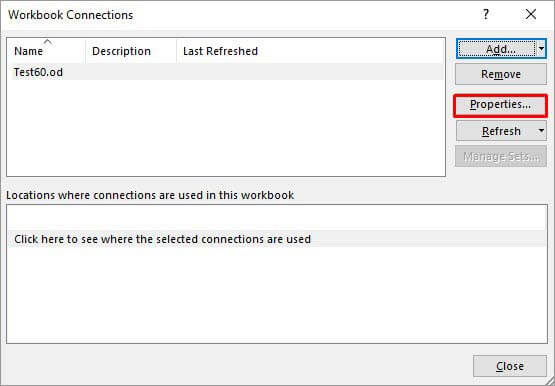
In the Excel file, go to the Data tab and then click Connections.
In the Workbook Connectionsdialog box, click on the ‘Add’ dropdown to add the workbook (in which you need to modify the refresh settings).
Once you have chosen the Excel file, click Properties.
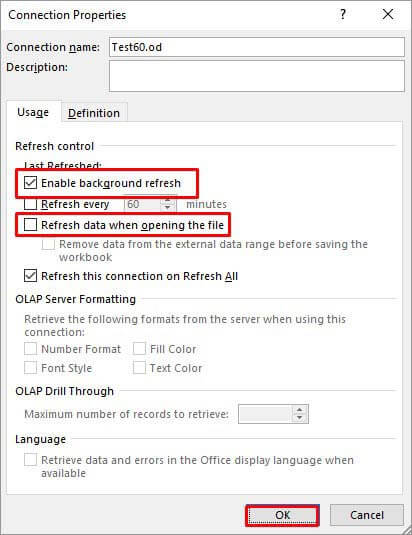
In the Connection Properties window, unselect the **”Enable background refresh”**option, select the “Refresh data when opening the file“, and click **OK.
**

Method 7: Check the VBA Code
The error can also occur when working with PivotTable using VBA code in Excel. Some Excel users reported this error on forums as run-time error 1004: The PivotTable field name is not valid. This error usually occurs when there are issues in the VBA code, affecting the PivotTable data source or field references. You can check field names referring to PivotTable or Workbook.RefreshAll function syntax and other errors in the code.
Method 8: Repair your Excel File
One of the reasons behind the “Pivot Table field name is not valid” error is corruption in the Excel file, containing the Pivot Table. You can repair your Excel file using Microsoft built-in utility - Open and Repair. Here’s how to use this utility:
In Excel, navigate to File > Open.
Click Browse to choose the affected workbook.
The Open dialog box will appear. Click on the corrupted file.
Click the arrow next to the Openbutton and then select Open and Repair.
You will see a dialog box with three buttons - Repair, Extract Data, and Cancel.
Click on the Repair button to recover as much of the data as possible.
After repair, a message is displayed. Click Close.

Method 9: Use a Professional Excel Repair Tool
If the Excel file is heavily damaged or corrupted, then the “Open and Repair” utility may not work or provide the intended results. In such a case, you can opt for a professional Excel repair tool. Stellar Repair for Excel is an advanced Excel file repair tool, which is highly recommended by experts. It can repair severely corrupted Excel files and restore all the data from corrupt file, including pivot tables. This tool comes with a user-friendly interface that even a non-technical user can use. You can try the software’s demo version to check how it works. The software is fully compatible with all Excel versions, including Excel 2019.
Conclusion
The Excel error “Pivot Table field name is not valid” can occur due to hidden or merged column/row headers, empty columns/rows, corrupted pivot table, and various other reasons. You can try the methods mentioned above to fix the error. If this error has occurred due to corruption in the Excel file, then you can use Stellar Repair for Excel - an advanced tool to repair corrupted pivot table, macros, fields, or other elements in an Excel file. It is compatible with all Windows editions, including the latest Windows 11. It can help fix the error if the data source or Pivot table configuration is affected by corruption.
[Solved] : How to Fix MS Excel Crash Issue
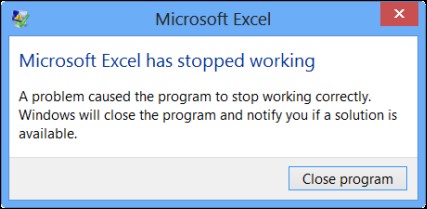
Microsoft Excel may stop responding , hang, freeze, or stop working due to several reasons, such as in compatible add-ins. In such a case, you may receive one of the following error messages.
- Excel has stopped working
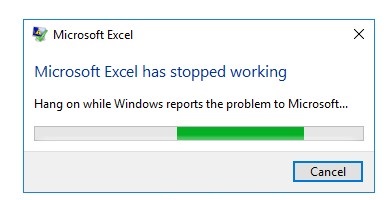
- Excel is not responding
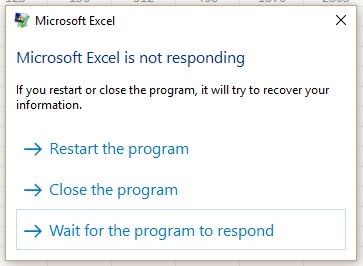
- A problem caused the program to stop working correctly. Windows will close the program and notify you if a solution is available.
Why Does Excel Keep Crashing?
If Excel keeps crashing on your PC while opening a workbook, saving Excel file, scrolling or editing cells, etc., it indicates a problem with your Excel program or the Excel file.
Microsoft Excel may crash due to any one or more reasons given below,
- Incompatible Add-Ins
- Outdated MS Excel program
- Conflict with other programs or antivirus tool
- Excel file created by third party software
- Problem with network connection
- Combination of Cell formatting and stylings
- Problem with MS Office installation
- Partially damaged or corrupt Excel file
Problems Caused by Excel Crash Issue
Microsoft Excel crash may cause damage to Excel file and also lead to Excel (XLS/XLSX) file corruption.
Such corrupt Excel files can’t be opened or accessed via MS Excel app. If you try to access a corrupt Excel file, MS Excel may fail to open the file or stop responding and crash. Additionally, you may receive the following or similar error message,
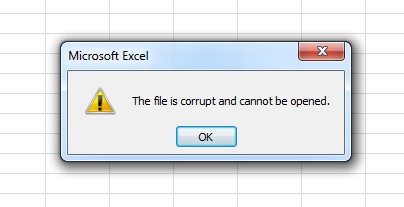
In such a case, you should immediately try to recover the Excel file. You may do so by restoring the Excel file from backup or by using an Excel File Repair software. Otherwise, continue following this guide.
How to Solve Excel Crash Issue?
Before heading to solutions, follow these troubleshooting steps to resolve the Excel Crash issue.
Step 1: Copy File to Local Drive
If you are trying to access and edit or view an Excel file from a network drive, try moving the file to local drive. This will help you find if there is something wrong with the file or the network.
Step 2: Ensure Sufficient Memory
Excel files can grow fairly large when you start adding lots of formatting and shapes. Make sure that your system has enough RAM to run the application.

If you often work with large Excel files and complex data values& formulas, then install 64-bit versions of MS Office. It will give you an advantage of larger processing capacities and prevent Excel from crash or freeze.
Step 3: Check If Excel is Open and In Use by Another Process
Open Task Manager and close all processes or apps (tasks) that may be using or have access to your Excel file that you are working on. You can find this detail in status bar of Excel program at the bottom of program window.
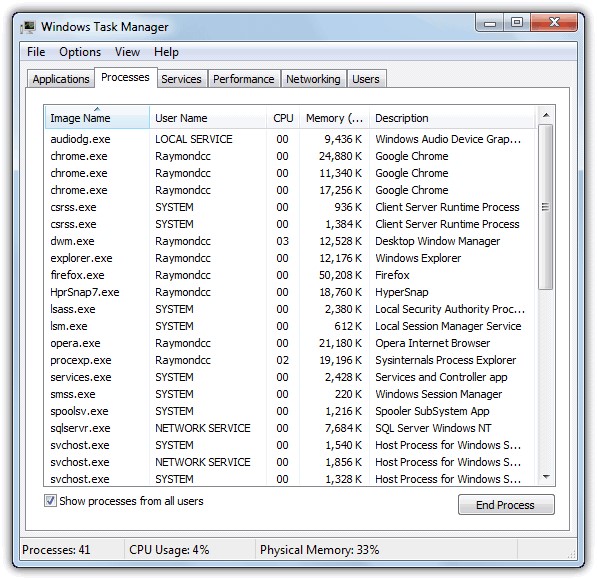
After closing the tasks, try to access the Excel file and check if this fixes the performance and crash problem in Excel.
Step 4: Test and Repair Excel File
Create a copy of the Excel file and install Stellar Repair for Excel software. It’s free to download. Scan and repair your Excel file using the software. After repair, save the Excel file at your desired location and then open the Excel file in the MS Excel program.
This should ideally fix all the issues with Excel.
However, if the Excel program still crashes, the problem lies within the system or program. Follow the solutions discussed in this guide to try to fix the Excel crash issue.
NOTE: To save repaired Excel file using the mentioned software, you must purchase the activation key and activate it.
Solutions to Fix MS Excel Crash Issue
Following are some solutions to resolve problems with MS Excel such as,
- Excel not responding
- Excel won’t open
- Excel keeps crashing
Follow these solutions in the given order. In case a method doesn’t work, move to the next one.
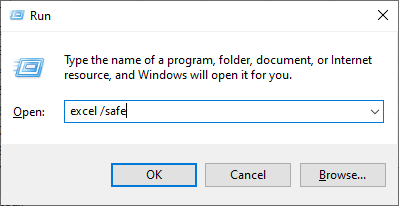
Solution 1: Restart Excel in Safe Mode
By starting MS Excel in safe mode, you can run the program without loading the Excel add-ins and with limited features. But COM add-ins are excluded.
To launch Excel in safe mode, close MS Excel and follow these steps,
- Create a shortcut of MS Excel (.exe) on Desktop
- Press and hold the Ctrl key while launching the program
- Click ‘Yes’ when a prompt appears to confirm
Alternatively, press Windows+R, type excel /safe and press ‘Enter’. Use this to open Excel in safe mode on Windows 10, 8.1, 8, or 7 system.
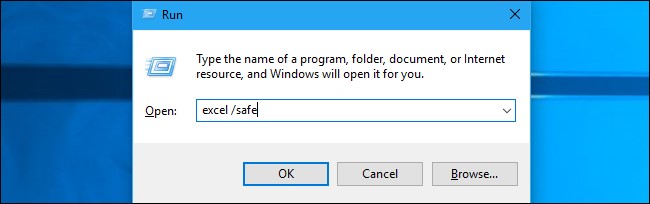
Now try to open and access the Excel file and check if the issue is resolved. If it’s not, head on to the next solution.
Solution 2: Check and Remove Faulty Add-ins
In case Excel doesn’t crash in Safe Mode, it’s possible that some faulty add-ins are the culprit behind frequent Excel crash and freeze. These Excel add-ins may interfere or conflict with the Excel program.
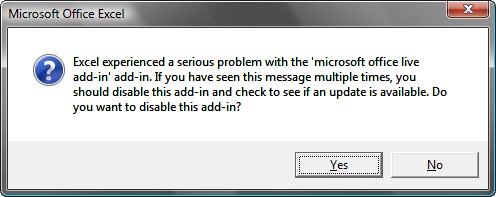
Find and remove the faulty add-in. It can resolve the issue. To do so, follow these steps,
- Restart Excel in normal mode and go to File> Options> Add-ins
- Choose COM Add-ins from the drop-down and click Go

- Uncheck all the checkboxes and click OK
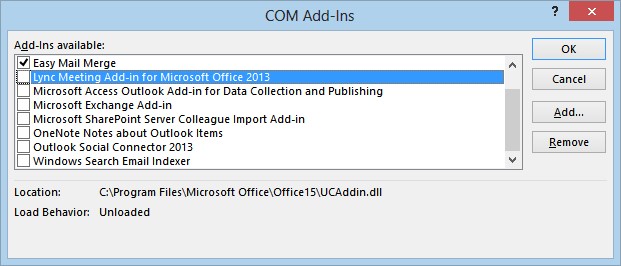
- Restart Excel and check if the issue is resolved
- If Excel doesn’t crash or freeze anymore, open COM Add-ins and enable one add-in at a time followed by Excel restart. Then observe Excel for freeze or crash problem
This will help you find out the faulty add-in, which is causing the problem. Remove the add-in which is causing the problem to resolve the issue. If that doesn’t fix, move to the next solution.
Solution 3: Check and Install the Latest Updates
If you haven’t set Windows to Download and Install Updates automatically, do it now.
Apart from updating the operating system, latest Windows updates sometimes fixes bugs for other applications installed on the system such as MS Office. Often installing an important update that you might have missed may correct the Excel crash problem.
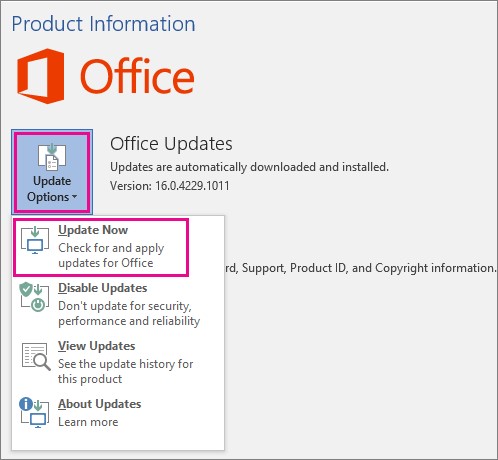
You can also update MS Office manually. Follow these steps,
Go to File > Account
Under Product Information, select Update Options and click Update Now
If you have installed MS Excel from Microsoft Store, open the store and update your Office applications.
NOTE: This also works if you can’t open Excel file or Excel crashes after Windows upgrade from Windows 7 or Windows 8/8.1 to Windows 10.
After installing the latest MS Office updates, check if Excel works fine. If not, head to the next solution.
Solution 4: Clear Conditional Formatting Rules
If a sheet is causing Excel to freeze or crash, there might be a problem with that particular sheet. In such a case, you may try clearing the Conditional Formatting rules. The steps are as follows,
- Under Home, click ‘Conditional Formatting > Clear Rules> Clear Rules from Entire Sheet’
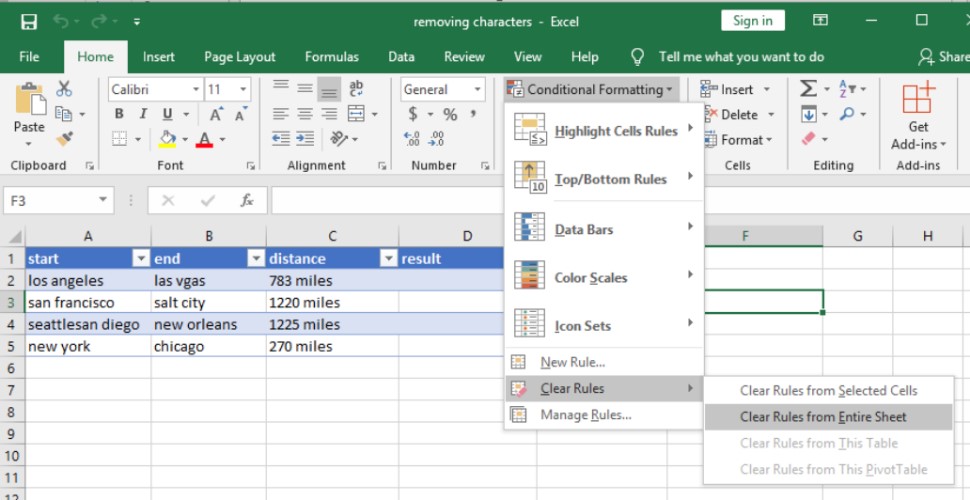
- You may repeat this step for all other sheets in the Excel workbook
- Then click File> Save as and save the Sheet as a new file at a different location
This avoids overwriting or making changes to the original Excel file. Once done, try working on the sheet.
If this doesn’t work out, move to the next solution.
Solution 5: Remove Multiple Cell Formatting and Styles
If a workbook is being shared and edited by others on different platforms then it’s possible that many cells are formatted differently. This can cause issues with Excel such as crash and freeze. It can also lead to Excel file corruption. The problem mostly occurs when a workbook contains multiple worksheets using different formatting.
You can follow this guide to remove different cell formats and styles, and then open the Excel file.
Solution 6: Disable Microsoft Excel Animation
Animations require additional processing power and resources. By disabling animations in Excel, you may resolve Excel freeze and crash issue. This also improves MS Excel performance.
To disable the animations in MS Excel, follow these steps:
- Go to File > Options
- Click ‘Advanced’ and check ‘Disable hardware graphics acceleration’animation
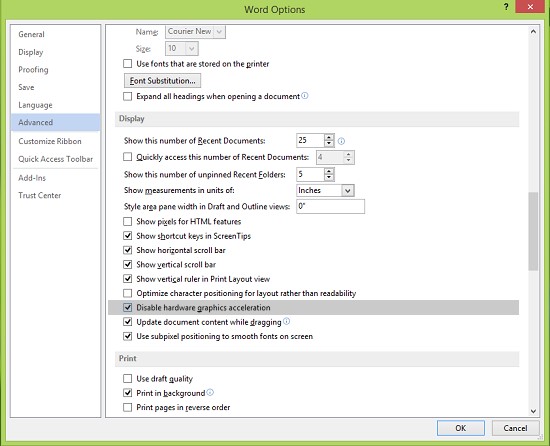
- Click ‘OK’ to close the window and then restart MS Excel
This has helped many users in fixing the Excel crash issue. If it doesn’t work for you, head to the next solution.
Solution 7: Check If Excel File is Generated by a Third-Party Application
There are applications which you may have used to generate Excel files to fetch data. For instance, downloading data from Google Analytics in Excel format.
Sometimes, these Excel files are not generated correctly by such third-party apps. Thus, some features in Excel may not work as intended when you access the files in MS Excel.
In such a case, you should get in touch with the app developer for help with the file or use Stellar Repair for Excel to repair such Excel files.
Solution 8: Check If Antivirus or Other Apps are Conflicting with MS Excel
Ensure your antivirus is up-to-date and not conflicting with MS Excel. An outdated antivirus tool may conflict with Excel which can cause the application to hang, freeze, or crash.
- Update your antivirus
- Try disabling the add-in or integration between Excel and antivirus. See if it works
Alternatively, you may disable the anti-virus tool temporarily to check if it is the culprit behind Excel performance issue and crash. If that resolves the problem, get in touch with your antivirus vendor and report the problem.
They might provide you with a better solution or workaround to fix this problem without disabling the antivirus protection.
IMPORTANT NOTE: Disabling or altering antivirus protection makes your PC vulnerable to malicious attacks and virus or malware intrusion.
Solution 9: Clean Boot Windows to Inspect the Cause Behind Excel Crash
When Windows boot, it starts several processes, services, and application during start up automatically, which runs in the background.
These startup apps and services can interfere with other applications such as MS Excel. To find out if that’s the cause behind Excel crash, you can perform a Clean Boot.
This helps you identify processes, services, or applications that are conflicting with Excel. Steps to perform Clean Boot are as follows,
- Press Windows key + R, type MSConfig, and press ‘Enter’
- In System Configuration window, click on the General tab and choose Selective startup
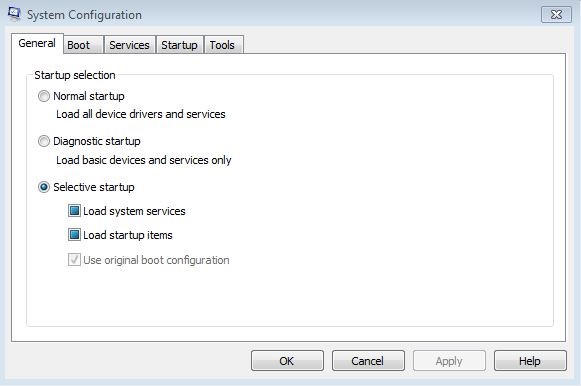
Uncheck ‘Load startup items’ and click ‘OK’
After this, close all running applications and restart your PC
Check if the crash problem with Excel is resolved. Uninstall the conflicting apps or update them. If your issue is not resolved, follow the next solution.
Solution 10: Repair or Reinstall MS Office
Repairing Office programs may also resolve Excel crash issues if caused by damaged MS Excel program or MS Office files. The steps are as follow,
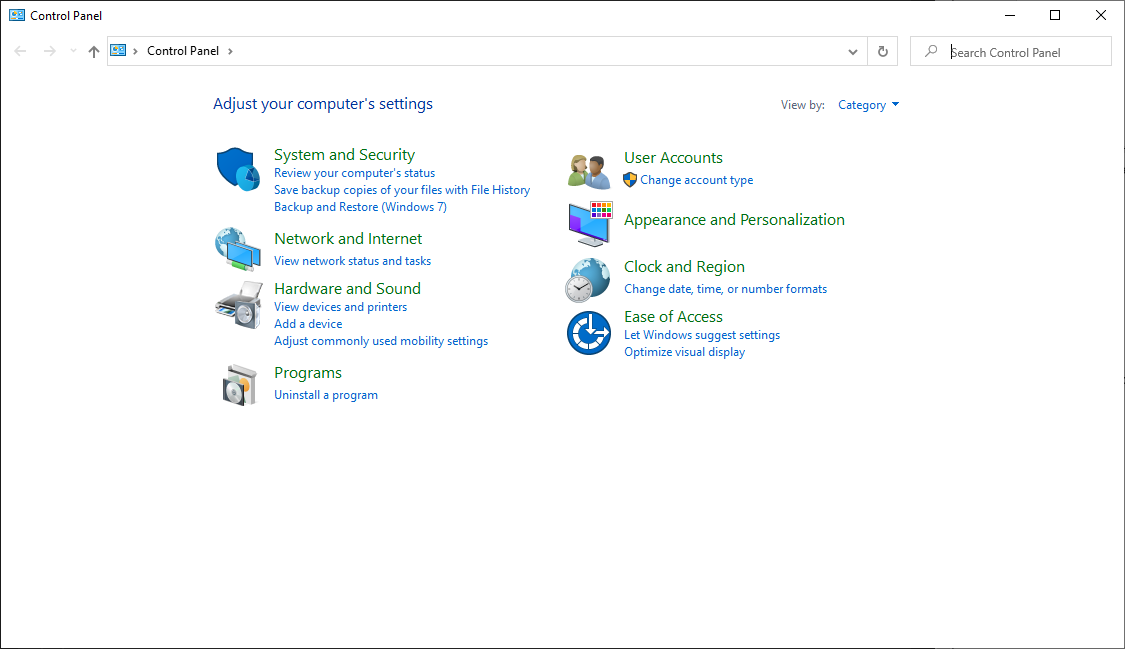
- Close all MS Office apps and open the Control Panel
- Click Uninstall a program under Programs
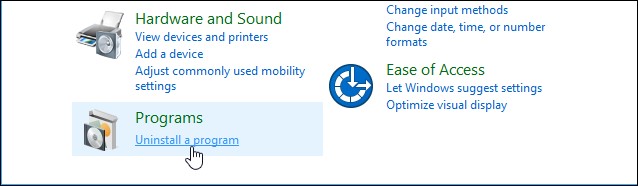
- Click on Microsoft Office and then click on the Change option
- Choose ‘Quick repair’ and then select ‘Repair’
- Click ‘Continue’ to repair MS Office installation
You may also try ‘Online Repair’ if this fails to fix the issue. After repair, if the Excel issue persists, reinstall MS Office.
Need More Help?
If none of the above-mentioned solutions worked for you, it indicates that the problem is not with the Excel program but with the Excel file. If you haven’t tried the Stellar Repair for Excel software, do it now.
Select the Excel file which is causing the problem and repair it with the software. It’s a powerful Excel repair software that can fix all the problems with Excel files (XLS/XLSX). It repairs corrupt and severely damaged Excel files.
The software is compatible with all Excel files created using MS Excel 2019, 2016, 2013, 2010, 2007, 2003 or 2000.
After repairing and saving the Excel file, you can open it in your MS Excel program and work on it without any performance issue. To know more about this software, visit this page.
[Fixed] The Workbook Cannot Be Opened or Repaired By Microsoft Excel
An MS Excel workbook (.XLS/.XLSX) file may not open due to damage or corruption caused by various reasons, such as:
- Sudden power failure
- System crash
- Virus or malware intrusion
- Large or oversized Excel file
- Incompatible add-ins
- Drive errors
- Damaged MS Office/Excel program files
As a result, when you try to open or access a corrupt Excel document, the program displays errors, such as “The workbook cannot be opened or repaired by Microsoft Excel because it is corrupt.” This may lead to a data loss situation.

Methods to Fix ‘The Workbook Cannot Be Opened’ Error
When an Excel workbook gets corrupt, MS Excel automatically detects and starts the file recovery mode to open and repair the file. However, when it fails to repair the corruption or recover the Excel file automatically, it displays the error message, “The workbook cannot be opened or repaired by Microsoft Excel because it is corrupt.” In such a situation, you can follow these methods to repair and recover the Excel document manually.
If the manual methods fail to resolve the error, you can use an Excel repair software, such as Stellar Repair for Excel. The software repairs corrupt XLS/XLSX file, recovers all the data, and saves it in a new Excel document with 100% precision, while keeping the cell formatting and properties intact.
NOTE: Before performing the below methods to repair or recover Excel documents, create a backup copy of the original file. This will help you recover data by using an Excel repair tool and avoid permanent data loss.
1. Repair Excel Workbook Manually
If the automatic repair fails, you may try manual repair to fix the damage or extract the data from the damaged Excel workbook. The steps are as follows:
- Navigate to File > Open and then go to the location where the spreadsheet is located.
- In the Open window, select the corrupted workbook that you want to fix and then click on the arrow next to the Open button.
- From the available options, choose Open and Repair…

- Then click ‘Repair‘ if you want to recover maximum data from the workbook or click ‘Extract data‘ if the repair option fails to fix the issue. It will extract all the values, formulas, tables, etc., from the corrupt workbook.

If both options fail to fix the issue, head to the next method.
2. Remove Faulty or Incompatible Add-ins
Faulty or incompatible add-ins may also cause this error. To find and remove such add-ins, follow these steps:
- Press **Windows key + R.
**
- Type Excel /safe and press ‘Enter‘ or click ‘OK.’ This opens MS Excel in Safe Mode.
- Go to File > Options and then select ‘Add-ins.‘
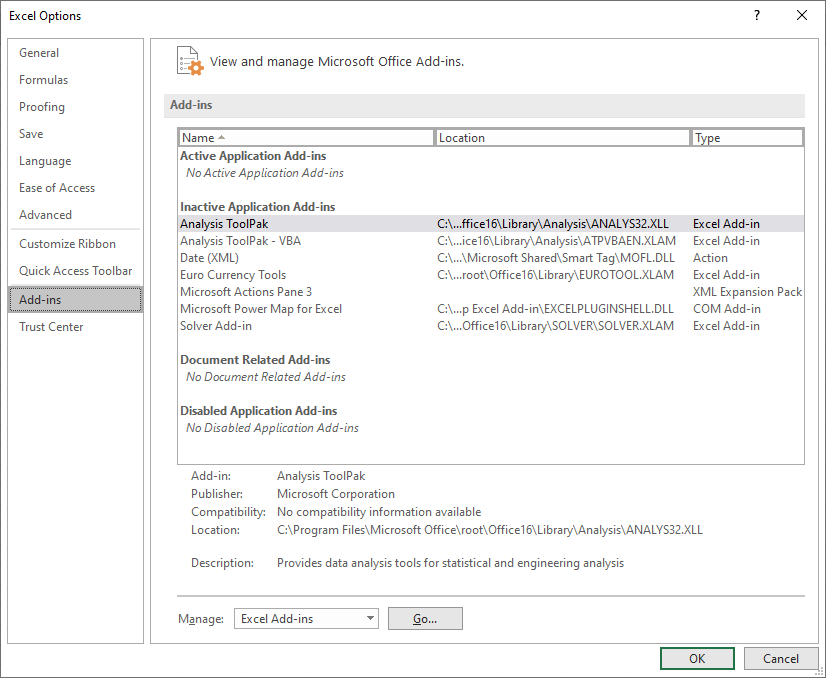
- Choose ‘Excel Add-ins‘ from Manage: option and then click on the Go button to view all Add-ins.
- Uncheck the checkboxes of Add-ins and then click ‘OK‘ to disable them.
Now close the Excel program and run it normally. Click ‘File > Open‘ and choose the Excel file you want to access.
3. Repair MS Office Installation
Damaged Excel program files may also lead to such errors. However, you can easily repair MS Office installation to fix the problem. The steps are as follows:
- Open Control Panel and select ‘Uninstall a program.‘
- Search and choose MS Office from the programs list. Then click on the ‘Change’ button.
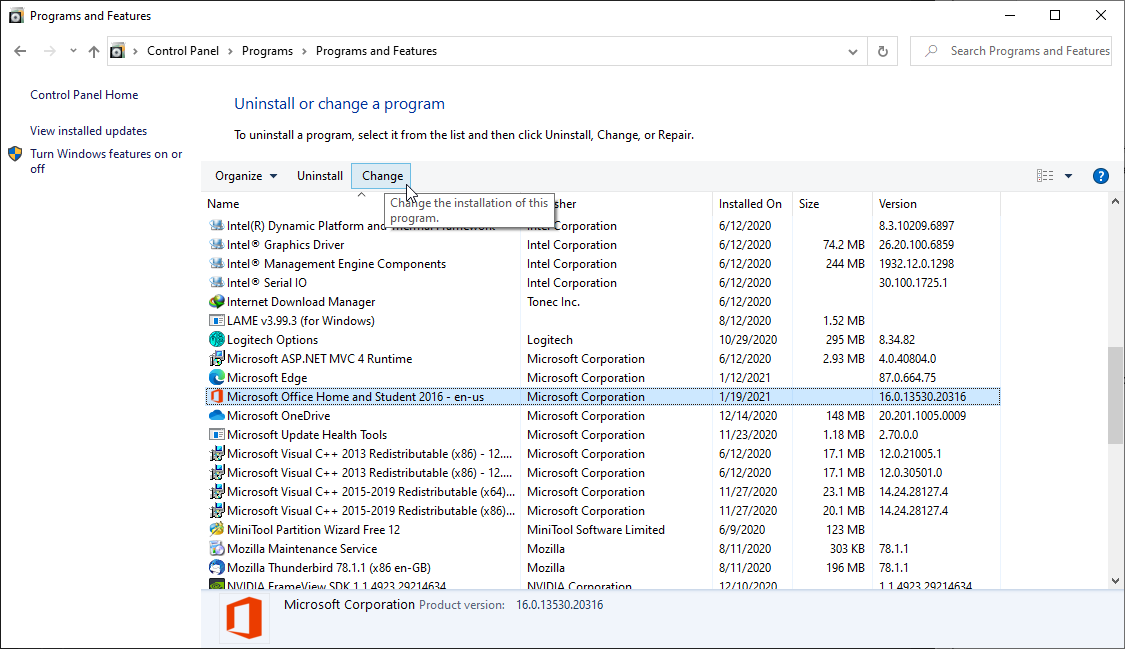
- Select ‘Repair’ and follow the wizard to fix the damaged program files.

If this fails to address the issue, you can uninstall and then fresh install MS Office on your system. Alternatively, try accessing the file on another PC.
4. Use Excel Repair Software
The best option is to use an Excel repair software, such as Stellar Repair for Excel , to repair the file, resolve the error, and access the Excel (XLS/XLSX) worksheet. The software can repair an Excel file without any size limitation.
After recovering the Excel file using the software, you can open it in any MS Excel program without encountering the error message.
Conclusion
A corrupt or damaged Excel workbook may lead to errors, such as “The workbook cannot be opened or repaired by Microsoft Excel because it is corrupt,” and cause a data loss situation. The most efficient way to fix such corrupt Excel files is to repair them by using an Excel repair tool, such as Stellar Repair for Excel.
Unlike manual methods that may fail to resolve the issue or lead to further damage, this software extracts the data from the damaged Excel file and saves it in a new Excel workbook. Thus, it is 100% safe to run on an original Excel file, as it does not overwrite or alter the original file.
The software is free to download. You can scan, repair, and preview a corrupt Excel file by using the demo version. Once you are satisfied with the results, activate the software to save the repaired Excel workbook data in a new sheet.
- Title: Unable to Save Excel 2021 Workbook Issue Fix 2024 | Stellar
- Author: Ian
- Created at : 2024-03-12 10:13:44
- Updated at : 2024-03-14 16:22:39
- Link: https://techidaily.com/unable-to-save-excel-2021-workbook-issue-fix-2024-stellar-by-stellar-guide/
- License: This work is licensed under CC BY-NC-SA 4.0.
