
Top iPhone 8 Plus Message Recovery Software | Stellar
Top iPhone Message Recovery Software
iPhone is a valuable digital device, and so are the messages you store in it. Nonetheless, many users may accidentally delete them at once while deleting some unnecessary apps or data from their iPhones. If you are a victim of such an incident and looking for quick options to recover iPhone messages, this article is your ultimate saviour.
Do iPhone recovery programs work?
Yes! iPhone’s built-in recovery options can restore temporarily deleted or lost messages hidden in the operating system. Moreover, many iPhone-friendly tools and applications guarantee retrieval of lost messages without using backup options. Simply download and install the tool and play along to scan your iOS device.
What is the best message recovery software?
With a wide range of data recovery software available online, finding an ideal solution to recover lost messages would be challenging. Here’s some criteria for selecting the right tool:
- The software or tool can recover deleted messages even without backup.
- It can recover deleted messages on iPhone from iCloud or iTunes without affecting the existing data.
- The tool is virus-free, reliable, and safe to use.
- It is compatible with all iOS models, including iPhone 15, 14, 13, 12, 11, or XS.
- It can recover various iOS files like messages, photos, videos, contacts, WhatsApp, or FaceTime messages.
- The tool must offer professional technical support to address your queries while using the software.
Pro Tip: Stop using your iPhone as soon as you realize that a significant amount of data, including files, messages, photos, etc., are lost. Any operation on the device may overwrite the hidden or lost data, making it irretrievable.
Best 5 iPhone Message Recovery Software to Try
1. Stellar Data Recovery for iPhone
One of the most esteemed iPhone data recovery tools, Stellar Data Recovery for iPhone , is known for its incredibly intuitive GUI. It meets all the above-mentioned criteria that make it proficient at salvaging your lost iPhone messages, WhatsApp chats, FaceTime data, etc. Further, the tool can transfer your important messages from iPhone to personal computer, laptop, or Mac.

Besides data recovery from iPhone, iCloud, and iTunes, Stellar Data Recovery for iPhone gives you the option to selectively browse, preview, and recover data after scan. Moreover, it allows you to permanently erase unwanted data from your iPhone beyond recovery. All such advanced features make it a prestigious iPhone recovery message option. Read this KB to recover deleted data from iPhone via Stellar Data Recovery for iPhone.
Stellar Data Recovery for iPhone - Advantages
The tool can recover unlimited file formats on storage media, be it Safari bookmarks, notes, voice memos, and WhatsApp chat history, or general messages.
You can preview all the data recovered from your iPhone for free.
It is proficient at recovering deleted data from an encrypted backup.
The tool is easy-to-use and does deep scanning of an iPhone.
It can also perform recovery of lost data from iTunes and iCloud backup.
Disadvantages You cannot save the recovered messages or files without purchasing the software.
2. Dr. Fone for iOS
Dr. Fone for iOS is another famous iPhone message recovery application. It’s a professional tool that guides you on retrieving deleted messages on your iPhone while enabling recovery of diverse iOS files, including contacts, photos, voicemails, and SMS. The app has a preview function to help you view the deleted messages before recovery.
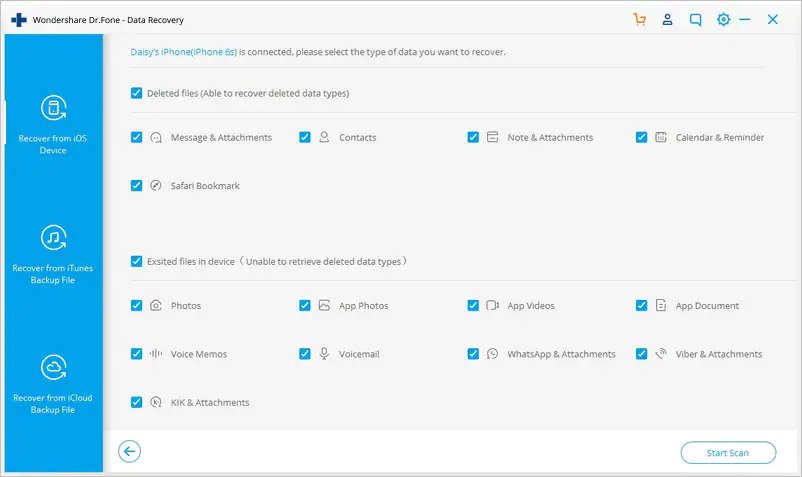
Dr. Fone for iOS - Advantages
- Swiftly recovers data from iTunes, iCloud, and iPhone
- Compatible with all iPhone models.
Disadvantages
- You can’t access advanced data recovery functionalities without using the upgraded version.
- The application is costly to upgrade.
3. EaseUS MobiSaver
EaseUS MobiSaver is an iPhone SMS recovery software that can scan your iOS device, iCloud backup, and iTunes backup to trace the lost message files. It not only recovers lost messages but also helps you retrieve data from your iPhone if your device turns inaccessible. The free version has certain limitations which can be overcome using the paid version.
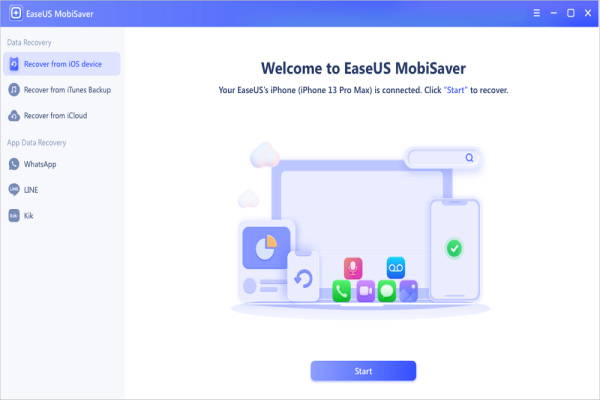
EaseUS MobiSaver – Advantages
- It is an absolutely free data recovery solution.
- It can recover messages from a water-damaged, broken, lost, or cracked iPhone.
- The app displays all the deleted files.
Disadvantages
- Its data recovery success rate is low compared with other professional software.
- Being a free tool, it can recover only a limited set of data files.
4. Syncios Data Recovery
This tool claims to bring back all deleted or lost data from iPhone, including audio files, SMS, documents, video files, and contacts. Syncios Data Recovery works for all iPhones, iPads, or even iPods. It is recommended to download the free trial version and see if your deleted messages can be recovered or not.
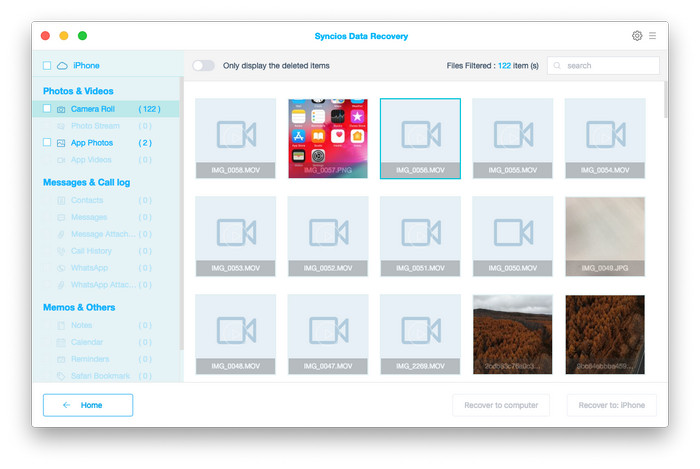
Syncios Data Recovery - Advantages
- The tool is compatible with all versions of the iPhone.
- You can reach out to their quality customer service via email or phone.
- The brand offers free technical support for a lifetime.
Disadvantages
- It takes a long time to retrieve deleted text messages from iPhone or lost data.
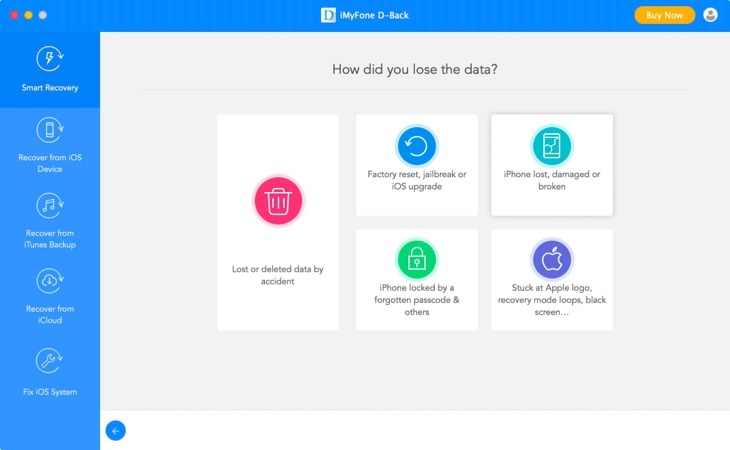
5. iMyFone D-Back
This tool enables you to recover the data in all iOS devices whose data have been lost or deleted accidentally. Renowned as iPhone text recovery app, iMyFone D-Back claims to recover all the lost SMS, WhatsApp texts, contacts, notes, call history, and photos. Further, the tool can easily and swiftly bring back iCloud, iTunes, and even iOS backup files. Its smooth preview function enables you to check and recover selective items only.
iMyFone D-Back - Advantages
- It can recover about 20+ varieties of files.
- The tool is free from viruses and malware.
- Besides iPhone, it is also compatible with almost all iPad versions.
Disadvantages
- Data recovery from iCloud remains a challenge.
- It cannot recover all kinds of lost data files.
The Bottom Line
iPhone data recovery tools are available in bulk. All are significantly different from each other in terms of functionality and proficiency. We cherry-picked some reputed tools for you to ease the pain of losing crucial messages from iPhone. There is no one-size-fits-all tool in the iPhone data recovery category. Therefore, we suggest you pick a reliable software, which is trusted and recommended by industry veterans, easy-to-use, and performs multiple functions at a reasonable cost. This article will give you a clear picture of which tool is the most suitable to overcome your iPhone messages recovery needs.
How to Put iPhone or iPad on Recovery mode? (Step by Step Tutorial)
Summary: DFU or Recovery mode is a way to recover your iPhone or iPad using a computer in case of technical issues. Read this post for a step-by-step process of how to enter and exit Recovery Mode and DFU mode on iPhone.


When you run out of solutions to troubleshoot your iPhone, Recovery Mode or DFU Mode comes as a rescue. Whether iPhone stops booting or fails to restore, you can use the functions in iPhone and fix the issue.
But the method to bring an iPhone in DFU or Recovery Mode varies in each iPhone model and iPad.
This post will guide you on how to enter and exit Recovery and DFU Modes in different iPhone and iPad variants. But first, understand what these iPhone functions are and their uses.

What is Recovery Mode and its use?
Recovery Mode uses iBoot to upgrade or restore your iPhone. iBoot is a bootloader program for iOS devices. Recovery Mode helps install the same or above iOS firmware version already on your iPhone. The iPhone screen in Recovery Mode prompts to connect iPhone to iTunes, showing a computer image.
Recovery Mode helps fix iPhone updates or restore issues, such as iPhone stuck at the Apple logo , unable to open the locked iPhone or want to reset iPhone but forgot iPhone passcode .
What is DFU Mode and its use?
Device Firmware Update or DFU mode lets your iPhone connect with iTunes on the computer without iBoot. As DFU mode doesn’t use iBoot, you can make changes in the operating system of the iOS device. An iPhone in DFU mode has a completely black screen.
Putting iPhone into DFU mode is the solution when Recovery Mode doesn’t resolve the problem. DFU mode can restore or upgrade iPhone. This mode is also commonly used to downgrade or jailbreak iPhone s.
Caution — you may lose all your iPhone data!
If you are entering DFU mode, make sure to back up your iPhone data . DFU mode permanently erases iPhone data . So always back up your videos, photos, messages, chats, Notes, etc., either to iCloud or iTunes.
However, if you have lost iPhone data and don’t have a backup, then immediately download iPhone data recovery software — Stellar Data Recovery for iPhone . The software helps to restore lost or deleted iPhone contacts, call logs, photos, videos, text, FaceTime, audio, chats, Calendar, Notes, Safari bookmarks, etc. It is quick to recover and extremely user-friendly.
What is required to perform Recovery and DFU modes in iPhone?
- Windows or Mac system.
- Lightning to USB cable.
- iTunes updated to the latest version on your computer.
How to put iPhone 6 and earlier versions in Recovery Mode
Follow the below steps to enter Recovery Mode on iPhone 6, iPhone 6s, iPhone 6s Plus, iPhone 5s, iPhone 5, iPhone 4s, and iPhone 4.
- Connect your iPhone to your PC using USB Lightning Cable and launch iTunes.
- Press and hold down the Home and Power button to turn the iPhone.

- Then connect the USB cable to iPhone and turn it on by holding the Home button.
- Continue to hold the Home button until a pop-up appears informing ‘an iPhone has been detected in recovery mode’ on your system.
- In Recovery mode, you can either restore the iPhone, set it up as new, or just recover your backups.

How to put iPhone 7 in Recovery Mode
It’s easy to enter Recovery Mode on iPhone 7 or iPhone 7 Plus. Follow the below steps:
- Turn off your iPhone 7 and connect it to your Mac or Windows computer.
- Ensure iTunes or Finder is running on the system.
- Press and hold the Power and Volume down button for 10 seconds.
- While continuing to hold the Volume down button, release the Power button.

- Release the button if you see the iTunes has detected an iPhone in recovery mode message on your system.
How to put iPhone 8 in Recovery Mode
If you want to enter the Recovery Mode on iPhone 8 and its variants, follow the below steps:
- Connect your iPhone 8 to your Mac or Windows system with a USB cable.
- Next, press and release the following buttons in a sequence Volume Up button, Volume Down, and Side button until your device reboots. Continue holding the Side button, even after seeing the Apple logo appear.
- Release the Side button once the Connect to iTunes logo appears on the iPhone’s display.

- Launch iTunes, and you should see a message stating, “There is a problem with the iPhone that requires it to be updated or restored.” You can choose to Update or Restore your iPhone’s software.
How to put iPhone 11 into Recovery Mode
To enter Recovery Mode on iPhone 11, iPhone 11 Pro, or iPhone 11 Pro Max, follow these steps:
- Connect your iPhone with your Mac or PC and launch iTunes.
- Force restart your iPhone with the following steps:
- Press and release the Volume Up button.
- Press and release the Volume Down button.
- Press and hold the Side button.
- Make sure to release these buttons if you see the recovery mode screen with the “Connect to iTunes” screen.
- Then choose your iPhone in iTunes, and you will see a pop-up saying that your iPhone is in Recovery Mode. Here, you can either update or restore your iPhone.
How to put iPhone 12 into Recovery Mode
Follow the below steps to enter Recovery Mode on iPhone 12, iPhone 12 mini, iPhone 12 Pro, and iPhone 12 Pro Max:
- Update iTunes to the latest version.
- Connect your iPhone to your PC or Mac via Lightning to a USB cable.
- Note: If you are connecting your iPhone to the computer for the first time, click on ‘Trust’ in the Trust This Computer dialog box and follow the prompts.
- Once your iPhone is paired with the computer, press the Volume up button followed by the Volume down button and release.
- Press and continue to hold the Side button until you see the ‘Connect to computer’ screen on your iPhone. While on your computer, you would see the iPhone Recovery Mode message in iTunes, confirming that your iPhone has entered into Recovery Mode. The computer asks you to either Update or Restore your iPhone**.** Click on any based on your requirement.
If you choose Update, iTunes will update your iPhone 12 to the latest iOS release. This won’t lead to any loss of data.
If you select Restore: It will erase iPhone data completely and renew your entire iPhone.
How to put Recovery Mode on iPhone 13
Entering Recovery Mode on iPhone 13 and iPhone 13 Pro has the same steps as iPhone 12. To enter the Recovery Mode, connect your iPhone to your computer and do the following steps in quick succession.
- Press the Volume up button and release.
- Press the Volume down button and release.
- Press and continue to hold the side button until the ‘Connect to iTunes’ screen appears on iPhone.

How to put Recovery Mode on iPhone 14
To use recovery mode on iPhone 14 and iPhone 14 Pro, follows these steps:
- Connect your iPhone to your system with a Lightning cable.
- Now on iPhone, press and quickly release the Volume up, Volume down, and side buttons until you see the recovery mode screen.
- Select your iPhone in the Finder/iTunes window and choose to update or restore your iPhone.

How to exit Recovery Mode on iPhone
It’s easy to exit Recovery Mode on iPhone. Follow the below steps:
- Hold the Home button and Lock button to exit DFU mode on iPhone 6 and earlier versions until your device reboots.
- To exit DFU mode on iPhone 7/7 Plus, hold the Side and Volume Down buttons until the device reboots.
- To exit the Recovery Mode on iPhone 8 or later version, press and hold the Side button until the “Connect to iTunes” screen disappears, and then iPhone should reboot back into iOS.
How to put Recovery Mode on iPad
To enter Recovery Mode on the iPad, follow these steps:
- Connect your iPad to Windows or Mac system using a USB cable.
- For iPad with a Home button: Press and hold the Home button and the Top/Side button until your iPad enters recovery mode.
- For iPad without a Home button: Quickly press and release the Volume Up button, Volume Down button, and the Top button. Keep holding the Top button until the iPad enters recovery mode.

How to put iPhone into DFU mode ?
Follow the below steps to enter DFU Mode on iPhone and its various version:
- Connect iPhone to PC or Mac via USB cable. Note: If the ‘Trust This Computer’ dialog box appears, follow the prompts.
- Once your iPhone is paired with a computer, follow these steps:
How to Enter DFU Mode on an iPhone 8 and later versions
- Press the Volume up button, then Volume down button, and release.
- Quickly press and hold the Side button for about 5 seconds.
- Along with the Side button, press and hold the Volume down button.
- Release the Side button and continue to hold the Volume down button for about 10 seconds.
- Once you see the ‘Recovery Mode’ screen in iTunes on your computer, you have successfully entered the DFU mode. However, the iPhone screen remains black in DFU Mode.
How to Enter DFU Mode on an iPhone 7
- Press and hold the Power and the Volume down buttons for 8–10 seconds.
- Release the Power button and continue to hold the Volume down button.
- Release the Volume down button once your iPhone has entered recovery mode.
How to Enter DFU Mode on an iPhone 6S or Earlier Versions
- Press and hold the Power/Sleep and Home buttons together for 10 seconds.
- Release the Power/Sleep button, but continue holding the Home button.
- Release the Home button once you see iTunes/Finder has detected an iPhone in recovery mode message.
Note: If you see the Apple logo on your iPhone, try again and repeat the above steps carefully.
How to exit DFU Mode on iPhone ?
If you want to exit DFU Mode on iPhone and its variants, follow the below steps:
How to Exit DFU Mode on an iPhone 8 or Later versions
- Press the Volume Up button and quickly release.
- Press the Volume Down button and quickly release.
- Now, press and hold the Side button until the Apple logo appears on iPhone. This indicates your iPhone has exited DFU Mode. Your iPhone would boot to the ‘Lock’ screen in a few seconds. Now, enter your passcode and continue to use your iPhone.
How to Exit DFU Mode on an iPhone 7
Press and hold the Power or Sleep button and the Volume down button until you see the Apple Logo.
How to Exit DFU Mode on iPhone 6 or Earlier versions
Hold the Home button and the Power button of the iPhone simultaneously until Apple’s logo appears on the screen.
Conclusion
Whenever your iPhone and its variants show problems like being stuck at the Apple logo, won’t upgrade, restore, or respond, you can use Recovery Mode and DFU Mode functions to resolve the problem. But don’t forget to back up your iPhone data before using these functions.
However, in any unfortunate incident of data loss while performing the functions, trust Stellar Data Recovery for iPhone – a software that brings back lost data on your iPhone securely.
FAQ
1. Does DFU Mode delete iPhone data?
If you use DFU mode to install something or restore your device, all your iPhone’s data will be erased.
2. Can you enter the recovery mode if your iPhone is disabled?
An iPhone is disabled when a user enters an incorrect password too many times on the lock screen. You should be able to enter the recovery mode using the same steps mentioned above and restore your iPhone to regain access.
3. How to put the iPhone in recovery mode without a computer?
A computer is not necessary to enter the recovery mode on an iPhone. You only need to press the right buttons, depending on your iPhone model, to enter the recovery mode. However, to restore your iPhone – you will need a computer.
What should I do if I don’t find the deleted iPhone files after scanning?
Stellar Data Recovery for iPhone is an efficient software to recover all kinds of lost data from iPhone, iTunes, and iCloud.
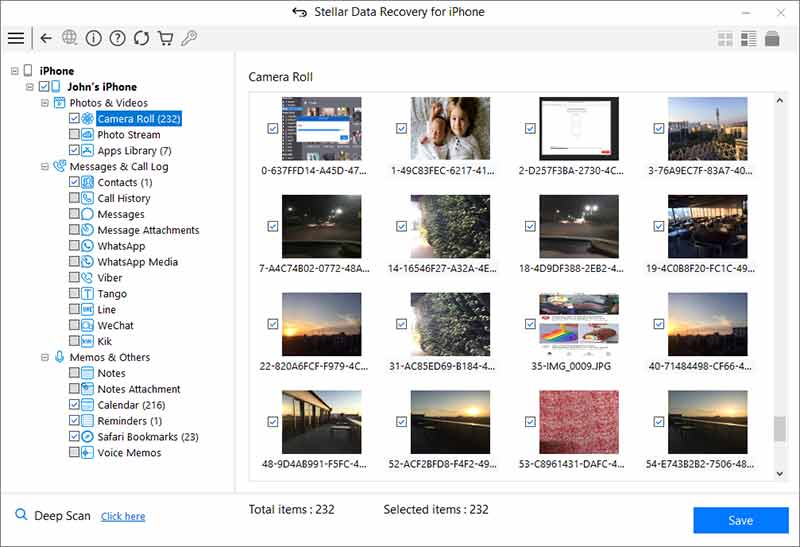
In case you are unable to find the lost data after quick scan through Stellar Data Recovery for iPhone , choose to perform Deep Scan.
Deep scan is a next level of aggressive scanning. It involves thorough scan of the device and the backups (iTunes and iCloud) using advanced algorithms. Deep Scan recovers as much data as possible from the selected device or backup. It searches for lost files on the basis of file signature. This recovery option recovers everything that is found in the selected source. This option is especially helpful in case of severely deleted and corrupted iPhone data.
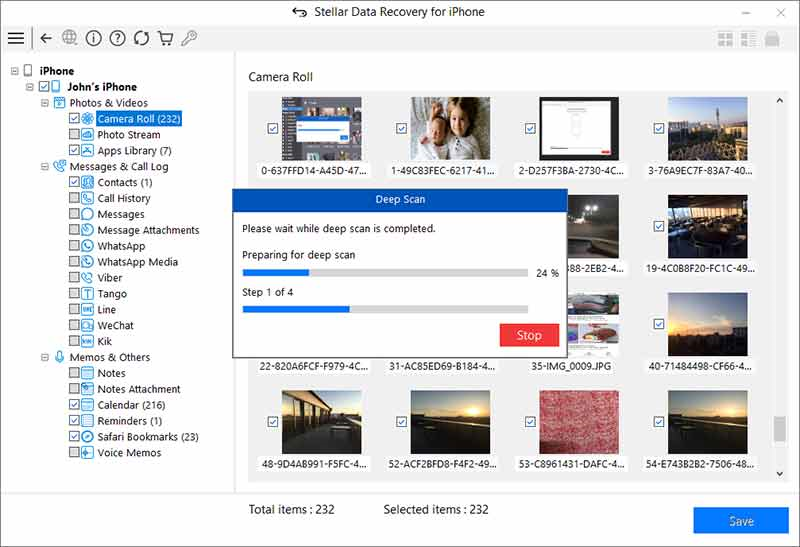
How to perform Deep Scan?
Once quick scan is completed, in the preview window choose Click Here option at the bottom left of the window to start Deep Scan.
When the scanning process is completed, a dialog box displaying the message ‘Deep Scan completed’ is displayed.
In case the additional data is not recovered through Deep Scan, the dialog box displays the message ‘Deep Scan completed. No additional data found.’
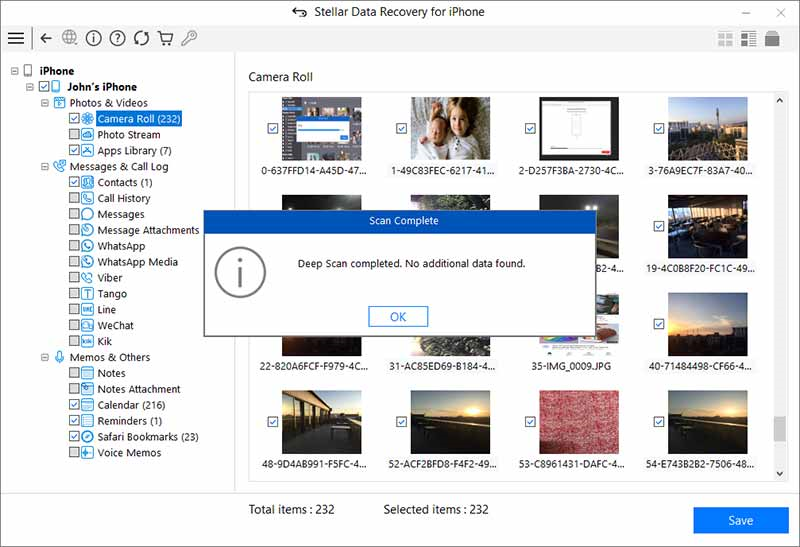
Files found during Deep Scan can be viewed in the preview window and saved at any desired location.
Stellar Data Recovery for iPhone® Stellar Data Recovery for iPhone® is the best DIY software to recover missing or accidentally deleted Contacts, Messages, Calendar, Photos, Videos, Call History etc directly from iPhone or iPad.
How to Fix iPhone Stuck at ‘attempting data recovery’ Loop
Summary: If your iPhone gets stuck at ‘attempting data recovery’ loop screen while updating iOS, learn how to fix iPhone failed iOS update error and efficiently recover lost data using Stellar Data Recovery for iPhone.

Since the release of iOS 16, there are frequent complaints about flood updates leading to the ‘attempting data recovery’ loop. Moreover, users are concerned about data loss in such situations.
Users globally reported that their iPhone gets stuck in the ‘attempting data recovery’ loop while trying to install iOS updates. The issue occurs when they update to iOS 16 versions by using iTunes. It leaves the update in the lurch and erases some or all data from their iPhone.
iOS updates breathe new life into your device. However, the truth is that Apple’s every update brings some bug or new problem, like this one.
Read this post further if your iPhone screen gets stuck at the ‘attempting data recovery’ loop during an iOS update.
It shares how to fix iPhone ‘attempting data recovery’ failed problem and recover lost iPhone data in any case.
You can apply the methods on iPhone 14, 13, 12, SE, 11, XS, XR, X, 8, 7, 6, 5, and 4 series. They are relevant to iOS 16 and below versions.
Common causes of ‘attempting data recovery’ loop on iPhone
The attempting to data recovery failed problem usually occurs when iOS is updated with iTunes. The ‘attempting data recovery’ screen takes a long time and is often followed by a prompt ‘press home button to restore.’
Some of these occurrences were reported in the following scenarios:
- Users unplugged the iPhone from a PC or Mac during the update
- Downgrading from iOS 16 to 15 or below
- Updating iOS after jailbreak
How to fix iPhone stuck at the ‘Attempting Data Recovery’ loop
- Force Restart iPhone
- Put iPhone into Recovery Mode
Method 1: Force Restart iPhone
It’s essential to know that a force restart differs from a normal Restart. A force restart is advised when iPhone is not in its normal working condition. It is either hanged or stuck at the Apple logo or another screen in Recovery Mode or Restore Mode. It cuts the power and turns on the iPhone again. Force restart usually fixes many iPhone issues.
Steps to Force Restart iPhone 8 and earlier:
- Press and fast release the Volume Up button
- Press and fast release the Volume Down button
- Press and hold the Side button (power) until the Apple logo appears
Steps to Force Restart iPhone X and later:
- Press and quickly release the Volume Up button
- Press and quickly release the Volume Down button
- Press and hold the Side button until you see the recovery-mode screen.
Method 2: Put iPhone into Recovery Mode
If Force Restart doesn’t help, try this method. Recovery Mode helps in cases of failed iOS updates. Thus, whenever the iOS updates, the iPhone gets stuck at the ‘attempting data recovery,’ op put the device on Recovery Mode.
[Caution]: Recovery Mode erases the iPhone data, which can be restored with the help of iTunes backup. So, make sure that the iTunes version is the latest.
Steps to put iPhone on Recovery Mode:
- Connect iPhone to computer
- Open iTunes
- Force restart iPhone (with steps mentioned above)
- A dialog box appears. Select Update

5. After the Update process completes, set up your iPhone.
Fixed ‘attempting data recovery’ failed problem. Further, how to restore data on iPhone
Recovery Mode, though fixes iPhone’s ‘attempting data recovery’ issue but at the same time erases all information from the device. You can restore iPhone data from iTunes backup or iCloud backup.
In case, iTunes/iCloud backups are not able to restore iPhone or you discover that some of the data is still missing after restoring the device, choose Stellar Data Recovery for iPhone .
The software is also helpful when you don’t want to recover all the data from iTunes or iCloud unnecessarily. Instead, it. It lets you recover precisely what you want, by allowing you to choose specific files like photos, videos, WhatsApp chats, or memos, Calendar, etc., and restoring them on the device.
Additionally, Stellar Data Recovery for iPhone also restores the data lost and deleted after jailbreak, water damage, a Black screen of death, iPhone stuck at Apple logo , screen damage iPhone, factory reset, etc. It supports recovery from iPhone 15, 14, 13, 12, SE, 11, XS, XR, X, 8, 7, 6, 5, and 4 series.
Steps to Restore Data on iPhone with Stellar Data Recovery of iPhone
- Download Stellar Data Recovery for iPhone on PC/ Mac
- Connect iPhone to the computer
- Select iTunes from the software screen
- Follow the simple on-screen instructions
Wrapping Up
Users look forward to iOS updates. However, the experience can get irritating, when iPhone software updates fail. For example, iPhone ‘attempting data recovery’ loop is a common problem faced after attempts to upgrade to the latest iOS 16.
Force restart of the device often resolves the ‘attempting data recovery’ loop issue. If this doesn’t work, further try to get your iPhone on Recovery Mode. Later restore data via iTunes or Stellar Data Recovery for iPhone. The software approach is straightforward and lets you select and restore the informathat you want.
Also read:
- [Updated] Alternatives to Xsplit for Digital Media Masters
- [Updated] In 2024, Quintessential Radio Narrative Craftsmanship
- [Updated] The Art of Gamers' Screen Recording on Win10
- How do I reset my Itel P55T Phone without technical knowledge? | Dr.fone
- How do I reset my Xiaomi Redmi K70 Phone without technical knowledge? | Dr.fone
- How To Transfer WhatsApp From Apple iPhone 12 Pro Max to other iPhone 11 Pro Max devices? | Dr.fone
- In 2024, Optimal After Effects Scripting Solutions
- New Dont Know Which Video Splitter to Choose? Just Check Out Our List of the 5 Best Video Software for Splitting Videos Below
- Sign a .pdf file document with electronic signature tool
- Solutions to restore deleted files from Motorola Edge 2023
- Top Tech Stream Cam Gear Reviewed for YouTube & Facebook Use for 2024
- Title: Top iPhone 8 Plus Message Recovery Software | Stellar
- Author: Ian
- Created at : 2024-12-10 04:15:51
- Updated at : 2024-12-15 23:35:22
- Link: https://techidaily.com/top-iphone-8-plus-message-recovery-software-stellar-by-stellar-data-recovery-ios-iphone-data-recovery/
- License: This work is licensed under CC BY-NC-SA 4.0.