
Top 5 Ways to Fix Excel 2021 File Not Opening Error | Stellar
Top 5 Ways to Fix Excel File Not Opening Error
Summary: MS Excel users sometimes face issues while using the MS Excel application. One such issue is the Excel file not opening error. In this post, we’ve mentioned the reasons that may result in this error and the ways to resolve it. Also, you’ll find about an Excel repair software that can help you repair corrupt Excel files.

Several Microsoft Excel users have reported encountering the ‘Excel file not opening’ error when opening their Excel file. There are several reasons that may cause this error. In this post, we’ll be discussing the reasons that may lead to the ‘Excel file not opening’ error and the top 5 ways to fix this error.
Why Does the ‘Excel File Not Opening’ Error Appear?
Following are some possible causes that may result in the ‘Excel file not opening’ error:
- There may be a problem with an add-in that is preventing you from opening the Excel files.
- There’s a chance that your Excel application is faulty.
- Your Excel program is unable to communicate with other programs or the operating system.
- The file association might have been broken. This is a common problem faced by users who have upgraded their Excel application or operating system.
- The file you’re trying to open is corrupted.
5 Ways to Fix Excel File Not Opening Error
Let’s explore the ways to resolve the Excel file not opening error:
1. Uncheck the Ignore DDE Checkbox
Dynamic Data Exchange (DDE)allows Excel to communicate with other programs. The Excel error may occur due to incorrect DDE settings. You need to ensure that the correct DDE configuration is enabled. Follow the steps provided below:
- Launch your MS Excel file.
- Go to File > Options.

- Now click on Advanced.

- Further, find the General option on the screen.

- Uncheck the option **‘Ignore other applications that use Dynamic Data Exchange (DDE)**’.
- Click OK to save the changes.
2. Reset Excel File Associations
When you launch your Excel file, the file association ensures that the Excel application is used to open the file. You can try to reset these associations and see if Excel opens after this. Proceed with the following steps to do so:
- Navigate to Start Menu and launch Control Panel.
- Now, navigate to Programs > Default Programs > Set Your Default Programs.

- A new window will open. Herein, find the Excel program in the list and select it. Now, select the option ‘Choose defaults for this program’. Click OK.

- A new window for ‘Set Program Associations’ will open.
- Check the box against the ‘Select All’ option.
- Further, click Save to reset the Excel File Associations settings.

3. Disable Add-Ins
Many people install third-party add-ins to enhance the application’s functionality. Sometimes, these add-ins can create an issue. Follow the below-mentioned steps to disable the problem creating add-ins:
- Launch MS Excel application.
- Navigate to File > Options > Add-ins.

- In the window that opens, go to the Manage option at the bottom.
- Herein, select the COM Add-ins option from the dropdown list. Click Go.

- In the COM Add-ins window, uncheck all the boxes to disable the add-ins. Click OK.

4. Repair MS Office Program
Sometimes the issue is not with your Excel file. Instead, the reason for the error can be a corrupt MS Office application. You can repair the program to fix the Excel file not opening error. Here are the steps:
- Press the Windows + R keys to launch the ‘Run’ dialog box.

- Enter the text ‘appwiz.cpl’ to launch the program and features window.

- Find the MS Office program in the list of applications.

- Right-click on it and select Change.

- In the new window, select the Quick Repair radio button. Click Repair.

- Follow the on-screen instructions to repair the Office application. Once the repair process is completed, you can try opening the Excel file to see if the problem is resolved.
5. Disable Hardware Graphics Acceleration
The hardware graphics acceleration assists in the system’s better performance, especially when you use MS Office applications, like MS Excel or Word. Sometimes, this causes the Excel file not opening issue. You can disable this option to try to resolve the issue. Here are the steps:
- Launch your MS Excel application.
- Navigate to File > Options > Advanced.
- Herein, go to the Display option.
- Uncheck the Disable hardware graphics acceleration checkbox. Click OK.

What If These Solutions Do Not Work?
If you have applied all the methods mentioned above and still cannot open your Excel file, there are chances that your file is corrupted. You can use a specialized Excel repair tool , such as Stellar Repair for Excel to repair the corrupted Excel file. This software has powerful algorithms that can scan and repair even severely corrupt Excel files, without any file size limitation. After repairing the file, it restores all the data, including tables, charts, rules, etc. to a new Excel, with 100% integrity.
To know how the software works, see the video below:

Conclusion
Before you proceed with resolving the Excel file not opening error, try to find out the root cause of this error. If you know the real reason, you can try the method right away. If the reason for the error is corruption in the Excel file, the best option is to repair the file using a professional Excel repair tool, such as Stellar Repair for Excel .
How to Repair Corrupt Excel Workbook?
Summary: Corruption in an Excel workbook could lead to data loss. This blog outlines the possible reasons behind corrupted workbook and describes how to repair the workbook manually and using an Excel repair tool.
Is your Excel behaving differently, for instance, stops responding or freezes? Or have you encountered a warning or an error message indicating corruption in the Excel workbook?
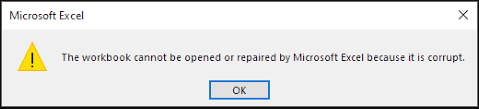
Figure 1 - Corruption Warning in Excel: The corrupt workbook cannot be opened or repaired
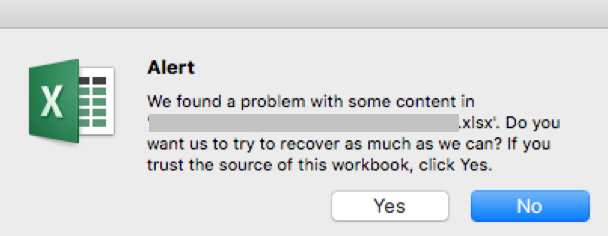
Figure 2 - Excel File Corruption Message
In any of these situations, you won?t be able to open your Excel workbook.
TIP! If you?re unable to open an Excel workbook, it does not necessarily mean that the workbook is corrupt. Try a few workarounds to resolve the issue, like disabling the ?Protected View Settings?, disabling add-ins, or moving the workbook to another drive.
You will need to repair the corrupted Excel workbook to make it usable. Before discussing the repair methods, let?s first look at the possible reasons behind file corruption.
To jump to methods to repair the workbook, click here .
Possible Reasons behind Corrupted Excel Workbook
- Large size of a workbook: A workbook containing lots of information or objects like images, shaded cells, or other visual representations is prone to corruption.
- Unexpected system shutdown or power loss: If you haven?t saved your Excel file, abrupt system shutdown or power failure can corrupt the data and render the file inaccessible.
- Bad sectors on storage media: Accumulation of bad sectors on storage media on which Excel files are saved is another reason that may lead to Excel file corruption.
Other common reasons causing Excel file corruption are virus attack, network errors, etc.
Methods to Repair Corrupted Excel Workbook
Note: Repairing the corrupt workbook may result in data loss. And so, it?s recommended to back up the workbook before attempting to repair the file.
Method 1 ? Repair the Excel Workbook Manually
Use the Excel ?Open and Repair? feature to repair your corrupt workbook manually. Here?s how:
Step 1: In Excel, click the File tab and then click Open.
Step 2: Select the corrupt Excel file, click the arrow button next to the Open button and then select Open and Repair.

Figure 3 - Excel Open and Repair Feature
Step 3: In Microsoft Excel dialog box that opens, click Repair to begin repairing your corrupt workbook.

Figure 4 - Repair the Microsoft Excel File
Note: If the Excel repair process fails, repeat Steps 1 till 3 and click the ?Extract Data? button. This will help you extract values and formulas from the corrupted workbook.
Performing these steps will repair your Excel file. If the issue persists, skip to the next method.
Method 2 ? Use Excel File Repair Software
If the above method failed to fix corruption in the workbook, use Excel file repair software to repair your workbook quickly. This Excel repair tool is purpose-built to help users repair large-sized Excel files (.xlsx and .xls) in just a few clicks. Also, it helps recover all the data from the corrupted workbook while preserving the cell formatting and worksheet properties.
Steps to Repair Corrupt Excel File Using the Software
Step 1: Download, install, and open Stellar Repair for Excel software.
Free Download for windows ](https://tools.techidaily.com/stellardata-recovery/repaire-for-excel/ )
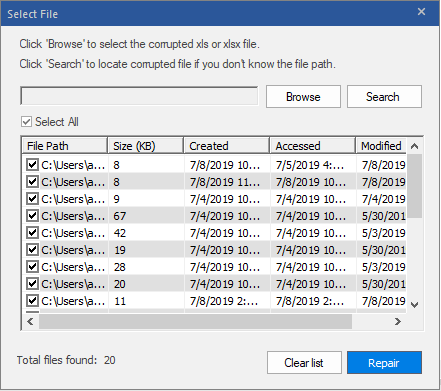
Step 2: Click Browse to select your corrupted .xlsx or .xls file. If you are not aware of the file location, click Search to locate and select the file.

Figure 5 - Select Corrupt Excel Workbook
Step 3: Once the file is selected, click Repair.
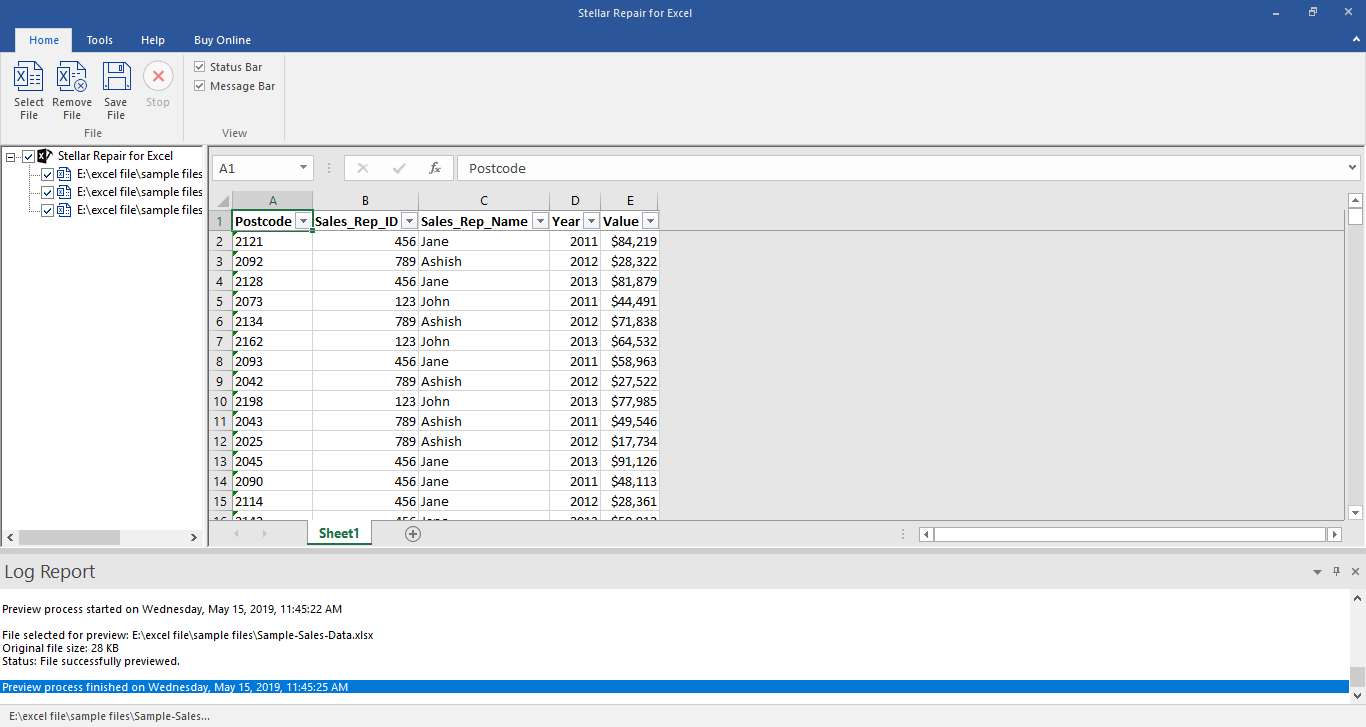
Step 4: A preview of recoverable workbook data gets displayed.
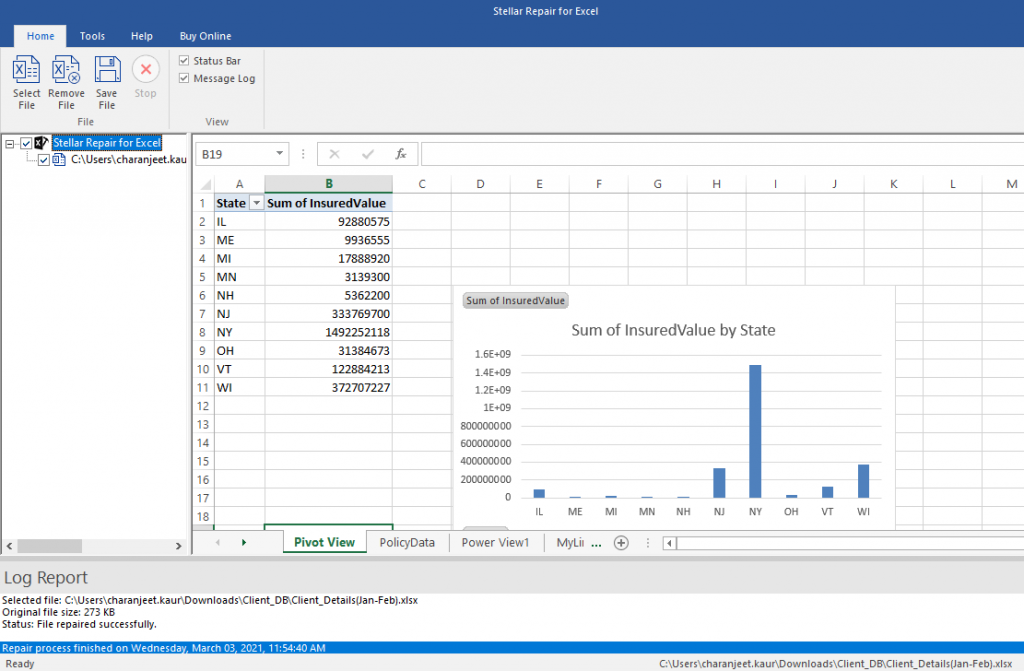
Figure 6 - Preview of Recoverable Excel Workbook Data
Note: You will need to activate the licensed version of Stellar Repair for Excel software for saving the repaired file. Once activated, proceed with the steps below to save the repaired file.
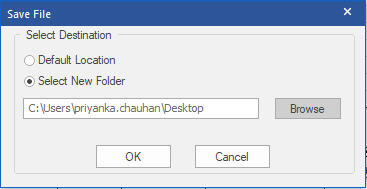
Step 5: Click Save File on the File menu. This will open a Save File dialog box with options to save the repaired .xlsx/.xls file at default or new location. After choosing the appropriate option, click OK.
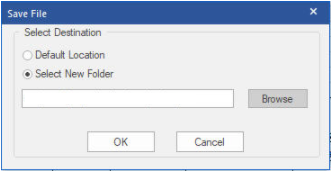
Figure 7 - Save Repaired Excel File
The repaired file will get saved at the selected location.
Key Features of Stellar Repair for Excel Software
- Repairs severely corrupt Excel file and recovers pivots, pivot tables, conditional formatting rules, chart, chart sheets, etc.
- Can repair multiple Excel files in a batch simultaneously
- Can handle all types of Excel file corruption errors, like ?Excel found unreadable content in filename.xls?, ?Excel cannot open the file filename.xlsx?, etc.
- Supports repairing corrupt workbooks of Excel 2019, 2016, 2013, 2007, 2003, and lower versions.
End Note
If your Excel workbook has turned corrupt, try using the methods discussed in this blog to repair the workbook. Once it is repaired, you must follow preventive measures to avoid your Excel file from getting corrupt. Some of these measures are as follows:
Reduce the size of your workbook by:
- Removing unused data
- Saving images at lower resolutions
- Avoid saving pivot table cache
Turn on the ?AutoRecover? and ?AutoSave? features in Excel
Data Disappears in Excel - How to get it back
Summary: You may face the issue of ‘Excel spreadsheet data disappeared’ after changing Excel file properties and formatting rows and columns. This blog discusses the possible reasons for data disappearance and the solutions to fix the issue. Also, it mentions an Excel file repair tool to retrieve the data from the file. Sometimes, while editing or formatting a cell in an Excel spreadsheet, the data may go missing or disappear. Let’s discuss in detail the reasons that may cause the ‘Excel data disappeared’ issue along with the solutions.
Probable Reasons for Data Disappearing in MS Excel and Solutions Thereof
Reason 1 – Unsaved Data
While entering data in an Excel spreadsheet, it is important to save the data at frequent intervals. Doing so prevents any unsaved data from disappearing if you lose power or accidentally click ‘No’ when prompted to save the file. Unfortunately, such a situation is quite common as users often close the file without saving the recently made changes to a spreadsheet.
Solution – Use the ‘AutoSave’ Feature
With the AutoSave feature enabled in Excel, data won’t be lost in the event of power failure or abruptly closing the Excel program. By default, Excel automatically saves the information in a spreadsheet after every 10 minutes. You can reduce the limit to a few seconds to reduce the chances of Excel file data lost after being saved.

Reason 2 – Changing Excel Format
You can save an Excel file in various formats, like spreadsheet, text, webpage, and more. However, at times, saving the spreadsheet in a different format may lead to missing data. For example, when you save a workbook to a text file format, all formulas and calculations applied to the data will be lost.
Solution – Adjust a Spreadsheet for the Changed Format
If you’re changing the format of a spreadsheet, make space for the rows and columns. Also, remove all calculations before saving the file.
Note: If the sheet is shared on multiple computers, then save the file in compatibility mode.
Reason 3 – Merging Cells
You can combine two or more cells data to make one large cell. This technique is primarily used to fit the text of a title in a sheet. If there is data in two or more cells, then only the data in the top-left cell is displayed and the data in all other cells is deleted. If the other merged cells have been populated with data after merging, the data is not featured and it does not appear even after remerging the cells.
Solution – Merge Cells inside One Column
To merge cells without data loss, combine all the cells you want to merge within a column and do the following:
- Select the cells to be combined.
- Ensure that column width is wide enough to fit the contents of a cell.
- In the spreadsheet, under the Editing group, click ‘Fill,’ and then click ‘Justify.’

- Under Alignment, click on the ‘Merge & Center’ option to center align the text. Or, click on ‘Merge Cells’.
Note: This solution works for text only. You cannot use it to merge formulas or any numerical values. If you need to combine two or more cells with formula into a single cell, try using the Excel CONCAT function .
Reason 4 – Cell Formatting
Cells and text in the cells can be displayed in different colors to make the spreadsheet simple to create and infer. You may experience data loss when you try to modify the data or change the color or size of the data. Though the information may exist, the data may show an error due to the following reasons:
- White-colored text will not show in a white-colored cell
- Large font-sized data may not appear in small-sized cell
- Calculations may show (#VALUE) error after cell-formatting
Solution – Check and Clear Formatting
Make sure to use dark-colored text on a white-colored cell. Also, resize the cell to fit the text size. Check if numbers in a cell are entered as text. If so, you need to apply a number format to the text-formatted numbers. Read more about it, from here .
What Else You Can Do to Resolve the ‘Excel Data Disappeared’ Issue?
If you can’t recover the missing Excel file data, try to repair or extract the data from the file using the built-in Excel repair tool. Follow the below steps to use the tool:
- Open MS Excel, click File > Open > Computer > Browse.
- On the ‘Open’ window, select the file you want to repair and then click on the Open dropdown.
- Select Open and Repair.

Use the ‘Repair’ option to repair the file and recover as much data as you can from the repaired file. If this doesn’t work, use the ‘Extract’ option to recover the data.
If you fail to retrieve the disappeared data from that file using the above-listed steps, opt for an Excel repair tool , like Stellar Repair for Excel. This software has a proven track record of repairing corrupt or damaged Excel files and recover all the data.

The software helps:
- Fix all corruption errors. It helps in getting back the data which has disappeared.
- Repair a single as well as multiple Excel files.
- Recover all components of XLS/XLSX files – tables, chart sheet, cell comment, image and more.
- Preserve the worksheet properties and cell formatting.
- Support the latest Excel 2019 and earlier versions.
The Excel repair software repairs the Excel file in these simple steps:
- Launch and open the software.
- Select the corrupt Excel file by using the ‘Browse’ option. If the file location is not available, then find the Excel file using the ‘Search’ option.

- Click ‘Repair’ to scan the corrupt file.

- Once the repair process is complete, verify the components of Excel file and check if the available preview shows complete data that disappeared from Excel.

- Save file at default location or preferred location.

The Excel file with all the restored data will be saved at the selected location.
Conclusion
It is better to repair the affected Excel file than suffer the loss when data or text disappears in Excel. A professional software ensures that users get back all the data in the form of a new Excel file. Stellar Repair for Excel software repairs the corrupt file without modifying the original content and file format. The software’s easy-to-use user interface lets you perform the functions without formal software training and technical expertise.
How to Fix “File Not Loaded Completely” Error in Excel?
Summary: You may get the “File not loaded completely” error when opening a large-sized Excel file. Read this post to understand the causes behind this issue and the troubleshooting solutions to fix this Excel error. Also, you’ll get to know about an Excel repair tool that can help fix the issue if the cause is corruption in the Excel file.
Several users have reported experiencing the “File not loaded completely” error while opening Excel spreadsheets or when importing CSV file into Excel. This error can occur if the worksheet has crossed the maximum rows and columns limit , i.e., 1048576 rows by 16,386 columns. However, this issue can also occur due to various other reasons. Let’s take a look at the possible causes behind this error.
Why this Error Occurs?
The “File not loaded completely” issue can occur due to one of the following reasons:
- The Excel file you are trying to open is corrupted.
- The Excel file is too large.
- The Excel file has crossed the rows limit.
- Memory issue in your system.
Methods to Resolve the “File not Loaded Completely” Error
Following are some methods you can try to fix the Excel file not loaded completely issue.
Method 1: Try to Import the Spreadsheet into MS Access
A large-sized Excel file takes time and memory to load. When you try opening a large file, you may get the “file not loaded completely” error. It indicates your file contains unwanted rows and columns. In such a case, you can try importing your spreadsheet into Access. By doing this, you can easily access the rows and columns in the database table, and then remove the extra rows. Follow the steps below to import your spreadsheet into Access:
- Open a blank database in Access application.
- Navigate to the External Data tab and then click on the Excel button.

- In the Get Data-Excel Spreadsheet window, click Browse.

- In the File Open dialog box, select the Excel file (in which you are getting the error) and click Open.

- Select Import the source data into a new table in the current database and click OK.

- In the Import Spreadsheet Wizard window, you’ll see all the rows and columns of your Excel file. Click Next.

- In the dialog box that appears, you can modify the field information (extra columns or rows).

Once you performed the changes, click on the Next button.
Provide a name to the table.

- Next, select the option “I would like a wizard to analyze my table after importing the data” (if you want to analyze the data) and click Finish.
- You will get a dialog box with a message. Click Yes.

- The Table Analyzer wizard will appear on the screen.


- Click on the Next button.

- Follow the instructions of the Table Analyzer wizard.
- Once you complete all the steps, select “Save import step” and click Close.

Method 2: Split Your Large Excel File
You may face the Excel file not loaded completely issue when importing a large Excel file. In such a case, you can try splitting your large file into smaller ones. To split the file, you can use VBA codes or the move or copy feature.
Method 3: Stop Unwanted Processes Running in the Background
Sometimes, you get the “File not loaded completely” error if you are running multiple files or programs simultaneously. You can check and stop unnecessary background processes in Windows using your system’s Task Manager. Here are the steps:
- Press the Ctrl+Shift+Esc keys to open the Task Manager window.

- Navigate to the Processes tab and check the Memory section.
- You can see the memory consumption of all the applications in your system.
- Select the unwanted applications and click on End Task.

Now, try to open the Excel file.
Method 4: Repair your Excel File
Sometimes, Excel throws the “File not loaded completely” error if it fails to read the data in your file. This might happen if your Excel file is corrupt. You can use the Open and Repair utility in Excel to repair your Excel file. Follow the below steps:
- In Excel, click the File tab and then click Open.
- Click Browse to select the desired file.
- In the Open dialog box, click on the corrupted file.
- Click on the arrow next to the Open button and then select Open and Repair.

- Click on the Repair button.

- After repair, you will see a message as shown in the below figure.

- Click Close.
An Alternative Solution
If your file gets corrupted, then repairing it using the “Open and Repair” utility is a good option. However, the Open and Repair utility may not work if the file is severely damaged or corrupted. In such a case, you can use a professional Excel repair tool, such as Stellar Repair for Excel. This tool is primarily designed to repair inaccessible or corrupted Excel files. It can effectively work even if your file is too large or severely damaged. It can recover all the data from the corrupted Excel file without impacting its actual format. The software supports Excel files of almost all Excel versions.
Conclusion
The File not loaded completely issue in Excel may occur due to numerous reasons. Try the troubleshooting methods listed above to resolve the issue. If the Excel file is corrupt, then you can try repairing your file using the Open and Repair tool. However, it can fix only minor corruption issues. If your file is severely corrupted, then use Stellar Repair for Excel . The software offers you the safest way to repair your Excel file without making any changes in the formatting. You can download the free trial version of the software today to scan and preview the Excel file.
How to Repair Multiple Excel Files by Using Stellar
With Stellar Repair for Excel, it is quite easy and simple to repair multiple MS Excel (XLS and XLSX) files that are damaged. This is because the software has a self-explanatory interface and hence is a Do-it-yourself software. Nonetheless, when using this software to repair multiple Excel files, you would have to add all of the files into the software by following a few pre-defined steps. Follow the steps mentioned below:
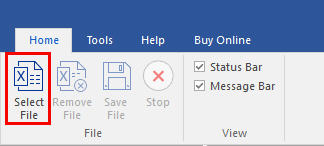
- Launch Stellar Repair for Excel software.
- Under Home menu, click Select file
- Click Browse and select corrupt Excel files. Select the checkbox to repair multiple files.
- Click Repair
- The software provides the preview facility. You can check the it on left pane.
- Save the repired filr ether Default location or Select New Folder radio button.
Stellar Repair for Excel Stellar Repair for Excel is the best choice for repairing corrupt or damaged Excel (.XLS/.XLSX) files. This Excel recovery software restores everything from corrupt file to a new blank Excel file.
Fixed “Cannot Insert Object” Error in Excel | Step-by-Step Guide
Summary: The error “cannot insert object” in MS Excel can prevent you from modifying objects in the worksheet. This blog will discuss the primary reasons behind this error and the possible solutions to fix it. You will also learn about a professional Excel repair software that can help fix the error if it has occurred due to corruption in Excel file.
Many users have reported encountering the “cannot insert object” error while adding/embedding objects into the Excel file. It usually occurs when using Object Linking and Embedding (OLE) to add content (PDF, Microsoft documents) from external applications to worksheet. The error can also occur when using ActiveX control in Excel. Below, we’ll explain why you cannot insert object into Excel sheet and how to troubleshoot the issue.
Why the “Cannot Insert Object” Error Occurs?
- Macro Settings can prevent the insertion of objects into a workbook.
- The Excel file in which you are trying to add an element is corrupted.
- The object (you are inserting into the workbook) is damaged.
- Object size limitations.
- System’s insufficient memory might prevent new objects’ addition.
- Incompatible Excel file format.
- Add-ins controls are disabled.
- Incompatible or faulty Add-ins.
- Issue with Security Settings.
Methods to Fix the “Cannot Insert Object” Error in Excel
You may encounter the “Cannot insert object” error when trying to add an element stored on a network. It can occur due to issues with the file link, such as incorrect file location. In such a case, you can check the link by selecting the link to file option from the Insert tab.
Sometimes, the error can occur if the file in which you are trying to insert the object is locked and password-protected. In this case, you can unprotect the Excel file . If the issue still persists, then you can follow the below methods.
Method 1: Check and Change Restricted Security Settings
Excel provides security settings to protect your workbook. Sometimes, these settings can prevent inserting objects in the file. You can change the security settings to allow Excel to insert objects. To do so, follow these steps:
- Open your Excel application.
- Locate the File and then click Options.
- In Excel Options, click Trust Center.

- Click Trust Center Settings.
- In the Trust Center Settings window, select Protected View from the left pane.

- Under Protected View, unselect the below three options:
- Enable Protected View for files originating from the internet.
- Enable Protected View for files located in potentially unsafe locations.
- Enable Protected View for Outlook attachments.

- Click OK.
- Once you’re done with this, click on Macro Settings in the Trust Center window.
- Under Macro Settings, make sure “Disable all macros without notification” is not selected. If it is selected, then unselect it. After that, click OK.

- Restart Excel to apply the changes.
Method 2: Uninstall Microsoft Office Updates
You can also encounter the “Cannot insert object” error in Excel after installing MS Office updates. It might be due to the issues with the installed updates. To fix this, you can uninstall the recently installed Office updates. To uninstall the Office updates, follow these steps:
- Go to the system’s Control Panel.
- Click Programs and then click Program and Features.
- Search for “View Installed Updates” and click on the desired Office updates.
- Right-click on it and then click Uninstall.
- Follow the uninstallation steps on the screen.
- Once the process is complete, restart the system.
Method 3: Check Memory Usage
The “Cannot insert object” issue can also occur if your system is low on memory. You can check and close unnecessary processes and applications running in the background to free up memory. To do so, follow these steps:
- Press CTRL + ALT + DEL on the keyboard and click Task Manager.
- Click on the Processes tab and search for any unnecessary processes.
- Right-click on the process and then select End Task.
- Restart Excel to see if the issue is fixed.
Method 4: Check Excel File Size
If your Excel file size exceeds the prescribed limit, it can also lead to the “Cannot insert Excel object” error. So, check the Excel file size. You can reduce the file size by removing unnecessary objects, such as formulas or images.
Method 5: Check and Change Excel ActiveX Settings
You can get the “Excel cannot insert object” error if your Excel file contains macros, controls, and other interactive buttons. It usually occurs if the ActiveX Controls option is disabled. You can check and change the ActiveX Settings to fix the issue. Here are the steps:
- Open your Excel application.
- Navigate to File and then click Options.
- In Excel Options, click the Trust Center tab.
- In the Trust Center Settings, click ActiveX Settings.
- Under ActiveX Settings, make sure the “Enable all controls without restrictions and without prompting” option is selected.

- If the option is not selected, then select it and click OK.
- Restart the Excel and check if the error is fixed or not.
Method 6: Repair the Excel Workbook
The “Cannot insert object” error can occur if the object you are trying to insert is corrupted or the file in which you are inserting the object is damaged. If the issue has occurred due to a corrupted Excel file, then you can repair the file using the Open and Repair utility in MS Excel. To use this Microsoft-inbuilt utility, follow these steps:
- In the Excel application, go to the File tab and then click Open.
- Click Browse to choose the affected file.
- The Open dialog box is displayed. Click on the corrupted file.
- Click on the arrow next to the Open button and then click Open and Repair.
- Click on Repair.

- After repair, a message will appear (as shown in the below figure).

- Click Close.
If the Open and Repair utility fails to fix the issue, then try a professional Excel Repair software, like Stellar Repair for Excel. It is designed to repair severely corrupted Excel files. It can restore all the Excel file objects, such as tables, charts, formulas, etc. It helps fix all types of corruption related errors. The software is compatible with all versions of Excel.
Conclusion
You might encounter the “Cannot insert object” error when embedding or inserting objects in Excel. In this post, we have discussed the possible solutions to fix this error. We have also mentioned an Excel repair software that can help to easily repair the corrupted Excel file and recover all the data. You can download the Stellar Repair for Excel’s free demo version to preview the recoverable objects of the corrupted Excel file.
Ways to Fix the “Failed to Parse the Corrupted Excel File” Error
Summary: While parsing an Excel file, you may experience the “Failed to parse the corrupted Excel file” error. It usually occurs if the Excel file is corrupt. This blog covers some easy fixes to fix this Excel error. It also mentions an advanced Excel repair tool that can help fix the issue by repairing the corrupted file.
You may encounter the “Failed to parse the corrupted Excel file” error when parsing (extracting or converting) the data in an Excel file. This error usually occurs if the Excel file is corrupted – either completely or partially (some of its objects, like formulas, macros, and values are corrupt). However, there are various other reasons that may lead to this Excel error. Let’s know the possible causes behind the “Failed to parse the corrupted Excel file” error and how to fix it.
Causes of the “Failed to parse the corrupted Excel file” Error
This error could occur due to any of the following causes:
- Damaged or corrupted macros
- Excel document is closed suddenly
- Issues with Excel application installation
- Virus or malware attack
- Hardware failure
- Bad sectors on the hard drive
Ways to Fix the “Failed to parse the corrupted Excel file” Error
Here are some possible ways to fix this error and recover the Excel file.
Method 1: Try to Save the File in a Different Format
Sometimes, the error can occur if the file format is not compatible with your Excel version. You can try saving the file to a different format. To do this, follow the below steps:
- Open the Excel file.
- Click on the File option and then select Save As.
- Click on Browse option and then click Save as Type.

- Select the desired Excel file format and click Save.
Method 2: Revert to the Previously Saved Version of the Excel File
You can try reverting to the previously saved version of the Excel file. Here’s how:
- Open your Excel application.
- Navigate to File > Info > Manage Workbook.

- Click Recover unsaved workbooks.

- Click on the Restore option you see at the top of the file.
Method 3: Set the Calculation Option to Manual
When the calculation mode is set to automatic, Excel automatically recalculates all the formulas in the file even if you make a minor change. It can take time to load the file and stop you from parsing data in your Excel file. You can change the calculation option to manual so that Excel only recalculates when you explicitly tell the application to do it. Here are the steps:
- Open your Excel application.
- Navigate to File and then click Options.
- In Excel Options, select Formulas.
- Under Workbook Calculation, select Manual and click OK.

Method 4: Use Open and Repair Utility
You can try repairing the corrupted Excel file with Excel’s inbuilt tool – Open and Repair . To use the tool, follow the steps cited below:
- In Excel, go to the File tab and then click Open.
- Click Browse to select the corrupted file.
- The Open dialog box will appear. Click on the corrupted file.
- Click on the arrow next to the Open button and then click Open and Repair.
- You will see a dialog box with three buttons Repair, Extract Data, and Cancel.

- Click on the Repair button to recover as much of your work as possible.
- After repair, a message will appear (as shown in the below figure).

- Click Close.
What If None of the Above Methods Works?
The above methods may fail to work if the Excel file is severely damaged. In such a case, we recommend using an efficient Excel repair tool , such as Stellar Repair for Excel. It can quickly repair corrupted Excel (.XLS/.XLSX) files. It can recover all the objects from the file, including charts, tables, formulas, etc. You can download the free trial version of the tool to preview the recoverable data.
Conclusion
Above, we have discussed some tried and tested methods to fix the “Failed to parse the corrupted Excel file” error. If the Excel file is severely damaged or corrupted, you can try repairing it using a third-party Excel repair software, like Stellar Repair for Excel . It can repair multiple Excel files without affecting the original formatting. The tool is compatible with all Excel versions.
Also read:
- [New] Designing Direct Access to Your Channel's Subscribe Page
- [Updated] Top 5 Mid-Range Gaming Keyboards Costing $99+
- Custom Build Computers Vs. Pre-Built Units - Which Option Suits You Best?
- Einfachheit Und Effizienz: Komplettes Handbuch Zur Installation Von WinXDVD
- Enhancing Dragon's Dogma II Gaming Performance: Overcoming Frame Drops & Smooth Out the Play
- Filmora Video (AVI) to Image (GIF) A Step by Step Guide
- Hard Resetting an Sony Xperia 10 V Device Made Easy | Dr.fone
- How to Downgrade Apple iPhone 11 Pro to the Previous iOS Version? | Dr.fone
- How to Reset Nokia 105 Classic Without the Home Button | Dr.fone
- How To Update or Downgrade Apple iPhone 12 Pro Max Without iTunes? | Dr.fone
- How To Update or Downgrade Apple iPhone 13 Without Losing Anything? | Dr.fone
- How To Update or Downgrade Apple iPhone 15 Pro Max? | Dr.fone
- In 2024, Exceptional Windows Calls 8 Highest Rated
- In 2024, How to Use Life360 on Windows PC For Nubia Red Magic 8S Pro? | Dr.fone
- Select 8 Android Apps Combining Free and Paid Video Collages for 2024
- Simple ways to get lost messages back from OnePlus
- Solutions to restore deleted files from 14
- Solved - The File is Corrupted and Cannot be Opened - Excel 2000
- What is Geo-Blocking and How to Bypass it On Tecno Spark Go (2023)? | Dr.fone
- Title: Top 5 Ways to Fix Excel 2021 File Not Opening Error | Stellar
- Author: Ian
- Created at : 2024-12-09 01:41:41
- Updated at : 2024-12-16 00:16:14
- Link: https://techidaily.com/top-5-ways-to-fix-excel-2021-file-not-opening-error-stellar-by-stellar-guide/
- License: This work is licensed under CC BY-NC-SA 4.0.