
Top 5 Ways to Fix Excel 2016 File Not Opening Error | Stellar
Top 5 Ways to Fix Excel File Not Opening Error
Summary: MS Excel users sometimes face issues while using the MS Excel application. One such issue is the Excel file not opening error. In this post, we’ve mentioned the reasons that may result in this error and the ways to resolve it. Also, you’ll find about an Excel repair software that can help you repair corrupt Excel files.

Several Microsoft Excel users have reported encountering the ‘Excel file not opening’ error when opening their Excel file. There are several reasons that may cause this error. In this post, we’ll be discussing the reasons that may lead to the ‘Excel file not opening’ error and the top 5 ways to fix this error.
Why Does the ‘Excel File Not Opening’ Error Appear?
Following are some possible causes that may result in the ‘Excel file not opening’ error:
- There may be a problem with an add-in that is preventing you from opening the Excel files.
- There’s a chance that your Excel application is faulty.
- Your Excel program is unable to communicate with other programs or the operating system.
- The file association might have been broken. This is a common problem faced by users who have upgraded their Excel application or operating system.
- The file you’re trying to open is corrupted.
5 Ways to Fix Excel File Not Opening Error
Let’s explore the ways to resolve the Excel file not opening error:
1. Uncheck the Ignore DDE Checkbox
Dynamic Data Exchange (DDE)allows Excel to communicate with other programs. The Excel error may occur due to incorrect DDE settings. You need to ensure that the correct DDE configuration is enabled. Follow the steps provided below:
- Launch your MS Excel file.
- Go to File > Options.

- Now click on Advanced.

- Further, find the General option on the screen.

- Uncheck the option **‘Ignore other applications that use Dynamic Data Exchange (DDE)**’.
- Click OK to save the changes.
2. Reset Excel File Associations
When you launch your Excel file, the file association ensures that the Excel application is used to open the file. You can try to reset these associations and see if Excel opens after this. Proceed with the following steps to do so:
- Navigate to Start Menu and launch Control Panel.
- Now, navigate to Programs > Default Programs > Set Your Default Programs.

- A new window will open. Herein, find the Excel program in the list and select it. Now, select the option ‘Choose defaults for this program’. Click OK.

- A new window for ‘Set Program Associations’ will open.
- Check the box against the ‘Select All’ option.
- Further, click Save to reset the Excel File Associations settings.

3. Disable Add-Ins
Many people install third-party add-ins to enhance the application’s functionality. Sometimes, these add-ins can create an issue. Follow the below-mentioned steps to disable the problem creating add-ins:
- Launch MS Excel application.
- Navigate to File > Options > Add-ins.

- In the window that opens, go to the Manage option at the bottom.
- Herein, select the COM Add-ins option from the dropdown list. Click Go.

- In the COM Add-ins window, uncheck all the boxes to disable the add-ins. Click OK.

4. Repair MS Office Program
Sometimes the issue is not with your Excel file. Instead, the reason for the error can be a corrupt MS Office application. You can repair the program to fix the Excel file not opening error. Here are the steps:
- Press the Windows + R keys to launch the ‘Run’ dialog box.

- Enter the text ‘appwiz.cpl’ to launch the program and features window.

- Find the MS Office program in the list of applications.

- Right-click on it and select Change.

- In the new window, select the Quick Repair radio button. Click Repair.

- Follow the on-screen instructions to repair the Office application. Once the repair process is completed, you can try opening the Excel file to see if the problem is resolved.
5. Disable Hardware Graphics Acceleration
The hardware graphics acceleration assists in the system’s better performance, especially when you use MS Office applications, like MS Excel or Word. Sometimes, this causes the Excel file not opening issue. You can disable this option to try to resolve the issue. Here are the steps:
- Launch your MS Excel application.
- Navigate to File > Options > Advanced.
- Herein, go to the Display option.
- Uncheck the Disable hardware graphics acceleration checkbox. Click OK.

What If These Solutions Do Not Work?
If you have applied all the methods mentioned above and still cannot open your Excel file, there are chances that your file is corrupted. You can use a specialized Excel repair tool , such as Stellar Repair for Excel to repair the corrupted Excel file. This software has powerful algorithms that can scan and repair even severely corrupt Excel files, without any file size limitation. After repairing the file, it restores all the data, including tables, charts, rules, etc. to a new Excel, with 100% integrity.
To know how the software works, see the video below:

Conclusion
Before you proceed with resolving the Excel file not opening error, try to find out the root cause of this error. If you know the real reason, you can try the method right away. If the reason for the error is corruption in the Excel file, the best option is to repair the file using a professional Excel repair tool, such as Stellar Repair for Excel .
Easy Steps to Make Excel Hyperlinks Working
Summary: This blog discusses why hyperlinks won’t work in Excel and solutions to fix it. If nothing works, try using Stellar Repair for Excel software to recover your workbook with hyperlinks and all the data intact.
Hyperlinks in your Excel file could be references to a file’s location on the computer or a location within the same worksheet. Or, hyperlinks might be pointing to a URL. Sometimes, the hyperlinks won’t work and any of the following errors may pop up on your screen on clicking a hyperlink:
‘Cannot open the specified file.’

‘This operation has been canceled due to restrictions in effect on this computer. Please contact your system administrator.’

Causes of ‘hyperlinks not working in Excel’ problem, and solutions thereof
Here are some of the possible causes behind the ‘hyperlinks not working’ issue and solutions to fix it:
Cause 1 – Change in the name of the hyperlinked file
If the file name that appears in the hyperlink text is different than the actual file name, it will prevent the hyperlink from working.
Solution – Link to the renamed file
Ensure that the links in the Excel file are updated and points to the renamed file. For this, right-click the hyperlink and select ‘Edit the hyperlink’. Next, in the hyperlink address, replace the current filename with the renamed one in the hyperlink address.
Cause 2 – File name has a pound (#) sign
When you create a hyperlink for a file in Excel, you cannot use a pound character (#) in the file name that appears in the hyperlink. That is because the pound sign is not accepted in hyperlinks and may lead to the ‘Cannot open the specified file’ error.
Note: While you can use a pound character in a file name, it cannot be used in hyperlinks in an MS Office document.
Solution – Rename the file name and remove the pound sign
Open the file that contains the ‘#’ sign and rename it by following these steps.
- Right-click the cell containing the hyperlink that is not working, and click Edit Hyperlink.
- From the Address box, copy the address of the file you are linking to.
- Go to the location where the file is stored, right-click on the file, and click Rename.
- Remove the ‘#’ character from the name of the file.
- Go back to the Excel file, right-click on the problematic hyperlink, and choose Edit Hyperlink. Next, browse and select the renamed file.
- The renamed file without the pound sign will be added in the Address box.
- Click OK.
Now try opening the hyperlink.
Cause 3 – Sudden system shutdown causes abrupt closing of Excel
There may be a discrepancy in the data in hyperlinks when a system shut down suddenly, without properly closing the Excel file. And so, when trying to open a link, it won’t open.
Solution – Enable the option to save hyperlinks
There is an inbuilt option in Excel to update hyperlinks every time the workbook is saved. Follow these steps to enable that option:
Note: The steps may vary based on the Excel version you are using.
For Excel 2013, 2016, or 2019:
- Open Excel Workbook -> Go to File->Options->Advanced
- Scroll down to find the General tab and click on Web Options
- Web Options Window pops-up
- In the Web Options Window, go to Files Tab and select the ‘Update Links on save‘ checkbox
- Click on OK button and your option is saved
The steps are also explained in the image below:

For Excel 2007:
- Click the Office button
- Select Excel Options, then follow Step 1) to Step 5), as mentioned above and get the Excel Hyperlinks to work again.
Still unable to open hyperlinks in Excel?
If you fail to make Excel hyperlinks work using the above-discussed solutions, use an Excel repair tool to fix the hyperlinks issue. Download the Stellar Repair for Excel to repair an XLS/XLSX file and restore the hyperlinks.

See the working of the tool here:
The tool recovers all components of the Excel file including tables, charts, chart sheets, cell comments, images, formulas, and more. You can repair multiple worksheets and fix all dysfunctional Excel hyperlinks across multiple worksheets in a single workbook. Click on the workbook, select all worksheets and start repairing
Conclusion
Carefully read the possible causes behind the ‘Excel Hyperlinks not working’ issue to understand what resulted in the issue in the first place. If nothing helps, use Stellar Repair for Excel to restore the hyperlinks and save the result in a new Excel file, without interfering with worksheet properties and cell formatting.
File Format and Extension of [filename] don’t Match in Excel File
Summary: The “File format and extension of [filename] don’t match. The file could be corrupted or unsafe” error message indicates that the Excel file you’re trying to open is unsupported, unsafe, or corrupted. Read this article to learn more about this error and how to fix this error. It also mentions an advanced Excel recovery tool to repair the corrupted Excel file and retrieve all its data in a few clicks.
You can encounter the “File format and extension of [filename] don’t match. The file could be corrupted or unsafe” error when the Excel application detects any issue with the file. This happens when you try to open an old version file format in a newer version or if the file is received from an unsafe destination. This can prevent you from opening the Excel file.
As indicated from the error message, this error occurs due to the following reasons:
- The file has incorrect file extension.
- The file is corrupted.
- The file you are trying to open is protected.
Now, let’s see how to resolve this Excel error.
Methods to Fix the “File format and extension of [filename] don’t match” Error
Try the following methods to troubleshoot the “File format and extension don’t match” error in Excel.
Method 1: Rename the Excel File
You can face the “File format and extension don’t match” issue if the file has incorrect extension. It can occur if the file extension has been altered or you’ve mistakenly saved the file with incorrect extension. To fix this, you can try renaming the Excel file with the correct file extension.
Method 2: Check the Default Excel File Format
Different versions of Microsoft Excel use different default file formats. For example, .xls is the default file format of older versions (2003 and lower) of Excel, whereas .xlsx format is used by the newer versions (2007 and later). Opening the Excel file with an incompatible extension can cause the “File format and extension don’t match” issue. You can check the Excel version you are using and ensure it’s compatible with the Excel file you are trying to open.
Method 3: Change the Protected View Settings
You may receive the “File format and extension of excel don’t match” error if the Excel file is protected. You can check and try disabling the Protected View settings .
Caution: Changing the Protected View settings can put your system at risk. If the Excel file is being downloaded from the internet, it may contain viruses that can infect your system. So be careful before disabling the Protected View settings.
Steps to Change Protected View Settings in Excel:
- In the Excel’s File menu, click on Options.
- Select Trust Center > Trust Center Settings.

- Under Trust Center, select Protected View and disable the below three options:
- Enable Protected View for files originating from the internet.
- Enable Protected View for files located in potentially unsafe locations.
- Enable Protected View for Outlook attachments.

- Click OK. Then, try to open the Excel file.
Method 4: Check and Provide the Excel File Permissions
Sometimes, you can get the error if you don’t have sufficient permissions to open the Excel file. This usually happens when you try to open the Excel file received from other sources. You can check and provide the desired permissions to fix the error. Here are the steps:
- Locate the affected Excel file, right-click on it, and select Properties.

- In the Properties window, click the Securities option and select Edit.

- In the Security window, under ‘Group or users name’, select the user names. Check the file permissions and make sure Full Control is enabled. If not, then click on the Add option.

- Click on the Advanced option in the Users, Computers, Service Accounts, or Groups window**.**

- Click the Find Now option. A list of all users and groups appears in the search field.

- Select “Everyone” from the list and then click OK.

- In the object names field, you will see ‘Everyone’. Click on OK.

- In the Permissions window, select “Everyone” and enable all options (Full Control, Modify, Read & Execute, Read, and Write) under Permissions for Everyone.

- Click Apply and then OK.
Method 4: Repair your Excel File
As the error message indicates, corruption is one of the causes of the “File format and extension of [filename] don’t match” error. If your file is corrupted, you can repair it using Microsoft’s built-in Open and Repair tool. Here are the steps to run the Open and Repair tool to repair corrupted Excel file:
- In Excel, click on File.
- Click Open and then click on Browse to select the corrupted Excel file.
- In the Open dialog box, click the Excel workbook (in which you are facing the error).
- Click the arrow next to the Open button and select Open and Repair.
- Then, click Repair to recover as much data as possible.
- The Excel prompts a message after the repair process is complete. Click Close.
The Open and Repair utility may fail to give the intended results. In such a case, you can repair the corrupted/damaged Excel file using a specialized Excel repair tool . Stellar Repair for Excel is one such tool that can repair severely corrupted Excel files. With the help of this tool, you can quickly recover all the objects from the Excel file. The tool has a simple user interface that even a non-technical can use to repair the Excel files. The tool can also repair multiple Excel files at once. You can check the tool’s functionality by downloading its demo version.
Closure
You can encounter the “File format and extension of [filename] don’t match” error due to different reasons. To resolve the issue, you can check the file extension, permissions, protected settings, etc. If you suspect the error has occurred due to corruption in the Excel file, you can try repairing the Excel file using the Open and Repair tool. If nothing works for you, then try Stellar Repair for Excel . It can repair highly damaged Excel files and recover all the data while preserving the file properties and cell formatting. The tool can help you fix all the common corruption-related errors quickly.
How to fix Pivot Table Field Name is not Valid error in Excel?
The Pivot Table field name is not valid error can occur while creating, modifying, or refreshing data fields in the pivot table. It can also appear when using VBA code to modify the pivot table. It usually occurs when there is an issue with the field name in a code or if there is a hidden or empty column in the pivot table. However, there could be many other reasons behind this error.
Why the “Pivot Table Field Name is not Valid” Error Occurs?
You can get the “Pivot Table field name not valid” error in Excel due to several reasons. Some possible causes are:
- Excel file is corrupted
- Damaged fields in the pivot table
- Pivot table is corrupted/damaged
- Hidden columns in the pivot table
- Macro (referring to the pivot table) is corrupted
- Preserve formatting option is enabled
- Missing or incorrect fields in the VBA code
- Issue with workbook.RefreshAll method syntax (if using)
- Pivot Table contains empty columns
- Header values or header column is missing in the Pivot Table
- Pivot table is created without headers
- Columns/rows are deleted from the Pivot Table
Methods to Fix Pivot Table Field Name is not Valid Error in Excel
You can get this error if you have selected the complete data sheet and then trying to create the Pivot Table. Make sure you choose only the data fields that you want to insert in the Pivot Table. If this is not the case, then follow the troubleshooting methods mentioned below.
Method 1: Check the Header Value in the Pivot Table
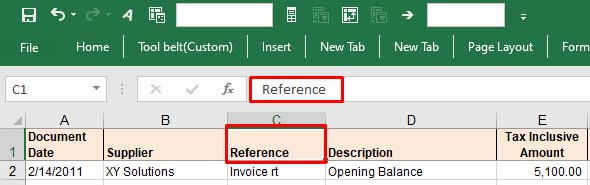
The “Pivot table field name is not valid” error can occur if you have not set up the pivot table correctly. All the columns having data in them should have header and header values. A pivot table without a header value can create issues. You can check the header and its value from the Formula bar. Change the header if the header value is too lengthy or if it contains special characters.
Method 2: Check and Change the Data Range in the Pivot Table
The “Pivot Table field name is not valid” can occur while modifying a field in Pivot Table. It usually occurs if you’re trying to add or modify the field by selecting an incorrect data range in the Create PivotTable dialog box. The “Create PivotTable“ feature helps define how data would be displayed within the pivot table.
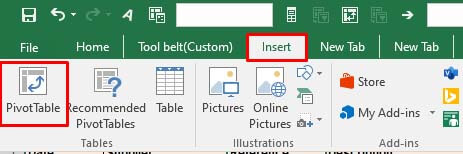
Let’s take a scenario to understand this. Open the Excel file with PivotTable. Click on the fields (you want to add), go to the Insert option, and click PivotTable.
If you select an incorrect range, i.e. A1:E18, instead of correct range - “Expenses**!$A$3:Expenses!$A$4**,” you will immediately get the error message.
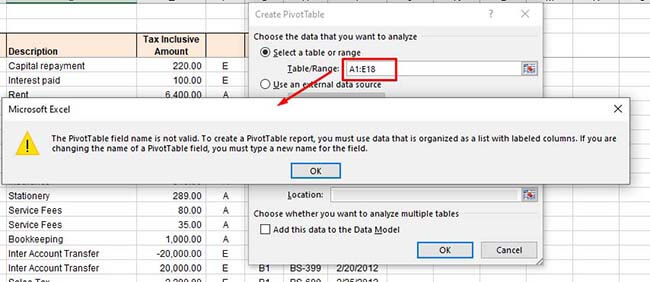
So, type the correct range under the Select a table or range option and click OK.
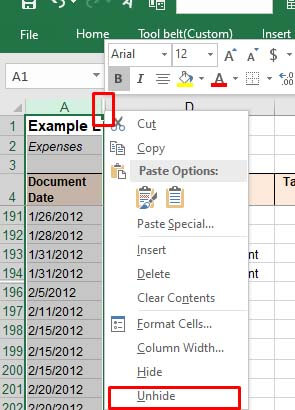
Method 3: Unhide Excel Columns/Rows
The error can also occur if some columns/rows of the Pivot Table’s data source are hidden. When you try to add a hidden column as a field in the PivotTable, the Excel application will fail to read the data of the hidden column. You can check and unhide the Excel columns by following these steps:
Open the Excel file.
Locate the hidden column number.
Move your cursor on the hidden column number and right-click on the space between the columns. Click Unhide.

Method 4: Check and Delete Empty Excel Columns
Sometimes, you can get the “Pivot Table field name is not valid” error if you are trying to use an empty column as a field in your Pivot Table. Check the columns with no values in all cells. If found, then delete the empty columns. This method is ideal for small-size Excel files. However, for large-sized files, it is a time-consuming process.
Method 5: Unmerge the Column Header (If Merged)
The “Pivot Table field name is not valid” error can also occur due to merged column headers. The pivot table references headers to identify the data inside the rows or columns. The merged headers can sometimes create data inconsistencies. You can try unmerging the column headers to fix the issue. Follow these steps:
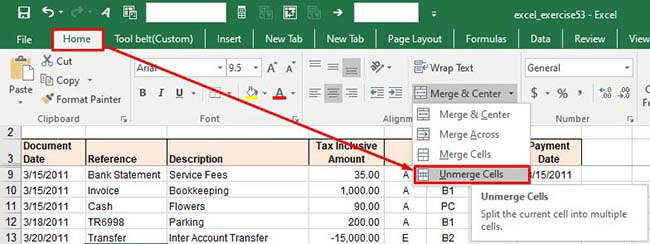
In the Excel file, go to the Home
Click the Merge & Center option and select Unmerge Cells from the dropdown.
Method 6: Disable the Background Refresh Option
If the “background refresh” option in the Excel file is enabled, it may also create issues with Pivot Table. The Excel updates all the pivot tables in the background even after a small change if the background refresh option is enabled. This may create issues if the Excel file is large with too many tables. You can try turning off the “background refresh” option in the Excel file to troubleshoot the issue. Here is how to do so:
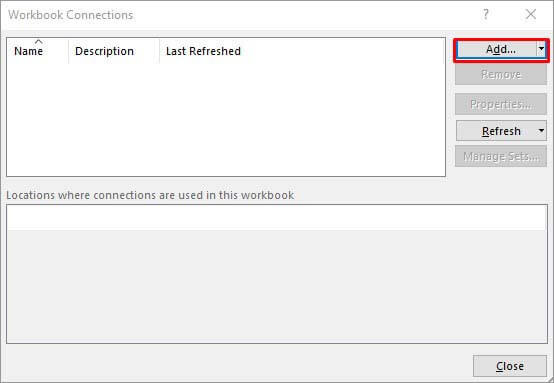
In the Excel file, go to the Data tab and then click Connections.
In the Workbook Connectionsdialog box, click on the ‘Add’ dropdown to add the workbook (in which you need to modify the refresh settings).
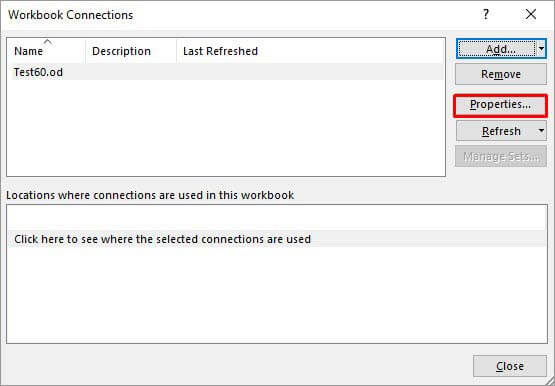
Once you have chosen the Excel file, click Properties.
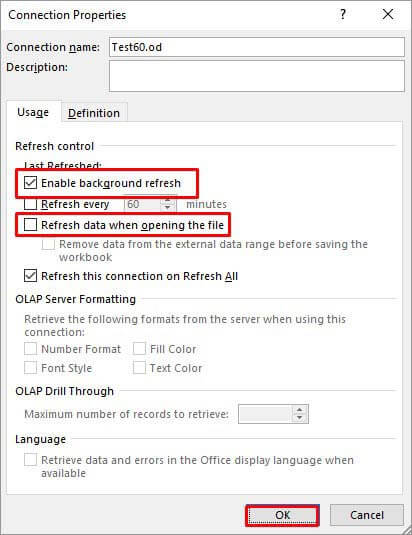
In the Connection Properties window, unselect the **”Enable background refresh”**option, select the “Refresh data when opening the file“, and click **OK.
**

Method 7: Check the VBA Code
The error can also occur when working with PivotTable using VBA code in Excel. Some Excel users reported this error on forums as run-time error 1004: The PivotTable field name is not valid. This error usually occurs when there are issues in the VBA code, affecting the PivotTable data source or field references. You can check field names referring to PivotTable or Workbook.RefreshAll function syntax and other errors in the code.
Method 8: Repair your Excel File
One of the reasons behind the “Pivot Table field name is not valid” error is corruption in the Excel file, containing the Pivot Table. You can repair your Excel file using Microsoft built-in utility - Open and Repair. Here’s how to use this utility:
In Excel, navigate to File > Open.
Click Browse to choose the affected workbook.
The Open dialog box will appear. Click on the corrupted file.
Click the arrow next to the Openbutton and then select Open and Repair.
You will see a dialog box with three buttons - Repair, Extract Data, and Cancel.
Click on the Repair button to recover as much of the data as possible.
After repair, a message is displayed. Click Close.

Method 9: Use a Professional Excel Repair Tool
If the Excel file is heavily damaged or corrupted, then the “Open and Repair” utility may not work or provide the intended results. In such a case, you can opt for a professional Excel repair tool. Stellar Repair for Excel is an advanced Excel file repair tool, which is highly recommended by experts. It can repair severely corrupted Excel files and restore all the data from corrupt file, including pivot tables. This tool comes with a user-friendly interface that even a non-technical user can use. You can try the software’s demo version to check how it works. The software is fully compatible with all Excel versions, including Excel 2019.
Conclusion
The Excel error “Pivot Table field name is not valid” can occur due to hidden or merged column/row headers, empty columns/rows, corrupted pivot table, and various other reasons. You can try the methods mentioned above to fix the error. If this error has occurred due to corruption in the Excel file, then you can use Stellar Repair for Excel - an advanced tool to repair corrupted pivot table, macros, fields, or other elements in an Excel file. It is compatible with all Windows editions, including the latest Windows 11. It can help fix the error if the data source or Pivot table configuration is affected by corruption.
[Fixed] The Workbook Cannot Be Opened or Repaired By Microsoft Excel
An MS Excel workbook (.XLS/.XLSX) file may not open due to damage or corruption caused by various reasons, such as:
- Sudden power failure
- System crash
- Virus or malware intrusion
- Large or oversized Excel file
- Incompatible add-ins
- Drive errors
- Damaged MS Office/Excel program files
As a result, when you try to open or access a corrupt Excel document, the program displays errors, such as “The workbook cannot be opened or repaired by Microsoft Excel because it is corrupt.” This may lead to a data loss situation.

Methods to Fix ‘The Workbook Cannot Be Opened’ Error
When an Excel workbook gets corrupt, MS Excel automatically detects and starts the file recovery mode to open and repair the file. However, when it fails to repair the corruption or recover the Excel file automatically, it displays the error message, “The workbook cannot be opened or repaired by Microsoft Excel because it is corrupt.” In such a situation, you can follow these methods to repair and recover the Excel document manually.
If the manual methods fail to resolve the error, you can use an Excel repair software, such as Stellar Repair for Excel. The software repairs corrupt XLS/XLSX file, recovers all the data, and saves it in a new Excel document with 100% precision, while keeping the cell formatting and properties intact.
NOTE: Before performing the below methods to repair or recover Excel documents, create a backup copy of the original file. This will help you recover data by using an Excel repair tool and avoid permanent data loss.
1. Repair Excel Workbook Manually
If the automatic repair fails, you may try manual repair to fix the damage or extract the data from the damaged Excel workbook. The steps are as follows:
- Navigate to File > Open and then go to the location where the spreadsheet is located.
- In the Open window, select the corrupted workbook that you want to fix and then click on the arrow next to the Open button.
- From the available options, choose Open and Repair…

- Then click ‘Repair‘ if you want to recover maximum data from the workbook or click ‘Extract data‘ if the repair option fails to fix the issue. It will extract all the values, formulas, tables, etc., from the corrupt workbook.

If both options fail to fix the issue, head to the next method.
2. Remove Faulty or Incompatible Add-ins
Faulty or incompatible add-ins may also cause this error. To find and remove such add-ins, follow these steps:
- Press **Windows key + R.
**
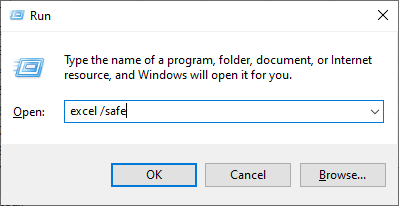
- Type Excel /safe and press ‘Enter‘ or click ‘OK.’ This opens MS Excel in Safe Mode.
- Go to File > Options and then select ‘Add-ins.‘
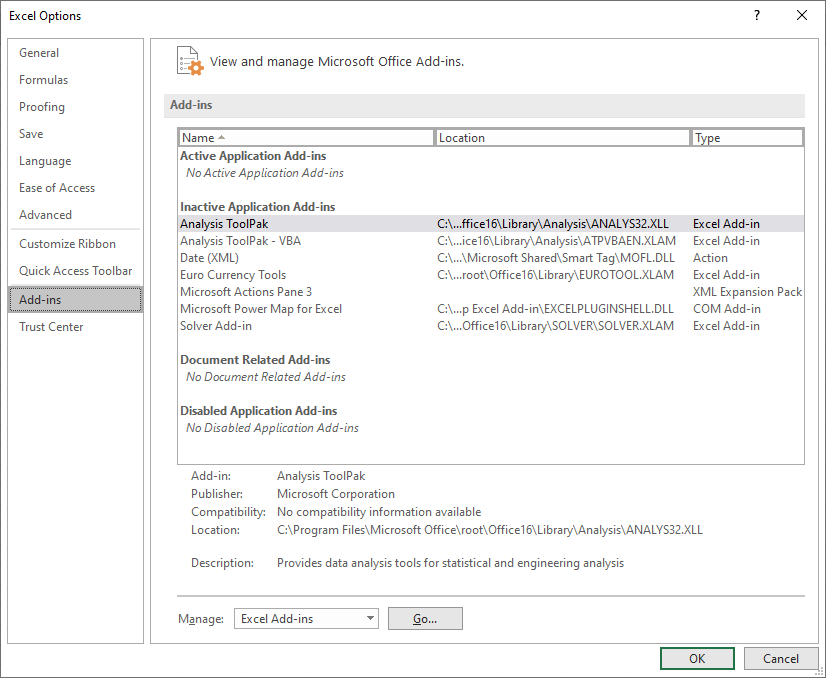
- Choose ‘Excel Add-ins‘ from Manage: option and then click on the Go button to view all Add-ins.
- Uncheck the checkboxes of Add-ins and then click ‘OK‘ to disable them.
Now close the Excel program and run it normally. Click ‘File > Open‘ and choose the Excel file you want to access.
3. Repair MS Office Installation
Damaged Excel program files may also lead to such errors. However, you can easily repair MS Office installation to fix the problem. The steps are as follows:
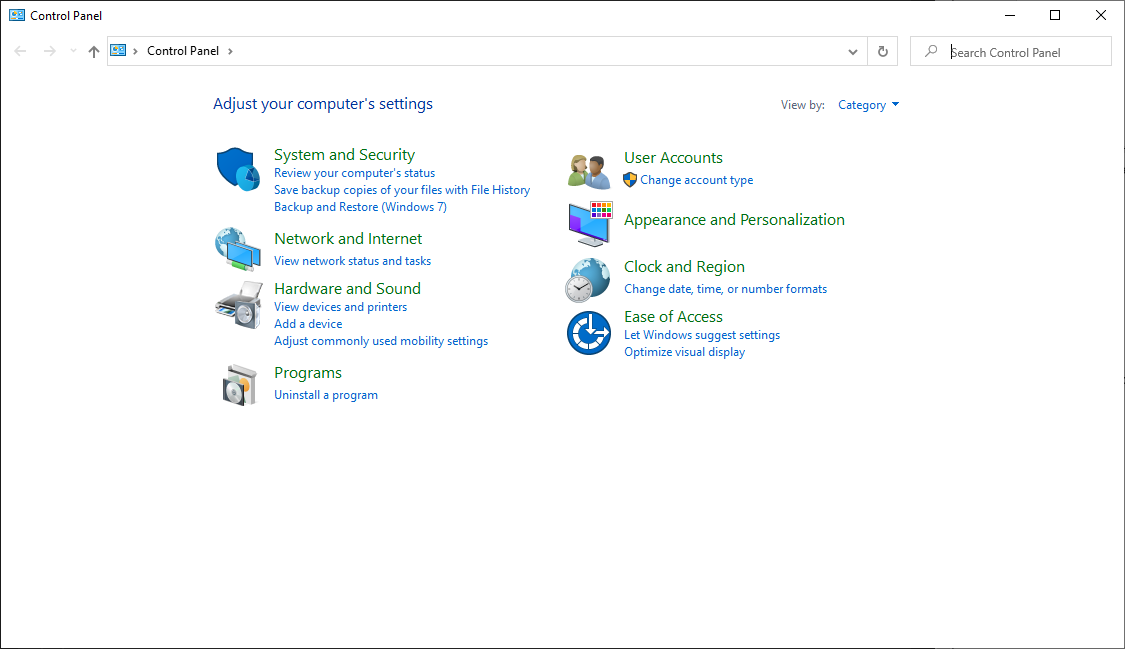
- Open Control Panel and select ‘Uninstall a program.‘
- Search and choose MS Office from the programs list. Then click on the ‘Change’ button.
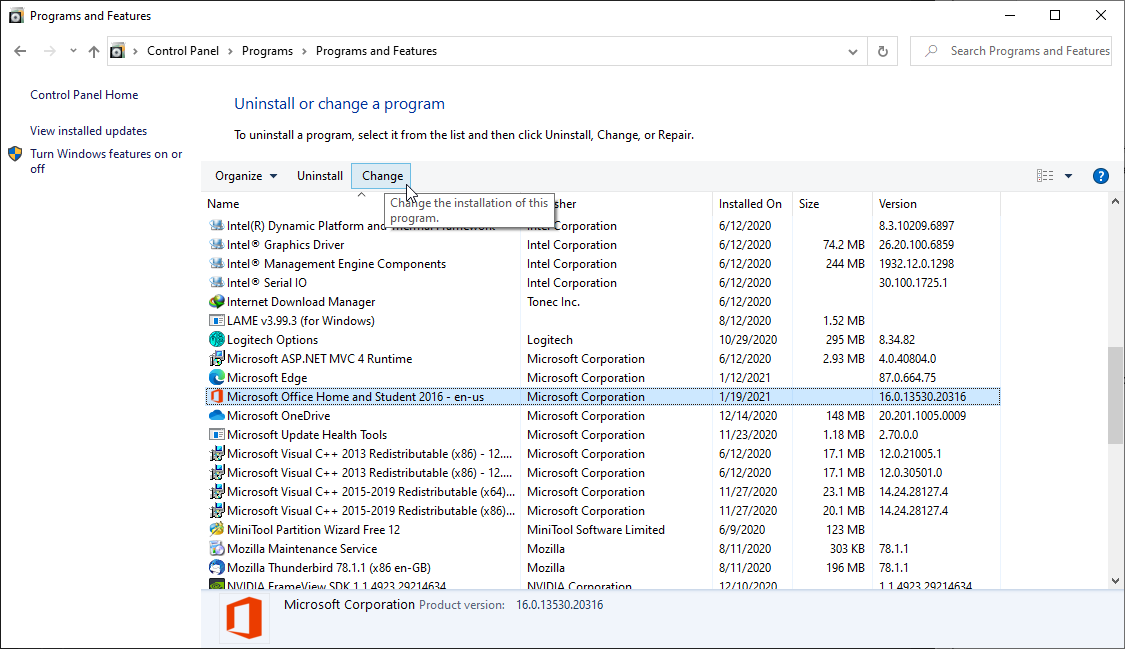
- Select ‘Repair’ and follow the wizard to fix the damaged program files.

If this fails to address the issue, you can uninstall and then fresh install MS Office on your system. Alternatively, try accessing the file on another PC.
4. Use Excel Repair Software
The best option is to use an Excel repair software, such as Stellar Repair for Excel , to repair the file, resolve the error, and access the Excel (XLS/XLSX) worksheet. The software can repair an Excel file without any size limitation.
After recovering the Excel file using the software, you can open it in any MS Excel program without encountering the error message.
Conclusion
A corrupt or damaged Excel workbook may lead to errors, such as “The workbook cannot be opened or repaired by Microsoft Excel because it is corrupt,” and cause a data loss situation. The most efficient way to fix such corrupt Excel files is to repair them by using an Excel repair tool, such as Stellar Repair for Excel.
Unlike manual methods that may fail to resolve the issue or lead to further damage, this software extracts the data from the damaged Excel file and saves it in a new Excel workbook. Thus, it is 100% safe to run on an original Excel file, as it does not overwrite or alter the original file.
The software is free to download. You can scan, repair, and preview a corrupt Excel file by using the demo version. Once you are satisfied with the results, activate the software to save the repaired Excel workbook data in a new sheet.
[Fix] Excel formula not showing result
Summary: Is your Excel spreadsheet showing text of a formula you’ve entered and not its result? This blog explains the possible reasons behind such an issue. Also, it describes solutions to fix the ‘Excel formula not showing result’ error. You can try Stellar Repair for Excel software to recover engineering and shared formulas.
Sometimes, when you type a formula in a cell of worksheet and press Enter, instead of showing the calculated result, it returns the formula as text. For instance, Excel cell shows:

But you should get the result as:

Why Does Excel Show or Display the Formula Not the Result?
Following are the possible reasons that may lead to the ‘Excel showing formula not result’ issue:
- You accidentally enabled “Show Formulas” in Excel.
- The cell format in a spreadsheet is set to text.
- ‘Automatic calculation’ feature in Excel is set to manual.
- Excel thinks your formula is text (Syntax are not followed).
- You type numbers in a cell with unnecessary formatting.
How to Fix ‘Excel Showing Formula Not Result’ Issue?
Solution 1 – Disable Show Formulas
If only the formula shows in Excel not result, check if you have accidentally or intentionally enabled ‘show formula’ feature of Excel. Instead of applying calculations and then showing results, this feature displays the actual text written by you.
You can use the ‘Show Formulas’ feature to quickly view all formulas, but if you are not aware of this feature, and enabled it accidentally, it can be a headache. To disable this mode, go to ‘Formulas’ and click on ‘Show formula enabled.’ If it’s previously enabled, it will be disabled by just clicking on it.

Solution 2 – Cell Format Set to Text
Another possible reason that only formula shows in Excel not result could be that the cell format is set to text. This means that anything written in any format in that cell will be treated as regular text. If so, change the format to General or any other. To get Excel to recognize the change in the format, you may need to enter cell edit mode by clicking into the formula bar or just press F2.

Solution 3 – Change Calculation Options from ‘Manual’ to ‘Automatic’
There is an “automatic calculation” feature in Excel, which tells Excel to do calculations automatically or manually. If ‘Excel formula is not showing results’, it may be because the automatic calculations feature is set to manual. This issue is not easily detected because it results in calculating formula in one cell but if you copy it to some other cell, it will retain the first calculation and will not recalculate on the base of the new location. To fix this, follow these steps:
- In Excel, click on the ‘File’ tab on the top left corner of the screen.
- In the window that opens, click on ‘Options’ from the left menu bar.
- From ‘Excel Options’ dialog box, select ‘Formulas’ from the left side menu and then change the ‘Calculation options’ to ‘Automatic’ if it’s currently set as ‘Manual’.

- Click on ‘OK’. This will redirect you to your sheet.
Solution 4 – Type Formula in the Right Format
There is a proper way to tell Excel that your text is a formula. If you don’t write the formula in a particular format, Excel considers it as simple text and hence no calculations are performed according to it. For this reason, keep the following in mind when typing a formula:
Equal sign: Every formula in Excel should start with an equal sign (=). If you miss it, Excel will mistake your formula as regular text.
Space before equal sign: You are not supposed to enter any space before equal sign. Maybe a single space will be hard for us to detect, but it breaks the rule of writing formulas for Excel.
Formula wrapped in quotes: You need to make sure that your formula is not wrapped in quotes. People usually make this mistake of writing a formula in quotes, but in Excel, quotes are used to signify text. So your formula won’t be evaluated. But you can add quotes inside formula if required, for example: =SUMIFS(F5:F9,G5:G9,”>30″).
Match all parentheses in a formula: Arguments of Excel functions are entered in parenthesis. In complex cases, you may need to enter more sets of parenthesis. If those parentheses are not paired/closed properly, Excel may not be able to evaluate the entered formula.
Nesting limit: If you are nesting two or more Excel functions into each other, for example using nested IF loop, remember the following rules:
- Excel 2019, 2016, 2013, 2010, and 2007 versions only allow to use up to 64 nested functions.
- Excel 2003 and lower versions only allow up to 7 nested functions.
Solution 5 – Enter Numbers without any Formatting
When you use a number in the formula, make sure you don’t enter any decimal separator or currency sign, e.g. $, etc. In an Excel formula, a comma is used to separate arguments of a function and a dollar sign makes an absolute cell reference. Most of these special characters have built-in functions so avoid using them unnecessarily.
What to Do If the Manual Solutions Don’t Work?
If you’ve tried out the manual solutions mentioned above but still unable to resolve the ‘Excel formula not showing result’ issue, you can try repairing your Excel file with the help of an automated Excel repair software , such as Stellar Repair for Excel.
This reliable and competent software scans and repairs Excel files (.XLSX and .XLS). It also helps recover all the file components, like formulas, cell formatting, etc. Armed with an interactive GUI, this software is extremely easy to work with, and its advanced algorithms allow it to fend off Excel errors with ease.

Conclusion
This blog outlined the possible reasons that may cause ‘Excel not showing formula results’ issue. Check out these reasons and implement the manual fixes, depending on what resulted in the problem in the first place. If none of these fixes help resolve the issue, corruption in the Excel file might be preventing the formulas from showing the actual results. In that case, using Stellar Repair for Excel tool might help.
How to Repair Corrupt Pivot Table of MS Excel File?
Summary: If you are not able to perform any action on the Pivot Table of MS Excel file, it indicates Excel Pivot Table corruption. In such a case, you must repair the corrupt Pivot Table of MS Excel file by using an Excel repair software or manual troubleshooting steps discussed in this post.
MS Excel is equipped with several brilliant features and functions which make working with large volumes of data easy. In addition to helping users save data into well-organized cells and tables, the application helps users draw inferences from the data. Pivot Table is one such Excel feature that helps users extract the gist from a large number of rowed data. But often, the Pivot table may get corrupted and lead to unexpected errors or data loss.
Corrupt Pivot Tables can stop users from reopening previously saved Excel workbooks, raising the serious issue of data inaccessibility. Resolving such issues is an uphill task unless one gets to the actual root cause of the problem.
However, with Stellar Repair for Excel software, you can repair the corrupt Pivot table of MS Excel file while keeping the Excel file data, formatting, layout, etc. intact.

Excel Pivot Tables & Associated Problems
Pivot Tables in Microsoft Excel are created by applying an operation such as sorting, averaging, or summing to the data in certain tables. The results of the operation are saved as summarized data in other tables. Typically, working on the grouping of saved data, Pivot Tables are used in data processing and are found in data visualization programs, such as spreadsheets or business intelligence software.
Put simply, Pivot Tables in Excel allow you to extract the significance or the gist from a large, detailed data set by allowing you to slice-and-dice data, sort-and-filter data, or arrange it in any way you want.
Frequently Encountered Problems with Pivot Tables in MS Excel
Take a look at the most frequently encountered Pivot Table issues:
- You add new data into a pivot table but it doesn’t show up when you refresh
- Pivot Table contains Blanks instead of Zeros for fields that have no source data
- Automatic field names assigned by the Pivot Table can be inappropriate
- It doesn’t directly show the percentage of total
- Grouping one pivot table affects another
- Your number of formatting gets lost
- Refreshing a pivot table messes up column widths
- Field headings make no sense and add clutter
While some of the above problems seem minute and can easily be resolved using a few tweaks, bigger issues like unexpected Pivot Table error messages that an Excel throws can be troublesome.
Pivot Table Errors & Their Reasons
Excel users who have built new Pivot Tables in Excel often report the following errors when trying to reopen a previously saved workbook:
We found a problem with some content in

Naturally, users are prompted to click on ‘Yes’. But when they do, they get another error message saying:
Removed Part: /xl/pivotCache/pivotCacheDefinition1.xml part with XML error
(PivotTable cache) Load error. Line 2, column 0
Removed Feature: PivotTable report from /xl/pivotTables/pivotTable1.xml part (PivotTable view)
Such errors are indicative of the fact that the data within the Pivot Table still exists, but the table itself isn’t functioning anymore.
There could be two primary reasons behind such behavior:
- You’ve created the Pivot Table in an older version of Excel but are trying to open-refresh-save it through a newer Excel version
- The Pivot Table itself is corrupted
How to Repair the Pivot Table Quickly?
To solve the errors associated with Pivot Tables, you need to repair them. But Microsoft doesn’t offer any inbuilt technique or option to repair Pivot Tables. Thus, to fix the issue, you either need some sort of workaround or an Excel file repair software .
Methods to Fix Corrupt Pivot Table in MS Excel
Though there aren’t many options to fix the Pivot Table, you can follow these workarounds to try and repair a corrupt Pivot Table of MS Excel. However, before following these steps, create a backup copy of your Excel file.
Method 1: Open MS Excel in Safe Mode
First, try opening the Excel file in safe mode and then check if you can access the Pivot Table. If you can, save all its contents to a new Pivot Table in the latest version of Excel so that this problem doesn’t arise anymore.
Method 2: Use Pivot Table Options
If, however, above method doesn’t work, follow the below-mentioned steps:
- Right-click on the Pivot Table and click on Pivot Table Options
- On the Display tab, clear the checkbox labeled “Show Properties in ToolTips”
- Save the file (.xls, .xlsx) with the new settings intact
Method 3: Make Changes to Pivot Table
If the above method or steps didn’t work,
- Try opening the Pivot Table Options window by right-clicking on the Pivot Table within your Excel file
- Select Pivot Table Options from the pop-up menu and make appropriate changes to the options given there
- Then check if the issues go away
Method 4: Check and Set Data Source
If the problem in the Pivot table is related to data refresh,
- Go to Analyze > Change Data Source
- Check if the data source is set properly
- Also, try reselecting the data source and check if the refresh option is working properly
If not, resorting to Stellar Repair for Excel software might be your only hope.
Excel Pivot Table Repair by Using Excel Repair Software
When corruption strikes an Excel Pivot Table and no manual trick work, Stellar Repair for Excel is the best solution. This easy-to-use Excel Repair software repairs even the most severely corrupted Excel (XLS/XLSX) files to restore all data, properties, formatting, and preferences. It enables users to extract their saved data into new blank Excel files.
If you have this utility by your side, you don’t need to think twice about any Excel error.

What customer says about the Excel Repair Software?


Conclusion
Excel Pivot Table corruption may occur due to any unexpected errors or reasons. This can lead to inaccurate observation in data analysis and also cause data loss if not fixed quickly. However, you can prevent data loss due to problems caused by Pivot Table corruption by keeping a backup of all your critical Excel files and fix the Pivot Table corruption by using proper tools, such as Excel file repair software, that can help you get over any Excel corruption and errors quickly.
Also read:
- [New] Mastering Instagram Video Edits Ultimate Tutorial Guide
- [Updated] 6 YouTuber Quizzes to Know Which YouTuber You Are for 2024
- [Updated] In 2024, Vimeo to Visual Story Crafting GIFs From Captivating Videos
- [Updated] The Essential Audio Interface for Your Podcaster
- 10 Ways to Employ Auto-GPT in Daily Life
- Hard Reset Samsung Galaxy A15 4G in 3 Efficient Ways | Dr.fone
- How To Transfer Data From Apple iPhone 14 Plus To Other iPhone 11 Pro devices? | Dr.fone
- How To Transfer Data From Apple iPhone SE (2020) To Android? | Dr.fone
- New Best Free FLV Video Editors for Beginners and Pros Alike
- The Endless Loop Breaker: Deleting Your Account Forever
- Three Solutions to Hard Reset Realme Narzo 60x 5G? | Dr.fone
- VidTap - ChatCam Sniper App for 2024
- Title: Top 5 Ways to Fix Excel 2016 File Not Opening Error | Stellar
- Author: Ian
- Created at : 2024-12-10 02:28:07
- Updated at : 2024-12-16 02:07:17
- Link: https://techidaily.com/top-5-ways-to-fix-excel-2016-file-not-opening-error-stellar-by-stellar-guide/
- License: This work is licensed under CC BY-NC-SA 4.0.