
The 5 Best Methods to Track a Lost or Stolen iPhone 14 Pro | Stellar
The 5 Best Methods to Track a Lost or Stolen iPhone
Summary: Lost your iPhone? Don’t worry, here we tell you how to track lost or stolen iPhone using various techniques. Also, learn how to erase your iPhone data permanently to prevent it from reaching in wrong hands or misuse, using Stellar Data Recovery for iPhone.
|
Q. I cannot live without my iPhone. It was stolen yesterday and can’t recall where I lost it. It has been switched off. Can I track the location of my iPhone? Is there any way to track lost iPhones?
| A. Don’t panic. Log in to ‘Find My iPhone’ via iCloud.com and set it to ‘Lost Mode’. To know what else you can do now to track the iPhone location, read this post. |
|---|
Losing an iPhone (and for that matter any smartphone) is tormenting. Besides the upfront costs, there’s an incredible amount of personal data at stake. Today, smartphones not only store personal photos, videos, and music libraries but might also contain an incredible amount of sensitive information in the form of browsing history, social data, app traces, etc. So the apprehension of exploitation and misuse of the data stored in a stolen or lost iPhone is but real.
So, as soon as you discover that your iPhone has been stolen or lost, first, try to track the location of your missing device and lock it.
How to track a lost or stolen iPhone?
Try out the following methods
- Use Find My iPhone
- Track through Apple’s Family Sharing
- Use Google Timeline
- Try Google Photos
- Use location-tracking apps

Method 1: Use Find My iPhone
If Find My iPhone is enabled on your stolen iPhone, you can do the following:
- Locate your mobile phone
- Protect your iPhone data by choosing Lost Mode or erasing the data remotely
How to use Find My iPhone when the phone is missing
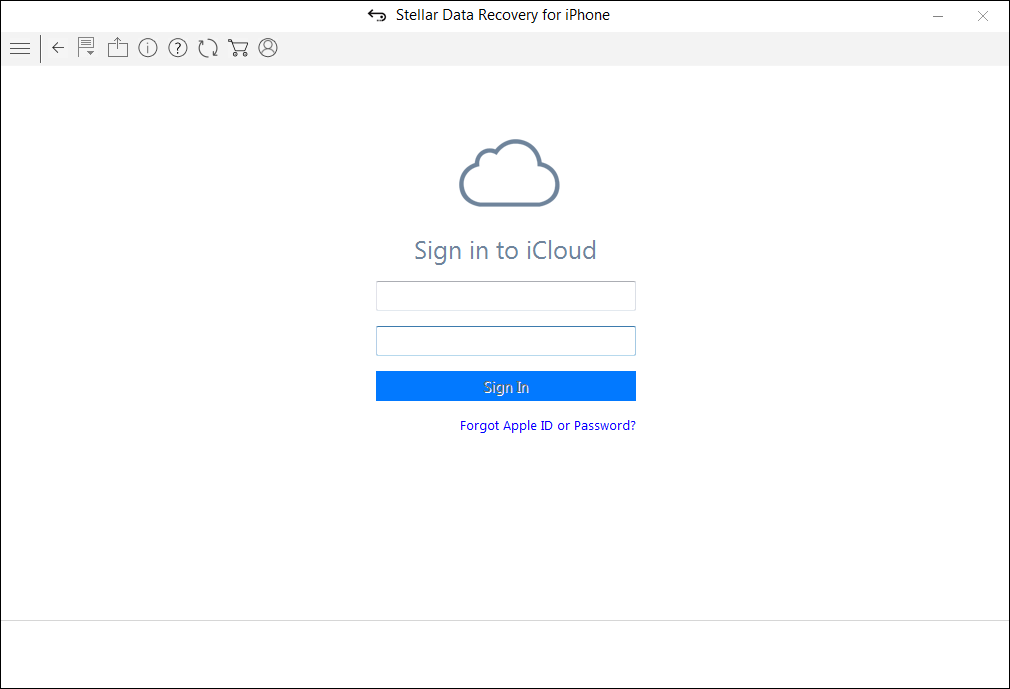
- Sign in to icloud.com on your computer.
- Click on the Find My iPhone link at the bottom.
- On the Find My iPhone’s map interface, select your lost iPhone via the All Devices drop-down menu. The app starts tracking your iPhone location on the map.
As you see the location of your device you can choose to do the following
- Play sound (if your iPhone is nearby, you can trace it with sound)
- Activate ‘Lost Mode’ (this locks your device and still tracks it)
What does Lost Mode do to your device?
- Remotely locks your device
- Displays a message with your phone number on the missing iPhone’s Lock Screen
- Keeps track of your device location.
- Erase iPhone remotely (with this action you won’t be able to track your iPhone but data is prevented from slipping into the wrong hands)
How to erase iPhone data remotely?
Choosing to erase the iPhone remotely deletes the complete data from it.
Note: Always remember to copy important photos, videos, music, and other data on iCloud backup before remotely erasing the iPhone.
Use a trusted and safe data recovery solution such as Stellar Data Recovery for iPhone to restore lost files from iCloud. The software allows the recovery of specific data rather than recovering the entire data.
Method 2: Track iPhone through Family Sharing

If you have set up Family Sharing, use it to track your iPhone. Family Sharing helps the members to know each one’s device location. Ask another member in the Family Sharing group to trace your iPhone via the Find My iPhone app. The member can also sign into iCloud.com to locate the missing iPhone.
|
Is your missing iPhone switched off or offline?
If the missing iPhone is switched off or showing offline in Family Sharing, you can still activate Lost Mode or remotely erase its data via Find My iPhone.
Note: The iPhone’s last known location remains only for one day. In case your device is offline for over 24 hours, you cannot trace its last location.
|
| — |
What to do when ‘Find My iPhone’ is NOT enabled or the missing iPhone is offline for more than one day?
- Change your Apple ID passwords to prevent anyone from accessing your data.
- Change your social media and other Internet account passwords like Gmail, Twitter, Facebook, Instagram, etc.
- Report the device as missing to the authorities.
- Report your network carrier to disable the services like calls, messages, or data use.
Method 3: Use Google Timeline to find lost iPhone
If you have turned on Location Services and Location History on your iPhone, Google’s Timeline will record all the locations of your device.
When an iPhone goes missing, access the location information on a map and find the last location. Remember, Google Timeline records the location only when the iPhone is switched on with an internet connection.
How to see the last location of a lost iPhone in Google Timeline
- Visit <com/maps/timeline> on your computer.
- Sign in to your Google account.
- Click Today or select Date.
- Scroll down to see the last reported location of your iPhone.
Along with the location, note the time when your phone was last connected to Google. Taking clues from the location and time information, you can find your lost iPhone. If needed, take the help of cops.
Method 4: Take location clue from Google Photos
If anyone has captured a photo from your lost iPhone and you have the Google Photos location-sharing option enabled, then luck is on your side.
Visit <photos.google.com/>. Check, if any new photos were uploaded and view their upload location.
Method 5: Location tracking apps
If you have installed any location-tracking app such as GPS Location Tracker, CocoSpy Cell Phone Tracker, or iTrack on your missing device, use it to track the lost or stolen iPhone. These apps share the real-time location of your device on your computer or other connected devices.
Conclusion
Apple’s Find My iPhone feature is the best way to track the location of a stolen or missing device. If Find My iPhone is not enabled you can try Google Timeline or Google Photos. Other than these methods, third-party apps can also help track a lost iPhone, but only if you have installed them before the phone was lost.
Nevertheless, ensure that you copy the iCloud backup of the stolen iPhone before taking any of the above steps.
A smarter way is to filter out the data that you want to keep, with the help of Stellar Data Recovery for iPhone.
Is this post helpful? Share your experience in the comments below, how you managed to track and get back your stolen iPhone.
How to Put iPhone or iPad on Recovery mode? (Step by Step Tutorial)
Summary: DFU or Recovery mode is a way to recover your iPhone or iPad using a computer in case of technical issues. Read this post for a step-by-step process of how to enter and exit Recovery Mode and DFU mode on iPhone.


When you run out of solutions to troubleshoot your iPhone, Recovery Mode or DFU Mode comes as a rescue. Whether iPhone stops booting or fails to restore, you can use the functions in iPhone and fix the issue.
But the method to bring an iPhone in DFU or Recovery Mode varies in each iPhone model and iPad.
This post will guide you on how to enter and exit Recovery and DFU Modes in different iPhone and iPad variants. But first, understand what these iPhone functions are and their uses.

What is Recovery Mode and its use?
Recovery Mode uses iBoot to upgrade or restore your iPhone. iBoot is a bootloader program for iOS devices. Recovery Mode helps install the same or above iOS firmware version already on your iPhone. The iPhone screen in Recovery Mode prompts to connect iPhone to iTunes, showing a computer image.
Recovery Mode helps fix iPhone updates or restore issues, such as iPhone stuck at the Apple logo , unable to open the locked iPhone or want to reset iPhone but forgot iPhone passcode .
What is DFU Mode and its use?
Device Firmware Update or DFU mode lets your iPhone connect with iTunes on the computer without iBoot. As DFU mode doesn’t use iBoot, you can make changes in the operating system of the iOS device. An iPhone in DFU mode has a completely black screen.
Putting iPhone into DFU mode is the solution when Recovery Mode doesn’t resolve the problem. DFU mode can restore or upgrade iPhone. This mode is also commonly used to downgrade or jailbreak iPhone s.
Caution — you may lose all your iPhone data!
If you are entering DFU mode, make sure to back up your iPhone data . DFU mode permanently erases iPhone data . So always back up your videos, photos, messages, chats, Notes, etc., either to iCloud or iTunes.
However, if you have lost iPhone data and don’t have a backup, then immediately download iPhone data recovery software — Stellar Data Recovery for iPhone . The software helps to restore lost or deleted iPhone contacts, call logs, photos, videos, text, FaceTime, audio, chats, Calendar, Notes, Safari bookmarks, etc. It is quick to recover and extremely user-friendly.
What is required to perform Recovery and DFU modes in iPhone?
- Windows or Mac system.
- Lightning to USB cable.
- iTunes updated to the latest version on your computer.
How to put iPhone 6 and earlier versions in Recovery Mode
Follow the below steps to enter Recovery Mode on iPhone 6, iPhone 6s, iPhone 6s Plus, iPhone 5s, iPhone 5, iPhone 4s, and iPhone 4.
- Connect your iPhone to your PC using USB Lightning Cable and launch iTunes.
- Press and hold down the Home and Power button to turn the iPhone.

- Then connect the USB cable to iPhone and turn it on by holding the Home button.
- Continue to hold the Home button until a pop-up appears informing ‘an iPhone has been detected in recovery mode’ on your system.
- In Recovery mode, you can either restore the iPhone, set it up as new, or just recover your backups.

How to put iPhone 7 in Recovery Mode
It’s easy to enter Recovery Mode on iPhone 7 or iPhone 7 Plus. Follow the below steps:
- Turn off your iPhone 7 and connect it to your Mac or Windows computer.
- Ensure iTunes or Finder is running on the system.
- Press and hold the Power and Volume down button for 10 seconds.
- While continuing to hold the Volume down button, release the Power button.

- Release the button if you see the iTunes has detected an iPhone in recovery mode message on your system.
How to put iPhone 8 in Recovery Mode
If you want to enter the Recovery Mode on iPhone 8 and its variants, follow the below steps:
- Connect your iPhone 8 to your Mac or Windows system with a USB cable.
- Next, press and release the following buttons in a sequence Volume Up button, Volume Down, and Side button until your device reboots. Continue holding the Side button, even after seeing the Apple logo appear.
- Release the Side button once the Connect to iTunes logo appears on the iPhone’s display.

- Launch iTunes, and you should see a message stating, “There is a problem with the iPhone that requires it to be updated or restored.” You can choose to Update or Restore your iPhone’s software.
How to put iPhone 11 into Recovery Mode
To enter Recovery Mode on iPhone 11, iPhone 11 Pro, or iPhone 11 Pro Max, follow these steps:
- Connect your iPhone with your Mac or PC and launch iTunes.
- Force restart your iPhone with the following steps:
- Press and release the Volume Up button.
- Press and release the Volume Down button.
- Press and hold the Side button.
- Make sure to release these buttons if you see the recovery mode screen with the “Connect to iTunes” screen.
- Then choose your iPhone in iTunes, and you will see a pop-up saying that your iPhone is in Recovery Mode. Here, you can either update or restore your iPhone.
How to put iPhone 12 into Recovery Mode
Follow the below steps to enter Recovery Mode on iPhone 12, iPhone 12 mini, iPhone 12 Pro, and iPhone 12 Pro Max:
- Update iTunes to the latest version.
- Connect your iPhone to your PC or Mac via Lightning to a USB cable.
- Note: If you are connecting your iPhone to the computer for the first time, click on ‘Trust’ in the Trust This Computer dialog box and follow the prompts.
- Once your iPhone is paired with the computer, press the Volume up button followed by the Volume down button and release.
- Press and continue to hold the Side button until you see the ‘Connect to computer’ screen on your iPhone. While on your computer, you would see the iPhone Recovery Mode message in iTunes, confirming that your iPhone has entered into Recovery Mode. The computer asks you to either Update or Restore your iPhone**.** Click on any based on your requirement.
If you choose Update, iTunes will update your iPhone 12 to the latest iOS release. This won’t lead to any loss of data.
If you select Restore: It will erase iPhone data completely and renew your entire iPhone.
How to put Recovery Mode on iPhone 13
Entering Recovery Mode on iPhone 13 and iPhone 13 Pro has the same steps as iPhone 12. To enter the Recovery Mode, connect your iPhone to your computer and do the following steps in quick succession.
- Press the Volume up button and release.
- Press the Volume down button and release.
- Press and continue to hold the side button until the ‘Connect to iTunes’ screen appears on iPhone.

How to put Recovery Mode on iPhone 14
To use recovery mode on iPhone 14 and iPhone 14 Pro, follows these steps:
- Connect your iPhone to your system with a Lightning cable.
- Now on iPhone, press and quickly release the Volume up, Volume down, and side buttons until you see the recovery mode screen.
- Select your iPhone in the Finder/iTunes window and choose to update or restore your iPhone.

How to exit Recovery Mode on iPhone
It’s easy to exit Recovery Mode on iPhone. Follow the below steps:
- Hold the Home button and Lock button to exit DFU mode on iPhone 6 and earlier versions until your device reboots.
- To exit DFU mode on iPhone 7/7 Plus, hold the Side and Volume Down buttons until the device reboots.
- To exit the Recovery Mode on iPhone 8 or later version, press and hold the Side button until the “Connect to iTunes” screen disappears, and then iPhone should reboot back into iOS.
How to put Recovery Mode on iPad
To enter Recovery Mode on the iPad, follow these steps:
- Connect your iPad to Windows or Mac system using a USB cable.
- For iPad with a Home button: Press and hold the Home button and the Top/Side button until your iPad enters recovery mode.
- For iPad without a Home button: Quickly press and release the Volume Up button, Volume Down button, and the Top button. Keep holding the Top button until the iPad enters recovery mode.

How to put iPhone into DFU mode ?
Follow the below steps to enter DFU Mode on iPhone and its various version:
- Connect iPhone to PC or Mac via USB cable. Note: If the ‘Trust This Computer’ dialog box appears, follow the prompts.
- Once your iPhone is paired with a computer, follow these steps:
How to Enter DFU Mode on an iPhone 8 and later versions
- Press the Volume up button, then Volume down button, and release.
- Quickly press and hold the Side button for about 5 seconds.
- Along with the Side button, press and hold the Volume down button.
- Release the Side button and continue to hold the Volume down button for about 10 seconds.
- Once you see the ‘Recovery Mode’ screen in iTunes on your computer, you have successfully entered the DFU mode. However, the iPhone screen remains black in DFU Mode.
How to Enter DFU Mode on an iPhone 7
- Press and hold the Power and the Volume down buttons for 8–10 seconds.
- Release the Power button and continue to hold the Volume down button.
- Release the Volume down button once your iPhone has entered recovery mode.
How to Enter DFU Mode on an iPhone 6S or Earlier Versions
- Press and hold the Power/Sleep and Home buttons together for 10 seconds.
- Release the Power/Sleep button, but continue holding the Home button.
- Release the Home button once you see iTunes/Finder has detected an iPhone in recovery mode message.
Note: If you see the Apple logo on your iPhone, try again and repeat the above steps carefully.
How to exit DFU Mode on iPhone ?
If you want to exit DFU Mode on iPhone and its variants, follow the below steps:
How to Exit DFU Mode on an iPhone 8 or Later versions
- Press the Volume Up button and quickly release.
- Press the Volume Down button and quickly release.
- Now, press and hold the Side button until the Apple logo appears on iPhone. This indicates your iPhone has exited DFU Mode. Your iPhone would boot to the ‘Lock’ screen in a few seconds. Now, enter your passcode and continue to use your iPhone.
How to Exit DFU Mode on an iPhone 7
Press and hold the Power or Sleep button and the Volume down button until you see the Apple Logo.
How to Exit DFU Mode on iPhone 6 or Earlier versions
Hold the Home button and the Power button of the iPhone simultaneously until Apple’s logo appears on the screen.
Conclusion
Whenever your iPhone and its variants show problems like being stuck at the Apple logo, won’t upgrade, restore, or respond, you can use Recovery Mode and DFU Mode functions to resolve the problem. But don’t forget to back up your iPhone data before using these functions.
However, in any unfortunate incident of data loss while performing the functions, trust Stellar Data Recovery for iPhone – a software that brings back lost data on your iPhone securely.
FAQ
1. Does DFU Mode delete iPhone data?
If you use DFU mode to install something or restore your device, all your iPhone’s data will be erased.
2. Can you enter the recovery mode if your iPhone is disabled?
An iPhone is disabled when a user enters an incorrect password too many times on the lock screen. You should be able to enter the recovery mode using the same steps mentioned above and restore your iPhone to regain access.
3. How to put the iPhone in recovery mode without a computer?
A computer is not necessary to enter the recovery mode on an iPhone. You only need to press the right buttons, depending on your iPhone model, to enter the recovery mode. However, to restore your iPhone – you will need a computer.
How To Recover Whatsapp Chat History From iPhone
Summary: Losing the WhatsApp chat history from iPhone can be annoying. It may contain important details, photos, videos, and audio recordings. This post brings easy and quick methods to recover lost or deleted WhatsApp chat on iPhone using Stellar Data Recovery for iPhone.
With social media engulfing our lives, it becomes all the more important to keep track of people close to us through various social media apps, not only personally but professionally as well.
Messaging apps such as WhatsApp gives you total access to chat and share data with your family, friends, and even with your business or work colleagues 24*7. Each day, billions of people all over the globe, chat and share videos, audio, photos, etc. over this one messaging app. Therefore, it contains information that is of great value.
But it is important to know that this app is not fail-safe. Sometimes due to some technical issues, WhatsApp chats and other valuable information gets erased from the phone and chances of recovery are slim. If you are an iPhone user, it is a common scenario that due to tech issues such as jail breaking or when you upgrade your iPhone, your data as well as your WhatsApp chats may get erased from the iPhone.
Losing the chat history which also contains your priceless photos, videos, and audio can be quite frustrating! Hence, recovery becomes imperative! So in order to help you recover the data lost from your iPhone including your WhatsApp chats, we suggest the following steps that can help restore your chat history.
Recover Deleted Messages from WhatsApp Chat iCloud Backup
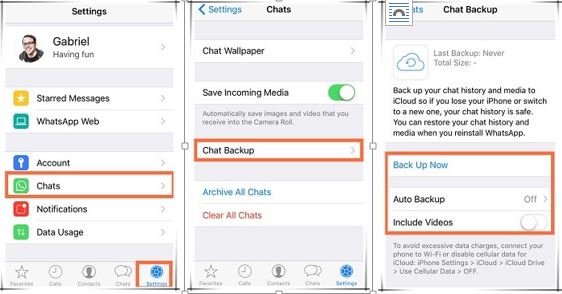
1- First of all, make sure that you have created a backup of all your WhatsApp chats and data on iCloud. In order to check that, go to the WhatsApp settings and check it on the Chat Backup present in the Chats.
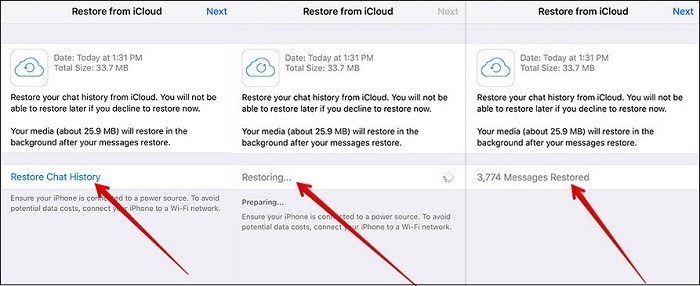
2- Next, uninstall the existing WhatsApp and then reinstall it again from the app store and log in with your number. When you log in, a dialogue box will appear asking you to backup the chats: click on the confirm button to proceed.
Recover Deleted WhatsApp Messages Without Backup
1- Download and install iPhone Data Recovery Software by Stellar on your computer and then register the product using the product key.
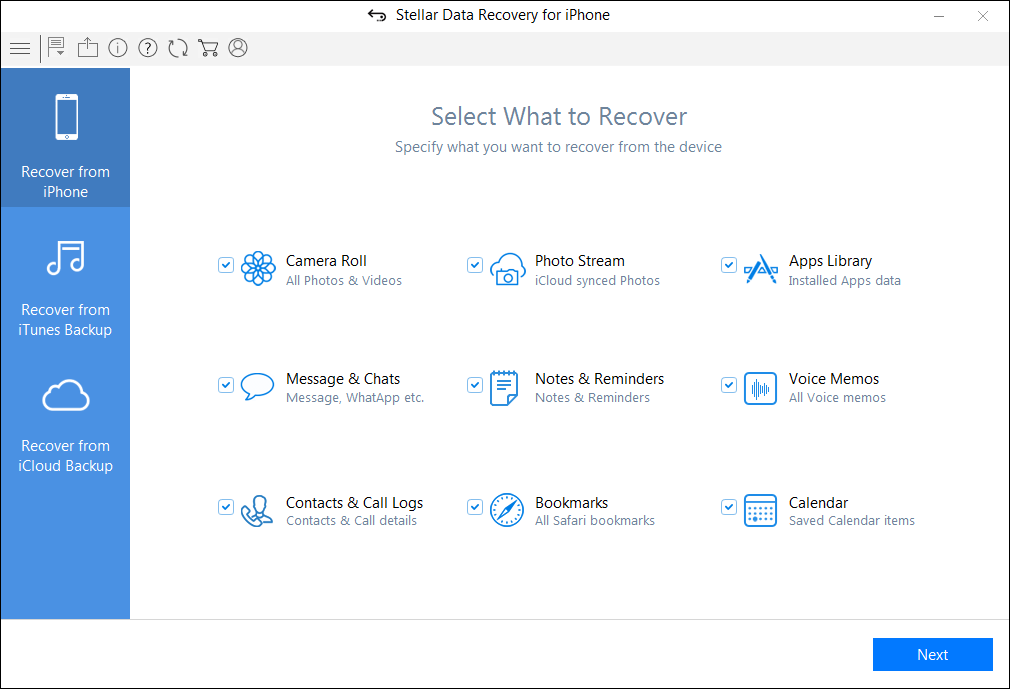
2- Now after connecting the iPhone, click on Recover from iPhone option. Select the file type you want to recover and click “Next”. The scan will initiate thereafter.
3- Select Only Show Deleted option on the top to focus only on the deleted data. Then select the conversations you want to save. Then click Save.
4- Choose the desired location on your computer where you want to save the files or you can save it directly to your iPhone. Then click OK.
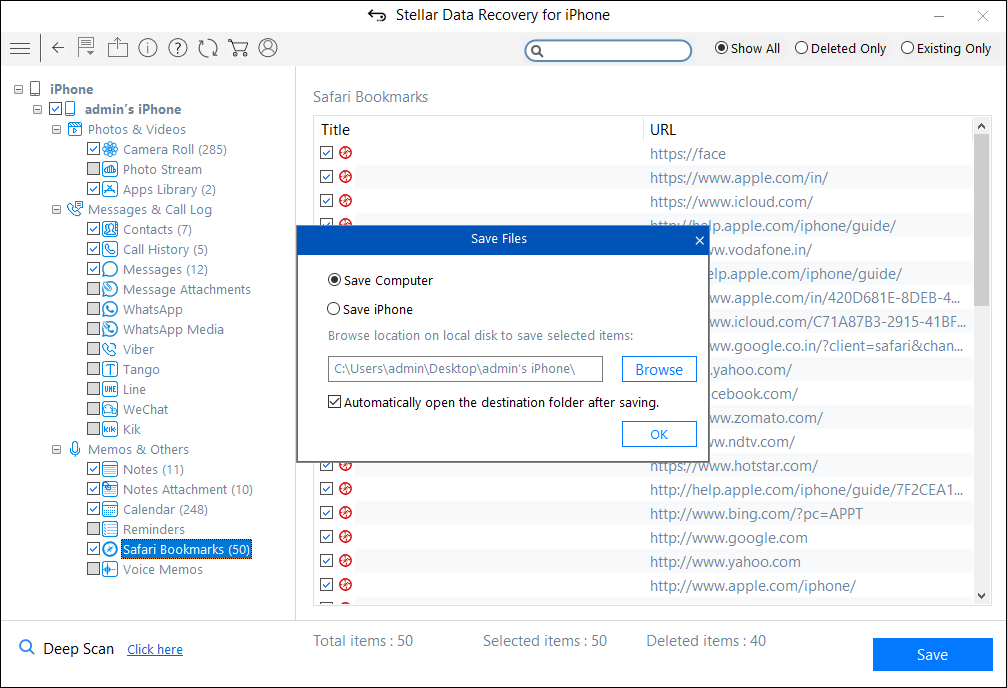
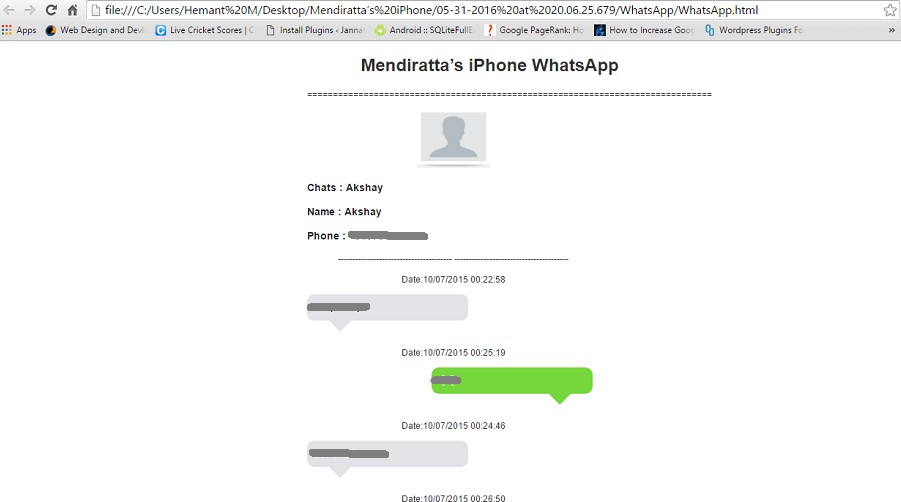
After a wait of 5-10 minutes, the lost data will be saved within form of a HTML page which can be opened using any browser.
Restore Deleted WhatsApp Messages from iTunes Backup
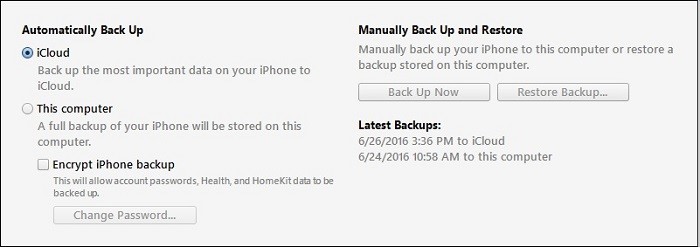
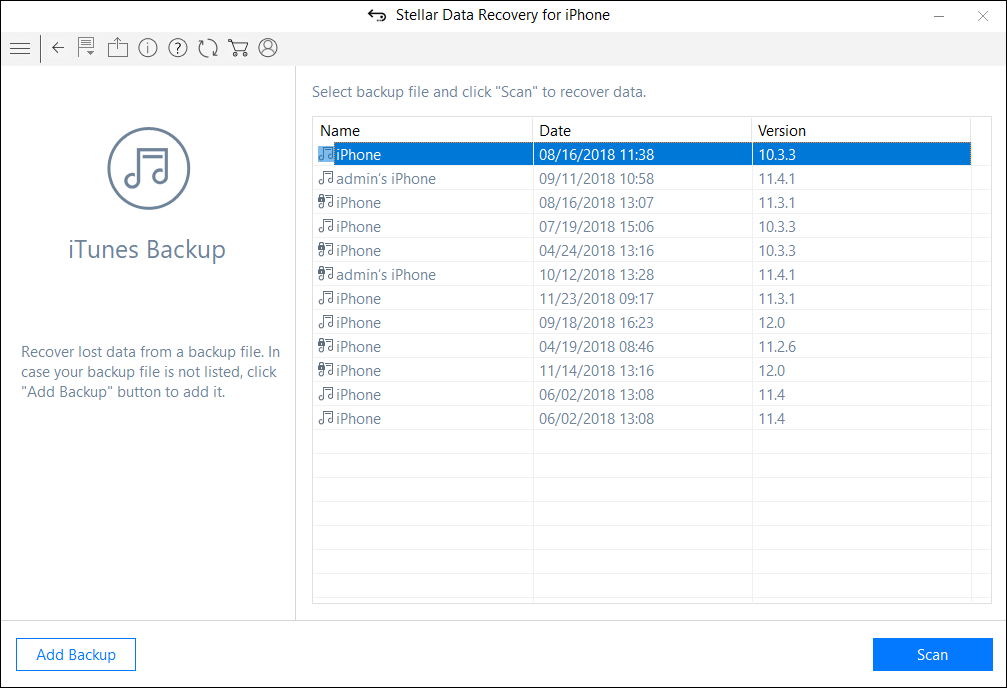
If you have backed up your WhatsApp chats and files in the iTunes app of the iPhone, then you can easily get back all your chats and files easily from it by following the below steps—
1- Open the iTunes app on your computer and then connect your iPhone into it. Next, click on the iPhone icon and then select restore backup. Then select the backup file that contains the WhatsApp messages and then select the recover option.
If you face any difficulty to recover your data from iTunes backup then use Stellar Data Recovery for iPhone to recover lost or deleted Contacts, Call history, Voice Memo, Messages, Notes, Reminders, Calendar, Safari Bookmarks from iOS device iTunes backup file.
Restore Deleted WhatsApp Messages from iCloud Backup
Just like iTunes, you can even back up your files and WhatsApp chats on iCloud present in your iPhone. However, before getting started, make sure that the data and chats are securely backed up in the app from which you have to recover.
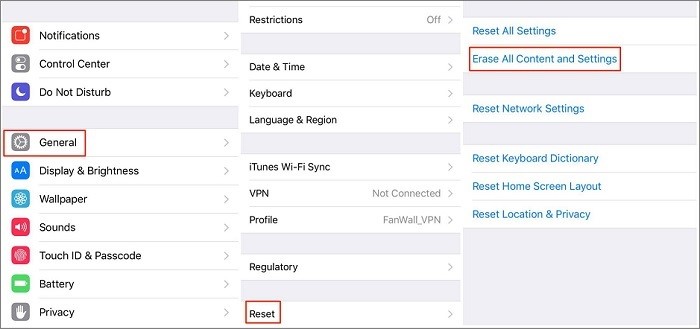
1- The first step contains erasing of all the content and settings present in the iPhone. This can be done by going to the general setting present in the iPhone.
2- A setup screen will be displayed. Follow the steps to get to the apps and data, then select on restore from iCloud backup from it.
3- Select the files and data that you wish to backup and then click on the restore button and let the system restore all the backed up data into your phone.
If you face any difficulty to recover your data from iCloud backup then use Stellar Data Recovery for iPhone to recover lost or deleted Contacts, Call history, Voice Memo, Messages, Notes, Reminders, Calendar, Safari Bookmarks from iOS device iCloud backup file.
Conclusion
Losing chats and other data from WhatsApp may lead to a situation of despair. Therefore, to ease you off your worries, the above simple steps will help restore all your chats as well as your lost photos, audio, and videos from your iPhone.
How to Restore iPhone without Backup
Summary: Have you lost your iPhone data after an iOS upgrade or accidental deletion, etc.? Learn how iPhone data recovery software helps restore your iPhone without backup.
Digital devices are at a constant risk of inadvertent data loss, this data might be critical and iPhones are no exception. As a result, understanding different approaches you can take to bounce back from iPhone data loss is crucial when there’s no recent backup.
Data loss in iPhone occurs when you accidentally delete some important data, or your device is lost or stolen or physically damaged resulting in an inability to access or use your data. The best way to prevent it is to take routine backups of your iPhone data using iCloud or iTunes.
However, many users fail to maintain regular iPhone backups and lose crucial data when dealing with a fatal error. In such cases, you can utilize the multiple practices mentioned in this guideline to restore all your iPhone data without backup and save the day.
What Causes Data Loss on iPhones?
In the world of smartphones, there are many ways to lose data. Sometimes, it happens by accident; other times, it emerges as a result of malicious activity. Some of the most common causes of data loss on iPhones include:
- Human Error: Sometimes, data loss occurs when someone accidentally deletes important data. Either they were not paying attention or were distracted by something else that lead accidental data loss.
- Malware Activity: Malware is a program designed to harm your phone or information. Although iOS is relatively immune to cyber-attacks, it’s still advised to stay away from suspicious websites and emails to keep your iPhone and its data safe.
- Software Corruption: Software corruption occurs when a program, including an OS, fails to run properly due to internal errors like virus or malware attack, failed software updates, etc.
Although there are many other causes for data loss in iPhones, the top three mentioned above are the most common.
Can iPhone Data be Restored without Backup?
It may be possible to restore iPhone data without backup, but its success depends on certain factors. Deleting the iPhone data or factory resetting the iPhone doesn’t mean that your data is completely removed from the device. That data is still there on your device but has been moved to an unallocated folder.
To restore this deleted or lost iPhone data, immediately stop using your device to avoid overwriting. Then there is a possibility that you may be able to retrieve your iPhone data.
How Can I Restore iPhone without Backup?
The only way to restore lost data on your iPhone without a backup is by utilizing third-party recovery software. Stellar Data Recovery for iPhone is an award-winning recovery software that can restore deleted or lost files from your iPhone/iPad/iPod touch. It offers many amazing features to help you get back your photos, videos, audio files, documents, and other essential data in no time.
This software is powerful and easy-to-use when retrieving lost data, and you can operate it even if you have no technical background. Follow the steps below to discover how to utilize Stellar Data Recovery for iPhone and restore your lost data.
- Connect your iOS-operated device to a computer
- Download and install Stellar Data Recovery for iPhone on your computer.
- Click on the Start menu, type Stellar Data Recovery for iPhone, and press Enter.
- As the software launches, enter the Activation Key you received with your purchase.
- Then select the type of data you wish to recover and click Next.

- Wait for the scanning process to finish.

- Browse the recovered files and press Recover to save them on a storage device.

- After following the instructions, the lost files are accessible on the storage device you selected.
How Do I Prevent Data Loss on iPhones?
An iPhone backup is the best way to prevent data loss; it’s a copy of your data on a storage media or any Cloud server other than your iPhone.
There are several ways to create a backup of your iPhone; the safest choices are iTunes and iCloud. Follow the instructions below to create a backup immediately.
Back up iPhone using iTunes
Follow these steps to utilize iTunes:
- Download and install iTunes on your computer.
- Connect your device to the computer.
- Once you’re in the Device Summary page, click on Back Up Now.
- Wait for the process to finish.

Back up iPhone using iCloud
Follow these steps to utilize iCloud:
- Unlock your phone and open Settings.
- Tap on your name at the top of the screen.
- Select iCloud on the following page.
- Turn on iCloud Backup.
- Tap Back Up Now.
- Wait for the process to finish.

You can use this iCloud backup to restore iPhone data when needed. To know more, read: How to Restore iPhone from iCloud backup .
Bottom Line
Data loss in iPhone can occur due to various reasons including accidental deletion, software malfunction, etc.
The best way to prevent such scenarios is by taking regular backups of your iPhone. So, in an emergency, you can restore all your data from the backups you created earlier.
If you need help keeping healthy backups or utilizing recovery software to restore your information, seek a professional assistant to provide more instructions.
FAQ
1. Is Stellar Data Recovery for iPhone free?
You can download a free demo of Stellar Data Recovery for iPhone and test all the features. However, you must activate the product if you wish to recover files.
2. What version of iOS does Stellar Data Recovery for iPhone support?
The software supports the latest iOS and all the previous versions.
3. Does Stellar Data Recovery for iPhone require iTunes to be installed?
Stellar Data Recovery for iPhone utilizes iTunes system drivers to identify your devices.
4. How to recover deleted photos, videos & music files from your iPhone?
Users may lose their photos/videos/ music files due to accidental file deletion, system resets, failed updates, etc. However, by using Stellar Data Recovery for iPhone, you can recover lost media from Camera Roll, Photo Stream, WhatsApp, Kik, Viber, Tango, and other apps.
5. How to recover deleted voice memos from your iPhone?
You can restore deleted voice memos from the Recently Deleted folder, iCloud or iTunes backup, and iPhone data recovery software.
6. How to recover deleted contacts from your iPhone?
Losing contacts is frustrating, leaving users in agony to re-enter the lost information manually. However, Stellar Data Recovery for iPhone offers professional scans to retrieve lost or missing contacts and save them in CF, CSV, or HTML formats.
7. How to Retrieve Call History on iPhone?
Call logs may become inaccessible because of an app crash, iOS update, hardware damage, etc. Use backup or Stellar Data Recovery for iPhone to restore the lost or deleted iPhone call history .
8. How to retrieve deleted text messages on your iPhone?
Messages may contain valuable information, and losing them can cause immense stress. Use the best iPhone data recovery tool like Stellar Data Recovery for iPhone to recover lost text messages and iMessages from your iPhone or iPad.
9. How to recover deleted notes from your iPhone?
If you lose access to your notes for some reason, you can use Stellar Data Recovery for iPhone to run deep scans and retrieve deleted Notes and attachments .
10. How to restore iPhone from iTunes backup?
Although you can restore an iTunes backup from your computer, Stellar Data Recovery for iPhone also lets you retrieve only the preferred files from your iTunes files.
Also read:
- Complete Guide to Hard Reset Your Honor Play 8T | Dr.fone
- Corsair Keyboard Not Responding? A Comprehensive Fix and Support Guide
- Crafting the Rhythm Adding Beats and Melodies to Your FB Vids
- Edit and Send Fake Location on Telegram For your Oppo Reno 10 5G in 3 Ways | Dr.fone
- How do I reset my Oppo A78 Phone without technical knowledge? | Dr.fone
- How to Hide the Power Button From the Start Menu on Windows 11 & 11
- How To Repair Apple iPhone XR iOS System Issues? | Dr.fone
- How To Upgrade or Downgrade Apple iPhone XS Max Without Losing Anything? | Dr.fone
- In 2024, 5 Premier Cloud Platforms Revolutionizing Storage
- In 2024, Top 10 Fingerprint Lock Apps to Lock Your Infinix Smart 7 HD Phone
- New 2024 Approved Education Exclusive Get Final Cut Pro at an Unbeatable Price
- Overcoming iPhone Data Transfer Hurdles: Essential USB Driver Fixes
- Sign Excel Online for Free
- Top iPhone 12 mini Message Recovery Software | Stellar
- Undeleted lost videos from Honor Magic 6
- Vergleich Der Bestände: DVD Vs. Blu-Ray Vs. Digitale Filme - Besseres Preis-Leistungs-Verhältnis Findest Du Hier!
- Title: The 5 Best Methods to Track a Lost or Stolen iPhone 14 Pro | Stellar
- Author: Ian
- Created at : 2025-01-15 22:54:52
- Updated at : 2025-01-21 21:58:34
- Link: https://techidaily.com/the-5-best-methods-to-track-a-lost-or-stolen-iphone-14-pro-stellar-by-stellar-data-recovery-ios-iphone-data-recovery/
- License: This work is licensed under CC BY-NC-SA 4.0.