
Stellar Data Recovery for iPhone 15 Pro failed to recognize my iPhone. How to fix it? | Stellar
Stellar Data Recovery for iPhone failed to recognize my iPhone. How to fix it?
In case Stellar Data Recovery for iPhone software doesn’t recognize your iPhone, do the following to fix the issue:
- Install/ update to the latest iTunes on your PC or Mac computer.
- Ensure your iPhone is turned on and on the Home screen.
- Check if the USB port and cable are working fine or use a different Apple USB cable.
- Ensure the iOS device ‘Trust’ your computer. If you receive the ‘Trust this Computer’ message, click on ‘Trust’.
- Restart your iPhone.
- Restart your computer.
- Update your Windows or macOS.
Stellar Data Recovery for iPhone supports all the iPhone models and their individual variants, including iPhone 13, iPhone 12, iPhone 11, iPhone XS, and below variants. It is compatible with the latest iOS 15, 14, 13, 12 and below.
What to do if iPhone is not listed when I run the software?
Your iPhone will only appear in the software if it is visible in iTunes on your computer. If your iOS device is not listed in the software, it means iTunes is not installed on your PC or Mac.
Download the latest version of iTunes and then launch the Stellar Data Recovery for iPhone software.
To launch iTunes on your computer:
When iTunes is not installed on your computer, Stellar Data Recovery for iPhone automatically generates the below message. It asks to download and install iTunes. You can click on ‘Click here’ to download iTunes.
If iTunes is already install on your computer and you don’t see your iPhone in the software, update your iTunes to the latest version.
How to Wipe iPhone Data Permanently?
Summary: Do you want to erase everything on your iPhone? But fear that it could be recovered. Learn about the best tool that wipes iPhone data permanently and makes it unrecoverable by any recovery software.

Your iPhone is a trove of personal data — photos, videos, passwords, ID proofs, bank details, chats, messages, contacts, and a lot more— which, naturally, you don’t want to fall into other hands. That’s why you prefer to delete all the information on your iPhone before selling it to others.
But several iPhone recovery software can easily restore deleted data from an old or discarded iPhone. So there’s always a fear that someone could recover your iPhone’s data and misuse it.
Here’s a solution — permanently wipe iPhone data beyond the scope of recovery by any software.
How do you permanently erase data from your iPhone?
Manual deletion is one of the ways to remove data. But it can be easily recovered by iPhone features like restoring ‘Recently Deleted’ or recovery software.
Then, Apple suggests resetting the content and settings of the iOS device. It’s effective as the deleted data is not accessible directly on your iPhone. But this also does not completely erase your data from iPhone storage.
So to wipe iPhones permanently, specialized erasure software should be used. The iPhone data erasure tool destroys all information on your storage by overwriting, thus rendering it unrecoverable.
Methods to erase everything on iPhone
- Reset content and settings on iPhone (data gets inaccessible but recoverable)
- Use iPhone data erasure software – Stellar Toolkit for iPhone (permanently wipes iPhone’s data, unrecoverable)
Method 1: Reset content and settings on iPhone
Apple provides a factory reset feature in iPhone with the ‘Erase All Content and Settings’ option. This method lets you bring your device to default settings by erasing iPhone data.
Apple’s factory reset will delete all settings, passcodes, photos, videos, notes, contacts, call history, messages, search history, app history, and other data on your iPhone.
However, erasing your iPhone with the ‘Erase All Content and Settings’ option does not delete your data permanently. All the personal data on iPhone is still recoverable with the help of advanced iPhone data recovery software.
Steps to Factory Reset iPhone:
- Open Settings on your iPhone.
- Tap and follow General > Reset.
- Tap on Erase All Content and Settings.
- A dialog box appears; click Erase Now.
- Enter your Passcode and your Apple ID password when prompted. This will wipe iPhone completely and turn off the device.
Now your device is ready to use as new without any personal photos, videos, or other information.
Note: Back up your iPhone data on iCloud or iTunes before performing a factory reset. Even when you want to sell the iPhone, the old data remains in iCloud and iTunes. And you can access it anytime on your computer or new iPhone.
Method 2: Erase data permanently using Stellar Toolkit for iPhone
When you want to delete iPhone data permanently beyond the scope of any recovery software, use an iPhone erasure tool – Stellar Toolkit for iPhone.
The factory reset option by Apple does leave a chance of iPhone data recovery by using the software. But, Stellar Toolkit for iPhone software permanently resets iPhone. The software erases iPhone data from the storage drive by overwriting and setting it to the original default settings. The software leaves no possibility of recovering data by any means.
You can quickly remove iPhone’s settings, photos, videos, audio, music, contacts, messages, chats, installed apps, call history, reminders, search history, and other data.
The software works with all iPhones and iPads. It can wipe off data from iPhone 15, 14, 14 Pro, 14 Pro Max, 13, 13 Pro, 13 Pro Max, 12, 12 Pro, 12 Pro Max, 11 Pro, 11, XS MAX, XS, XR, X, 8, 7, 7s, 6s, 6 Plus, 6, 5s, 5c, 5, 4s, and 4. It supports iOS 6.0 and up to iOS 16.x.
Stellar iPhone erasure lets you completely wipe data from an unlimited number of iPhones with the software.
Additionally, the Toolkit can also recover lost, or deleted data from iPhone, iCloud, and iTunes in various data lost cases such as water-damaged iPhones , broken iPhones , stuck at Apple logos , and so on.
Key benefits
- Wipes complete iPhone data permanently
- Erases data from multiple unique iPhones
- Easy-to-use
- Compatible with all iPhones and iPads
![]()
Steps to erase iPhone data permanently with software:
Step 1: Download and run Stellar Toolkit for iPhone on your computer.
Step 2: Select Erase Data.

Step 3: Erase the iPhone Data screen appears. Click Next.

Step 4: Plug your iPhone into the computer when prompted.

Step 5: Click Erase.
Step 6: An Erase Process dialog box appears. Select Yes to start the erasing process on iPhone. Next, you can view the process progress bar.

Step 7: Once the process finishes, the ‘Data Erase Completes’ message box appears. Click OK.
Your iPhone is now reset as new without any personal information, passwords, or settings.
When should you erase iPhone data with software?
Your data is sensitive and can be easily exploited by someone. So before giving away your iOS device to its next owner, it is better to wipe it off completely so that no one can recover it.
You can use iPhone erasure software when you are-
- Selling an old iPhone
- Exchanging an old iPhone with a new one
- Donating an iPhone to someone
- Fixing technical malfunctions in your iPhone
Final Words
Stellar Toolkit for iPhone comes to the rescue when you want to be sure about your iPhone data privacy.
If you have to use your iOS device as new, give it away, donate, or resell, you must use the erasure software to wipe iPhone data permanently. It’s 100% secure and easy to use.
![]()
A free trial is available for Stellar Toolkit for iPhone; you may try it yourself.
How to Recover Deleted Notes from iPhone?
Summary: Lost Notes from iPhone after iOS upgrade, deletion, factory reset, etc.? This post shares 5 best ways to restore lost Notes on iPhone. Also learn how Stellar Data Recovery for iPhone quickly recovers only the missing Notes from your iPhone.


When Matt opened his iPhone 14 Notes after iOS 16.4 upgrade, he found many of his old Notes had disappeared. He was repenting about the upgrade and now looking for ways to get back his Notes on his iPhone.
Notes are important for those who make optimum use of this app. However, if you have also lost them for some reason, this post shares how to restore the lost Notes on your iPhone.
Often underrated, iPhone Notes app lets you do much more than you can think of — scribbling thoughts, ideas, checklists, sketching, adding photos, and videos, attaching location links from Maps, etc.
However, Notes may disappear after an iOS update, jailbreak, factory reset, accidental deletion, etc.
How to Recover Notes on iPhone?
Usually, Notes can be recovered from iCloud, iTunes, or your recently deleted Notes App folder.
But, if in a situation when you have deleted Notes and also don’t have a backup in iCloud, an iPhone recovery software is the way to go.
Top 5 methods that can recover lost Notes from iPhone
- Recover iPhone Notes & Attachments without backup
- Restore Notes from iCloud backup
- Restore from iTunes backup
- Recover Recently Deleted folder
- Restore Notes from e-mail account on iPhone
1. Recover iPhone Notes & Attachments without Backup
There is a plethora of iPhone recovery software. Carefully pick that supports Notes and attachments recovery. Most importantly, the iPhone recovery software should be 100% secure to download and free from viruses.
Advanced tools such as Stellar Data Recovery for iPhone can recover even permanently deleted Notes and their attachments. It is fast, easy to use, and supports the latest iOS and iPhone versions.
Stellar Data Recovery for iPhone restores in situations like,
- In the absence of iCloud backup
- Factory Reset of iPhone
- Unable to retrieve Notes from iCloud/ iTunes
- iPhone is damaged or stolen
- and others
The software lets you recover deleted Notes from iPhone , iPad, iCloud, and iTunes. It thoroughly scans the iOS device and backup to restore every bit of lost data. If you don’t find the required Notes after running the initial quick scan, it offers a second-level Deep Scan for a more comprehensive search.
Unlike Apple backups — iCloud and iTunes, you can select only those Notes and their attachments that you need. Thus, the software protects you from unnecessary data recovery.
You can view the lost and deleted Notes of iPhone in the demo version of the software.
Step-by-step: Recover deleted/ lost Notes and Attachments on iPhone
- Download Stellar Data Recovery for iPhone on your Mac/PC
- Connect your iPhone to your computer and launch the software
- Choose “Recover from iPhone”, select “Notes & Reminders” and click “Next”
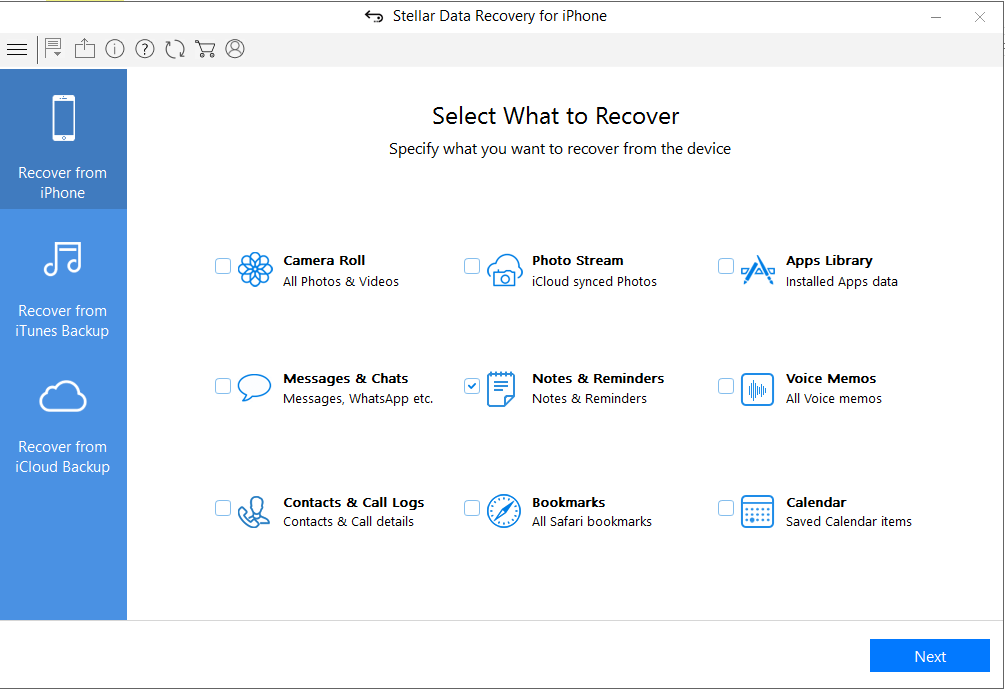
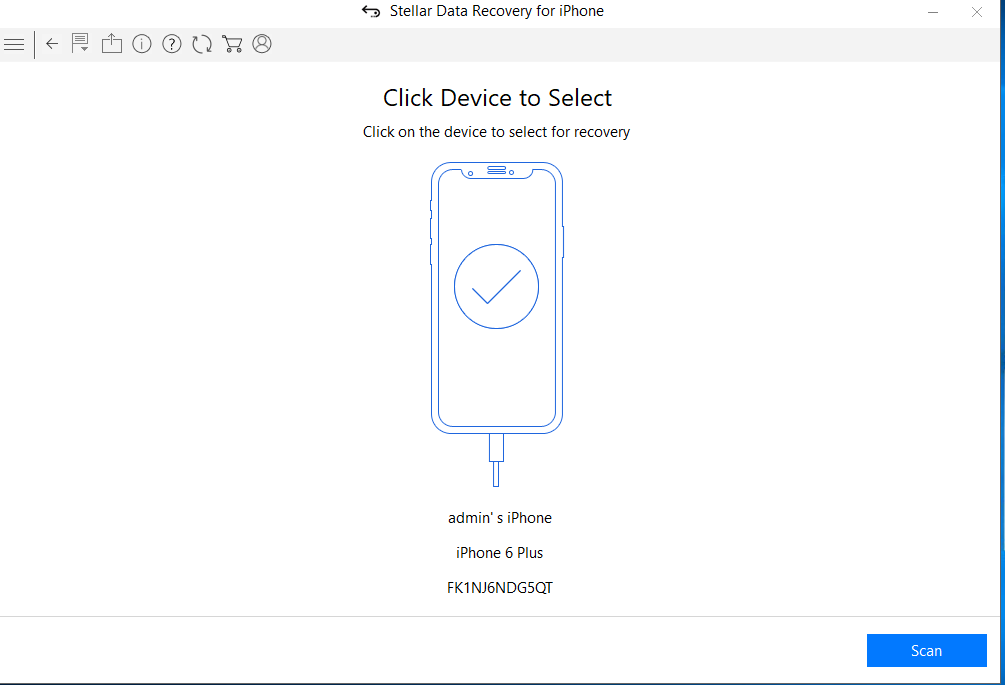
- Select your device and click “Scan.”
- After scanning, select Notes on your left pane to preview in the right pane before saving.

- Click on Save and browse the desired location to save the recovered notes.
Recover Notes from Apple Backups
iCloud and iTunes backup storage protect against data loss. If your Notes are backed up in any of the two, recover the files from there.
Just log in through your Apple ID and restore Notes from backup.
However, one of the major drawbacks of this method is that it will remove and replace all your existing iPhone data, including Camera Roll, apps, messages, music, etc.
2. How to recover iPhone Notes from iCloud backup
- Go to Settings > General > Reset> Erase all Contents and Settings
- On Apps & Data screen, tap Restore from iCloud Backup
- Sign in to your iCloud account
- Choose the last backup and Restore
3. How to restore Notes from iTunes
- Connect iPhone to PC/Mac
- Launch iTunes
- Select your iPhone under the Device list and choose the recent backup entry date
- Click Restore Backup
4. Recover iPhone Notes from ‘Recently Deleted.’
Once you delete Notes, they remain in the recently deleted folder on your iPhone for 30 days. After that, Notes are permanently deleted from the device.
Steps to restore from ‘Recently Deleted.’
- In the Notes app, tap Recently Deleted.
- Select the notes you want to restore
- Click Recover in the toolbar. The note moves to the Notes folder
5. Restore Notes from an e-mail account on iPhone
When you delete a Note from your iPhone, it remains in your e-mail account of your iPhone. So, for example, suppose you use Gmail on your iPhone, and all your Notes are saved to the e-mail address.
Steps to restore Notes from e-mail on iPhone
- Go to Setting > Accounts & Passwords
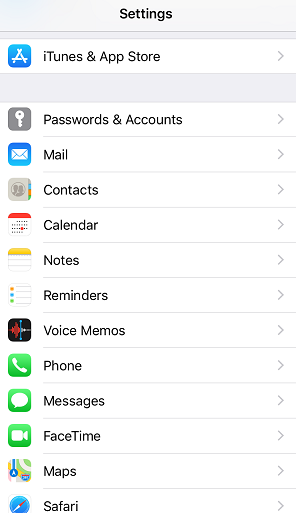
- Click on each email account (Gmail, Yahoo, AOL, etc.) one by one
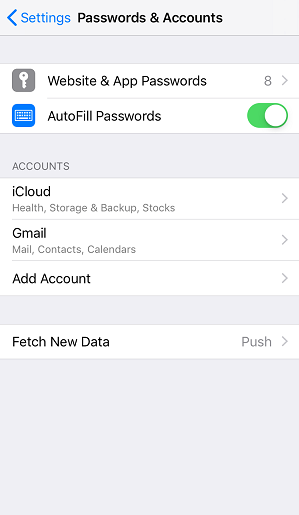
- Turn on Notes for each account

- Open the Notes app to see if they are back
Byte: Do you know the email accounts on your iPhone can store Contacts, Calendars, and Notes, apart from sending e-mails.
Wrapping Up
Notes are your best companion; you don’t want to part with them. Recover all or specific Notes with the help of iPhone notes recovery software.
However, you can also try to restore deleted Notes from an iCloud, e-mail accounts,s or recently deleted folders on your iPhone. However, Stellar iPhone Recovery software is the best solution for permanently deleted Notes in case of the absence of backup.
Also read:
- [New] 2024 Approved Parody Pointers From Script to Screenplay
- [New] Beyond the Basics Advanced Video Splitting
- [New] Mastering Live-Streamed Gaming Sessions
- [Updated] In 2024, Best Facebook Lite Video Downloading Software of 2023
- Determining Facebook Video Orientation Choices Ahead
- Full Guide to Hard Reset Your Samsung Galaxy A05s | Dr.fone
- Full Guide to Hard Reset Your Tecno Camon 30 Pro 5G | Dr.fone
- How to Easily Hard reset my Motorola Moto G24 | Dr.fone
- How to Factory Reset Vivo Y17s in 5 Easy Ways | Dr.fone
- How to Hard Reset Samsung Galaxy Z Fold 5 Without Password | Dr.fone
- How to Update or Install NVIDIA Quadro Drivers on Windows 10: Step-by-Step Tutorial with Downloads
- In 2024, Navigating YouTube Feedback A User Guide
- Mastering Silence and Speed: A Comprehensive Review of the Levelplay Combat Air CA4 CPU Cooler
- Quick Fix: Easily Rotate Videos Back Into Proper Orientation with Simple Steps
- Recover Apple iPhone 13 mini Data From iTunes Backup | Dr.fone
- Sign .docx Documents Online for Free
- The Ultimate Guide to Upgrading Your Gaming Experience on Windows 11
- The way to get back lost videos from Galaxy S23
- Undelete lost pictures from Nokia C110.
- Title: Stellar Data Recovery for iPhone 15 Pro failed to recognize my iPhone. How to fix it? | Stellar
- Author: Ian
- Created at : 2025-01-17 20:02:33
- Updated at : 2025-01-21 16:39:29
- Link: https://techidaily.com/stellar-data-recovery-for-iphone-15-pro-failed-to-recognize-my-iphone-how-to-fix-it-stellar-by-stellar-data-recovery-ios-iphone-data-recovery/
- License: This work is licensed under CC BY-NC-SA 4.0.