
Stellar Data Recovery for iPhone 13 mini failed to recognize my iPhone. How to fix it? | Stellar
Stellar Data Recovery for iPhone failed to recognize my iPhone. How to fix it?
In case Stellar Data Recovery for iPhone software doesn’t recognize your iPhone, do the following to fix the issue:
- Install/ update to the latest iTunes on your PC or Mac computer.
- Ensure your iPhone is turned on and on the Home screen.
- Check if the USB port and cable are working fine or use a different Apple USB cable.
- Ensure the iOS device ‘Trust’ your computer. If you receive the ‘Trust this Computer’ message, click on ‘Trust’.
- Restart your iPhone.
- Restart your computer.
- Update your Windows or macOS.
Stellar Data Recovery for iPhone supports all the iPhone models and their individual variants, including iPhone 13, iPhone 12, iPhone 11, iPhone XS, and below variants. It is compatible with the latest iOS 15, 14, 13, 12 and below.
The 5 Best Methods to Track a Lost or Stolen iPhone
Summary: Lost your iPhone? Don’t worry, here we tell you how to track lost or stolen iPhone using various techniques. Also, learn how to erase your iPhone data permanently to prevent it from reaching in wrong hands or misuse, using Stellar Data Recovery for iPhone.
|
Q. I cannot live without my iPhone. It was stolen yesterday and can’t recall where I lost it. It has been switched off. Can I track the location of my iPhone? Is there any way to track lost iPhones?
| A. Don’t panic. Log in to ‘Find My iPhone’ via iCloud.com and set it to ‘Lost Mode’. To know what else you can do now to track the iPhone location, read this post. |
|---|
Losing an iPhone (and for that matter any smartphone) is tormenting. Besides the upfront costs, there’s an incredible amount of personal data at stake. Today, smartphones not only store personal photos, videos, and music libraries but might also contain an incredible amount of sensitive information in the form of browsing history, social data, app traces, etc. So the apprehension of exploitation and misuse of the data stored in a stolen or lost iPhone is but real.
So, as soon as you discover that your iPhone has been stolen or lost, first, try to track the location of your missing device and lock it.
How to track a lost or stolen iPhone?
Try out the following methods
- Use Find My iPhone
- Track through Apple’s Family Sharing
- Use Google Timeline
- Try Google Photos
- Use location-tracking apps

Method 1: Use Find My iPhone
If Find My iPhone is enabled on your stolen iPhone, you can do the following:
- Locate your mobile phone
- Protect your iPhone data by choosing Lost Mode or erasing the data remotely
How to use Find My iPhone when the phone is missing
- Sign in to icloud.com on your computer.
- Click on the Find My iPhone link at the bottom.
- On the Find My iPhone’s map interface, select your lost iPhone via the All Devices drop-down menu. The app starts tracking your iPhone location on the map.
As you see the location of your device you can choose to do the following
- Play sound (if your iPhone is nearby, you can trace it with sound)
- Activate ‘Lost Mode’ (this locks your device and still tracks it)
What does Lost Mode do to your device?
- Remotely locks your device
- Displays a message with your phone number on the missing iPhone’s Lock Screen
- Keeps track of your device location.
- Erase iPhone remotely (with this action you won’t be able to track your iPhone but data is prevented from slipping into the wrong hands)
How to erase iPhone data remotely?
Choosing to erase the iPhone remotely deletes the complete data from it.
Note: Always remember to copy important photos, videos, music, and other data on iCloud backup before remotely erasing the iPhone.
Use a trusted and safe data recovery solution such as Stellar Data Recovery for iPhone to restore lost files from iCloud. The software allows the recovery of specific data rather than recovering the entire data.
Method 2: Track iPhone through Family Sharing

If you have set up Family Sharing, use it to track your iPhone. Family Sharing helps the members to know each one’s device location. Ask another member in the Family Sharing group to trace your iPhone via the Find My iPhone app. The member can also sign into iCloud.com to locate the missing iPhone.
|
Is your missing iPhone switched off or offline?
If the missing iPhone is switched off or showing offline in Family Sharing, you can still activate Lost Mode or remotely erase its data via Find My iPhone.
Note: The iPhone’s last known location remains only for one day. In case your device is offline for over 24 hours, you cannot trace its last location.
|
| — |
What to do when ‘Find My iPhone’ is NOT enabled or the missing iPhone is offline for more than one day?
- Change your Apple ID passwords to prevent anyone from accessing your data.
- Change your social media and other Internet account passwords like Gmail, Twitter, Facebook, Instagram, etc.
- Report the device as missing to the authorities.
- Report your network carrier to disable the services like calls, messages, or data use.
Method 3: Use Google Timeline to find lost iPhone
If you have turned on Location Services and Location History on your iPhone, Google’s Timeline will record all the locations of your device.
When an iPhone goes missing, access the location information on a map and find the last location. Remember, Google Timeline records the location only when the iPhone is switched on with an internet connection.
How to see the last location of a lost iPhone in Google Timeline
- Visit <com/maps/timeline> on your computer.
- Sign in to your Google account.
- Click Today or select Date.
- Scroll down to see the last reported location of your iPhone.
Along with the location, note the time when your phone was last connected to Google. Taking clues from the location and time information, you can find your lost iPhone. If needed, take the help of cops.
Method 4: Take location clue from Google Photos
If anyone has captured a photo from your lost iPhone and you have the Google Photos location-sharing option enabled, then luck is on your side.
Visit <photos.google.com/>. Check, if any new photos were uploaded and view their upload location.
Method 5: Location tracking apps
If you have installed any location-tracking app such as GPS Location Tracker, CocoSpy Cell Phone Tracker, or iTrack on your missing device, use it to track the lost or stolen iPhone. These apps share the real-time location of your device on your computer or other connected devices.
Conclusion
Apple’s Find My iPhone feature is the best way to track the location of a stolen or missing device. If Find My iPhone is not enabled you can try Google Timeline or Google Photos. Other than these methods, third-party apps can also help track a lost iPhone, but only if you have installed them before the phone was lost.
Nevertheless, ensure that you copy the iCloud backup of the stolen iPhone before taking any of the above steps.
A smarter way is to filter out the data that you want to keep, with the help of Stellar Data Recovery for iPhone.
Is this post helpful? Share your experience in the comments below, how you managed to track and get back your stolen iPhone.
How to Recover Deleted Notes from iPhone?
Summary: Lost Notes from iPhone after iOS upgrade, deletion, factory reset, etc.? This post shares 5 best ways to restore lost Notes on iPhone. Also learn how Stellar Data Recovery for iPhone quickly recovers only the missing Notes from your iPhone.


When Matt opened his iPhone 14 Notes after iOS 16.4 upgrade, he found many of his old Notes had disappeared. He was repenting about the upgrade and now looking for ways to get back his Notes on his iPhone.
Notes are important for those who make optimum use of this app. However, if you have also lost them for some reason, this post shares how to restore the lost Notes on your iPhone.
Often underrated, iPhone Notes app lets you do much more than you can think of — scribbling thoughts, ideas, checklists, sketching, adding photos, and videos, attaching location links from Maps, etc.
However, Notes may disappear after an iOS update, jailbreak, factory reset, accidental deletion, etc.
How to Recover Notes on iPhone?
Usually, Notes can be recovered from iCloud, iTunes, or your recently deleted Notes App folder.
But, if in a situation when you have deleted Notes and also don’t have a backup in iCloud, an iPhone recovery software is the way to go.
Top 5 methods that can recover lost Notes from iPhone
- Recover iPhone Notes & Attachments without backup
- Restore Notes from iCloud backup
- Restore from iTunes backup
- Recover Recently Deleted folder
- Restore Notes from e-mail account on iPhone
1. Recover iPhone Notes & Attachments without Backup
There is a plethora of iPhone recovery software. Carefully pick that supports Notes and attachments recovery. Most importantly, the iPhone recovery software should be 100% secure to download and free from viruses.
Advanced tools such as Stellar Data Recovery for iPhone can recover even permanently deleted Notes and their attachments. It is fast, easy to use, and supports the latest iOS and iPhone versions.
Stellar Data Recovery for iPhone restores in situations like,
- In the absence of iCloud backup
- Factory Reset of iPhone
- Unable to retrieve Notes from iCloud/ iTunes
- iPhone is damaged or stolen
- and others
The software lets you recover deleted Notes from iPhone , iPad, iCloud, and iTunes. It thoroughly scans the iOS device and backup to restore every bit of lost data. If you don’t find the required Notes after running the initial quick scan, it offers a second-level Deep Scan for a more comprehensive search.
Unlike Apple backups — iCloud and iTunes, you can select only those Notes and their attachments that you need. Thus, the software protects you from unnecessary data recovery.
You can view the lost and deleted Notes of iPhone in the demo version of the software.
Step-by-step: Recover deleted/ lost Notes and Attachments on iPhone
- Download Stellar Data Recovery for iPhone on your Mac/PC
- Connect your iPhone to your computer and launch the software
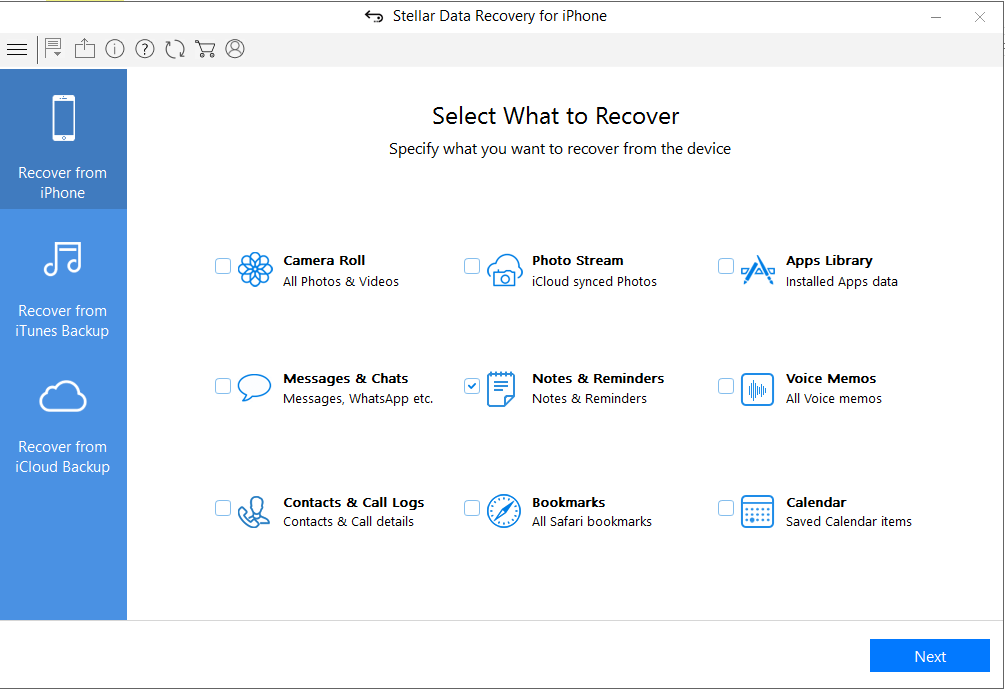
- Choose “Recover from iPhone”, select “Notes & Reminders” and click “Next”
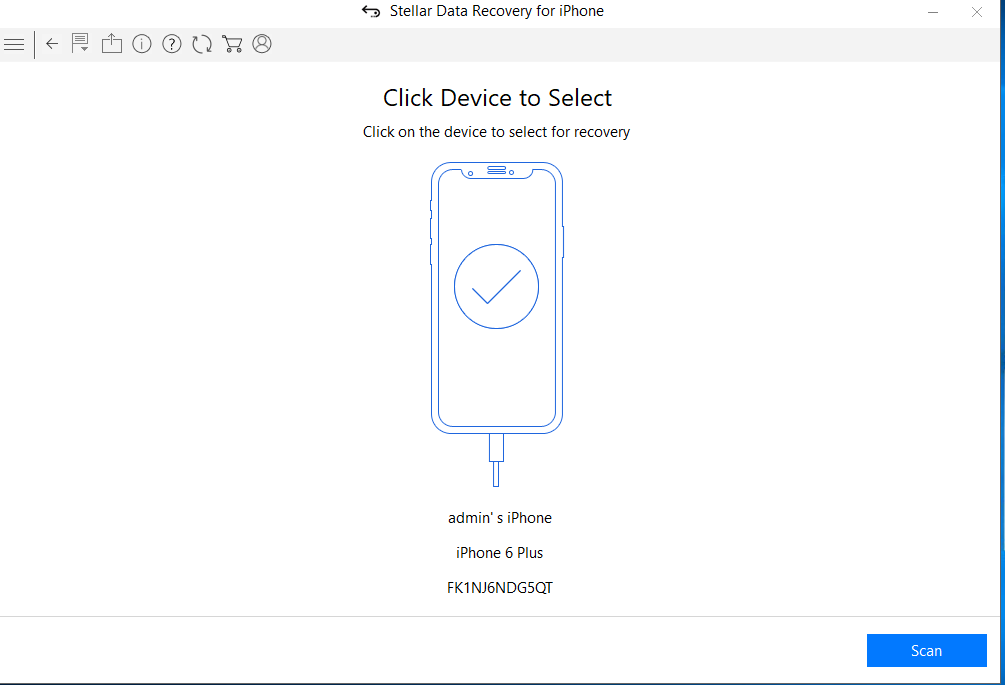
- Select your device and click “Scan.”
- After scanning, select Notes on your left pane to preview in the right pane before saving.

- Click on Save and browse the desired location to save the recovered notes.
Recover Notes from Apple Backups
iCloud and iTunes backup storage protect against data loss. If your Notes are backed up in any of the two, recover the files from there.
Just log in through your Apple ID and restore Notes from backup.
However, one of the major drawbacks of this method is that it will remove and replace all your existing iPhone data, including Camera Roll, apps, messages, music, etc.
2. How to recover iPhone Notes from iCloud backup
- Go to Settings > General > Reset> Erase all Contents and Settings
- On Apps & Data screen, tap Restore from iCloud Backup
- Sign in to your iCloud account
- Choose the last backup and Restore
3. How to restore Notes from iTunes
- Connect iPhone to PC/Mac
- Launch iTunes
- Select your iPhone under the Device list and choose the recent backup entry date
- Click Restore Backup
4. Recover iPhone Notes from ‘Recently Deleted.’
Once you delete Notes, they remain in the recently deleted folder on your iPhone for 30 days. After that, Notes are permanently deleted from the device.
Steps to restore from ‘Recently Deleted.’
- In the Notes app, tap Recently Deleted.
- Select the notes you want to restore
- Click Recover in the toolbar. The note moves to the Notes folder
5. Restore Notes from an e-mail account on iPhone
When you delete a Note from your iPhone, it remains in your e-mail account of your iPhone. So, for example, suppose you use Gmail on your iPhone, and all your Notes are saved to the e-mail address.
Steps to restore Notes from e-mail on iPhone
- Go to Setting > Accounts & Passwords
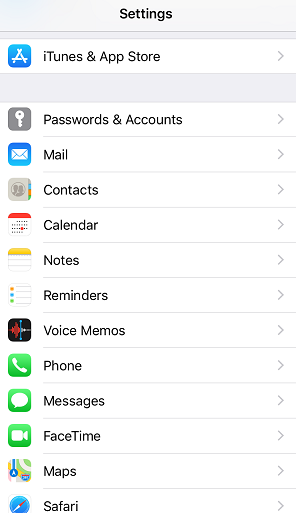
- Click on each email account (Gmail, Yahoo, AOL, etc.) one by one
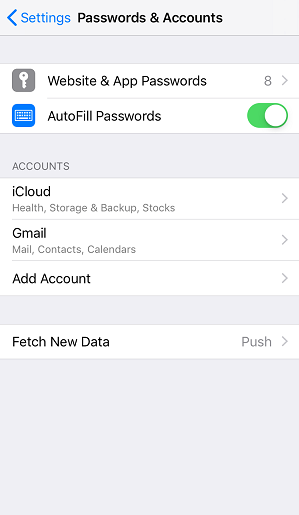
- Turn on Notes for each account

- Open the Notes app to see if they are back
Byte: Do you know the email accounts on your iPhone can store Contacts, Calendars, and Notes, apart from sending e-mails.
Wrapping Up
Notes are your best companion; you don’t want to part with them. Recover all or specific Notes with the help of iPhone notes recovery software.
However, you can also try to restore deleted Notes from an iCloud, e-mail accounts,s or recently deleted folders on your iPhone. However, Stellar iPhone Recovery software is the best solution for permanently deleted Notes in case of the absence of backup.
7 Ways to Fix iTunes Error 9
Summary: The iTunes error 9 appears when iPhone update through iTunes gets failed. It’s annoying as the error doesn’t let you use your device further. Learn 7 quick methods to fix iTunes error 9 and update the device without any issue.
Trying to get the new iOS on your iPhone but facing iTunes Error 9?

The iTunes error 9 usually occurs while updating your iPhone via iTunes. The error annoyingly neither lets you update the iPhone nor do any activity on your device. Thus, it urgently requires a fix so that you can work on your iPhone and also update the device.
In this post, we will share with you 7 best possible ways to fix iTunes Error 9. But before that let’s know what is causing the iTunes error on trying to update your iPhone.
Why does iTunes Error 9 occur?
It is difficult to determine the exact reason of your iTunes Error 9. But it may be due to any of the reasons given below :
- USB port or cable is damaged
- You have jailbroken your iPhone
- Corrupt network settings
- Security software prevents access to Apple server
How to fix iTunes error 9?
Since it is usually, regarded as a hardware issue, you should begin with hardware-related workarounds and later move to other software troubleshooting methods.
Going by the order, try below methods to fix iTunes Error 9
- Check USB cable & port
- Restore iPhone with iTunes on another computer
- Force your device to restart
- Check Anti-Virus & Firewall on your computer
- Update iTunes to the latest version
- Use Recovery Mode to Fix iTunes Error 9
- Choose to update iPhone wirelessly
Solution 1: Check USB cable and port
Make sure your iPhone USB cable and port are properly connected and working fine. Do the below checks and fix:
- USB cable is not loosely connected to the computer
- You are using the USB cable that you got with your iPhone or another certified cable
- The USB port is not damaged. Try by shifting to another USB port
Solution 2: Restore iPhone with iTunes on another computer
iTunes error 9 is generally regarded as a hardware-related problem. Sometimes it is difficult to detect the issue. The easier way out is to restore iPhone using iTunes on another computer or laptop. If still the error persists, move on to the other workarounds.
Solution 3: Force restart your device
Apple suggests trying once force a restart of iPhone to fix iTunes error 9.
iPhone X, iPhone 8, & iPhone 8 Plus users: Press and quickly release the Volume Up button. Press and quickly release the Volume Down button. Then, press and hold the Side button until you see the Apple logo.
iPhone 7 & iPhone 7 Plus users: Press and hold both the Side and Volume Down buttons for at least 10 seconds, until you see the Apple logo.
Solution 4: Check Anti-Virus & Firewall on your computer
Antivirus or Firewalls in your computer may prevent iTunes to connect with Apple server. Check the security software settings, and tweak them if required to allow iTunes to access the network servers.
Solution 5: Update iTunes to the latest version
Updates usually bring in new features, fix existing bugs and make the application smarter. If the iTunes error 9 is due to outdated iTunes, installing the latest version may help to fix the error.
How to update iTunes to the latest version?
For Windows users: Launch iTunes on PC. On the menu bar, click Help > Check for Updates and follow the given instructions
For Mac users: Launch iTunes on Mac. On Menu bar go to iTunes > Check for Updates and follow the on-screen instructions.
After updating iTunes, reboot your computer and check if the iTunes error 9 is fixed.
Solution 6: Use Recovery Mode to fix iTunes Error 9

iPhone in Recovery Mode
All the above methods fail to fix iTunes error 9? As last resort choose Recovery Mode to restore iPhone in iTunes. Choosing this option means you will lose all your iPhone data. Thus, first take backup in iCloud or iTunes before applying this fix.
How to put your iPhone into Recovery Mode? (For iPhone 8, 8 Plus, & X users)
- Update your iTunes
- Press and release the Volume Up button and then the Volume Down button
- Press and hold the Side button till connect to iTunes screen appears
- Once the iPhone is in Recovery Mode, connect your computer with iPhone via USB cable. You will see the white Apple logo screen.
- When iTunes asks you to update or restore, click Update to reinstall iOS
Lost iPhone data after restoring iPhone in iTunes via Recovery Mode?
Losing iPhone data after update through Recovery mode is a panicky situation. It gets even more serious if you are unable to restore from iCloud or iTunes backup. In such situation, Stellar Data Recovery for iPhone comes as big relief**.** The software restores complete iPhone information from iPhone, iCloud and iTunes.
Stellar iPhone data recovery software quickly and safely restores all iPhone data including photos, videos, music, contacts, messages, Safari bookmarks, etc. It also recovers the lost WhatsApp, WeChat, Line, Viber, Tango, and Kik messages. The software is extremely easy to use. Simply launch it on your Mac or PC, connect your iPhone to the computer and follow the on-screen instructions.
Solution 7: Choose to update iPhone wirelessly

Select Software Update in Settings on iPhone
Alternatively update iPhone wirelessly, without using iTunes. Make sure you have a continuous Internet connection. Go to Settings > General > Software Update. If an update is available, tap on Download and Install.
Conclusion
Although iTunes Error 9 rarely occurs but is a frustrating situation as you are unable to do any other activity on your device.
You can sometimes easily fix the Error 9 by doing a simple check if your USB cable, port connection, and firewall settings are appropriate. Restarting the device and updating iTunes to the latest version can also resolve Error 9. As a last resort, update iOS in iTunes through Recovery Mode. Nevertheless, you can also choose to bypass iTunes and update your device wirelessly.
One of the above methods is surely going to help you out. Also do not forget to share with us in the comment box below, which of these methods helped you to fix iTunes Error 9.
Also read:
- [New] 2024 Approved Gaming with Style - Perfecting Your Steam Footage
- [Updated] 2024 Approved Photoshop Insider Tips for Novice Editors
- [Updated] Ice Acceleration Showdown at the Olympics, 2022
- [Updated] In 2024, A Year in the Market Top 15 Finance Videos
- Forgot Pattern Lock? Heres How You Can Unlock Lava Yuva 3 Pro Pattern Lock Screen
- How to Easily Hard reset my Honor Play 8T | Dr.fone
- How To Erase Private Data From Apple iPhone 6 Plus | Dr.fone
- How to Fix when Apple Account Locked On Apple iPhone 13 Pro Max?
- Unlock locked iPhone 15 without Passcode
- Ways to trade pokemon go from far away On Lava Blaze 2? | Dr.fone
- Xiaomi Redmi 13C Unlock Tool - Remove android phone password, PIN, Pattern and fingerprint
- Title: Stellar Data Recovery for iPhone 13 mini failed to recognize my iPhone. How to fix it? | Stellar
- Author: Ian
- Created at : 2025-01-20 01:02:08
- Updated at : 2025-01-21 17:01:18
- Link: https://techidaily.com/stellar-data-recovery-for-iphone-13-mini-failed-to-recognize-my-iphone-how-to-fix-it-stellar-by-stellar-data-recovery-ios-iphone-data-recovery/
- License: This work is licensed under CC BY-NC-SA 4.0.