
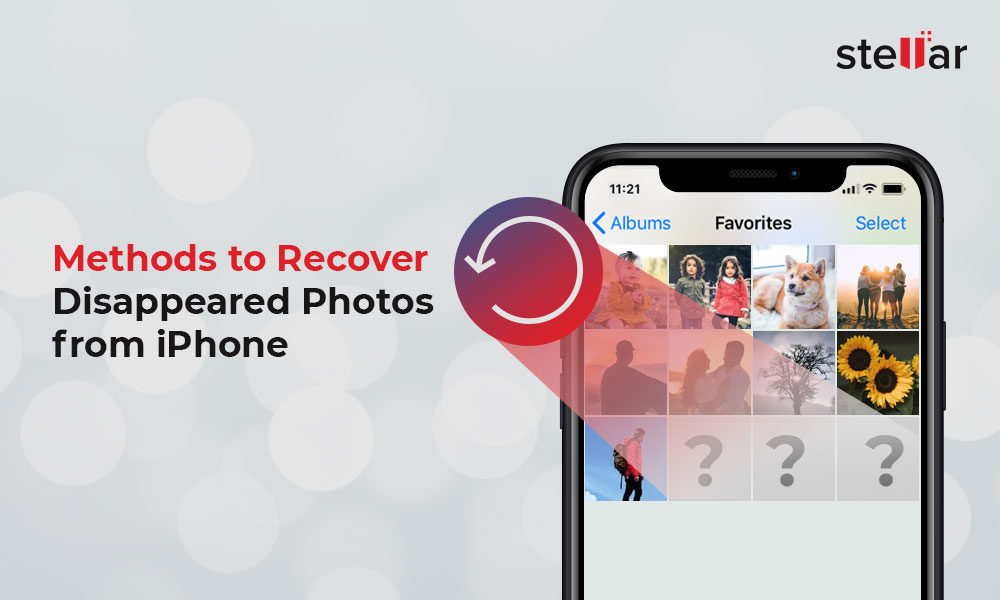
Solved Photos Disappeared from iPhone 8 Suddenly | Stellar
Solved: Photos Disappeared from iPhone Suddenly
‘I noticed that over 500 old photos from iPhone 11 have disappeared and now only the recently shot pictures are showing! I lost almost all of my best memories saved in my phone. I am sure I did not delete them. Where did the pictures disappeared from iPhone? How do I get back photos missing from iPhone? Please help.’
Photos suddenly disappearing from iPhone or random photos missing from Camera Roll or Gallery is a common complaint. Usually, photos get disappeared after iOS update, iPhone reset/restore, or when the device storage is full. You may also lose pictures after installing any new software, or jailbreaking. Sometimes, running an iPhone cleaning software without checking what it is deleting on your iOS device can also result in loss of photos.
The situation is stressful, even more when you don’t have any copies or backup of lost photos.
So how to recover the missing or lost photos on iPhone? This post shares the effective methods to get back the missing photos from Camera Roll, Gallery, or iCloud on your iPhone.
In any such sudden photo loss situation, the best solution is to use a secure photo recovery tool for iPhone that can recover photos lost due to any reason. Besides, there are free methods that might restore disappeared photos from iPhone, which you should try once.
Method 1: Restart your iPhone
If your photos suddenly disappeared from iPhone, first restart the iOS device. Then open the Photo app, Camera Roll, or Photo Stream to see if the missing photos are showing or not.
You can check here the steps to restart your iPhone model .
Method 2: Restore photos from Recently Deleted folder on iPhone
You might have accidentally deleted the photos on iPhone. Check and recover the photos from the ‘Recently Deleted’ folder of your Photos app.
Steps to recover photos on iPhone from ‘Recently Deleted’:
- On your iPhone, click to follow Photos > Albums.
- Scroll down to Utilities and click Recently Deleted.
- Look for your missing photo, tap on it and choose Recover. If there are multiple photos, click on ‘Select’ followed by ‘Recover’.
Note: Photos deleted on iPhone stay in your ‘Recently Deleted’ folder only for 30 days, after which they are permanently removed from the iOS device.
Method 3: Unhide photos on iPhone
Photos disappeared from iPhone can be in the hidden folder in Photos app. Simply, check the Hidden folder on your device and unhide the required photos.
- Open Photos app on iPhone.
- Click on Albums.
- Under Utilities click on Hidden folder. In case you don’t see the ‘Hidden’ folder, go to ‘Settings’ of your iPhone. Click on ‘Photos’ and toggle on ‘Hidden Album’.
- If you see the disappeared photos, select and click on the ‘Share’ button (the arrow icon).
- Next, tap Unhide to move the pictures to their original location on iPhone.
Method 4: Enable iCloud Photos
iCloud Photos store images in iCloud and syncs them to your iPhone, iPad, iCloud.com, iPod touch, Mac, and Apple TV. This means that any changes done to pictures library on one device will show up on your other iOS devices as well. If the photos are disappearing from iPhone only, may be the iCloud Photo is not synced or turned on. So enable iCloud Photos to get back the disappeared pictures on iPhone.
Steps to enable iCloud Photos on iPhone:
- Turn on Wi-Fi of your iPhone.
- On iPhone, navigate to Settings.
- Click on your name and tap iCloud > Photos.
- Toggle on iCloud Photos.
Now check if the missing photos are showing up on iPhone or not.
Method 5: Recover iPhone photos from iTunes backup
If you have created iTunes backup, restore the disappeared photos on iPhone from it. However, this will replace your existing iPhone data with iTunes backup data.
Steps to recover photos from iTunes:
- Connect your iPhone to computer.
- Launch iTunes.
- Select your iPhone under the device list and click on Summary.
- Click Restore Backup.
- In the Restore from Backup box, select the backup date that contains your photos.
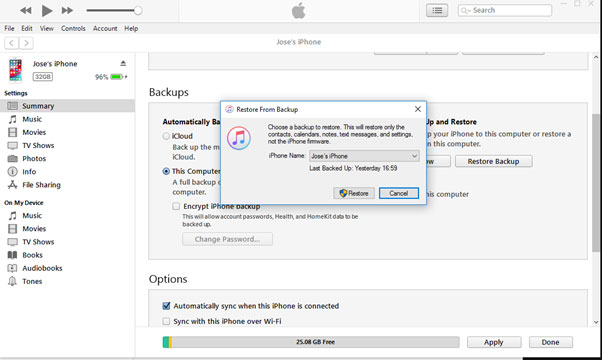
- Click Restore. Wait until the process finishes and your iPhone restarts. All your disappeared photos will be recovered on iPhone.
Method 6: Restore photos from iCloud Backup
You can restore the previous iCloud backup that has the missing photos. However, like iTunes, this method will also replace the current data on your iPhone.
Steps to recover disappeared photos from iCloud:
- On your iPhone, go to Settings > General > Reset.
- Click on Erase all Contents and Settings. In the dialog box, choose Erase Now.
- On the Apps & Data screen, click Restore from iCloud Backup. Enter your Apple ID. In case you have forgot your Apple ID, click here to know how to recover it.
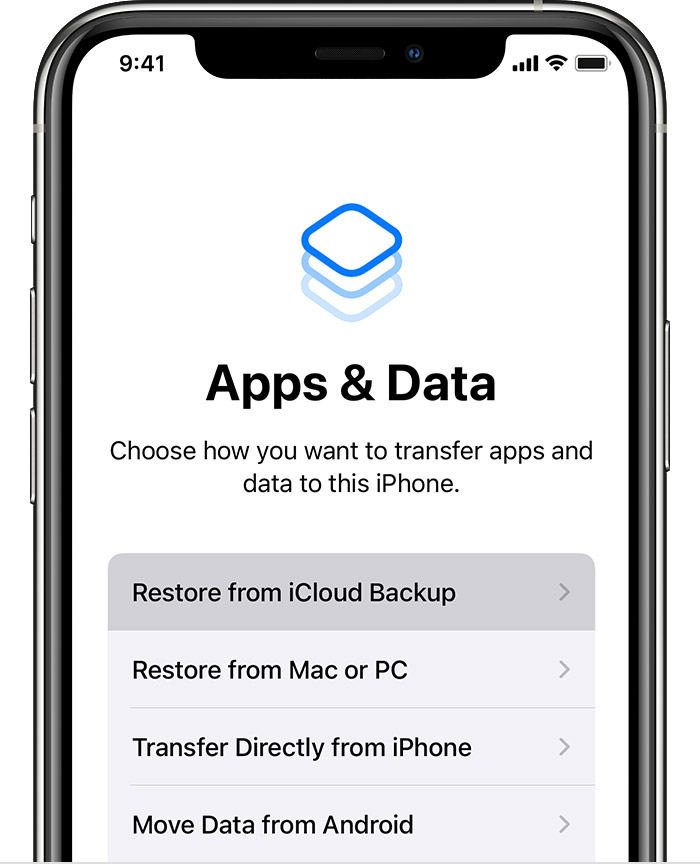
- Select the recent backup and click Restore. The lost photos should now appear on iPhone.
Method 7: Recover lost photos with an iPhone data recovery software
The advanced iPhone recovery software — Stellar Data Recovery for iPhone, can restore photos lost, deleted, or missing due to any reason. Whether your photos disappeared from iPhone after update, due to low storage, or any other reason, the software can recover in all situations.
The biggest advantage of using the software is that it doesn’t remove your existing iPhone data. Further, the software shows the preview of the recoverable photos. Hence, its easy to select and recover only the required disappeared pictures from Camera Roll, iCloud Photo Library, Gallery, or those shared on chat messages, etc. Stellar Data Recovery for iPhone is compatible with the latest iPhone 14/13/12/11, iPad, and iPod touch. The software supports recovery from the latest iOS 16 and older versions.
Quick steps to recover disappeared photos from iPhone:
- Download Stellar Data Recovery for iPhone on PC or Mac.
- Connect your iPhone to computer.
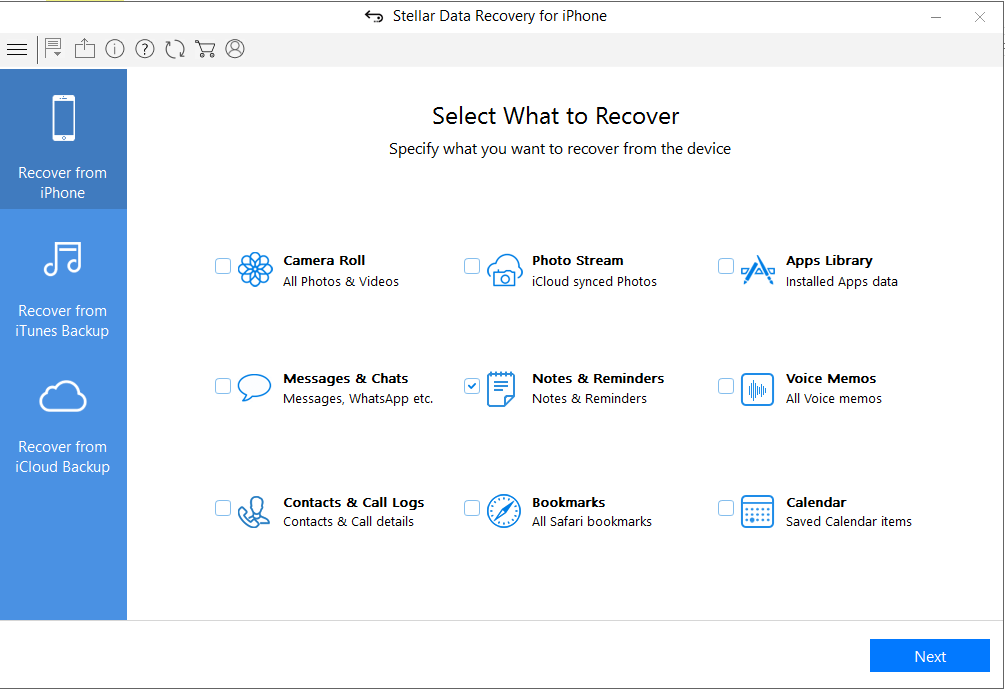
- Launch the software and select Recover from iPhone option from the left panel.
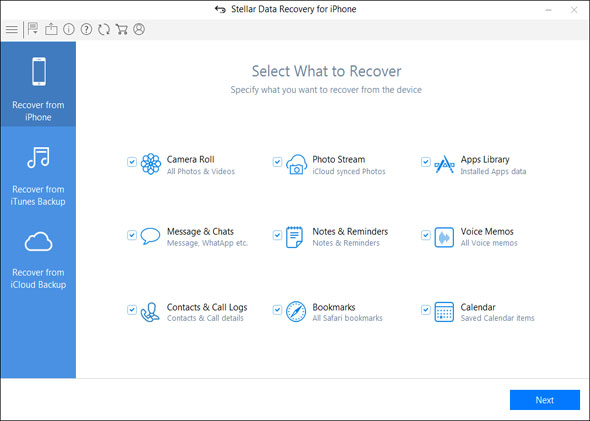
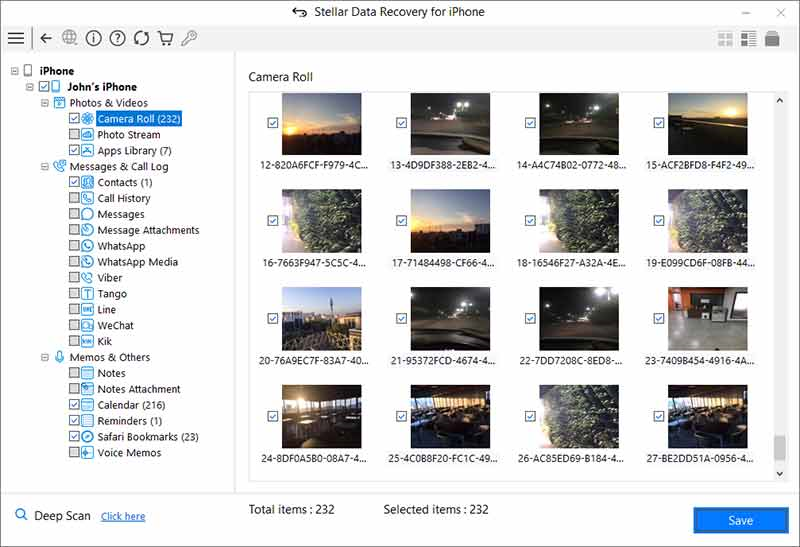
- Select the Camera Roll or Photo Stream from where the photos have disappeared and click Next to the start the scanning process.
- Now preview the recoverable photos, select them, and click Save to restore on iPhone or computer.
Note: You can also recover the lost photos from backup by choosing Recover from iCloud backup or Recover from iTunes backup , options in the software.
Conclusion
When you find suddenly photos disappearing from iPhone try any of the above 7 methods to get back the lost pictures. However, of all we recommend solutions Stellar Data Recovery for iPhone software is quick and easy to use. It is also of great help when you don’t want to recover from iCloud or iTunes backup that removes the existing data on iPhone.
How to Recover Deleted Notes from iPhone?
Summary: Lost Notes from iPhone after iOS upgrade, deletion, factory reset, etc.? This post shares 5 best ways to restore lost Notes on iPhone. Also learn how Stellar Data Recovery for iPhone quickly recovers only the missing Notes from your iPhone.


When Matt opened his iPhone 14 Notes after iOS 16.4 upgrade, he found many of his old Notes had disappeared. He was repenting about the upgrade and now looking for ways to get back his Notes on his iPhone.
Notes are important for those who make optimum use of this app. However, if you have also lost them for some reason, this post shares how to restore the lost Notes on your iPhone.
Often underrated, iPhone Notes app lets you do much more than you can think of — scribbling thoughts, ideas, checklists, sketching, adding photos, and videos, attaching location links from Maps, etc.
However, Notes may disappear after an iOS update, jailbreak, factory reset, accidental deletion, etc.
How to Recover Notes on iPhone?
Usually, Notes can be recovered from iCloud, iTunes, or your recently deleted Notes App folder.
But, if in a situation when you have deleted Notes and also don’t have a backup in iCloud, an iPhone recovery software is the way to go.
Top 5 methods that can recover lost Notes from iPhone
- Recover iPhone Notes & Attachments without backup
- Restore Notes from iCloud backup
- Restore from iTunes backup
- Recover Recently Deleted folder
- Restore Notes from e-mail account on iPhone
1. Recover iPhone Notes & Attachments without Backup
There is a plethora of iPhone recovery software. Carefully pick that supports Notes and attachments recovery. Most importantly, the iPhone recovery software should be 100% secure to download and free from viruses.
Advanced tools such as Stellar Data Recovery for iPhone can recover even permanently deleted Notes and their attachments. It is fast, easy to use, and supports the latest iOS and iPhone versions.
Stellar Data Recovery for iPhone restores in situations like,
- In the absence of iCloud backup
- Factory Reset of iPhone
- Unable to retrieve Notes from iCloud/ iTunes
- iPhone is damaged or stolen
- and others
The software lets you recover deleted Notes from iPhone , iPad, iCloud, and iTunes. It thoroughly scans the iOS device and backup to restore every bit of lost data. If you don’t find the required Notes after running the initial quick scan, it offers a second-level Deep Scan for a more comprehensive search.
Unlike Apple backups — iCloud and iTunes, you can select only those Notes and their attachments that you need. Thus, the software protects you from unnecessary data recovery.
You can view the lost and deleted Notes of iPhone in the demo version of the software.
Step-by-step: Recover deleted/ lost Notes and Attachments on iPhone
- Download Stellar Data Recovery for iPhone on your Mac/PC
- Connect your iPhone to your computer and launch the software
- Choose “Recover from iPhone”, select “Notes & Reminders” and click “Next”
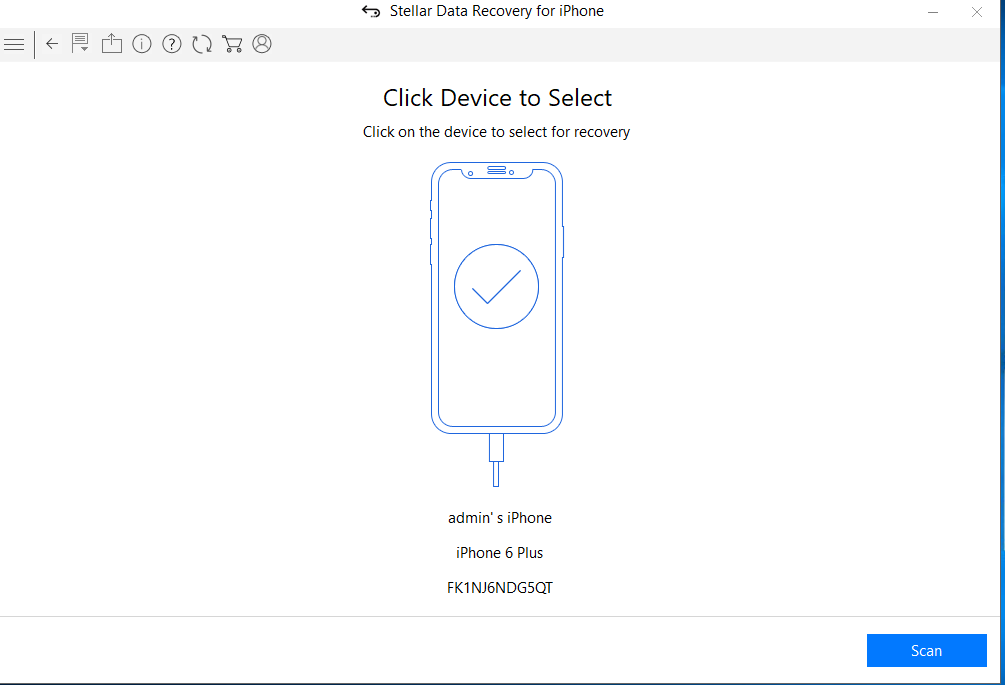
- Select your device and click “Scan.”
- After scanning, select Notes on your left pane to preview in the right pane before saving.

- Click on Save and browse the desired location to save the recovered notes.
Recover Notes from Apple Backups
iCloud and iTunes backup storage protect against data loss. If your Notes are backed up in any of the two, recover the files from there.
Just log in through your Apple ID and restore Notes from backup.
However, one of the major drawbacks of this method is that it will remove and replace all your existing iPhone data, including Camera Roll, apps, messages, music, etc.
2. How to recover iPhone Notes from iCloud backup
- Go to Settings > General > Reset> Erase all Contents and Settings
- On Apps & Data screen, tap Restore from iCloud Backup
- Sign in to your iCloud account
- Choose the last backup and Restore
3. How to restore Notes from iTunes
- Connect iPhone to PC/Mac
- Launch iTunes
- Select your iPhone under the Device list and choose the recent backup entry date
- Click Restore Backup
4. Recover iPhone Notes from ‘Recently Deleted.’
Once you delete Notes, they remain in the recently deleted folder on your iPhone for 30 days. After that, Notes are permanently deleted from the device.
Steps to restore from ‘Recently Deleted.’
- In the Notes app, tap Recently Deleted.
- Select the notes you want to restore
- Click Recover in the toolbar. The note moves to the Notes folder
5. Restore Notes from an e-mail account on iPhone
When you delete a Note from your iPhone, it remains in your e-mail account of your iPhone. So, for example, suppose you use Gmail on your iPhone, and all your Notes are saved to the e-mail address.
Steps to restore Notes from e-mail on iPhone
- Go to Setting > Accounts & Passwords
- Click on each email account (Gmail, Yahoo, AOL, etc.) one by one
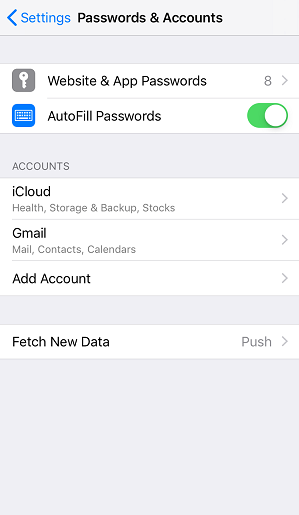
- Turn on Notes for each account

- Open the Notes app to see if they are back
Byte: Do you know the email accounts on your iPhone can store Contacts, Calendars, and Notes, apart from sending e-mails.
Wrapping Up
Notes are your best companion; you don’t want to part with them. Recover all or specific Notes with the help of iPhone notes recovery software.
However, you can also try to restore deleted Notes from an iCloud, e-mail accounts,s or recently deleted folders on your iPhone. However, Stellar iPhone Recovery software is the best solution for permanently deleted Notes in case of the absence of backup.
How to Factory Reset iPhone and iPad Without Apple ID
Summary: This post guides you to the best methods to factory reset the iPhone without the Apple ID and password. It also shares a professional tool — Stellar iPhone Eraser that can help wipe iPhone without using Apple ID.

iPhone factory reset is essential when you want to sell off your old iPhone or troubleshoot the iOS device issues, such as iPhone freeze , iPhone stuck at booting loop, stuck at Apple logo , etc. But what if you have forgotten your Apple ID?
Apple ID is not just required to sign in to iCloud account, App store, etc., but also needed to factory reset iPhone and iPad.
So how to reset iPhone without Apple ID?
Lets’ explore the methods to reset iPhone without Apple ID and password. Also, levarn how you can recover your Apple ID password and then attempt a factory reset on your iPhone or iPad.
Methods to Reset iPhone Without Apple ID Password
You can utilize iPhone Recovery Mode and iTunes on your computer to reset the iOS device without Apple ID. Another easier method to permanently delete everything on iPhone that doesn’t require your Apple ID is by using Stellar iPhone Eraser software.
While you can also choose to reset the forgotten Apple ID and password and then later factory reset the iOS device with the new Apple ID.
- Use Recovery Mode to reset iPhone without Apple ID
- Reset iPhone without Apple ID via Stellar iPhone Eraser
- Recover Apple ID and Password to reset iPhone
Important: As Factory Reset deletes everything on iPhone, always backup your data before reset. If you haven’t and already reset your iOS device, you can download Stellar Data Recovery for iPhone on your computer to restore the lost data due to factory reset.
![]()
Method 1: Use Recovery Mode to reset iPhone without Apple ID
You can factory reset iPhone without Apple ID or password by using Recovery Mode. Make sure to have the latest iTunes installed on your already trusted computer.
Steps to reset iPhone without Apple ID using Recovery Mode
Step 1: Update iTunes on your PC/Mac to the latest version.
Step 2: Connect your iPhone/ iPad to the computer via USB cable.
Step 3: Put your iPhone/ iPad to Recovery Mode. Note: The steps will vary with your iPhone/ iPad model.
How to put your iPhone to Recovery Mode
iPhone 8, iPhone X, or later: Press and quickly release the Volume Up button. Press and quickly release the Volume Down button. Then, press and hold the Side button until you see the recovery mode screen.
iPhone 7, iPhone 7 Plus, and iPod touch: Press and hold the Top (or Side) and Volume Down buttons at the same time. Keep holding them until you see the Recovery Mode screen.
iPhone 6s or earlier, iPad with Home button, and iPod touch: Press and hold both the Home and the Top (or Side) buttons at the same time. Keep holding them until you see the recovery mode screen.
iPad models that don’t have a Home button: Press and quickly release the Volume Up button. Press and quickly release the Volume Down button. Press and hold the Top button until your device begins to restart. Continue holding the Top button until your device goes into Recovery Mode.
Source: Apple support
Step 4: iTunes detects the DFU mode and alerts you. Click OK in the message box.
Step 5: In iTunes, click Summary.
Step 6: Select Restore iPhone on the right pane.

Figure: Restore iPhone option iTunes
Step 7: Click Restore to confirm.
iTunes factory resets your iPhone without Apple ID. This will delete all your photos, videos, contacts, messages, chats and other data, same as in normal factory reset process using iPhone settings, which requires Apple ID.
Method 2: Reset iPhone without Apple ID via Stellar iPhone Eraser
Stellar iPhone Eraser software is another secure way to permanently erase complete iPhone data when you have forgotten Apple ID and password. The software wipes iPhone as new without using the Apple ID.
Stellar iPhone Eraser is popularly used to reset iPhone before selling, donating, or exchanging so that no one can gain access to your personal data.
You can permanently delete photos, videos, audio, contacts, messages, passcodes, documents, third-party apps and other data from iPhone.
It sets the iOS device to the original factory settings. The software works with all iPhone variants including series of iPhone 15, 14, 13, 12, 11, XS MAX, XS, XR, X, 8, and below. It supports latest iOS 16 and below versions.
![]()
Steps to reset iPhone without Apple ID using software:
Step 1: Download and run Stellar Toolkit for iPhone on PC/Mac.
Step 2: Select Erase Data.

Step 3: On Erase iPhone Data screen, click Next.

Figure: Erase iPhone Data screen
Step 4: Connect your iPhone to the computer when prompted.

Figure: Erase button in software
Step 5: Click Erase.
Step 6: In the Erase Process dialog box, select Yes.
Step 7: In Data Erase Completes dialog box, click OK.
All the data gets erased permanently beyond recovery from your iPhone or iPad.
Method 3: Recover forgotten Apple ID and Password to reset iPhone
Apple ID password is necessary to use iPhone applications and services. So if you are not planning to sell off your iPhone or iPad, it is best to first recover the forgotten Apple ID password and then reset your iOS device using the ‘Erase All Content and Settings’ option in the iPhone Settings.
You can use iPhone Settings, Apple Support app, Find My iPhone, or visit Apple account page to recover lost Apple ID password.
Click here to know in detail how to reset forgotten Apple ID and password.
Once you recover the Apple account password, follow the below steps to reset iPhone with the new Apple ID.
Reset iPhone with Apple ID password:
- Go to Settings > General > Reset.
- Click on Erase All Content and Settings.

Figure: Reset option in iPhone
3. Enter the new Apple password and click Erase iPhone.
Also read: Does factory reset deletes everything on iPhone?
Conclusion
Without the Apple ID and password, you cannot reset your iOS device through the traditional ‘Erase All Content and Settings’ method. Either you recover the forgotten Apple ID and password or use any of the two methods shared above to factory reset the iPhone without Apple ID.
You can put the iPhone to Recovery Mode and use iTunes on your computer to reset the iOS device without Apple ID. Other than this, a simpler way to permanently delete everything on your iPhone is by using Stellar iPhone Eraser software. The software doesn’t ask for Apple ID through the process. It quickly resets your iPhone or iPad and brings it to original settings by erasing complete data on it.
![]()
How to fix ‘Unable to load Video: An Error Occurred’
Summary: Are you facing ‘unable to load video’ error message while trying to play videos on iPhone or iPad? No worries. This post guides you how to fix the error and watch your videos on the iOS device without any issue.
‘I am frequently facing ‘unable to load video’ error message ever since iOS 16 update. Its annoying as I cannot watch videos on iPhone. How to fix the issue?’
‘Since I upgraded to iPhone14 Pro from iPhone 11, I have problem playing a few videos. It states ‘error loading video’. I even bought more iCloud storage but no luck. Please help.’
Videos not loading on iPhone or show ‘Unable to load video, an error occurred’ message is a persistent issue faced by iPhone users, even after successive iOS upgrades, irrespective of the iPhone model.
As the annoying error stops you from watching your favorite videos on iPhone, you want to fix it soon. But before that its’ important to understand what could be the cause of this ‘unable to load video’ error, to troubleshoot the problem accordingly.
Why iPhone shows unable to load videos error?
There is no single reason for video loading error. Usually, videos saved in iCloud would display unable to load error on iPhone, if the Internet is off or you have slow connection.
Another common reason behind videos not loading on iPhone is that the ‘optimize storage’ option is enabled on your iOS device. Apple offers this feature to save space on your iOS device and stores the full resolution videos to iCloud. However, this often results in the video loading problem on the device.
Its’ also possible that your iPhone has insufficient space, which prevents videos from loading. There could also be a bug that can be fixed with iPhone update.
Right 9 ways to Fix ‘Unable to load Video, an error occurred’ on iPhone, iPad

Method 1: Restart iPhone
Restart, also called soft reset can fix error in loading video on iPhone or iPad. Close all the applications and restart your iPhone or iPad.
Method 2: Turn on Internet of the iOS device
If you are watching YouTube, Netflix, or other online videos, ensure cellular data of your device is turned on. In case you are facing the error ‘unable to load video: an error occurred’ while loading a higher quality version of the video on iPhone, try by switching to uninterrupted Wi-Fi connection. Note that high speed Internet is necessary for streaming videos on iOS device.
Method 3: Update your iOS device
You can update the device to fix ‘unable to load video’ error on iPhone or iPad. To update your iPhone or iPad follow the given steps. Before that make sure Wi-Fi is turned on.
- Go to Settings > General > Software Update.
- Click Download and Install followed by Install Now.
Method 4: Turn off the Optimize Storage option
When ‘optimize storage’ option is enabled on your iOS device, all the full-resolution high quality videos and photos get saved in iCloud while only the compressed space-saving versions are on your iPhone.
Thus, when you try to open a video on the iOS device, it takes time eventually to load it from iCloud. While sometimes, the video may not load at all. Try to fix unable to load video on iPhone by turning off this feature. Here are steps to disable optimize storage’ option:
- Open Settings. Click on your name.
- Tap on iCloud > Photos.
- Below Optimize iPhone Storage, tap on Download and Keep Originals option.

Figure: Disable Optimise iPhone Storage Option
Wait until the iPhone downloads all the videos from iCloud. You should now be able to open videos without loading error.
Method 5: Update the app that shows video load error on iPhone
If the video loading issue error pops up in a particular app like YouTube, Instagram, then update the application. If the update doesn’t help, you can reinstall the app also. This should fix videos not loading error or buffering issues. App update are available in App Store. To update any iPhone app follow the given steps:
- Open the App Store.
- Now click on your profile icon on top.

Figure: Update app in App Store
- Scroll to find your app and click on the Update button next to it. You can also click on Update All on top.
Method 6: Create free space on your iPhone
High quality videos may not load and show error if there is no space on your iPhone. Check your iOS device, if it has enough free space. Its’ essential to have 2GB free space available in the device to play high quality and large size videos.
You can check the available space on your iPhone or iPad by navigating to: Settings > General > iPhone Storage.

Figure: iPhone storage screen
On the top right, you will see the amount of space used on your iOS device. If the space is less, remove the useless videos, photos, apps and other data on your iPhone or iPad.
Method 7: Access video from iCloud.com
If the videos don’t load on iPhone and show error, try to access them via iCloud.com on your computer by following the below steps:
- Open iCloud.com and enter Apple ID credentials to sign in.
- Click on the Photos or iCloud Drive app where the video is saved.
- Find your video and click on it to open.
There’s also the options in icloud.com to share the video via email or download to save it on your computer.
Method 8: Repair video not loading on iPhone
If you face ‘unable to load video’ an error occurred in Camera Roll videos of iPhone, the file may have corrupted.
Copy or transfer the problem video to your PC or Mac. Download and install a video repair software—Stellar Repair for Video . It can fix file corruption in the error throwing iPhone video. The software is compatible with MP4, MOV, HEVC, video files formats used in iPhone and iPad.
The software also offers a free trail wherein you can repair the corrupt video and watch its preview.
Method 9: Restore iPhone to factory settings
If ‘unable to load video’ error is perpetual on your iPhone or iPad, in spite of trying the above methods, then factory reset can be your last bet.
As all know, factory reset will delete everything on your iOS device , make sure you create the latest backup of the iPhone in iCloud or iTunes.
Follow the below steps to factory reset iPhone and fix unable to load video error:
- Open Settings > General > Reset.
- Click on Erase All Content and Settings.
- Enter Apple passcode. Click on Erase iPhone and follow the prompts.
Now check if the video error problem is resolved or not.
Wrapping Up & FAQ
Usually one of the methods shared in this post fixes the error – ‘unable to load video‘, an error occurred’ on iPhone. However, unfortunately if none works and you cannot play videos on iPhone, contact Apple support .
FAQ
- Why does my iPhone say ‘an error occurred while loading a higher quality version of this photo’?
High quality photos/videos require more storage space to open. Less free storage is one of the for the media file loading error.
Hence, delete some useless photos, videos, or apps to free up space. Now you can open the high quality photo/video smoothly without any error.
2. Why my iPhone videos not playing on PC?
Your iPhone videos may not play on Windows PC due to many reasons— the media player doesn’t support videos file format; virus in your PC; or the video has turned corrupt during transfer. However, you can fix the problem and play iPhone videos on Windows .
3. Why I cannot view my video in icloud.com?
In iCloud.com, select the Photos app and click Photos. In the side bar, you will see the thumbnails of all your photos and videos. Find your video and click on it to view.
Also read:
- 1. Securely Transfer Data From SSD to Seagate SSHD Using Free Software
- Bandicam vs Camtasia, Which One Is Better for 2024
- How To Get Out of Recovery on Apple iPhone 7 Plus? | Dr.fone
- How to Prevent Game Crashes on PC and Console When Playing Nioe 2 Complete Edition
- In 2024, How to Use Life360 on Windows PC For Apple iPhone 7? | Dr.fone
- Maximum Video Stowage on a Single 64Gb Unit
- Recover Apple iPhone 8 Data From iOS iTunes Backup | Dr.fone
- Reset pattern lock Tutorial for Realme C55
- Revitalizing Retired Recording Systems
- Simple ways to get lost files back from Sony
- Step-by-Step Guide to Saving Insta Story Content
- Top iPhone SE (2022) Message Recovery Software | Stellar
- Why Aren't My iPhone Contacts Displaying? Troubleshooting Steps Inside
- Title: Solved Photos Disappeared from iPhone 8 Suddenly | Stellar
- Author: Ian
- Created at : 2025-01-18 19:30:58
- Updated at : 2025-01-21 23:40:06
- Link: https://techidaily.com/solved-photos-disappeared-from-iphone-8-suddenly-stellar-by-stellar-data-recovery-ios-iphone-data-recovery/
- License: This work is licensed under CC BY-NC-SA 4.0.