
Solved Microsoft Excel 2021 File Error The document cannot be saved | Stellar
Solved - The File is Corrupted and Cannot be Opened - Excel
Summary: Unable to open Excel file due to the error ‘The file is corrupted and cannot be opened’? Read this blog to find more details about the error, possible reasons behind it, and solutions to fix the error. In addition, the blog mentions about Stellar Repair for Excel software that can help fix the Excel error in a few clicks. Download the software now and see free preview of the file.

About the Error
Microsoft Excel is a widely used spreadsheet application that comes bundled with MS Office. Users tend to update the application with new security patches and features. Sometimes these updates can cause problems, and result in “The file is corrupted and cannot be opened” error.

Figure 1 – Excel File Corrupted Error Message
Other Possible Reasons behind ‘The File is Corrupt and Cannot Be Opened’ Excel Error
- Opening an older Excel version file in a newer version of Excel. For instance, opening Excel 2013, 2010, or earlier versions in Excel 2016.
- When attempting to open a Microsoft Office (Excel) email attachment in Microsoft Outlook 2010, MS Office 2010 reports a problem with the file preventing it from opening.
How to Fix the ‘Excel File is Corrupt and Cannot Be Opened’ Error?
Here are a few possible solutions that you can try to fix the ‘Excel file is corrupt and cannot be opened’ issue and open your Excel file.
Solution 1: Changing Component Services Settings
Solution 2: Changing the Protected View Settings
Solution 3: Repair Excel Files using Excel Repair Software
Solution 1: Changing Component Services Settings
[Caution] Changing Component Services settings requires making changes to the registry, and any mistake can harm your computer.
Follow these steps to change ‘Component Services’ settings:
Click ‘Start’ or ‘Win+R’ and type ‘dcomcnfg’ and press ‘Enter’.
In the navigation pane, expand the ‘Component Services’, and then expand ‘Computers’.

Figure 2 – Component Services Settings
- Next, right-click on ‘My Computer’, and then click ‘Properties’.
When the ‘My Computer Properties’ dialog box appears, click on the ‘Default Properties’ tab and then set the following values:
- Default Authentication Level: Connect
- Default Impersonation Level: Identify

Figure 3 – Illustrates My Computer Properties
- Click ‘OK’ to change ‘Default Properties’
Solution 2: Changing the Protected View Settings
[Caution] Disabling the ‘Protected View’ can put your system at high risk. Viruses attached to the Excel files can attack and infect your system. Be careful before using this option.
Excel 2010 file cannot open due to the ‘Protected View’ setting in Microsoft Outlook 2010. And so, changing the setting may help fix the error. For this, perform these steps:
- Open MS Excel 2010, go to the ‘File’ menu and click ‘Options’.

Figure 4 – Options
- When the ‘Excel Options’ window opens, click on ‘Trust Center’ and then on ‘Trust Center Settings’.

Figure 5 – Open Trust Center Settings
- Next, choose ‘Protected View’ and uncheck all the options including ‘Enable Protected View for Outlook attachments’ if you use Outlook for email.

Figure 6 – Uncheck Protected View Settings
- Click ‘OK’. Restart the application and try opening the Excel file again.
If none of the above solutions works for you, your Excel file is likely severely corrupt. To repair corrupt Excel files, you need to use advanced options like Stellar Repair for Excel tool. It repairs corrupt and damaged Excel files and helps in retrieving lost data.
Solution 3: Use Excel File Repair Tool
Considering the risks associated with the above solutions, it’s better to use an Excel repair tool to repair single or multiple corrupt Excel files at once. The process is simple, and even a novice can use the Excel file repair tool to repair Excel files with the help of the following steps:
- Download Stellar Repair for Excel and install it.

- Launch the tool. In the tool’s main interface, click ‘Browse’ to select the file. If you don’t know the file location use the ‘Search’ option.

Figure 7 – Illustrates Selecting Corrupt Excel File in Stellar Repair for Excel
- Select the file, and then click on Repair.

Figure 8 – Illustrates Initiating Excel File Repair in Stellar Repair for Excel
- The software scans and lists the Excel file in the left pane. Click on the file to preview its recoverable objects in the right pane.

Figure 9 – Illustrates Preview of Recoverable Excel File Objects
- Save the repaired file at either the default location or a user-specified location.

Figure 10 – Illustrates Saving Repaired Excel File in Stellar Repair for Excel
- Click ‘OK’ to save the repaired Excel file. After the repair process is completed, browse to the location and open it with MS Excel 2010 or any other version.

Figure 11 – Illustrates Saving Complete Message in Stellar Repair for Excel
You will be able to access your Excel file from the selected location.
Conclusion
You can use the first two possible solutions to fix the “The file is corrupted and cannot be opened” error. If you can access the file, save its data and restore the default settings. However, if the file is corrupt and the data retrieved using the first two solutions is inconsistent or incomplete, use Stellar Repair for Excel. This tool can help you recover Tables, Charts, Chart Sheets, cell comments, Images, and Formulas while preserving the worksheet properties and cell formatting. You can also preview the file and verify the data inside the file before saving it.
How to fix Microsoft Excel has stopped working error?
Summary: This blog discusses the possible reasons behind ‘Microsoft Excel has stopped working’ error and solutions to resolve the error manually. You can use Stellar Repair for Excel to quickly repair the file and recover all its data in a hassle-free manner.
Has your Microsoft Excel program stopped working or is acting strange? Excel not responding is a common issue you may experience on launching the application or opening a spreadsheet.

Figure 1 – Microsoft Excel Has Stopped Working Error Message
Possible Causes behind ‘Microsoft Excel has Stopped Working’ Error, and Solutions Thereof
Note: Several users have reported about encountering the ‘Excel has stopped working’ issue on Windows 10, 8, and 7 OS after installing an update for Excel (KB3118373). If you too have installed the update, then uninstall it and check if it solves the error. For detailed information, refer to this link .
How to Fix “Errors were detected while saving Excel” Error?
When trying to save the Excel file, you might face unexpected errors. The “Errors were detected while saving Excel” is one such error. It can also occur when using VBA in Excel. The complete error message appears as:
**“Errors were detected while saving [file name]. Microsoft Excel may be able to save the file by removing or repairing some features. To make the repairs in a new file, click Continue. To cancel saving the file, click Cancel.”
**
The error can occur if the features (Pivot tables, charts, macros) used in the Excel file get corrupted . However, there could be several other reasons behind the occurrence of the error. Let’s discuss them.
What Causes the “Errors were detected while saving Excel” Error?
There are various reasons why you encounter this error. Here are some of them:
- Incompatible pivot table in the Excel file
- Large or uncompressed images in the Excel file
- File-sharing properties are not allowing file saving
- Excel file is corrupted
- Large-sized Excel file
- File version incompatibility
- VBA code is corrupted
Ways to Fix the “Errors were detected while saving Excel” Error
You’re not able to save the Excel file if there is no storage space on your hard drive. So, first check if your hard drive has sufficient storage space to save the file. If this is not the case, then it might happen that your antivirus program is interrupting the saving process. To check this, temporarily disable your antivirus program and then try to save the file. If still your Excel is throwing the “Errors were detected while saving Excel” error, then follow the below given methods to fix the error:
Method 1: Open the Excel in Safe Mode and Disable the Add-ins
When you open Excel in safe mode, it opens without the third-party add-ins. This helps in finding out if any add-ins are causing the error.
Here’s how to open the Excel in safe mode:
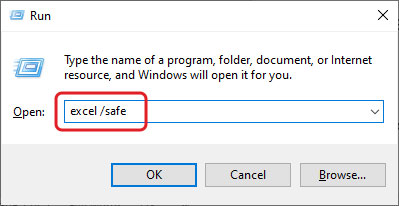
Open the Run window by pressing Windows key + R.
Type excel /safe in the Run window.
 ?
?Next, click on OK.
It will open Excel in safe mode.
Now, try to open and save the affected file.
 ?
?If you are able to save the file without any issue, then this means that the error has occurred due to third-party add-ins or settings. You can try disabling the add-ins to fix the issue. To do this, follow these steps:
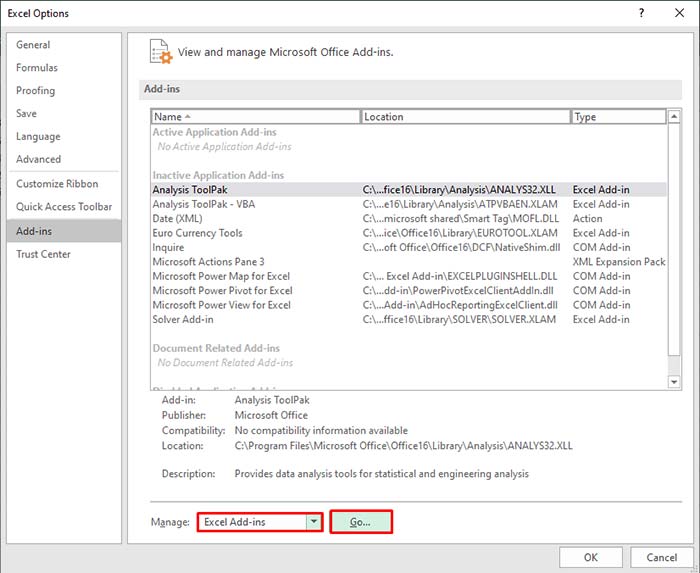
- First, open Excel.
- Then, go to the File tab and click Options.

- In Excel Options, click on the Add-ins

- Under the Manage section, select Excel Add-ins and then click on the Go
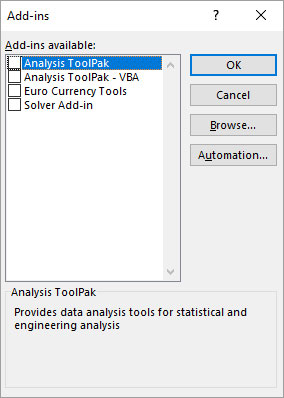
In the Add-ins dialog box, unselect the add-ins under the Add-ins available option and click OK.
Note: Disabling add-ins does not remove them from the system. To remove them permanently, you need to uninstall them.
Method 2: Check the Excel File Name
Some users have observed this error when saving the Excel file with an invalid name. You can check the file name and ensure that it should not contain more than 218 characters. If the name exceeds the required limit, then try shortening the file name or move the file to a folder with a short path name.
Method 3: Copy the Data from the Affected File to a New File
If you are not able to save the Excel document, then try copying the data from the affected file to a new Excel file. Then, save the new file with a different name. This helps in resolving the issue.
Method 4: Check and Provide File Permissions
You may experience the “Errors were detected while saving Excel” issue when you do not have desired permissions to modify the folder in which your Excel file is located. To modify the folder, you should have read, write, and create permissions. You can check and provide the desired permissions using the below steps:
- Navigate to the Windows Program Files and then find the desired folder (where the Excel file is saved).
- Right-click on the folder and then choose Properties.
- Select the Security tab and then click
- Click on Change Permissions in the Advanced Settings
- Click Administrators and then click Edit.
- Now set the Apply to drop-down button to This Folder, Subfolder, and Files.
- Click on the Full Control field and then click Apply > OK.
Method 5: Check Pivot Tables in Excel Sheet
You can review Pivot tables to see if they are causing the “Errors were detected while saving Excel” error. To do so, follow the below steps:
Click Power Pivot > Manage.
Check the tabs in the Power Pivot
Check if all the formulas used in the table are correct. Sometimes, even a small typo can create an issue in Excel.

Method 6: Repair Your Excel File
The “Errors were detected while saving Excel” issue can also occur if the Excel file is corrupted. In such a case, you can take the help of the built-in utility in Excel – Open and Repair to repair your Excel file. Here’s how to use the tool:
- In Excel, click the File tab and then click Open.
- Click Browse to select the desired file.
- The Open dialog box is displayed. Click on the corrupted file.
- Click on the arrow next to the Open button and then click Open and Repair.
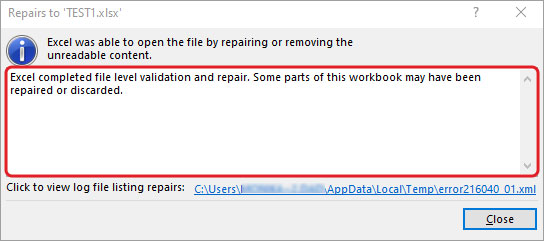
- Click on the Repair

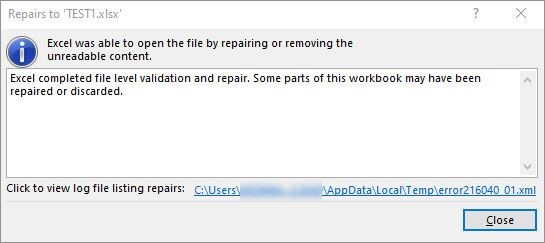
After repair, a message will appear (as shown in the below figure).
Click Close.
However, sometimes, the Open and Repair utility fails to fix the file if it is severely corrupted or large-sized. In such a case, you can take the help of a third-party Excel repair software, such as Stellar Repair for Excel. The tool performs a comprehensive scan of the corrupted Excel file to fix the issues and recover all the items from the file without changing the original formatting. It can recover pivot tables, charts, images, engineering formulas, etc. The tool is compatible with Windows 11/10/8.1/8/7. You can download the free trial version of the tool to evaluate its functionality.
Closure
Many Excel users reported facing the situation when they are saving the Excel file. You can check the file’s compatibility to fix the “Errors were detected while saving Excel” issue. If you are getting this error in a Macro-enabled file then you can try deleting the VBA project from a document to resolve the issue. However, deleting the entire VBA code cannot be a better solution as it can lead a data loss in the Project you are working on. In the above article, you have learned the reasons behind the issue and discovered how to fix the error. Follow the methods and if none of them works then try using Stellar Repair for Excel. It is an advanced tool that can quickly repair corruption in Excel worksheets at any level. It lets you restore the corrupted components from the corrupted file without removing the existing data.
Fix the Too many different cell formats Error in Excel?
Excel has set a limit on the number of unique cell formats within a workbook. Excel 2003 allows up to 4000 different cell format combinations, whereas Excel 2007 and later versions allow a maximum of 64000 combinations. When this limit exceeds, you may encounter errors, such as “Too many different cell formats”. It can prevent you from inserting or modifying workbook rows or columns. Sometimes, it prevents you to copy and paste the content within the same or different workbooks. This error may also occur due to various other reasons.
You can encounter the “Too many different cell formats” error due to the below reasons:
- Formatting is missing in the workbook.
- Size of your Excel file has increased due to excessive use of complex formatting (conditional formatting).
- Workbook contains a large number of merged cells.
- There are multiple built-in or custom cell styles.
- Excel workbook is corrupted.
- The unused styles are unexpectedly copied to new workbooks (when moving or copying a worksheet from one to another).
- Workbooks contain multiple worksheets with different cell formatting.
Methods to Fix the “Too many different cell formats” Error in Excel
First, check that your Excel application is up-to-date. It helps in preventing duplicate styles in workbooks. If the error persists, then follow the below methods:
Method 1: Simplify the Workbook Formatting
You can face the error in Excel - Too many different cell formats, if the size of your Excel file has increased due to excessive or unnecessary formatting. You can try to simplify the formatting of the affected workbook. While reducing the number of formatting combinations, you can follow the simplifying guidelines, such as using a standard font and applying borders consistently. Follow the below steps to remove unnecessary formatting in your worksheet:
- First, open the affected worksheet.
- Now, use the shortcut key (Ctrl+A) to select all the cells.
- In the Excel ribbon, navigate to the Home tab and click Clear.

- Then, select the Clear Formats option.

The above steps will remove all unnecessary formatting from the selected cells, thus reducing the number of cell formats. Besides this, you can try removing the cell patterns (if any) or use cell styles to remove unnecessary formatting in the workbook.
Method 2: Remove Conditional Formatting
Conditional formatting is also one of the reasons behind the “Too many different cell formats” error. It usually occurs if you have applied multiple rules to various cells or cell ranges within a workbook. Each rule has its own formatting settings. If you’ve applied a large number of conditional formatting to cells, it can increase the number of unique cell formats. You can check and remove the unnecessary conditional formatting. Here are the steps to do this:
- Open the Excel file in which you are getting the error.
- Go to the Home tab and locate Conditional Formatting.

- Select Manage Rules.
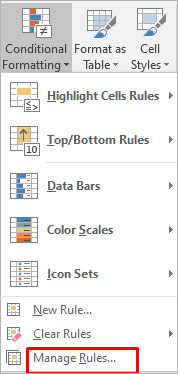
- The Conditional Formatting Rules Manager wizard is displayed. You can check the formatting rules and delete the unnecessary rule by clicking on the Delete Rule option.
Method 3: Repair your Excel Workbook
Corruption in the Excel workbook can also cause the “Too many different cell formats” error. You can try the Microsoft inbuilt utility to repair the file. Follow these steps to use this utility:
- Open your Excel application. Go to File > Open.
- Click Browse to choose the affected workbook.
- The Open dialog box will appear. Click on the corrupted file.
- Click the arrow next to the Open button and then select Open and Repair.
- You will see a dialog box with three buttons - Repair, Extract Data, and Cancel.

- Click on the Repair button to recover as much of the data as possible.
- After repair, a message is displayed. Click Close.
If the Open and Repair utility does not work or fails to repair the corrupted Excel file due to any reason, then you can use Stellar Repair for Excel to repair the Excel file. It is a simple-to-use third-party Excel repair tool with an intuitive UI that enables anyone to use it without much effort. The tool can help in fixing the “Too many different cell formats” error. It does so by repairing the Excel (XLS/XLSX) file and recovering all the components, including damaged cell style, without impacting the original formatting. You can download the software’s demo version and install it to check how it works.
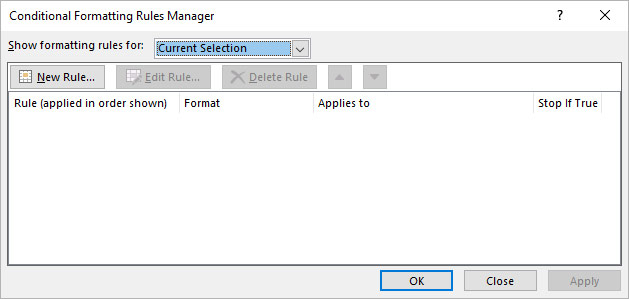
Method 4: Save the Excel File to a Binary Workbook (.xlsb) Format
You can also get the “excel too many cell formats” error if the size of the spreadsheet is too large. You can try saving the Excel file in binary (.xlsb) format to reduce the Excel file size. Here’s how to do so:
- In Excel, navigate to File > Save As.
- Select Excel Binary Workbook (*.xlsb) in the Save as type dialog box.
- Click Save.
Some Additional Solutions
Here are some additional methods you can try to fix the issue:
1. Check and Fix the Un-used Style Copy Issue
Many users have reported encountering the “Too many different cell formats” error when moving or copying the content of a workbook from one Excel to another and the unused styles being copied from one workbook to another. Microsoft has released a hotfix package which contains a fix for this issue. You can install this hotfix package (2598143 ) to resolve the issue.
2. Use Clean Excel Cell Formatting Option
You can check and enable the Excel cell formatting option to fix the “Too many cell formats” issue. This option will help you remove the excess formatting in your workbook. To locate this option, click on the Inquiabove steps willre tab. If you fail to see the Inquire tab, then check if the Inquire option is enabled in the Excel Com Add-ins settings.
3. Clean up Workbooks using Third-Party Tools
The “Too many different cell formats” issue can occur if your workbook contains a large number of unnecessary styles, as mentioned above. You can use third-party tools, such as XLStyles Tool or Remove Styles Add-in to clean up workbooks recommended in Microsoft Guide. However, Microsoft takes no guarantee of these tools.
Closure
If you’re getting the “Too many different cell formats” error in Excel, try the methods discussed in this post to resolve it. You can simplify the formatting by following standardized guidelines and clearing all the unnecessary conditional formatting. If the error has occurred due to corruption in Excel file, then you can use Stellar Repair for Excel to repair the Excel file. It is an advanced tool that can repair Excel worksheet and recover all its objects without losing the original formatting.
Resolve Compile Error in Hidden Module in Excel: Causes & Solutions
The hidden module in Excel refers to a container with VBA codes, custom queries, and complex macros. The compile error in a hidden (protected) module in the Excel worksheet usually occurs when doing different activities on a macro-enabled sheet, such as merging .xls files. The error can result in macros execution failure. You need to quickly resolve this compile error to restore full functionality of the VBA code. Below, we’ll be discussing the solutions to fix this Excel error. But before that, let’s see why this error occurs.
You may encounter the Compile error in hidden module due to one of the following reasons:
- The code in the workbook is not compatible with the Excel application.
- Manual queries created in a previous version are no longer compatible with your current version of Excel.
- Missing references.
- Invalid .exe files (control information cache files) are automatically created with ActiveX control insertion in Excel file.
- Protected module is corrupted.
- The workbook with hidden module is damaged or corrupted.
- Incompatible add-ins.
- Incompatible Excel file version.
- The module is protected or password-protected.
- Missing or corrupted mscomctl.ocx file.
Excel can throw the compile error while compiling the code that exists in the protected module. So, first check the error and identify the hidden module that is creating the issue. You can unprotect the module. Also, ensure that you have permission to access the VBA code in the module. If the error still exists, follow the below troubleshooting methods.
Method 1: Re-register ActiveX Control Files or mscomctl.ocx Files
You can get the compile error in the Excel file, containing the VBA code related to ActiveX controls or OCX files. The ActiveX control files and OCX files (mscomctl.ocx files) are the components of Microsoft’s standard controls library. The compile error in the hidden module can occur if these files are missing. In this case, you can use the Regsvr32 tool to re-register the OCX files. The Regsvr32 is a command-line utility to register and unregister OLE controls in the Windows registry.
Method 2: Delete .exd Files
The .exd files are temporary files created by Excel when inserting ActiveX controls objects. These temporary files can lead to a compile error if they are corrupted. So, if this issue has occurred, particularly in the Excel file containing ActiveX controls, then deleting .exd files might fix the issue. To delete the .exd file, follow the below steps:
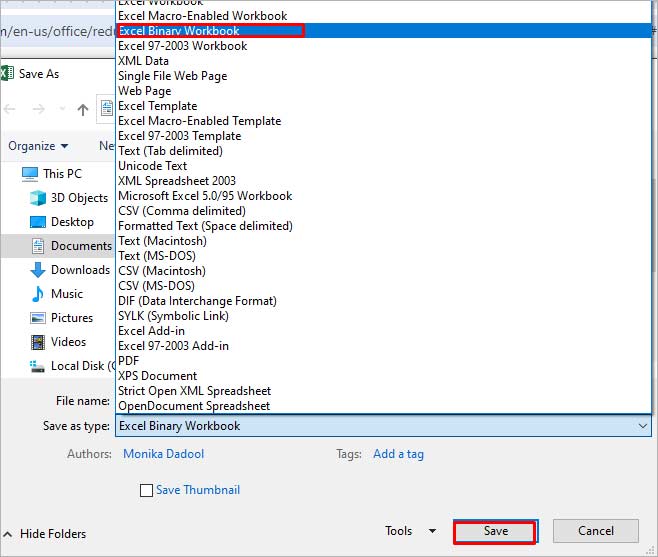
- First, open the Run window by pressing the Windows+R keys.
- In the Run window, type %appdata%.
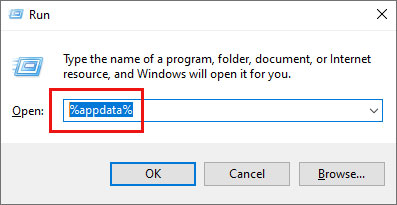
- In the Roaming window, click on the Microsoft option.
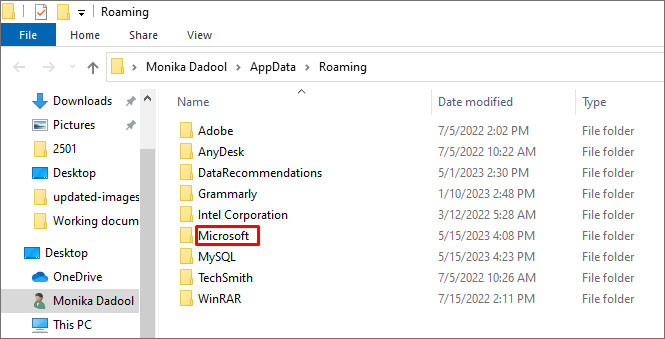
- Under Microsoft, you will see a list of folders. Search and click on Forms.
- Right-click on a file with .exd extension and select Delete.
- Once you delete the .exd files, restart your Excel application.
Method 3: Rollback the Office Updates
MS Office updates or upgrades may also cause the compile error in hidden module in Excel. If the error has occurred after downloading the recent Microsoft Office updates, try reverting to the previous version or uninstalling the recent updates to fix the issue.
Method 4: Unselect Missing References
The compile error in hidden module determine path in Excel can also occur if your file contains a reference to object library/type library, which is labelled as Missing. You can locate, check, and uncheck the references marked as ‘Missing’ to fix the issue. Here are the steps:
- Open your Excel and press Alt + F11 keys.
- The Visual Basic Editor is displayed.
- Go to the Tools option and then click References.
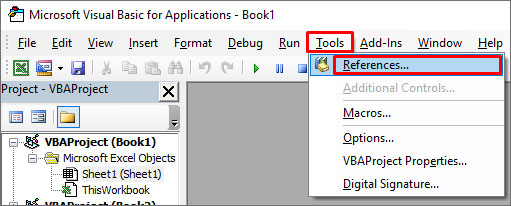
- In the References-VBAProject window, under Available References, search and unselect the references starting as “Missing”.
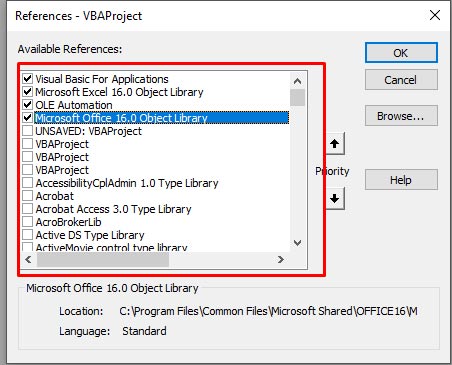
- Click OK.
Method 5: Check the Code in Module
The compile error in hidden module can occur if there are issues in the code within the module. The problems include incorrect or missing syntaxes, missing parameters/references, or the code contains incompatible functions or a wrong name of the object. You can check and fix these issues in the code by opening the VBA editor.
Method 6: Check and Remove Add-ins
In Excel, the compile error in macro-enabled files can also occur due to incompatible add-ins. You can check and disable the add-ins in Excel using the below steps:
- First, open the Run window and type excel /safe and then click OK. The Excel application will open in safe mode.
- Now try to open the affected Excel file. If it opens without the error, then check and remove the latest installed Excel add-ins.
- Navigate to the File option and then select Options.
- In the Excel Options window, click Add-ins.
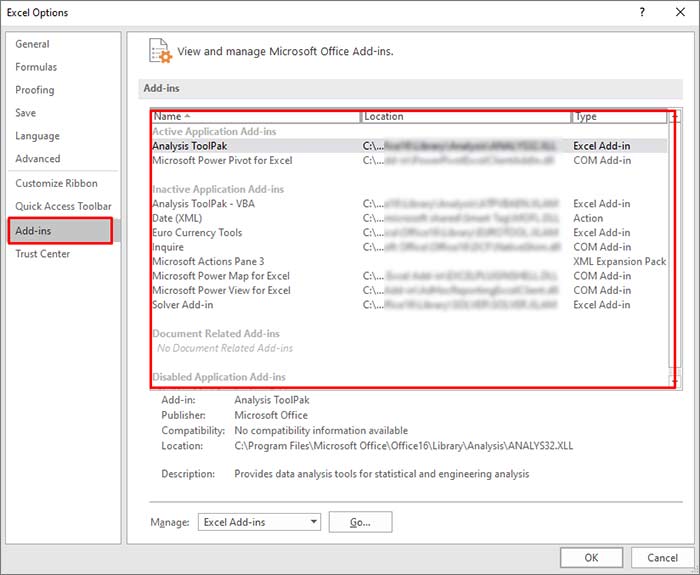
- Under Add-ins, search and select the latest add-ins, and then click on Go.
- In the Add-ins window, uncheck the add-ins and then click OK.

- Restart Excel and then check if the error is fixed or not.
Method 7: Repair the Corrupt Excel File
Corruption in the Excel file can affect the macros in the hidden module, which may result in the compile error. In such a case, you can try repairing the Excel file using Microsoft’s inbuilt utility -Open and Repair. To use this tool, follow these steps:
- Open your Excel application.
- Click the File tab and then click Open.
- Click Browse to select the affected workbook.
- The Open dialog box will appear. Click on the corrupted file.
- Click the arrow next to the Open button and then Open and Repair.
- You will see a dialog box with three buttons - Repair, Extract Data, and Cancel.

- Click on the Repair button to recover as much of the data as possible.
- After repair, a message is displayed. Click Close.
What if None of the Above Solutions Works?
If the above methods fail to get rid of the “compile error in hidden module” in Excel, then use an Excel repair tool such as Stellar Repair for Excel. This tool is specifically designed to repair the corrupted Excel file. It can recover all the components from corrupted Excel file (macros, queries, formulas, etc.) without changing their original formatting. The tool is compatible with all Excel versions and can be downloaded on a Windows system. You can download the free trial version of Stellar Repair for Excel to scan the corrupted Excel file and preview the data.
Closure
You can get the “compile error in hidden module” when Excel detects any issue while compiling the code in a protected module. It can occur when there is an issue with the macro-enabled Excel workbook or Excel add-ins. You can follow the above-mentioned methods to fix the issue. If the error occurs due to corruption in the database file, then you can try Stellar Repair for Excel . It can repair severely corrupted Excel files. It also helps recover all the Excel workbook’s components, including macros and queries. The tool has a simple and user-friendly interface.
Fix Cannot Paste the Data Error in Microsoft Excel
When copying and pasting the cell contents or attributes from one workbook to another, you can encounter the “Cannot paste the data” error. The error indicates that the values you are trying to paste do not match the cell format (Currency, Date, Text, etc.) used in the column. The error can occur if you are attempting to paste information into a merged cell. You can also get this error if the data you are trying to paste contains more columns than the destination worksheet can accept or if the copy area and paste area aren’t the same size.
Why you cannot Paste the Data in Microsoft Excel?
You can experience the “Excel cannot paste the data” error due to one of the following reasons:
- Locked cells
- Data size limitation
- Formatting issues
- The file size is too large
- Overloaded clipboard
- Data type mismatch
- Invalid range
- Lack of permissions
- Excel file is corrupted
- Compatibility issues
- While pasting the merged cells
Methods to Fix MS Excel Cannot Paste the Data Error
The “Microsoft Excel cannot paste the data” error usually appears when copying and pasting data within the spreadsheet. It primarily affects the copy-and-paste feature within the Excel file. However, the impact of this error may vary with the data you are working with. When this error occurs, first try restarting the Excel application. Ensure that you’ve saved all your important data before restarting the application to prevent data loss. If, after performing this basic step, you still face the issue, then try the following troubleshooting methods.
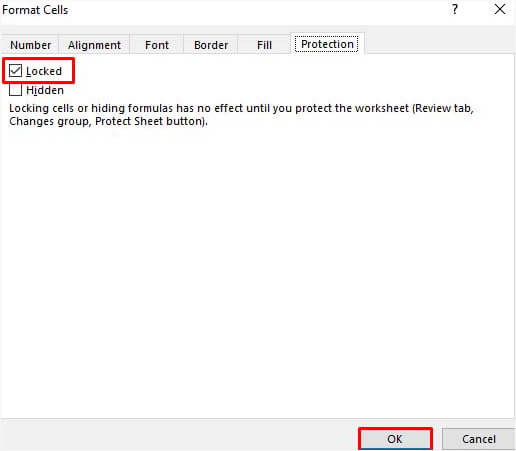
Method 1: Check and Unlock Cells in Excel
You can get the Excel cannot paste the data error if the cells you are trying to paste in the Excel file are locked. You can check and unlock the specific cells in the Excel file using the below steps:
- Go to the Home tab in your Excel file and click Format Cell Font popup launcher.

- In the Format Cells dialog box, click Protection.
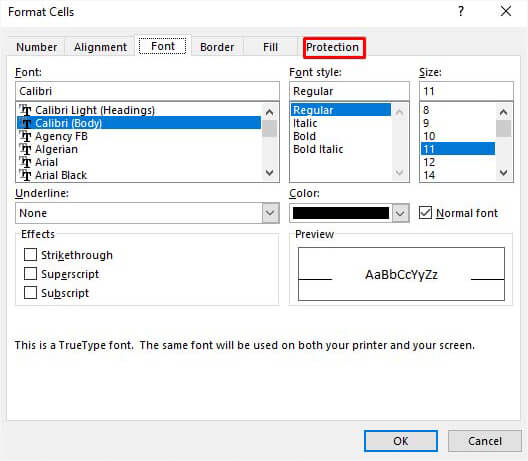
- Under the Protection option, unselect the locked field and then click OK.
Method 2: Check and Fix the Cell Format
Sometimes, you can get the “Cannot paste the data” error in Excel if there is an issue with the formatting of the cells in the column (in which you are trying to paste the data). You can check whether the cell formats of the columns of the source file (from where you are copying data) match the destination file (in which you are pasting the cell data). If not, then change the cell format. Here’s how to do so:
- In the Excel file, click on the affected column heading (whose cells you need to modify).
- Navigate to the Home tab and click the General dropdown menu.

- Click on the desired cell format that matches the values you are trying to paste into the column.
Method 3: Check Copy and Paste Area Size
The “data cannot be pasted” issue can also occur if Excel detects the copy area of the range of cells is not of the same size and shape as that of the paste area. So, make sure the size of the range of cells for the paste area is same as the copied area. To ensure this, you can try the following:
- Use Upper-left Cell
You can select the upper-left cell instead of the complete range to paste.
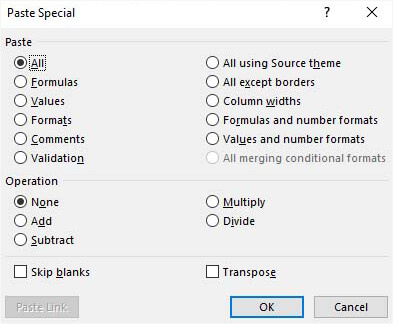
Use Paste Special Option
You can use the Paste Special option to paste the data. To use this option, go to Home > Paste Special.
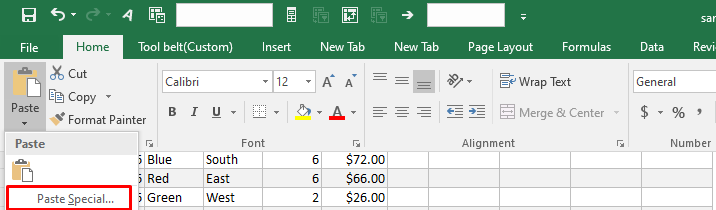
- You can choose from the different options, such as paste all, formulas, operations, Transpose, skip blanks, etc. to take control over how the data is pasted.
Method 4: Check and Unmerge Cells
The merged cells in the workbook can create discrepancies when copying and pasting data. These can create mismatch between the source and destination cell areas, resulting in errors. Make sure you are not pasting the data copied from merged cells. You can check and unmerge the cells using the below steps:
- Open the Excel file (in which you are copying data) and go to the Home tab.
- Click Merge & Center > Unmerge Cells.

Method 5: Unselect the Excel DDE (Dynamic Data Exchange) Option
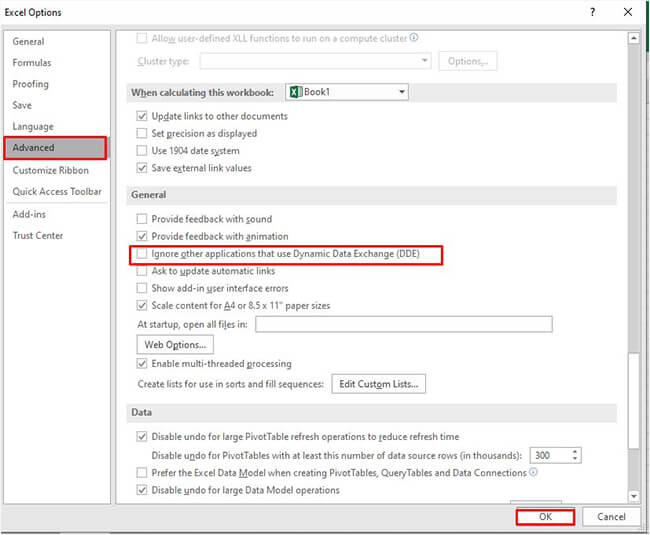
Sometimes, you can get the Excel cannot paste the data error while copying and pasting data from Excel file to external data sources or applications. It usually appears if you have established DDE links between them. To resolve this, you can uncheck the “Ignore other applications that use Dynamic Data Exchange (DDE)” option. Follow the below steps to do so:
- Open your Excel file.
- Go to File > Options.
In Excel Options, click Advanced and unselect “Ignore other applications that use Dynamic Data Exchange (DDE). Click OK.
Here are some additional solutions you can try to fix the “Cannot paste the data” error in Excel
Check the Excel File Format
Sometimes, the copy and paste error can occur if you try to move data from an older version of Excel file (XLS) into a newer version file (XLSX) or vice versa. You can try to change or convert the file format to resolve the issue.
Clear Clipboard
Too many items on the clipboard can prevent you from copying and pasting the data. You can empty your clipboard by deleting all clips. To do this, go to Home and click the Clipboard option.
Change the Column’s Cell Format
You can get the “Cannot paste the data” error when the information you need to paste does not match the cell format in the column. In such a case, you can change the column’s cell format. To do this, navigate to the Home option and then click on the General menu arrow. Then, change the cell format suitable to the type of information you are trying to paste in that column.
Add Columns
The copy-and-paste error in Excel can also occur if there are not enough columns to accept the data that you are trying to paste. You can insert more columns and then try copying and pasting data. To insert additional columns, click on the column heading, click Home, and then select Insert.
Remove Incompatible Add-ins
Sometimes, incompatible or faulty add-ins can also create conflicts with Excel’s clipboard operations, leading to the error. To check if add-ins are causing the issue, open the Excel file in safe mode. In safe mode, if you are able to paste the data, then check and uninstall the incompatible Excel Add-ins.
What to do if Nothing Works?
If the above methods do not work, then corruption in the Excel file could be the cause of the “Cannot paste the data” error. In such a case, you can use Excel’s built-in Open and Repair utility to repair the corrupted file. Here’s how to use this utility to repair the Excel file:
- Open your Excel application.
- Navigate to File and then click Open.
- Click the Browse option to select the affected Excel file.
- The Open dialog box opens up. Click on the corrupted file.
- From the Open dropdown, select the Open and Repair option.
- The Excel will prompt you to choose one of the below options:
- Repair
- Extract
- Cancel
- Select the Repair option to extract maximum data from the file. If the Repair option fails, choose the Extract option to recover the data, excluding formulas and values.
The Open and Repair utility may not be able to repair your Excel file if it is severely corrupted. In such a situation, the best possible way out is to use a professional Excel repair software to repair the file. You can try Stellar Repair for Excel. It can repair highly damaged or corrupted Excel (.xls, .xlsx, .xltm, .xltx, or .xlsm) file and recover all the objects from the file by maintaining the original formatting. The tool supports 2007 and higher editions of MS Excel. You can download the demo version of the software to preview the repaired objects and verify its functionality.
Conclusion
The “Excel cannot paste the data” error in Excel can occur due to different factors. You can check and clear the clipboard, unmerge the cells, unlock the cells, and use various other methods mentioned above to troubleshoot the error. If you fail to copy and paste the data due to file corruption, then opt for an advanced Excel repair software, like Stellar Repair for Excel. It is a reliable tool that can help you repair highly damaged/corrupted Excel files. It enables you to recover all the objects from the corrupted Excel file, with complete integrity.
Filter Not Working Error in Excel [Fix 2024]
Summary: The filter is not working issue in Excel can occur due to several reasons, like blank rows, hidden rows, merged cells, corrupted data, etc. In this post, we will mention the reasons why the filter is not working correctly in Excel and several fixes to resolve the issue. We will also mention an advanced Excel repair tool to repair the Excel file if corruption in file is the cause of the issue.
You can use the Filter function in Excel to filter data in large-sized Excel files quickly. While using Excel filters, sometimes, you face a situation where the filter is disabled or may fail to function properly.

The Excel filter usually fails to work if you have not selected the complete and correct range of data. Let’s learn more about the “Sort and Filter not working in Excel” issue and look at the possible methods to fix it.
Why the Filter is not Working in Excel?
You can face the “filter is not working” issue if you are applying the filter on a protected worksheet or trying to find the data from a hidden row. Besides this, there could be many other reasons contributing to this issue, such as:
- The data you are trying to filter is in merged cells.
- The Excel file automatically selected the data up to the first empty cell, excluding the remaining rows.
- Grouped sheets in Excel file.
- Blank row in the Excel sheet.
- You are trying to apply a filter on an invalid data range.
- The workbooks in which you’re facing the filter issues are corrupted.
- You are specifying incorrect criteria in the filter columns.
Solutions to Resolve the Filter is not Working Issue in Excel
There might be two scenarios: the Excel filter option is disabled/grayed out or the filters fail to function properly. You can follow the given troubleshooting solutions to resolve the issue based on the scenario you’re facing.
Scenario 1 – Filter Option is Disabled or Grayed Out
Method 1: Check and Un-group the Worksheet
When you apply filters to a single sheet in a grouped set, Excel disables the filter option in other sheets within the group. You can check the grouped sheets and try ungrouping them to enable the filter option. Here’s how to do so:
- In the Excel file, go to the Group section.

- Right-click on the Ungroup Sheets.
Alternatively, you can press the Shift + Alt + Left keys to ungroup the sheets.
Method 2: Unprotect Worksheet
The “disabled Excel filter” issue can also occur if your worksheet is protected. You can unprotect the worksheet to enable the filter option. To do so, go to the Review tab and then select Unprotect Sheet.

Method 3: Check and Uninstall Excel Add-ins
Sometimes, the Excel filter gets disabled due to faulty or corrupted Excel add-ins. You can run the Excel in Safe mode to check whether the issue has occurred due to add-ins. To do this, type excel /safe in the Run window and click OK.

In safe mode, if you see the filter option, it indicates some problematic Excel add-ins were causing the issue. In such a case, you can check and uninstall the faulty Excel add-ins to fix the issue.
Scenario 2 – Filter is not Working
Method 1: Try Clearing Filters
Sometimes, the Excel filter fails to work correctly if some filters from the previous sessions are still active. In such a case, you can clear the applied filters. Follow the below steps:
- In Excel file, click Sort & Filter option.
- Select clear.

Method 2: Select Entire Data
The filter not working issue in Excel can occur when the range selected for filtering is incomplete or incorrect. You need to make sure that you’ve selected the entire data range in Excel. You can use the Ctrl+A keys to select the entire content in the worksheet.
Method 3: Check and Delete Blank Cells from the Table’s Columns
When you apply a filter to the data, Excel expects data to be in a continuous range. Excel filters do not consider the blank cells, thereby resulting in incorrect functioning of the filter. To resolve this issue, check and delete all blank cells. In case your Excel file is too large to delete the blank cells, then you can add a “Serial number” row as an alternative. Adding serial number row creates a data continuity, thus helping in fixing the filter-related issue.
Method 4: Unhide Hidden Rows and Columns
Hidden rows or columns in worksheets can also affect the filter functionality. You can check and unhide rows/columns to troubleshoot the issue. Here is how to do so:
- In the affected Excel file, go to Home.
- Click on Format > Hide & Unhide.

- Click Unhide Rows or Unhide Columns (as required).

Method 5: Unmerge Cells
You can experience the filter in Excel is not working issue if you are using the filter to extract data from merged cells. Ensure to unmerge the “merged cells” before applying a filter in Excel. Follow the below steps to unmerge the merged cells in Excel:
- Navigate to the Home option.
- In the toolbar, select the Merge & Center option.
- Click Unmerge Cells.
Method 6: Repair the Workbook
Sometimes, the Filter Not Working in Excel issue can occur due to inconsistencies in file structure. If these issues occurred due to corruption in the worksheet, you can repair it using the Open and Repair tool. It is an in-built tool in Excel that is used to repair corrupted Excel files. Here are the steps to use this tool:
- In the Excel application, navigate to the File option.
- Click Open and then click Browse to choose the Excel file.
- In the Open dialog box, click the problematic Excel file.
- Click the arrow next to the Open option and select Open and Repair.
- Click Repair to recover as much data as possible.
- The application prompts a message after the repair process is complete. Click Close.
In most cases, the Open and Repair tool can easily fix corruption issues in the Excel file. However, for any reason, if the open and repair tool doesn’t work you can consider repairing the file using a professional Excel Repair tool. Stellar Repair for Excel is one such advanced and secure tool to repair Excel files. With this tool’s powerful scanning capabilities, you can repair highly corrupted Excel files and recover all their objects with complete integrity. The tool is compatible with all Windows editions, including the latest Windows 11.
Closure
Several reasons are associated with the filter not working issue in Excel. The filter option may not work as expected if you have not selected the complete and correct range of data or for many other reasons. You can follow the troubleshooting methods discussed above to fix the issue. If the filter fails to work due to corruption in the workbook, then try Stellar Repair for Excel . It is an advanced tool that can even repair severely damaged files. It also helps to recover all the data from corrupted files without changing the original formatting. You can check the tool’s functionality by downloading its demo version. It allows you to preview all the repairable objects in the corrupted Excel file.
Also read:
- [New] Best Practices Boosting Your Game Videos with Tags
- [New] Discovering Linux's Top Screenshots Tools
- [Updated] The Art of Fast-Loading Facebook Videos
- 2024 Approved Expert Guide to Displaying Audio Waves and Adding Motion Graphics in Premiere Pro
- Different Methods for Resetting Vivo G2 Phones with Screen Locked and Not | Dr.fone
- Digital Training Footage for 2024
- Hard Resetting an Infinix Note 30 VIP Racing Edition Device Made Easy | Dr.fone
- Hard Resetting an Samsung Galaxy A05s Device Made Easy | Dr.fone
- How to Reactivate Your Snapchat Account
- How to Reset Itel A05s without Losing Data | Dr.fone
- In 2024, Pinnacle Camera Technology – The Best Reviewed
- Mastery Manual for Dynamic, Distracting Filters
- The 5 Best Methods to Track a Lost or Stolen iPhone 8 | Stellar
- The Ultimate Guide to YouTube Keywords for Peak Performance for 2024
- Three methods to recover lost data on Motorola Moto G Stylus 5G (2023)
- Vivo Y100i Power 5G Video Recovery - Recover Deleted Videos from Vivo Y100i Power 5G
- Your Complete Guide To Reset Samsung Galaxy A25 5G | Dr.fone
- Title: Solved Microsoft Excel 2021 File Error The document cannot be saved | Stellar
- Author: Ian
- Created at : 2025-01-19 17:58:08
- Updated at : 2025-01-21 23:40:03
- Link: https://techidaily.com/solved-microsoft-excel-2021-file-error-the-document-cannot-be-saved-stellar-by-stellar-guide/
- License: This work is licensed under CC BY-NC-SA 4.0.