
Solved Mac Doesnt Recognize my iPhone XS Max | Stellar
Solved: Mac Doesn’t Recognize my iPhone
Summary: Is your Mac not recognizing the iPhone? Learn the 9 ways to fix iPhone not showing up on Mac. You can apply these methods for all iPhone models not recognized by macOS Ventura, Monterey, Catalina, Big Sur, High Sierra and below versions.

You may want to backup iPhone data or transfer favorite photos, music, or videos to Mac. But sometimes your Mac computer doesn’t detect the iPhone when you try to connect it. There are so many complaints such as iPhone not showing up in Finder in Ventura, Monterey, Catalina or Macbook not recognizing iPhone 14. Some also reported an unknown error or a 0xE error when trying to connect iPhone to Mac computer. The situation is frustrating as it prevents you to sync iPhone to macOS and access iPhone data on Mac.
No worries. There are methods, which can fix the issue and let you again access your iPhone on Mac. But, first you should be aware why Mac fails to recognize your iPhone as this helps in troubleshooting the problem.
Why your iPhone not detected by Mac computer?
Mac does not detect your iPhone due to many reasons, such as
- iPhone is not ‘on’ when connected to Mac.
- iPhone is damaged.
- The USB cable or USB port is not working.
- Software updates are pending including iOS, iTunes, and macOS.
- Third-party software conflict wherein 2 programs arecompeting for the same memory, peripheral device etc., on your Mac.
- Firewall or Antivirus software is preventing Mac to recognize iPhone.
- Mac settings don’t allow to view iPhone in Finder.

1. Check your iPhone
Before you connect your iPhone to Mac, make sure the iOS device is unlocked and on the Home screen.
2. Fix USB connection
When Mac computer doesn’t recognize iPhone, first check your USB connection. The USB cable or the port can be faulty. Try to connect iPhone to Mac using another Apple USB 2.0 cable. If that doesn’t work try with the different port. Plus, disconnect other USB devices from Mac except your iPhone.
3. Restart your iPhone
Restarting the iOS device would resolve any issue between your iPhone programs and iTunes. To restart hold volume/side/ top button depending on your iPhone model. Slide the red power off slider on your iPhone. Wait for your iPhone to turn off. After a few seconds, again restart iPhone. Now Mac should recognize your iPhone.
4. Restart your Mac
Restarting Mac clears the cache and memory of your system giving it a fresh start. It also installs pending updates.
5. Update your macOS
When iPhone is not showing up on Mac Finder but you can see it under USB Device Tree, update the macOS to the latest version. Make sure there are no pending software installs.
To check the USB Device Tree on Mac follow the below steps:
- Click on Apple icon followed by About This Mac.
- Click the System Report button.
- Under Hardware, select USB.

Figure: USB Device Tree
- On the right pane, you will see USB Device Tree. If you see your iPhone in the list, then update to the latest macOS.
6. Update iTunes
Older versions of iTunes can create conflict with normal Mac functions. Hence, Apple recommends installing the latest iTunes updates.
To install the latest iTunes, open iTunes. From the menu bar choose Help > Check for Updates and follow the prompts to install the latest version.
Now, check if your Mac recognizes the iPhone or not.
7. Disable antivirus on Mac
One of the reason cited for iPhone not detected by Mac is anti-virus or firewall protection on your system. So disable the antivirus or firewall and then try to connect your iPhone to Mac.
8. Enable iOS device in Mac Preferences
When iPhone is not showing on Mac Finder, check if your Mac Preferences allows to view iOS devices in Finder. To enable iOS device in Finder follow the below steps:
- Go to Finder > Preferences.
- Click on the Sidebar button in Finder Preferences box.
- Check in CDs, DVDs and iOS Devices.

Figure: Finder Preferences
This should fix iPhone not showing up in Finder on Mac.
9. Connect iPhone to a different Mac machine
Try by connecting your iPhone to another Mac. If you receive a message asking to ‘Trust this computer’, click on ‘Trust’ to access your iPhone data on the new computer. Make sure to backup iPhone to avoid data loss situation.
Tip: Have you lost or accidentally deleted Camera Roll, Contacts, Photos Stream, Voice Memos, or more while transferring iPhone data to Mac? No need to worry. Restore the deleted photos, videos, messages, contacts, etc., with the help of an efficient Stellar Data Recovery for iPhone for Mac.

FAQ
1. Can I connect iPhone with Mac wirelessly?
You can sync your Mac and iPhone over the same Wi-Fi network.
- Connect your iPhone to Mac using a USB cable.
- Open Finder on Mac and select your iPhone in the sidebar.
- Click on the General tab.
- Check in Show this iPhone when on Wi-Fi.
- Click Apply.
2. How to fix my iPhone cannot connect to iTunes?
If iPhone is not showing up in iTunes, restart your devices and ensure macOS, iTunes, and iOS are updated. To know more methods, read How fix iPhone unable to connect to iTunes problem.
3. How to connect iPhone to the latest MacBook Pro 2021 that doesn’t have USB A port?
The new MacBook has USB Type-C port. You can use USB-C to Lightning cable to connect iPhone XR, SE, 11, and above to the new MacBook. If you have iPhone X or below use USB-A to Lightning cable.
4. Can I use the methods to fix iPhone 14 not recognized by macOS Ventura?
Yes, you can apply the above methods to fix any iPhone not detected by macOS Ventura, Monterey, Big Sur, Catalina, or below.
5. Will I lose any data when syncing iPhone and Mac?
No, you won’t lose data by syncing iPhone to Mac. Syncing helps to access your iPhone data on Mac anytime from anywhere. However, if you accidentally delete iPhone data, use an iPhone Data Recovery software to restore it.
Wrapping Up
Syncing iOS device to macOS has so many advantages but if Mac is not recognizing your iPhone, you cannot transfer, back up, or access iPhone data on Mac. This post has shared 9 methods to fix the syncing issue of Mac and iPhone. One of them should resolve Mac not detecting your iPhone.
How to fix ‘Unable to load Video: An Error Occurred’
Summary: Are you facing ‘unable to load video’ error message while trying to play videos on iPhone or iPad? No worries. This post guides you how to fix the error and watch your videos on the iOS device without any issue.
‘I am frequently facing ‘unable to load video’ error message ever since iOS 16 update. Its annoying as I cannot watch videos on iPhone. How to fix the issue?’
‘Since I upgraded to iPhone14 Pro from iPhone 11, I have problem playing a few videos. It states ‘error loading video’. I even bought more iCloud storage but no luck. Please help.’
Videos not loading on iPhone or show ‘Unable to load video, an error occurred’ message is a persistent issue faced by iPhone users, even after successive iOS upgrades, irrespective of the iPhone model.
As the annoying error stops you from watching your favorite videos on iPhone, you want to fix it soon. But before that its’ important to understand what could be the cause of this ‘unable to load video’ error, to troubleshoot the problem accordingly.
Why iPhone shows unable to load videos error?
There is no single reason for video loading error. Usually, videos saved in iCloud would display unable to load error on iPhone, if the Internet is off or you have slow connection.
Another common reason behind videos not loading on iPhone is that the ‘optimize storage’ option is enabled on your iOS device. Apple offers this feature to save space on your iOS device and stores the full resolution videos to iCloud. However, this often results in the video loading problem on the device.
Its’ also possible that your iPhone has insufficient space, which prevents videos from loading. There could also be a bug that can be fixed with iPhone update.
Right 9 ways to Fix ‘Unable to load Video, an error occurred’ on iPhone, iPad

Method 1: Restart iPhone
Restart, also called soft reset can fix error in loading video on iPhone or iPad. Close all the applications and restart your iPhone or iPad.
Method 2: Turn on Internet of the iOS device
If you are watching YouTube, Netflix, or other online videos, ensure cellular data of your device is turned on. In case you are facing the error ‘unable to load video: an error occurred’ while loading a higher quality version of the video on iPhone, try by switching to uninterrupted Wi-Fi connection. Note that high speed Internet is necessary for streaming videos on iOS device.
Method 3: Update your iOS device
You can update the device to fix ‘unable to load video’ error on iPhone or iPad. To update your iPhone or iPad follow the given steps. Before that make sure Wi-Fi is turned on.
- Go to Settings > General > Software Update.
- Click Download and Install followed by Install Now.
Method 4: Turn off the Optimize Storage option
When ‘optimize storage’ option is enabled on your iOS device, all the full-resolution high quality videos and photos get saved in iCloud while only the compressed space-saving versions are on your iPhone.
Thus, when you try to open a video on the iOS device, it takes time eventually to load it from iCloud. While sometimes, the video may not load at all. Try to fix unable to load video on iPhone by turning off this feature. Here are steps to disable optimize storage’ option:
- Open Settings. Click on your name.
- Tap on iCloud > Photos.
- Below Optimize iPhone Storage, tap on Download and Keep Originals option.

Figure: Disable Optimise iPhone Storage Option
Wait until the iPhone downloads all the videos from iCloud. You should now be able to open videos without loading error.
Method 5: Update the app that shows video load error on iPhone
If the video loading issue error pops up in a particular app like YouTube, Instagram, then update the application. If the update doesn’t help, you can reinstall the app also. This should fix videos not loading error or buffering issues. App update are available in App Store. To update any iPhone app follow the given steps:
- Open the App Store.
- Now click on your profile icon on top.

Figure: Update app in App Store
- Scroll to find your app and click on the Update button next to it. You can also click on Update All on top.
Method 6: Create free space on your iPhone
High quality videos may not load and show error if there is no space on your iPhone. Check your iOS device, if it has enough free space. Its’ essential to have 2GB free space available in the device to play high quality and large size videos.
You can check the available space on your iPhone or iPad by navigating to: Settings > General > iPhone Storage.

Figure: iPhone storage screen
On the top right, you will see the amount of space used on your iOS device. If the space is less, remove the useless videos, photos, apps and other data on your iPhone or iPad.
Method 7: Access video from iCloud.com
If the videos don’t load on iPhone and show error, try to access them via iCloud.com on your computer by following the below steps:
- Open iCloud.com and enter Apple ID credentials to sign in.
- Click on the Photos or iCloud Drive app where the video is saved.
- Find your video and click on it to open.
There’s also the options in icloud.com to share the video via email or download to save it on your computer.
Method 8: Repair video not loading on iPhone
If you face ‘unable to load video’ an error occurred in Camera Roll videos of iPhone, the file may have corrupted.
Copy or transfer the problem video to your PC or Mac. Download and install a video repair software—Stellar Repair for Video . It can fix file corruption in the error throwing iPhone video. The software is compatible with MP4, MOV, HEVC, video files formats used in iPhone and iPad.
The software also offers a free trail wherein you can repair the corrupt video and watch its preview.
Method 9: Restore iPhone to factory settings
If ‘unable to load video’ error is perpetual on your iPhone or iPad, in spite of trying the above methods, then factory reset can be your last bet.
As all know, factory reset will delete everything on your iOS device , make sure you create the latest backup of the iPhone in iCloud or iTunes.
Follow the below steps to factory reset iPhone and fix unable to load video error:
- Open Settings > General > Reset.
- Click on Erase All Content and Settings.
- Enter Apple passcode. Click on Erase iPhone and follow the prompts.
Now check if the video error problem is resolved or not.
Wrapping Up & FAQ
Usually one of the methods shared in this post fixes the error – ‘unable to load video‘, an error occurred’ on iPhone. However, unfortunately if none works and you cannot play videos on iPhone, contact Apple support .
FAQ
- Why does my iPhone say ‘an error occurred while loading a higher quality version of this photo’?
High quality photos/videos require more storage space to open. Less free storage is one of the for the media file loading error.
Hence, delete some useless photos, videos, or apps to free up space. Now you can open the high quality photo/video smoothly without any error.
2. Why my iPhone videos not playing on PC?
Your iPhone videos may not play on Windows PC due to many reasons— the media player doesn’t support videos file format; virus in your PC; or the video has turned corrupt during transfer. However, you can fix the problem and play iPhone videos on Windows .
3. Why I cannot view my video in icloud.com?
In iCloud.com, select the Photos app and click Photos. In the side bar, you will see the thumbnails of all your photos and videos. Find your video and click on it to view.
iPhone users adore its camera. Capturing priced memories using its compelling features is one of the biggest attraction of the iOS device. However, like any other phone, the digital photos may get lost from iPhone too.
And the situation can be devastating if the lost photos include your precious memories — of a vacation, wedding, your child’s first birthday or a friend’s party, which you wanted to keep with you for a lifetime.
Helping you out in such a situation, here we bring the methods to recoup your memories back into your iPhone.
Why are your photos lost from iPhone?
There could be many possible reasons for the loss of photos from iPhone. Some common reasons are listed below:
- Accidental deletion
- Factory reset
- Camera Roll or Photo Stream crash
- Failed iOS update
- iPhone jailbreak
- Water damaged, stolen iPhone, and others
Methods to recover permanently deleted photos from iPhone
Different situations call for distinct methods to restore lost photos from iPhone.
Since with iCloud and iTunes, Apple ensures a backup for the iPhone photos, if available, get back the lost iPhone photos from there.
Wherein in absence of backup, an iPhone photo recovery software is the best way to get back the deleted or missing photos on your iPhone and iPad. An efficient iPhone recovery software , works regardless of the reason of the photo loss.
Other methods such as photo recovery from ‘Recently Deleted’ folder or turning on iCloud Photos can also work in specific situations.
These methods can be applied on all iPhone models including series of iPhone 15, 14, 13, 12, 11, XS, XS Max, XR, X, 8 Plus, 8, 7 Plus, 7, 6S Plus, 6S, 6 Plus, 6, 5S, 5c, 5, 4S and 4.
1. Recover photos from ‘Recently Deleted’ on iPhone
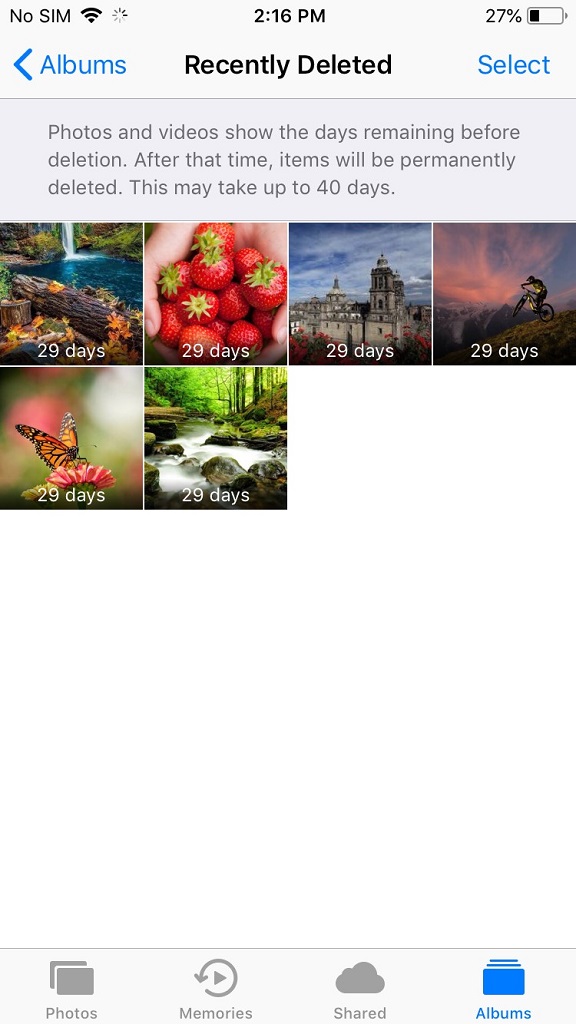
The ‘Recently Deleted’ folder on iPhone keeps all the deleted photos for 30 days. Beyond this duration, the photos are automatically deleted from iPhone and this time permanently.
You can find the deleted photos from Camera Roll, Photo Stream, WhatsApp, SnapChat or Instagram etc., in this folder.
Check the ‘Recently Deleted’ folder on your iPhone. Find the required photos and move them back to your album.
Steps to restore photos from ‘Recently Deleted’ on iPhone:
- Go to the Photos app > Albums > Recently Deleted
- Find the missing photo and tap on it to Recover
2. Use iPhone Photo Recovery tool
In case of absence of photos backup, download and install Stellar Data Recovery for iPhone on your Mac or PC. Stellar Data Recovery for iPhone works with all the iPhone models including series of iPhone 6, 7, 8, X, XS, XR, 11, 12, 13, and 14. It supports latest iOS 16.
Situations when you should use Stellar Data Recovery for iPhone:
- No backup of photos
- Permanently deleted photos from iPhone
- Accidentally deleted photos
- Unable to restore photos from iCloud
- Unable to restore photos from iTunes
- Photos lost after iOS update, Factory reset or jailbreak
- Photos lost after iPhone black screen of death
- Stolen iPhone, water/ liquid damaged iPhone etc.
Note: Apart from photos, Stellar Data Recovery for iPhone can recover your deleted Videos, Contacts, Texts, Calendar, text messages, Notes, and other data.
Try the Free Demo Version of the software to recover your lost and deleted photos in Mac System or in Windows Desktop/Tablet
Step-by-step: Recover deleted photos from iPhone
- Connect your iPhone to the computer
- Launch Stellar Data Recovery for iPhone
- On the first screen select Recover from iPhone
- Select Camera Roll and Photo Stream. To recover Instagram, SnapChat or other App’s photos, select Apps Library

- Click Next
- Preview and choose the photos you want to recover from the list
- Click Save
3. Recover from iCloud backup
Do you maintain iCloud backup of your photos? Then bring back the deleted photos on your iPhone via iCloud. iCloud photos recovery is possible in situations of accidentally or permanently deleted photos from iPhone. You can also recover photos lost after your iPhone is set on factory reset, damaged, or stolen.
Steps to restore photos from iCloud on iPhone:
- Click to follow Settings > General > Reset> Erase all Contents and Settings
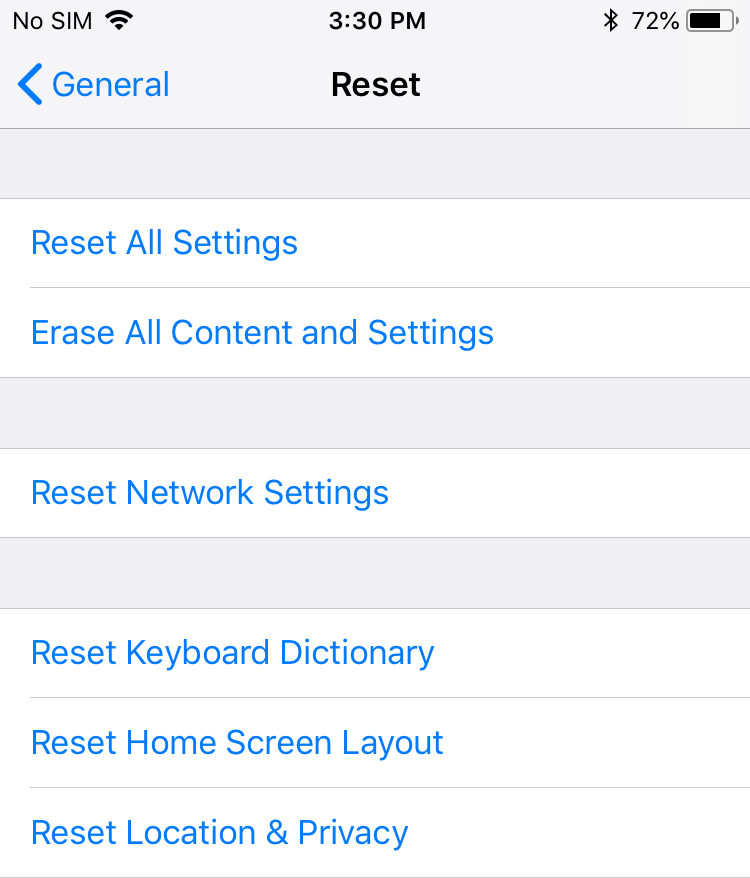
- A dialog box pops up, choose Erase Now
- Follow the instructions until you get on to the Apps & Data screenTap Restore from iCloud Backup
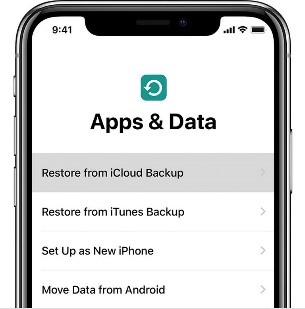
- Sign in to your iCloud account
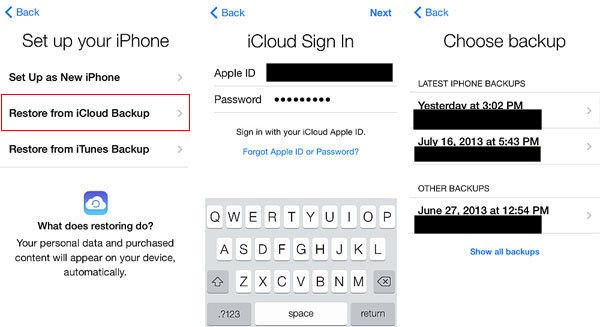
- Choose the recent backup and click Restore to get back the deleted photos on iPhone
How to recover Photos from iCloud without losing existing iPhone data
This method of iCloud photo recovery protects your existing iPhone data. It also allows you to select and recover only the lost photos from iCloud instead of complete backup data.
Follow the below steps to restore only the lost/deleted photos from iCloud:
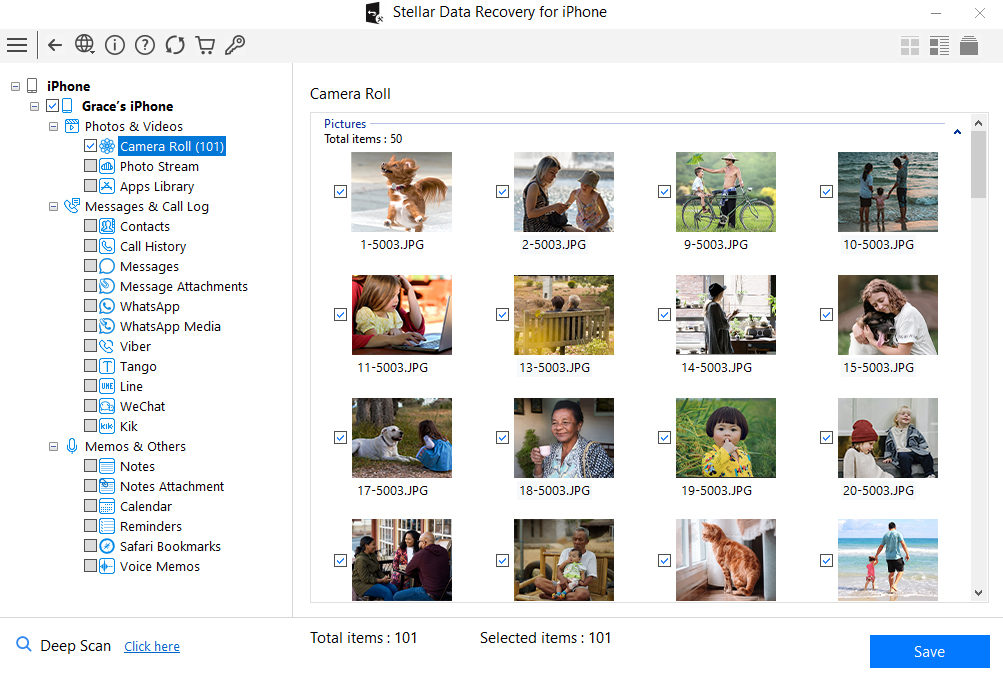
- Download and launch Stellar Data Recovery for iPhone on your computer. Note: You don’t need to connect your iPhone for recovering photos from iCloud backup files.
- Select Recover from iCloud Backup on main screen of software.
.png)
- Select Camera Roll and Photo Stream and click Next.
- Enter the Apple ID and password.
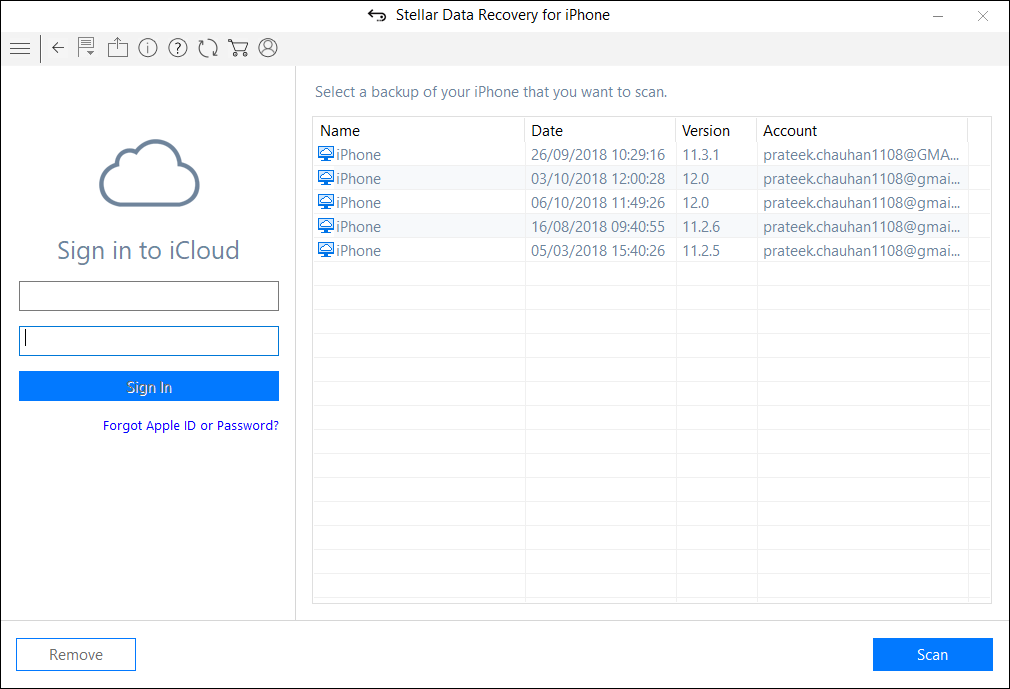
- List of all available iCloud backup files appears. Select the relevant backup of your iPhone and click Scan.
- Click Camera Roll and Photo Stream in the iCloud backup files list on the left window. Preview the existing and deleted photos or search for a specific photo by typing a keyword in the search box. If the desired photo is not in the recovered files list, click Deep Scan.
- Click Save. In the dialog box select either computer or iPhone to save the recovered photos. To save the photos on iPhone, make sure the iOS device is connected to the computer.
4. Recover deleted photos from iTunes
For those of you who maintain iTunes backup, it is the easiest way to retrieve the deleted photos of iPhone. iTunes backup also helps to restore photos lost due to deletion or after factory reset.
Steps to restore photos from iTunes backup:
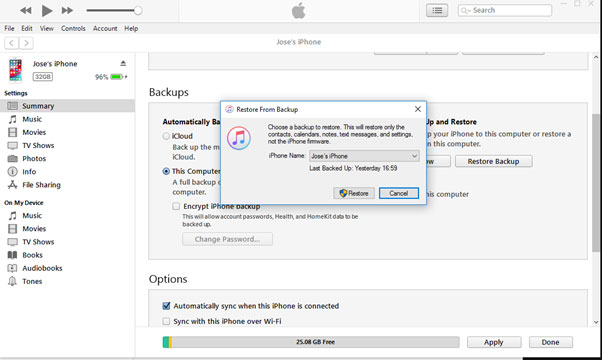
- Connect iPhone to your PC/Mac
- Launch iTunes
- Select your iPhone under the device list
- Select the recent backup date
- Click Restore Backup
All your lost and deleted photos will be restored on your iPhone.
How to recover Photos from iTunes without losing the existing iPhone data
Use Stellar Data Recovery for iPhone to protect your current data on iPhone. The software allows you to select and recover only the lost photos from iTunes. With this method, you can prevent unnecessary data recovery on your iOS device.
Follow the below steps to recover only the lost/deleted photos via iTunes:
- Download and launch Stellar Data Recovery for iPhone software. Note: You can connect your iPhone to computer, if want to save the recovered photos in the iOS device.
- Select Recover from iTunes Backup on the main screen of the application.
- Select Camera Roll and Photo Stream option. Click Next.
.png)
- From the list of the iTunes backup files, select the relevant iTunes backup from which you want to restore photos.
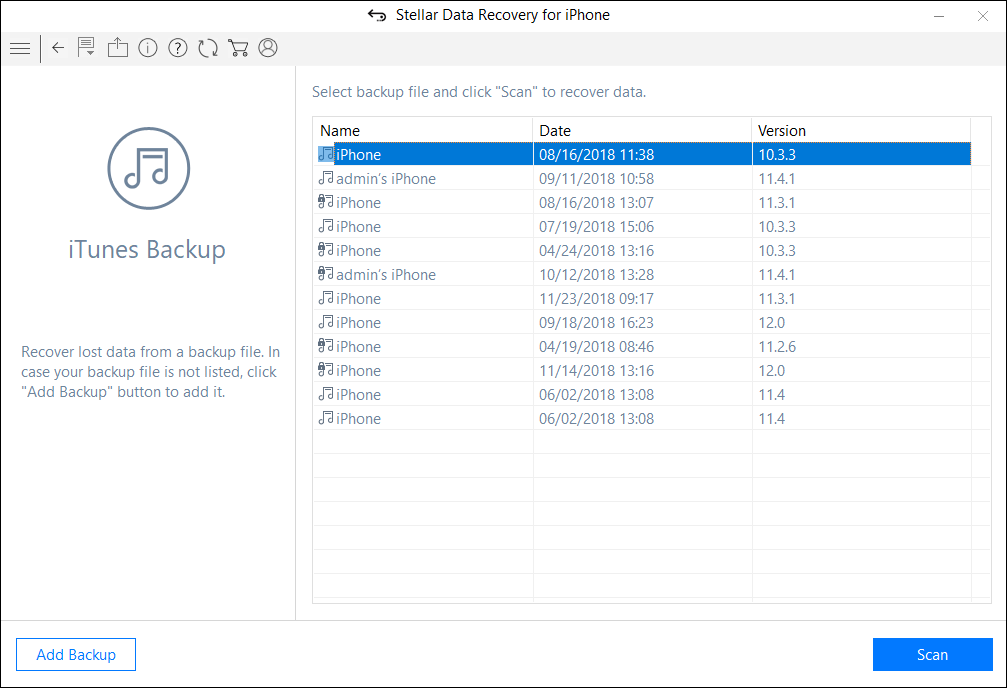
- If your iTunes backup is encrypted, a dialog box will open prompting you to enter the password. Enter the password and click OK.
- From the backup files list in the left pane, click Camera Roll and Photo Stream. Preview the existing and deleted photos or search for a specific photo by typing a keyword in the search box. Click Deep Scan at the bottom left side, if your desired photos are not in the list.
.png)
- Click Save. A dialog box appears asking to select the location to save photos. You can save the recovered photos either onto your iPhone or computer.
5. Enable iCloud Photos
Sometimes you could see the photos on iPhone but not on your synced iPad, iPod Touch, or Mac. To view these missing iPhone pictures on the synced iOS devices turn on iCloud Photos.
iCloud Photos stores the photos in iCloud. It ensures you can view them on your synced devices. If you can’t find a photo on your synced iPad, iPhone, or Mac etc., enable iCloud Photos under Settings of the iOS device.
Steps to turn on iCloud Photos on iPhone/iPad/ iPod Touch
- Click to follow Settings > [your name] > iCloud
- Tap Photos
- Toggle on iCloud Photos.
To turn on iCloud Photos on Mac
- Go to System Preferences > iCloud.

- Next to Photos, click Options
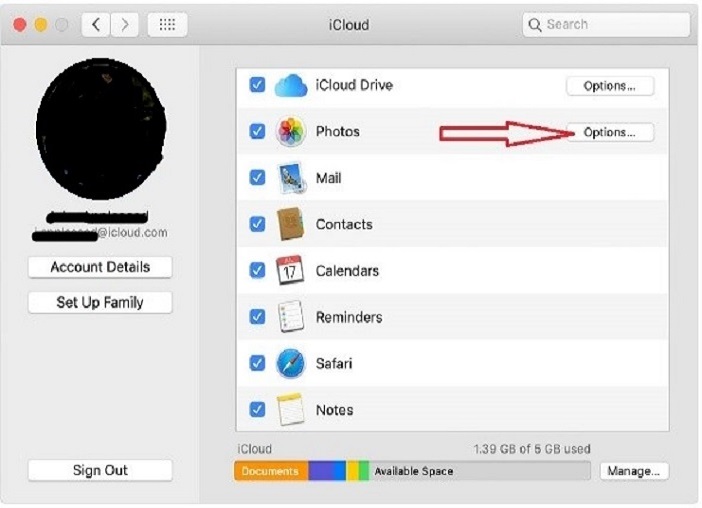
- Select iCloud Photos
Next, connect to Wi-Fi and wait for some time until your photos appear again on the synced devices.
Tip: When you turn on iCloud Photos, photos upload to iCloud but they are not duplicated in your iCloud backup. So make backup of your photo library. You can download your photos from iCloud.com to your PC/Mac and store them as a separate library or store them on a separate drive.
Comparison — iPhone Photo Recovery Methods
|
| Stellar Data Recovery for iPhone | Recover from iCloud | Recover from iTunes | Recently Deleted folder | Enable iCloud Photos |
| — | — | — | — | — | — |
| Success Rate | High | Medium | Medium | Low | Medium |
| Photo Recovery without backup | Yes | No | No | Yes | Yes |
| Effect on iPhone’s existing photos & other data after recovery | Existing data remains in iPhone | Deletes the existing iPhone data | Deletes the existing iPhone data | Existing data remains in iPhone | Existing data remains in iPhone |
| Select Photo and restore | Yes | No | No | Yes | Not applicable |
| Preview photos before recovery | Yes | No | No | Yes | Yes |
| Difficulty level | Nil | Medium | Medium | Nil | Medium |
| Recovery options | Recovers from iPhone, iPad, iCloud & iTunes | Recovers from iCloud only | Recovers from iTunes only | Recover from iPhone & iPad (within 30 days of photo deletion) | Recover on iPhone synced devices |
How to Recover Deleted Photos, Videos & Music Files from iPhone
Summary: Learn how to recover deleted photos, videos and music files from iPhone using the best recovery software —Stellar Data Recovery for iPhone.
There are zillions of tutorials one can find on how to take incredible photos with the A10 fusion chipped smartphone; however, few know how to recover deleted photos from iPhone. As a coin has two sides, through this post, we will explore the other untouched, unexplored side.
iPhone has been the epitome of perfection ever since it entered the smartphone realm. With stellar features and functionality, iPhone has become the highest selling property. There are some hidden iPhone camera features that users can utilize and take amazing photos and videos which leave a lasting impression.
Get Started Here!!!
Recovering deleted photos from iPhone is a straightforward process and do not involve much complexity, provided the right steps are implemented in the right manner.
Without much ado, you can recover deleted iPhone photos or videos with these simple steps. Let’s delve into it in detail.
Solution 1:
Apple has made it easy to recover deleted iPhone photos. Here’s what you need to follow:
- Go to the Albums and access your photos.
- Scroll down and select ‘Recently Deleted’ folder.
- In this folder, you will find all the photos that have been deleted.
- Simply tap the photo you want to recover and press “Recover.”
- To permanently delete a photo, press “Delete”.
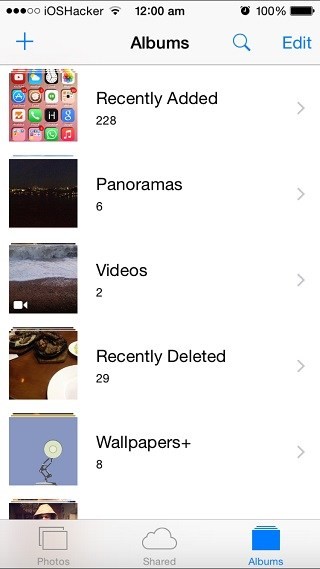
Figure 1 represents how to recover photos from Recently Deleted folder
**Important: In the ‘Recently Deleted’ folder, you’ll find photos, video & music files that have been deleted within the last 30 days only. To recover them before that period, either you have to restore from iTunes or iCloud backups or use iPhone photo recovery software .
Solution 2:
iCloud Photo Library to Your Rescue:
You can recover iPhone photos or videos through iCloud Photo Library. iCloud Photo Library securely stores your photos and videos on iCloud. It automatically saves all your photos and videos in iCloud so that you can access the library from any device.
Follow these steps to turn on the iCloud Photo Library:
- Go to settings < [your name] < iCloud < Photos, then turn on iCloud Photo Library (iOS 10.3 or later).
- In iOS 10.2 or earlier, go to Settings < iCloud < Photos.
**Important: Ensure that you’re signed in to iCloud with the same Apple ID as on all of your devices. Things can be complicated as iCloud Photo Library is synced with your different Apple devices which means there could be multiple copies and if a photo, video or music file is deleted from a device, it will not be available on the other devices as well. Deletion sync across all the devices.
Solution 3:
iTunes Backup is there to recover all your photos.
- Click File menu, select Devices < Restore from Backup.
Or
- Open the iOS device’s Summary tab. There are two ways to access this:
- Click the device button in the upper right corner.
- In iTunes tab, click the View menu and select Show Sidebar. Select your iOS device in iTunes under Devices.
- Click the Restore Backup button.
Solution 4:
Use Stellar Data Recovery for iPhone:
iPhone Data Recovery Software by Stellar is an ideal tool to recover lost data from your Apple devices. Utilizing its advanced algorithm, you can scan and recover data (photos, videos, calendar, notes, messages, call history, etc.) from your device. Furthermore, you can recover data from iCloud and iTunes backup as well.

- Connect your iPhone to your system and launch “Stellar Data Recovery for iPhone” software.
- Select “Recover from iPhone” and the software will scan your device for the contents.
- Click on any file to see its preview.
- Finally, click “Save” to save the recovered file to the preferred location.
The Final Word
Apple reflects perfection in its design and innovation; therefore, it constantly thrives to provide its consumers with the best platform. One such feature is that iOS can back up your photos on cloud services automatically so that you have access to them at any given time.
Moreover, there are iTunes backup, iCloud backup options available along with iPhone Data Recovery Software as well; but, it is advisable to backup your iPhone photos or videos timely and manually to avoid unnecessary issues.
Also read:
- [New] Top 10 High-Definition Gaming Laptops Reviewed
- 2024 Approved Navigating the World of Instagram Reel Downloads
- 3 Ways to Track Vivo V29 Pro without Them Knowing | Dr.fone
- AVCHD on G24 Power-convert MTS for G24 Power
- How to Easily Hard reset my Poco M6 Pro 4G | Dr.fone
- How to Reset Poco F5 Pro 5G Without the Home Button | Dr.fone
- In 2024, Navigating Links Between Instagram and TikTok
- The way to get back lost music from ZTE Blade A73 5G
- Your Complete Guide To Reset Oppo Reno 8T 5G | Dr.fone
- Title: Solved Mac Doesnt Recognize my iPhone XS Max | Stellar
- Author: Ian
- Created at : 2025-01-18 01:14:58
- Updated at : 2025-01-21 16:06:08
- Link: https://techidaily.com/solved-mac-doesnt-recognize-my-iphone-xs-max-stellar-by-stellar-data-recovery-ios-iphone-data-recovery/
- License: This work is licensed under CC BY-NC-SA 4.0.