
Solved Mac Doesnt Recognize my iPhone 8 | Stellar
Solved: Mac Doesn’t Recognize my iPhone
Summary: Is your Mac not recognizing the iPhone? Learn the 9 ways to fix iPhone not showing up on Mac. You can apply these methods for all iPhone models not recognized by macOS Ventura, Monterey, Catalina, Big Sur, High Sierra and below versions.

You may want to backup iPhone data or transfer favorite photos, music, or videos to Mac. But sometimes your Mac computer doesn’t detect the iPhone when you try to connect it. There are so many complaints such as iPhone not showing up in Finder in Ventura, Monterey, Catalina or Macbook not recognizing iPhone 14. Some also reported an unknown error or a 0xE error when trying to connect iPhone to Mac computer. The situation is frustrating as it prevents you to sync iPhone to macOS and access iPhone data on Mac.
No worries. There are methods, which can fix the issue and let you again access your iPhone on Mac. But, first you should be aware why Mac fails to recognize your iPhone as this helps in troubleshooting the problem.
Why your iPhone not detected by Mac computer?
Mac does not detect your iPhone due to many reasons, such as
- iPhone is not ‘on’ when connected to Mac.
- iPhone is damaged.
- The USB cable or USB port is not working.
- Software updates are pending including iOS, iTunes, and macOS.
- Third-party software conflict wherein 2 programs arecompeting for the same memory, peripheral device etc., on your Mac.
- Firewall or Antivirus software is preventing Mac to recognize iPhone.
- Mac settings don’t allow to view iPhone in Finder.

1. Check your iPhone
Before you connect your iPhone to Mac, make sure the iOS device is unlocked and on the Home screen.
2. Fix USB connection
When Mac computer doesn’t recognize iPhone, first check your USB connection. The USB cable or the port can be faulty. Try to connect iPhone to Mac using another Apple USB 2.0 cable. If that doesn’t work try with the different port. Plus, disconnect other USB devices from Mac except your iPhone.
3. Restart your iPhone
Restarting the iOS device would resolve any issue between your iPhone programs and iTunes. To restart hold volume/side/ top button depending on your iPhone model. Slide the red power off slider on your iPhone. Wait for your iPhone to turn off. After a few seconds, again restart iPhone. Now Mac should recognize your iPhone.
4. Restart your Mac
Restarting Mac clears the cache and memory of your system giving it a fresh start. It also installs pending updates.
5. Update your macOS
When iPhone is not showing up on Mac Finder but you can see it under USB Device Tree, update the macOS to the latest version. Make sure there are no pending software installs.
To check the USB Device Tree on Mac follow the below steps:
- Click on Apple icon followed by About This Mac.
- Click the System Report button.
- Under Hardware, select USB.

Figure: USB Device Tree
- On the right pane, you will see USB Device Tree. If you see your iPhone in the list, then update to the latest macOS.
6. Update iTunes
Older versions of iTunes can create conflict with normal Mac functions. Hence, Apple recommends installing the latest iTunes updates.
To install the latest iTunes, open iTunes. From the menu bar choose Help > Check for Updates and follow the prompts to install the latest version.
Now, check if your Mac recognizes the iPhone or not.
7. Disable antivirus on Mac
One of the reason cited for iPhone not detected by Mac is anti-virus or firewall protection on your system. So disable the antivirus or firewall and then try to connect your iPhone to Mac.
8. Enable iOS device in Mac Preferences
When iPhone is not showing on Mac Finder, check if your Mac Preferences allows to view iOS devices in Finder. To enable iOS device in Finder follow the below steps:
- Go to Finder > Preferences.
- Click on the Sidebar button in Finder Preferences box.
- Check in CDs, DVDs and iOS Devices.

Figure: Finder Preferences
This should fix iPhone not showing up in Finder on Mac.
9. Connect iPhone to a different Mac machine
Try by connecting your iPhone to another Mac. If you receive a message asking to ‘Trust this computer’, click on ‘Trust’ to access your iPhone data on the new computer. Make sure to backup iPhone to avoid data loss situation.
Tip: Have you lost or accidentally deleted Camera Roll, Contacts, Photos Stream, Voice Memos, or more while transferring iPhone data to Mac? No need to worry. Restore the deleted photos, videos, messages, contacts, etc., with the help of an efficient Stellar Data Recovery for iPhone for Mac.

FAQ
1. Can I connect iPhone with Mac wirelessly?
You can sync your Mac and iPhone over the same Wi-Fi network.
- Connect your iPhone to Mac using a USB cable.
- Open Finder on Mac and select your iPhone in the sidebar.
- Click on the General tab.
- Check in Show this iPhone when on Wi-Fi.
- Click Apply.
2. How to fix my iPhone cannot connect to iTunes?
If iPhone is not showing up in iTunes, restart your devices and ensure macOS, iTunes, and iOS are updated. To know more methods, read How fix iPhone unable to connect to iTunes problem.
3. How to connect iPhone to the latest MacBook Pro 2021 that doesn’t have USB A port?
The new MacBook has USB Type-C port. You can use USB-C to Lightning cable to connect iPhone XR, SE, 11, and above to the new MacBook. If you have iPhone X or below use USB-A to Lightning cable.
4. Can I use the methods to fix iPhone 14 not recognized by macOS Ventura?
Yes, you can apply the above methods to fix any iPhone not detected by macOS Ventura, Monterey, Big Sur, Catalina, or below.
5. Will I lose any data when syncing iPhone and Mac?
No, you won’t lose data by syncing iPhone to Mac. Syncing helps to access your iPhone data on Mac anytime from anywhere. However, if you accidentally delete iPhone data, use an iPhone Data Recovery software to restore it.
Wrapping Up
Syncing iOS device to macOS has so many advantages but if Mac is not recognizing your iPhone, you cannot transfer, back up, or access iPhone data on Mac. This post has shared 9 methods to fix the syncing issue of Mac and iPhone. One of them should resolve Mac not detecting your iPhone.
The 5 Best Methods to Track a Lost or Stolen iPhone
Summary: Lost your iPhone? Don’t worry, here we tell you how to track lost or stolen iPhone using various techniques. Also, learn how to erase your iPhone data permanently to prevent it from reaching in wrong hands or misuse, using Stellar Data Recovery for iPhone.
|
Q. I cannot live without my iPhone. It was stolen yesterday and can’t recall where I lost it. It has been switched off. Can I track the location of my iPhone? Is there any way to track lost iPhones?
| A. Don’t panic. Log in to ‘Find My iPhone’ via iCloud.com and set it to ‘Lost Mode’. To know what else you can do now to track the iPhone location, read this post. |
|---|
Losing an iPhone (and for that matter any smartphone) is tormenting. Besides the upfront costs, there’s an incredible amount of personal data at stake. Today, smartphones not only store personal photos, videos, and music libraries but might also contain an incredible amount of sensitive information in the form of browsing history, social data, app traces, etc. So the apprehension of exploitation and misuse of the data stored in a stolen or lost iPhone is but real.
So, as soon as you discover that your iPhone has been stolen or lost, first, try to track the location of your missing device and lock it.
How to track a lost or stolen iPhone?
Try out the following methods
- Use Find My iPhone
- Track through Apple’s Family Sharing
- Use Google Timeline
- Try Google Photos
- Use location-tracking apps

Method 1: Use Find My iPhone
If Find My iPhone is enabled on your stolen iPhone, you can do the following:
- Locate your mobile phone
- Protect your iPhone data by choosing Lost Mode or erasing the data remotely
How to use Find My iPhone when the phone is missing
- Sign in to icloud.com on your computer.
- Click on the Find My iPhone link at the bottom.
- On the Find My iPhone’s map interface, select your lost iPhone via the All Devices drop-down menu. The app starts tracking your iPhone location on the map.
As you see the location of your device you can choose to do the following
- Play sound (if your iPhone is nearby, you can trace it with sound)
- Activate ‘Lost Mode’ (this locks your device and still tracks it)
What does Lost Mode do to your device?
- Remotely locks your device
- Displays a message with your phone number on the missing iPhone’s Lock Screen
- Keeps track of your device location.
- Erase iPhone remotely (with this action you won’t be able to track your iPhone but data is prevented from slipping into the wrong hands)
How to erase iPhone data remotely?
Choosing to erase the iPhone remotely deletes the complete data from it.
Note: Always remember to copy important photos, videos, music, and other data on iCloud backup before remotely erasing the iPhone.
Use a trusted and safe data recovery solution such as Stellar Data Recovery for iPhone to restore lost files from iCloud. The software allows the recovery of specific data rather than recovering the entire data.
Method 2: Track iPhone through Family Sharing

If you have set up Family Sharing, use it to track your iPhone. Family Sharing helps the members to know each one’s device location. Ask another member in the Family Sharing group to trace your iPhone via the Find My iPhone app. The member can also sign into iCloud.com to locate the missing iPhone.
|
Is your missing iPhone switched off or offline?
If the missing iPhone is switched off or showing offline in Family Sharing, you can still activate Lost Mode or remotely erase its data via Find My iPhone.
Note: The iPhone’s last known location remains only for one day. In case your device is offline for over 24 hours, you cannot trace its last location.
|
| — |
What to do when ‘Find My iPhone’ is NOT enabled or the missing iPhone is offline for more than one day?
- Change your Apple ID passwords to prevent anyone from accessing your data.
- Change your social media and other Internet account passwords like Gmail, Twitter, Facebook, Instagram, etc.
- Report the device as missing to the authorities.
- Report your network carrier to disable the services like calls, messages, or data use.
Method 3: Use Google Timeline to find lost iPhone
If you have turned on Location Services and Location History on your iPhone, Google’s Timeline will record all the locations of your device.
When an iPhone goes missing, access the location information on a map and find the last location. Remember, Google Timeline records the location only when the iPhone is switched on with an internet connection.
How to see the last location of a lost iPhone in Google Timeline
- Visit <com/maps/timeline> on your computer.
- Sign in to your Google account.
- Click Today or select Date.
- Scroll down to see the last reported location of your iPhone.
Along with the location, note the time when your phone was last connected to Google. Taking clues from the location and time information, you can find your lost iPhone. If needed, take the help of cops.
Method 4: Take location clue from Google Photos
If anyone has captured a photo from your lost iPhone and you have the Google Photos location-sharing option enabled, then luck is on your side.
Visit <photos.google.com/>. Check, if any new photos were uploaded and view their upload location.
Method 5: Location tracking apps
If you have installed any location-tracking app such as GPS Location Tracker, CocoSpy Cell Phone Tracker, or iTrack on your missing device, use it to track the lost or stolen iPhone. These apps share the real-time location of your device on your computer or other connected devices.
Conclusion
Apple’s Find My iPhone feature is the best way to track the location of a stolen or missing device. If Find My iPhone is not enabled you can try Google Timeline or Google Photos. Other than these methods, third-party apps can also help track a lost iPhone, but only if you have installed them before the phone was lost.
Nevertheless, ensure that you copy the iCloud backup of the stolen iPhone before taking any of the above steps.
A smarter way is to filter out the data that you want to keep, with the help of Stellar Data Recovery for iPhone.
Is this post helpful? Share your experience in the comments below, how you managed to track and get back your stolen iPhone.
How to recover deleted photos after deleting from ‘Recently Deleted’ on iPhone
The Recently Deleted folder in the Photos App on iPhone is there to recover accidentally deleted photos. However, even if your important photos are deleted from ‘Recently Deleted’ you are not yet out of luck. This post shares how to recover deleted photos after deleting them from ‘Recently Deleted’ on iPhone.

‘I deleted some important pictures on my iPhone and also deleted them from the ‘Recently Deleted’ folder. Is there any possible way to recover photos after permanently deleting them from the iPhone?’
When you delete photos from your iPhone, they first go to the ‘Recently Deleted’ folder of the Photos App. Here the photos remain for 30 days. Hence, any picture deleted 30 days ago automatically gets removed after this period, and this time permanently.
However, sometimes you may accidentally delete valuable pictures too. To make the situation worse, even remove image files from ‘Recently Deleted’ or realize the mistake 30 days after deleting!
In any case, can you get photos back after deleting from ‘Recently Deleted’ on your iPhone?
This post addresses the problem situation of permanently deleted photos from iPhones and finds the appropriate solution.
Let’s read on…
Understanding permanently deleted photo recovery from iPhone
You can recover deleted photos from your iPhone after deleting them from the Recently Deleted folder or 30 days of automatic deletion.
Of course, backups — iCloud and iTunes are the immediate go-through solution in such a case. However, Apple backups have their own disadvantage. Photo recovery with iCloud and iTunes results in the loss of your current data on your iPhone!
That’s the reason, iCloud and iTunes are frustrating when you want to get back only a few photos.
So, if you are using another backup service such as Google Drive or OneDrive for iPhone photo backup, they are more convenient.
In addition, apart from backup, iPhone recovery software is just the right solution. It works even when you don’t have a backup or don’t want to eliminate your existing data on your iPhone or iPad.
1. Recover ‘Recently Deleted’ photos from iCloud backup
Use an iCloud backup to recover deleted photos from your iPhone after 30 days of deleting them from the ‘Recently Deleted’ folder. iCloud backup is the best solution to retrieve permanently deleted photos from iPhone free.
Just get on to the below steps to recover deleted photos from iCloud:
- On your iPhone, navigate to Settings > General > Reset> Erase all Contents and Settings.
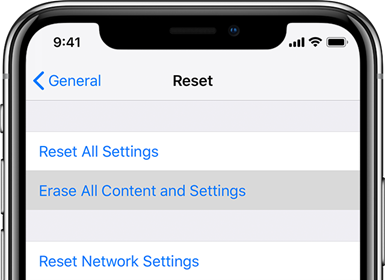
- Select Erase Now in the dialog box and follow the prompts until you reach the Apps & Data screen.
- Click on Restore from iCloud Backup.
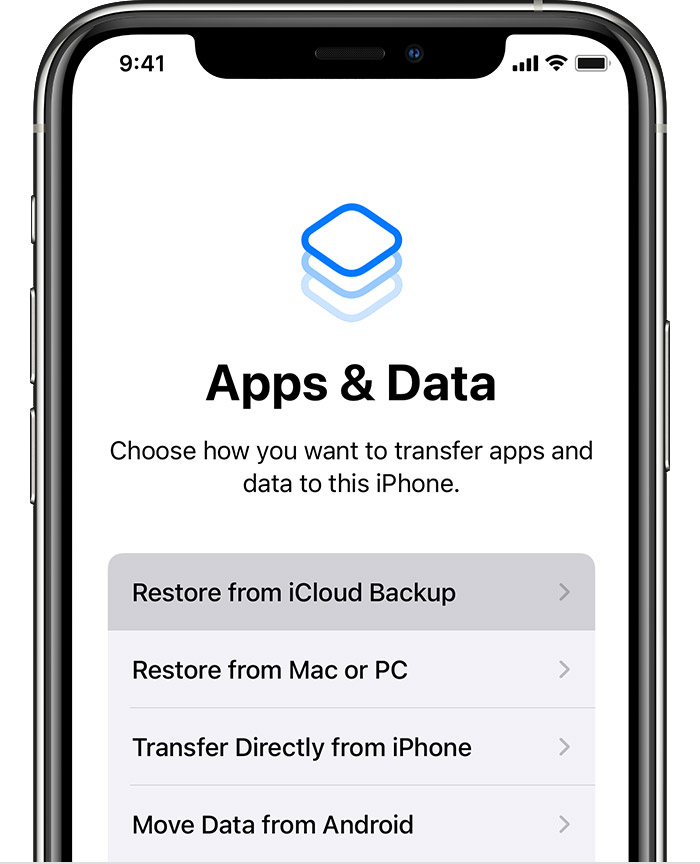
- Sign in to your iCloud account.
- Select the recent backup from the list that has the deleted pictures. Click Restore to get back the deleted photos on your iPhone.
2. Recover permanently deleted photos from iTunes
If you have an iTunes backup, look for the deleted photos after deleting from ‘Recently Deleted’ in your iTunes backup.
Below are the quick steps:
- Connect your iPhone to your PC or Mac and launch iTunes.
- Click on your iPhone under the device list and select the recent backup date that may contain the permanently deleted pictures.
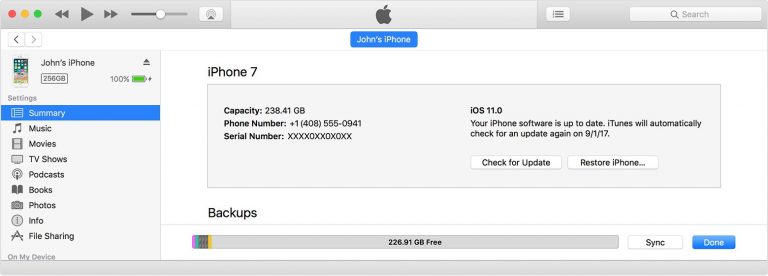
- Click Restore Backup.
That’s it. You get back the deleted photos on your iPhone. However, this will replace the current data on the iPhone with the old backup data.
3. Recover recently deleted photos from cloud storage
iPhone users, who don’t completely rely on iCloud and iTunes for backup, use third-party cloud backup solutions. If you are one of those, check your cloud storage for permanently deleted photos on your iPhone. Cloud backups such as Google Drive, iCloud, Dropbox, OneDrive, etc., are efficient ways to save and protect your photos on your iPhone from permanent loss. You can restore photos on a PC , Mac, or iPhone by using cloud storage.
4. Recover Recently Deleted Photos with iPhone recovery software [Recommended]
Some of you may not have photos backed up in iCloud or iTunes. It’s also possible you couldn’t find the desired picture in the backup. In any case, use the best iPhone recovery software to get pictures back after deleting from Recently Deleted on iPhone.
Try one of the popularly used Stellar Data Recovery for iPhone . It is compatible with not just old iPhones like iPhone 6, 7, 8, X, etc., but also the latest series of iPhone 15. You also get the latest iOS 17 support.
Stellar Data Recovery for iPhone can help to recover photos from the iPhone without backup. Additionally, you can retrieve lost or deleted contacts, messages, chat messages, Notes, Reminders, etc.
Besides, when you recover photos by using iTunes or iCloud, it gets back all data from the backup file whereas with the software you can select and recover only what you require. Unlike photo recovery from backup, the software doesn’t replace the existing data with old backup data on your iPhone.
Here are the steps to recover deleted photos after deleting them from the Recently Deleted folder on your iPhone:
- Connect your iPhone to your PC or Mac computer.
- Download and launch Stellar Data Recovery for iPhone on a computer.


- On the first screen, select Recover from iPhone on the left pane. If required, you can choose the ‘Recover from iCloud’ or ‘Recover from iTunes’ option.
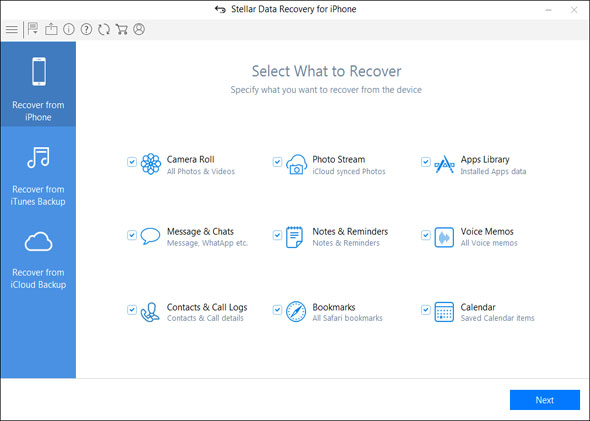
- Check-in Camera Roll and Photo Stream and click Next.
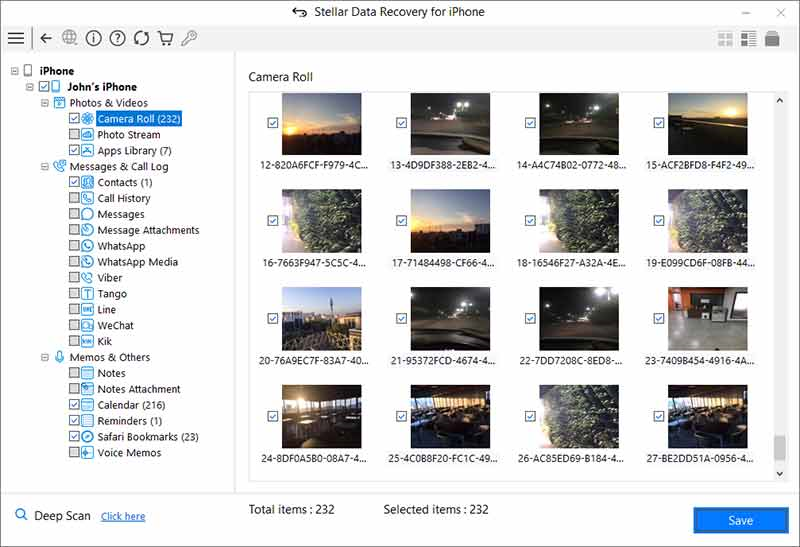
- The software scans and displays the recovered pictures. See preview, select, and save the desired photos.
Conclusion
An iPhone recovery software is the perfect approach to recover deleted photos from an iPhone after 30 days of deleting them from the ‘Recently Deleted’ folder. We recommend Stellar Data Recovery for iPhone. It is fast and can retrieve permanently deleted photos without affecting the current data of your iPhone. Unlike iCloud and iTunes backup, which annoyingly replace existing data with the old backup data, the software can restore only those photos, which you have deleted.
Take the free trial and ensure that Stellar Data Recovery for iPhone can retrieve permanently deleted photos from your iPhone.
Recover Deleted iPhone WhatsApp Attachments on Mac and Windows
Your iPhone has simplified your life to a great extent by making your daily task feasible. You can check your emails, send and receive text messages, WhatsApp messages, and attachments, browse the Internet, capture precious moments, etc. But, there could be situations, where the critical data stored on your iPhone might accidentally get deleted, especially the messages and attachments stored on your WhatsApp.
This situation often occurs when cleaning up the unwanted messages from the message boxes. Nevertheless, landing up in such a situation is disastrous.
With Stellar Data Recovery for iPhone, you can now recover lost or deleted iPhone WhatsApp attachments both on your Mac and Windows based systems. It is a highly reliable data recovery software that is capable of recovering your lost or deleted data from your iPhone, iTunes, and iCloud.
Steps to recover iPhone WhatsApp Attachments
Follow the below-mentioned steps, to recover deleted iPhone WhatsApp attachments on your Mac and Windows-based systems with Stellar Data Recovery for iPhone.
Step 1) Install Stellar Data Recovery for iPhone on your Mac or Windows based system
Step 2) Connect your iPhone to your system
Note: You can connect multiple devices and the software will list up the connected devices
Step 3) Double click on the icon of the software and the main screen will open as shown below

Step 4) To recover from your iPhone, click on the Recover from iPhone option displayed on the main screen and select “Message & Chats” option from the list.
Step 5) The software will scan the selected device and list all the items on your phone
Step 6) You can select WhatsApp option from the list
Step 7) Now click on the save button to save the files
Step 8) Provide the location where you would want the recovered data to be saved.
Note: You can import the recovered data to your iPhone but this option is available only when you recover the data in a Windows based system.
To sum up, whenever you are in a situation where you have lost or accidentally deleted WhatsApp attachment from your iPhone, you can rely on Stellar Data Recovery for iPhone. This is a highly-efficient software that is capable of recovering all your lost or deleted data from iPhone, iCloud, and iTunes backup. With this software, you can save all your recovered messages and attachments at your preferred location on your computer.
Also read:
- [New] 2024 Approved Optimal Visuals for Effective Pre & Post-Call Teams Conversations
- Complete guide for recovering video files on Tecno Spark Go (2024)
- Different Methods for Resetting Motorola Moto G04 Phones with Screen Locked and Not | Dr.fone
- How to Hard Reset Lenovo ThinkPhone Without Password | Dr.fone
- How to Reset Realme GT 5 (240W) Without the Home Button | Dr.fone
- How To Transfer Data From Apple iPhone 12 Pro Max To Other iPhone 14 Pro devices? | Dr.fone
- In 2024, A-List 5 High-Res TVs Perfecting Chromatic Balance
- In 2024, Elite Hue Refiner Toolkit
- The Ultimate Guide to Get the Rare Candy on Pokemon Go Fire Red On Honor X50i | Dr.fone
- Title: Solved Mac Doesnt Recognize my iPhone 8 | Stellar
- Author: Ian
- Created at : 2025-01-18 19:01:12
- Updated at : 2025-01-21 16:53:13
- Link: https://techidaily.com/solved-mac-doesnt-recognize-my-iphone-8-stellar-by-stellar-data-recovery-ios-iphone-data-recovery/
- License: This work is licensed under CC BY-NC-SA 4.0.