
Solved Mac Doesnt Recognize my iPhone 6 Plus | Stellar
Solved: Mac Doesn’t Recognize my iPhone
Summary: Is your Mac not recognizing the iPhone? Learn the 9 ways to fix iPhone not showing up on Mac. You can apply these methods for all iPhone models not recognized by macOS Ventura, Monterey, Catalina, Big Sur, High Sierra and below versions.

You may want to backup iPhone data or transfer favorite photos, music, or videos to Mac. But sometimes your Mac computer doesn’t detect the iPhone when you try to connect it. There are so many complaints such as iPhone not showing up in Finder in Ventura, Monterey, Catalina or Macbook not recognizing iPhone 14. Some also reported an unknown error or a 0xE error when trying to connect iPhone to Mac computer. The situation is frustrating as it prevents you to sync iPhone to macOS and access iPhone data on Mac.
No worries. There are methods, which can fix the issue and let you again access your iPhone on Mac. But, first you should be aware why Mac fails to recognize your iPhone as this helps in troubleshooting the problem.
Why your iPhone not detected by Mac computer?
Mac does not detect your iPhone due to many reasons, such as
- iPhone is not ‘on’ when connected to Mac.
- iPhone is damaged.
- The USB cable or USB port is not working.
- Software updates are pending including iOS, iTunes, and macOS.
- Third-party software conflict wherein 2 programs arecompeting for the same memory, peripheral device etc., on your Mac.
- Firewall or Antivirus software is preventing Mac to recognize iPhone.
- Mac settings don’t allow to view iPhone in Finder.

1. Check your iPhone
Before you connect your iPhone to Mac, make sure the iOS device is unlocked and on the Home screen.
2. Fix USB connection
When Mac computer doesn’t recognize iPhone, first check your USB connection. The USB cable or the port can be faulty. Try to connect iPhone to Mac using another Apple USB 2.0 cable. If that doesn’t work try with the different port. Plus, disconnect other USB devices from Mac except your iPhone.
3. Restart your iPhone
Restarting the iOS device would resolve any issue between your iPhone programs and iTunes. To restart hold volume/side/ top button depending on your iPhone model. Slide the red power off slider on your iPhone. Wait for your iPhone to turn off. After a few seconds, again restart iPhone. Now Mac should recognize your iPhone.
4. Restart your Mac
Restarting Mac clears the cache and memory of your system giving it a fresh start. It also installs pending updates.
5. Update your macOS
When iPhone is not showing up on Mac Finder but you can see it under USB Device Tree, update the macOS to the latest version. Make sure there are no pending software installs.
To check the USB Device Tree on Mac follow the below steps:
- Click on Apple icon followed by About This Mac.
- Click the System Report button.
- Under Hardware, select USB.

Figure: USB Device Tree
- On the right pane, you will see USB Device Tree. If you see your iPhone in the list, then update to the latest macOS.
6. Update iTunes
Older versions of iTunes can create conflict with normal Mac functions. Hence, Apple recommends installing the latest iTunes updates.
To install the latest iTunes, open iTunes. From the menu bar choose Help > Check for Updates and follow the prompts to install the latest version.
Now, check if your Mac recognizes the iPhone or not.
7. Disable antivirus on Mac
One of the reason cited for iPhone not detected by Mac is anti-virus or firewall protection on your system. So disable the antivirus or firewall and then try to connect your iPhone to Mac.
8. Enable iOS device in Mac Preferences
When iPhone is not showing on Mac Finder, check if your Mac Preferences allows to view iOS devices in Finder. To enable iOS device in Finder follow the below steps:
- Go to Finder > Preferences.
- Click on the Sidebar button in Finder Preferences box.
- Check in CDs, DVDs and iOS Devices.

Figure: Finder Preferences
This should fix iPhone not showing up in Finder on Mac.
9. Connect iPhone to a different Mac machine
Try by connecting your iPhone to another Mac. If you receive a message asking to ‘Trust this computer’, click on ‘Trust’ to access your iPhone data on the new computer. Make sure to backup iPhone to avoid data loss situation.
Tip: Have you lost or accidentally deleted Camera Roll, Contacts, Photos Stream, Voice Memos, or more while transferring iPhone data to Mac? No need to worry. Restore the deleted photos, videos, messages, contacts, etc., with the help of an efficient Stellar Data Recovery for iPhone for Mac.

FAQ
1. Can I connect iPhone with Mac wirelessly?
You can sync your Mac and iPhone over the same Wi-Fi network.
- Connect your iPhone to Mac using a USB cable.
- Open Finder on Mac and select your iPhone in the sidebar.
- Click on the General tab.
- Check in Show this iPhone when on Wi-Fi.
- Click Apply.
2. How to fix my iPhone cannot connect to iTunes?
If iPhone is not showing up in iTunes, restart your devices and ensure macOS, iTunes, and iOS are updated. To know more methods, read How fix iPhone unable to connect to iTunes problem.
3. How to connect iPhone to the latest MacBook Pro 2021 that doesn’t have USB A port?
The new MacBook has USB Type-C port. You can use USB-C to Lightning cable to connect iPhone XR, SE, 11, and above to the new MacBook. If you have iPhone X or below use USB-A to Lightning cable.
4. Can I use the methods to fix iPhone 14 not recognized by macOS Ventura?
Yes, you can apply the above methods to fix any iPhone not detected by macOS Ventura, Monterey, Big Sur, Catalina, or below.
5. Will I lose any data when syncing iPhone and Mac?
No, you won’t lose data by syncing iPhone to Mac. Syncing helps to access your iPhone data on Mac anytime from anywhere. However, if you accidentally delete iPhone data, use an iPhone Data Recovery software to restore it.
Wrapping Up
Syncing iOS device to macOS has so many advantages but if Mac is not recognizing your iPhone, you cannot transfer, back up, or access iPhone data on Mac. This post has shared 9 methods to fix the syncing issue of Mac and iPhone. One of them should resolve Mac not detecting your iPhone.
How to fix error 1015 while restoring iPhone
Summary: Error 1015 appears during iPhone restore through iTunes. If you are getting this error, its probably due to attempts of jailbreak or iPhone downgrade. This post shares 7 ways to fix iPhone restore error 1015 on iPhone 7, 8, XS, XR, SE, 11, 12, and above models.
Are you receiving iPhone error 1015 during restore with iTunes as below?
Case 1: _I have an old iPhone 3G stuck in Recovery Mode. I am trying to restore it through iTunes. But at the end of the restore, I get unknown error 1015. How can I fix error 1015 on my own?
_
Case 2: I tried to restore my iPhone in iTunes. It won’t finish because of this error 1015 code. I have the latest software. I’ve restarted and updated my iPhone too. Still the same error message appears.
Have you used tools like TinyUmbrella to restore firmware that Apple no longer supports?
Did you try to jailbreak your iPhone by using applications like Redsn0w or Pwnage?
If yes, that’s the reason behind the problem. The error 1015 is typically caused by attempts of jailbreak or downgrade on the iOS device. Such activities are a violation of the iOS end-user software license agreement. They can make your iPhone vulnerable to malware and prone to errors like 1015.
Naturally, Apple wouldn’t encourage jailbreak or downgrading to an older iOS version. Thus, you are bound to face problems when trying the unauthorized iOS modifications on your iPhone or iPad.
Thus, the probable reasons for the iPhone restore error 1015 are:
- Downgrade of iOS
- Jailbreak
- Outdated software
- Third-party tools on your computer
This post shares all the possible solutions to fix iPhone restore error 1015.
You can apply these solutions on all iPhones including 3G, 4, 5, 6, 6s, 7, 8, X and above models using any iOS version.
1. I****nstall the latest version of iTunes
Make sure your computer has the latest iTunes before restoring iPhone using iTunes.
On Windows PC, update iTunes by following Help > Check for Updates in the top menu bar of iTunes.
On Mac, go to App Store > Updates > click Install, if you see any iTunes updates.
2. Update iOS
iOS updates usually fix error 1015 which appears while restoring iPhone with iTunes.
On your iPhone, go to Settings > General > Software Update and tap Download and Install.
3. Update Windows or macOS
System update ensures smooth and error-free performance of your computer.
If you are using Windows PC, follow Start > Settings > Update & Security > Windows Update.
On Mac, click on Apple icon and select S****oftware Update and click on updates available.
4. Uninstall third-party software on PC/ Mac
Third-party software often create conflict among programs while performing iPhone restore or update with iTunes. You may not receive the error 1015, after uninstalling such programs.
On Windows computer go to Start > All apps. Find the third-party software and right-click on it. Choose Uninstall.
On Mac, in the Finder window, go to Applications. Find and select the third-party software. In the top menu bar, go to File and select Move to Trash. Next, click on Empty Trash.
5. Put your iPhone in Recovery Mode and restore
Before you put your iPhone on Recovery Mode, ensure you are using the latest version of iTunes. Next, follow the below steps to restore iPhone using the Recovery Mode.
- Connect your iPhone to computer
- Open iTunes
- Force restart your iPhone while it is still connected to the computer, until you see the iTunes logo (To force restart use home and/or volume button depending on your iPhone version)

- On your computer, you will receive a dialog box asking to either Update or Restore.

- Click Update
After the Update process completes, you can restore your iPhone from iTunes or iCloud backup without facing the error 1015.
Note: If you are unable to enter Recovery Mode on your iPhone due to jailbreak, you may use programs like RecBoot, which are used to enter and exit the Recovery Mode on iPhone, iPad or iPod touch.
6. Delete the IPSW file on your computer
Files with .ipsw extensions on your computer are backups and temporary files of your iOS updates. Many iPhone users who were receiving error 1015 while restoring iPhone were able to fix the problem by deleting these files on their PC or Mac.
Deleting these backup files doesn’t impact your iTunes or iPhone function.
Note: You can get rid of the old IPSW files and keep the most recent ones.
Location of .IPSW files on your computer:
On Windows XP: C:\Documents and Settings\[username]\Application Data\Apple Computer\iTunes\iPhone Software Update
On Windows Vista/7: C:\Users\[username]\AppData\Roaming\Apple Computer\iTunes\iPhone Software Updates
On Mac OS X: ~/Library/iTunes/iPhone Software Updates
7. Restore your iPhone into DFU Mode
When no other method is helpful, choose to put your iPhone in DFU (Device Firmware Update) mode. Whether you are receiving the iPhone error 1015 due to jailbreaking your iOS device or not, the DFU mode solution is your last resort to fix error 1015.
As in Recovery Mode, bringing your iOS device to DFU mode will lead to loss of iPhone data. Thus, before you attempt this, make sure you have iCloud or iTunes backup.
Steps to DFU mode for iPhone 7, 6s and below users:
- Connect your iPhone to computer (even if your iPhone is off)
- For 8 seconds, press and hold the Sleep button and Home button (iPhone 6s and below users) or the volume down button (iPhone 7). Next, release the Sleep button but continue to hold the Home button or the volume down button until iTunes shows message _‘iTunes has detected an iPhone in recovery mode._’

- Leave the Home button or volume down button. The iPhone screen turns black indicating the device has entered DFU mode
- Next, you can restore your iPhone using iTunes
Steps to DFU mode for iPhone X, 8, or 8 Plus users
- Connect your iPhone to computer (even if your iPhone is off)
- Quickly press and release the volume up button, quickly press and release the volume down button, and press and hold the side button until your iPhone screen turns black
- Press and hold the volume down button while continue holding the side button for 5 seconds
- Release the side button and continue holding the volume down button until your iPhone shows up in iTunes.
- Next, release the volume button. Your iPhone is in DFU mode
Now restore iPhone with iTunes. You can exit DFU Mode by force restarting your iPhone.
| Unable to restore iPhone from iTunes after Recovery Mode or DFU Mode?
If after putting your iOS device to Recovery or DFU mode you are unable to restore iPhone, download Stellar Data Recovery for iPhone The DIY software for Mac and PC can easily restore the data from iPhone, iCloud, and iTunes.

|
| — |
To Sum Up
Naturally, the error code 1015 is annoying when you quickly want to restore your iPhone using iTunes.
The error usually appears when your software is not updated, you have attempted jailbreak or downgraded your iPhone’s iOS.
The post shares 7 different ways you can try to fix the problem. Begin with the simpler troubleshooting such as updating your iOS, Windows/ macOS and iTunes. Uninstalling third-party security software or deleting the IPSW files on your computer has also worked for many in resolving the error 1015.
In case these methods don’t work, then go for the tougher solutions like bringing iPhone to Recovery Mode or DFU Mode which lead to iPhone data loss. They are the harsher solutions to the problem, but assure you don’t receive error 1015 while restoring from iTunes. But make sure you have iCloud and iTunes backup before attempting these two methods. Else you would need an iPhone data recovery software such as Stellar Data Recovery for iPhone to restore your lost iPhone data. The software is quick and efficient way to get back lost data in cases of jailbreak, downgrade of iOS and restore errors.
How to recover deleted photos after deleting from ‘Recently Deleted’ on iPhone
The Recently Deleted folder in the Photos App on iPhone is there to recover accidentally deleted photos. However, even if your important photos are deleted from ‘Recently Deleted’ you are not yet out of luck. This post shares how to recover deleted photos after deleting them from ‘Recently Deleted’ on iPhone.

‘I deleted some important pictures on my iPhone and also deleted them from the ‘Recently Deleted’ folder. Is there any possible way to recover photos after permanently deleting them from the iPhone?’
When you delete photos from your iPhone, they first go to the ‘Recently Deleted’ folder of the Photos App. Here the photos remain for 30 days. Hence, any picture deleted 30 days ago automatically gets removed after this period, and this time permanently.
However, sometimes you may accidentally delete valuable pictures too. To make the situation worse, even remove image files from ‘Recently Deleted’ or realize the mistake 30 days after deleting!
In any case, can you get photos back after deleting from ‘Recently Deleted’ on your iPhone?
This post addresses the problem situation of permanently deleted photos from iPhones and finds the appropriate solution.
Let’s read on…
Understanding permanently deleted photo recovery from iPhone
You can recover deleted photos from your iPhone after deleting them from the Recently Deleted folder or 30 days of automatic deletion.
Of course, backups — iCloud and iTunes are the immediate go-through solution in such a case. However, Apple backups have their own disadvantage. Photo recovery with iCloud and iTunes results in the loss of your current data on your iPhone!
That’s the reason, iCloud and iTunes are frustrating when you want to get back only a few photos.
So, if you are using another backup service such as Google Drive or OneDrive for iPhone photo backup, they are more convenient.
In addition, apart from backup, iPhone recovery software is just the right solution. It works even when you don’t have a backup or don’t want to eliminate your existing data on your iPhone or iPad.
1. Recover ‘Recently Deleted’ photos from iCloud backup
Use an iCloud backup to recover deleted photos from your iPhone after 30 days of deleting them from the ‘Recently Deleted’ folder. iCloud backup is the best solution to retrieve permanently deleted photos from iPhone free.
Just get on to the below steps to recover deleted photos from iCloud:
- On your iPhone, navigate to Settings > General > Reset> Erase all Contents and Settings.
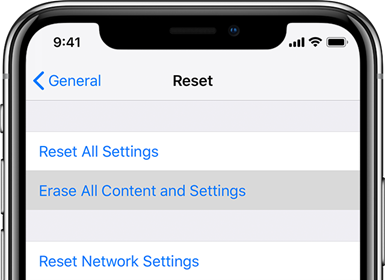
- Select Erase Now in the dialog box and follow the prompts until you reach the Apps & Data screen.
- Click on Restore from iCloud Backup.

- Sign in to your iCloud account.
- Select the recent backup from the list that has the deleted pictures. Click Restore to get back the deleted photos on your iPhone.
2. Recover permanently deleted photos from iTunes
If you have an iTunes backup, look for the deleted photos after deleting from ‘Recently Deleted’ in your iTunes backup.
Below are the quick steps:
- Connect your iPhone to your PC or Mac and launch iTunes.
- Click on your iPhone under the device list and select the recent backup date that may contain the permanently deleted pictures.
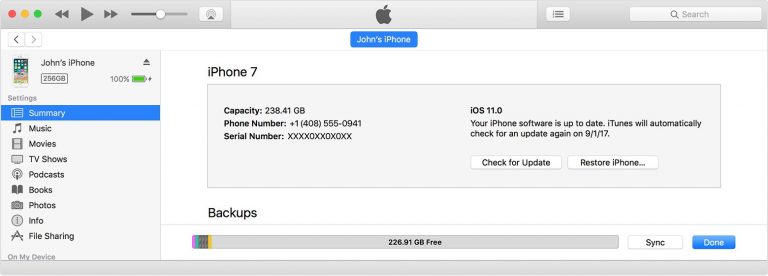
- Click Restore Backup.
That’s it. You get back the deleted photos on your iPhone. However, this will replace the current data on the iPhone with the old backup data.
3. Recover recently deleted photos from cloud storage
iPhone users, who don’t completely rely on iCloud and iTunes for backup, use third-party cloud backup solutions. If you are one of those, check your cloud storage for permanently deleted photos on your iPhone. Cloud backups such as Google Drive, iCloud, Dropbox, OneDrive, etc., are efficient ways to save and protect your photos on your iPhone from permanent loss. You can restore photos on a PC , Mac, or iPhone by using cloud storage.
4. Recover Recently Deleted Photos with iPhone recovery software [Recommended]
Some of you may not have photos backed up in iCloud or iTunes. It’s also possible you couldn’t find the desired picture in the backup. In any case, use the best iPhone recovery software to get pictures back after deleting from Recently Deleted on iPhone.
Try one of the popularly used Stellar Data Recovery for iPhone . It is compatible with not just old iPhones like iPhone 6, 7, 8, X, etc., but also the latest series of iPhone 15. You also get the latest iOS 17 support.
Stellar Data Recovery for iPhone can help to recover photos from the iPhone without backup. Additionally, you can retrieve lost or deleted contacts, messages, chat messages, Notes, Reminders, etc.
Besides, when you recover photos by using iTunes or iCloud, it gets back all data from the backup file whereas with the software you can select and recover only what you require. Unlike photo recovery from backup, the software doesn’t replace the existing data with old backup data on your iPhone.
Here are the steps to recover deleted photos after deleting them from the Recently Deleted folder on your iPhone:
- Connect your iPhone to your PC or Mac computer.
- Download and launch Stellar Data Recovery for iPhone on a computer.


- On the first screen, select Recover from iPhone on the left pane. If required, you can choose the ‘Recover from iCloud’ or ‘Recover from iTunes’ option.
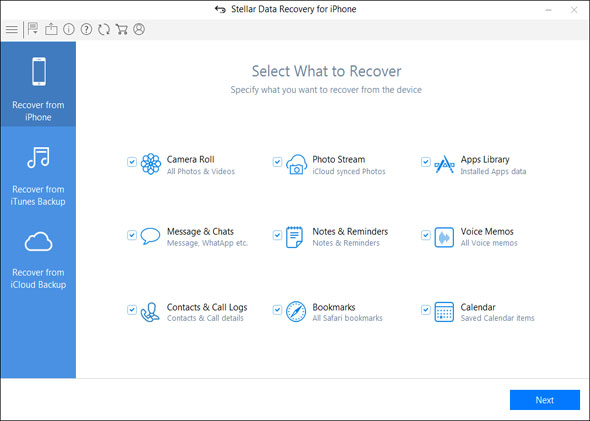
- Check-in Camera Roll and Photo Stream and click Next.
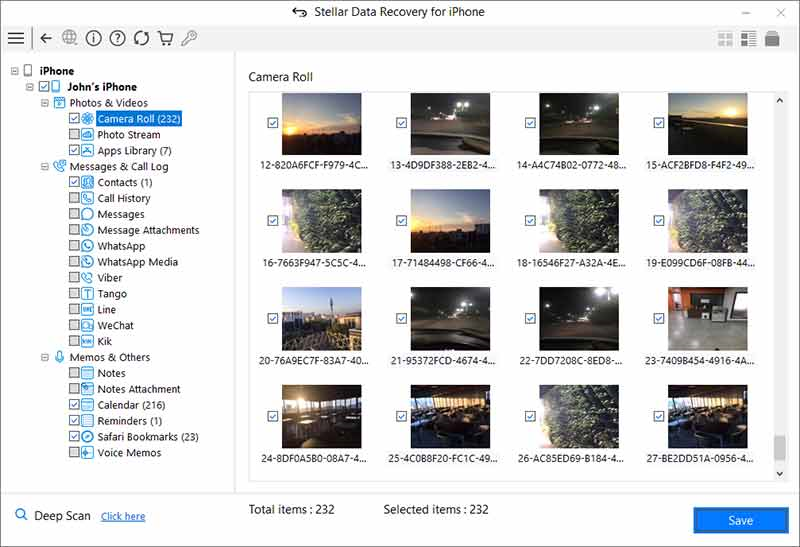
- The software scans and displays the recovered pictures. See preview, select, and save the desired photos.
Conclusion
An iPhone recovery software is the perfect approach to recover deleted photos from an iPhone after 30 days of deleting them from the ‘Recently Deleted’ folder. We recommend Stellar Data Recovery for iPhone. It is fast and can retrieve permanently deleted photos without affecting the current data of your iPhone. Unlike iCloud and iTunes backup, which annoyingly replace existing data with the old backup data, the software can restore only those photos, which you have deleted.
Take the free trial and ensure that Stellar Data Recovery for iPhone can retrieve permanently deleted photos from your iPhone.
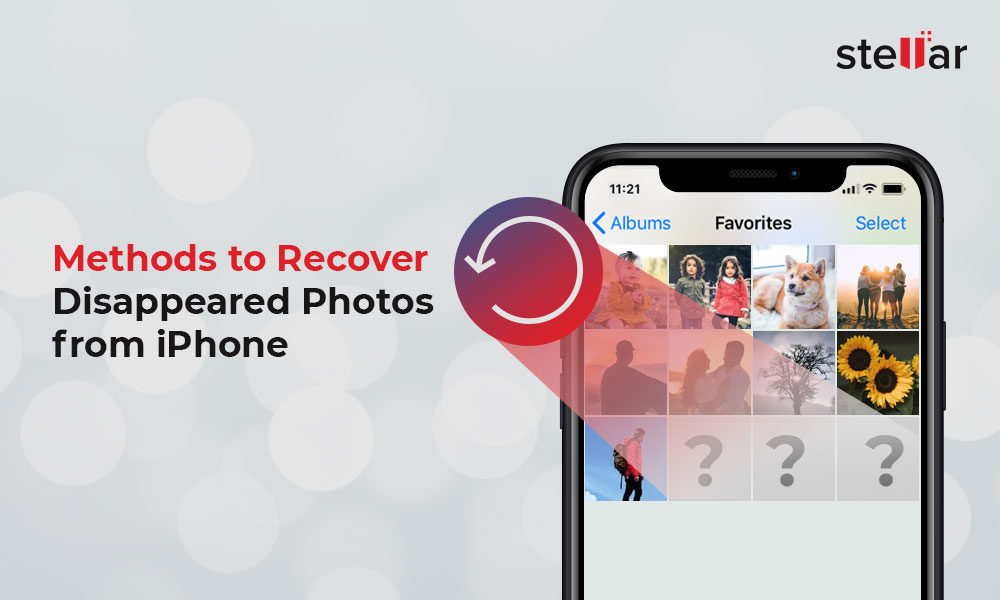
Solved: Photos Disappeared from iPhone Suddenly
‘I noticed that over 500 old photos from iPhone 11 have disappeared and now only the recently shot pictures are showing! I lost almost all of my best memories saved in my phone. I am sure I did not delete them. Where did the pictures disappeared from iPhone? How do I get back photos missing from iPhone? Please help.’
Photos suddenly disappearing from iPhone or random photos missing from Camera Roll or Gallery is a common complaint. Usually, photos get disappeared after iOS update, iPhone reset/restore, or when the device storage is full. You may also lose pictures after installing any new software, or jailbreaking. Sometimes, running an iPhone cleaning software without checking what it is deleting on your iOS device can also result in loss of photos.
The situation is stressful, even more when you don’t have any copies or backup of lost photos.
So how to recover the missing or lost photos on iPhone? This post shares the effective methods to get back the missing photos from Camera Roll, Gallery, or iCloud on your iPhone.
In any such sudden photo loss situation, the best solution is to use a secure photo recovery tool for iPhone that can recover photos lost due to any reason. Besides, there are free methods that might restore disappeared photos from iPhone, which you should try once.
Method 1: Restart your iPhone
If your photos suddenly disappeared from iPhone, first restart the iOS device. Then open the Photo app, Camera Roll, or Photo Stream to see if the missing photos are showing or not.
You can check here the steps to restart your iPhone model .
Method 2: Restore photos from Recently Deleted folder on iPhone
You might have accidentally deleted the photos on iPhone. Check and recover the photos from the ‘Recently Deleted’ folder of your Photos app.
Steps to recover photos on iPhone from ‘Recently Deleted’:
- On your iPhone, click to follow Photos > Albums.
- Scroll down to Utilities and click Recently Deleted.
- Look for your missing photo, tap on it and choose Recover. If there are multiple photos, click on ‘Select’ followed by ‘Recover’.
Note: Photos deleted on iPhone stay in your ‘Recently Deleted’ folder only for 30 days, after which they are permanently removed from the iOS device.
Method 3: Unhide photos on iPhone
Photos disappeared from iPhone can be in the hidden folder in Photos app. Simply, check the Hidden folder on your device and unhide the required photos.
- Open Photos app on iPhone.
- Click on Albums.
- Under Utilities click on Hidden folder. In case you don’t see the ‘Hidden’ folder, go to ‘Settings’ of your iPhone. Click on ‘Photos’ and toggle on ‘Hidden Album’.
- If you see the disappeared photos, select and click on the ‘Share’ button (the arrow icon).
- Next, tap Unhide to move the pictures to their original location on iPhone.
Method 4: Enable iCloud Photos
iCloud Photos store images in iCloud and syncs them to your iPhone, iPad, iCloud.com, iPod touch, Mac, and Apple TV. This means that any changes done to pictures library on one device will show up on your other iOS devices as well. If the photos are disappearing from iPhone only, may be the iCloud Photo is not synced or turned on. So enable iCloud Photos to get back the disappeared pictures on iPhone.
Steps to enable iCloud Photos on iPhone:
- Turn on Wi-Fi of your iPhone.
- On iPhone, navigate to Settings.
- Click on your name and tap iCloud > Photos.
- Toggle on iCloud Photos.
Now check if the missing photos are showing up on iPhone or not.
Method 5: Recover iPhone photos from iTunes backup
If you have created iTunes backup, restore the disappeared photos on iPhone from it. However, this will replace your existing iPhone data with iTunes backup data.
Steps to recover photos from iTunes:
- Connect your iPhone to computer.
- Launch iTunes.
- Select your iPhone under the device list and click on Summary.
- Click Restore Backup.
- In the Restore from Backup box, select the backup date that contains your photos.
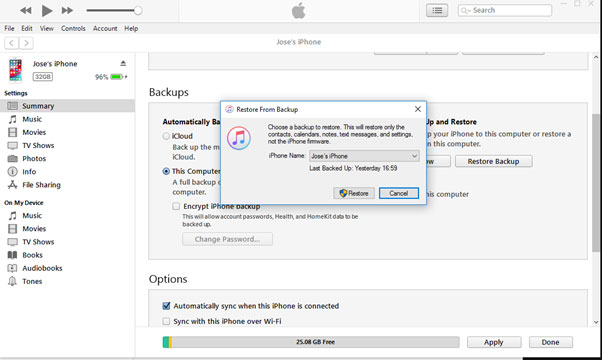
- Click Restore. Wait until the process finishes and your iPhone restarts. All your disappeared photos will be recovered on iPhone.
Method 6: Restore photos from iCloud Backup
You can restore the previous iCloud backup that has the missing photos. However, like iTunes, this method will also replace the current data on your iPhone.
Steps to recover disappeared photos from iCloud:
- On your iPhone, go to Settings > General > Reset.
- Click on Erase all Contents and Settings. In the dialog box, choose Erase Now.
- On the Apps & Data screen, click Restore from iCloud Backup. Enter your Apple ID. In case you have forgot your Apple ID, click here to know how to recover it.
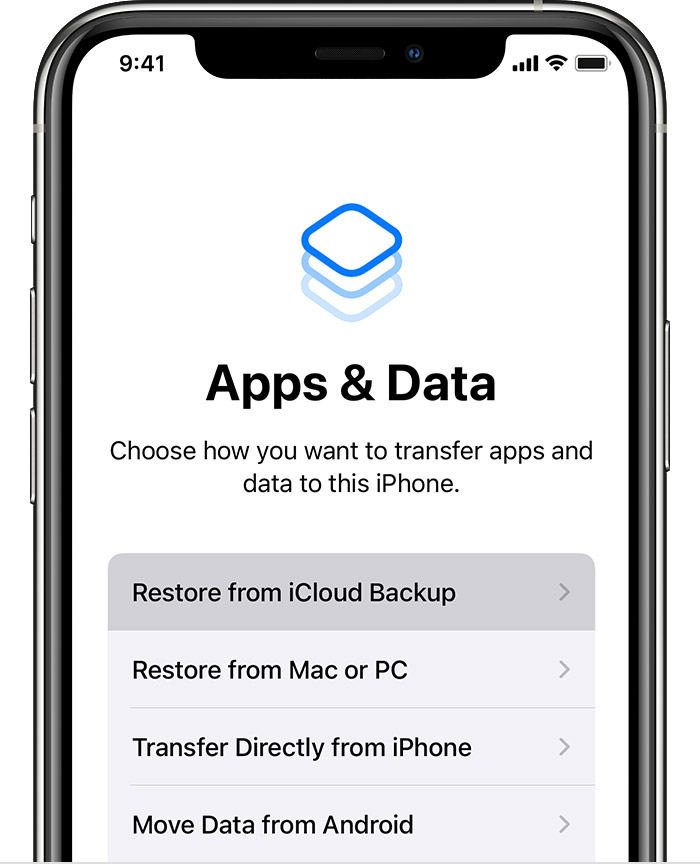
- Select the recent backup and click Restore. The lost photos should now appear on iPhone.
Method 7: Recover lost photos with an iPhone data recovery software
The advanced iPhone recovery software — Stellar Data Recovery for iPhone, can restore photos lost, deleted, or missing due to any reason. Whether your photos disappeared from iPhone after update, due to low storage, or any other reason, the software can recover in all situations.
The biggest advantage of using the software is that it doesn’t remove your existing iPhone data. Further, the software shows the preview of the recoverable photos. Hence, its easy to select and recover only the required disappeared pictures from Camera Roll, iCloud Photo Library, Gallery, or those shared on chat messages, etc. Stellar Data Recovery for iPhone is compatible with the latest iPhone 14/13/12/11, iPad, and iPod touch. The software supports recovery from the latest iOS 16 and older versions.
Quick steps to recover disappeared photos from iPhone:
- Download Stellar Data Recovery for iPhone on PC or Mac.
- Connect your iPhone to computer.
- Launch the software and select Recover from iPhone option from the left panel.
- Select the Camera Roll or Photo Stream from where the photos have disappeared and click Next to the start the scanning process.
- Now preview the recoverable photos, select them, and click Save to restore on iPhone or computer.
Note: You can also recover the lost photos from backup by choosing Recover from iCloud backup or Recover from iTunes backup , options in the software.
Conclusion
When you find suddenly photos disappearing from iPhone try any of the above 7 methods to get back the lost pictures. However, of all we recommend solutions Stellar Data Recovery for iPhone software is quick and easy to use. It is also of great help when you don’t want to recover from iCloud or iTunes backup that removes the existing data on iPhone.
Also read:
- [New] 2024 Approved YouTube Snippets Guide Essential Insights Unveiled
- Best Android Data Recovery - Retrieve Lost Contacts from Hot 30 5G.
- How do I reset my OnePlus Nord CE 3 5G Phone without technical knowledge? | Dr.fone
- How To Transfer Data From Apple iPhone 12 Pro To Other iPhone 12 Pro Max devices? | Dr.fone
- In 2024, How I Transferred Messages from Xiaomi Redmi K70E to iPhone 12/XS (Max) in Seconds | Dr.fone
- In 2024, How to Change Your Huawei P60 Location on life360 Without Anyone Knowing? | Dr.fone
- Optimal ISO Tool Selection for PCs & MacBooks - Complimentary Download Options
- Quick Solution Guide: Overcoming Delayed Start/Control Errors (Service ID 1053)
- Repair damaged, unplayable video files of Poco C51 on Mac
- What You Need To Know To Improve Your Motorola Edge 2023 Hard Reset | Dr.fone
- Your Complete Guide To Reset Samsung Galaxy M14 4G | Dr.fone
- Title: Solved Mac Doesnt Recognize my iPhone 6 Plus | Stellar
- Author: Ian
- Created at : 2025-01-18 23:11:59
- Updated at : 2025-01-21 19:41:33
- Link: https://techidaily.com/solved-mac-doesnt-recognize-my-iphone-6-plus-stellar-by-stellar-data-recovery-ios-iphone-data-recovery/
- License: This work is licensed under CC BY-NC-SA 4.0.