
:max_bytes(150000):strip_icc():format(webp)/GettyImages-165567842-58e5bd253df78c51625e84ab.jpg)
Solved - How to Fix MS Excel Crash Issue | Stellar
[Solved] : How to Fix MS Excel Crash Issue
Microsoft Excel may stop responding , hang, freeze, or stop working due to several reasons, such as in compatible add-ins. In such a case, you may receive one of the following error messages.
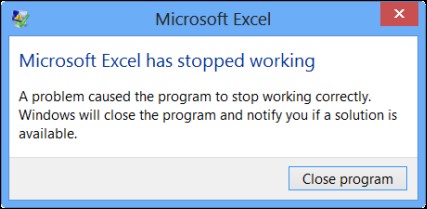
- Excel has stopped working
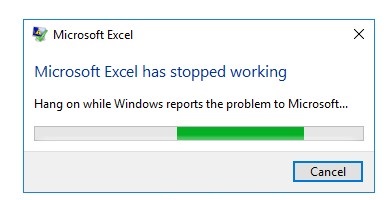
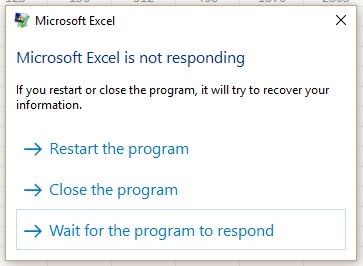
- Excel is not responding
- A problem caused the program to stop working correctly. Windows will close the program and notify you if a solution is available.
Why Does Excel Keep Crashing?
If Excel keeps crashing on your PC while opening a workbook, saving Excel file, scrolling or editing cells, etc., it indicates a problem with your Excel program or the Excel file.
Microsoft Excel may crash due to any one or more reasons given below,
- Incompatible Add-Ins
- Outdated MS Excel program
- Conflict with other programs or antivirus tool
- Excel file created by third party software
- Problem with network connection
- Combination of Cell formatting and stylings
- Problem with MS Office installation
- Partially damaged or corrupt Excel file
Problems Caused by Excel Crash Issue
Microsoft Excel crash may cause damage to Excel file and also lead to Excel (XLS/XLSX) file corruption.
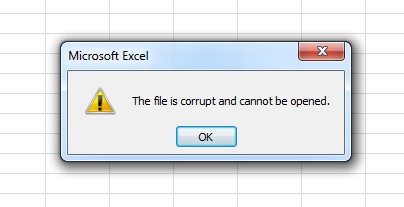
Such corrupt Excel files can’t be opened or accessed via MS Excel app. If you try to access a corrupt Excel file, MS Excel may fail to open the file or stop responding and crash. Additionally, you may receive the following or similar error message,
In such a case, you should immediately try to recover the Excel file. You may do so by restoring the Excel file from backup or by using an Excel File Repair software. Otherwise, continue following this guide.
How to Solve Excel Crash Issue?
Before heading to solutions, follow these troubleshooting steps to resolve the Excel Crash issue.
Step 1: Copy File to Local Drive
If you are trying to access and edit or view an Excel file from a network drive, try moving the file to local drive. This will help you find if there is something wrong with the file or the network.
Step 2: Ensure Sufficient Memory
Excel files can grow fairly large when you start adding lots of formatting and shapes. Make sure that your system has enough RAM to run the application.

If you often work with large Excel files and complex data values& formulas, then install 64-bit versions of MS Office. It will give you an advantage of larger processing capacities and prevent Excel from crash or freeze.
Step 3: Check If Excel is Open and In Use by Another Process
Open Task Manager and close all processes or apps (tasks) that may be using or have access to your Excel file that you are working on. You can find this detail in status bar of Excel program at the bottom of program window.
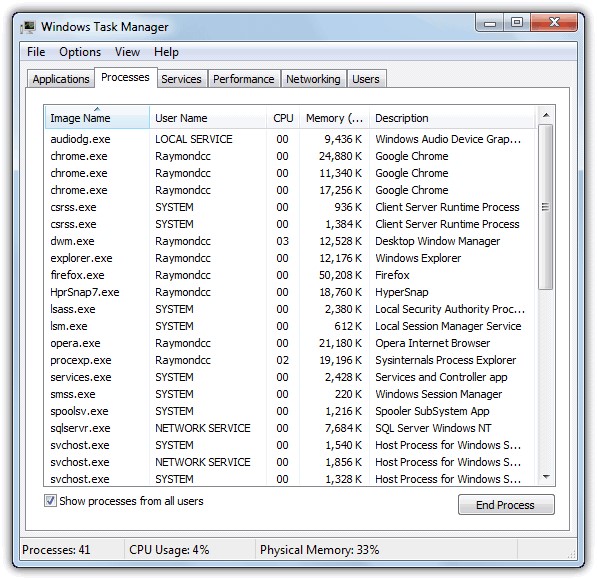
After closing the tasks, try to access the Excel file and check if this fixes the performance and crash problem in Excel.
Step 4: Test and Repair Excel File
Create a copy of the Excel file and install Stellar Repair for Excel software. It’s free to download. Scan and repair your Excel file using the software. After repair, save the Excel file at your desired location and then open the Excel file in the MS Excel program.
This should ideally fix all the issues with Excel.
However, if the Excel program still crashes, the problem lies within the system or program. Follow the solutions discussed in this guide to try to fix the Excel crash issue.
NOTE: To save repaired Excel file using the mentioned software, you must purchase the activation key and activate it.
Solutions to Fix MS Excel Crash Issue
Following are some solutions to resolve problems with MS Excel such as,
- Excel not responding
- Excel won’t open
- Excel keeps crashing
Follow these solutions in the given order. In case a method doesn’t work, move to the next one.
Solution 1: Restart Excel in Safe Mode
By starting MS Excel in safe mode, you can run the program without loading the Excel add-ins and with limited features. But COM add-ins are excluded.
To launch Excel in safe mode, close MS Excel and follow these steps,
- Create a shortcut of MS Excel (.exe) on Desktop
- Press and hold the Ctrl key while launching the program
- Click ‘Yes’ when a prompt appears to confirm
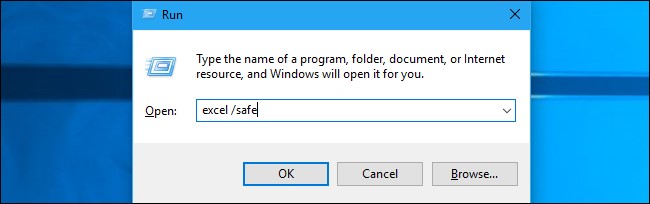
Alternatively, press Windows+R, type excel /safe and press ‘Enter’. Use this to open Excel in safe mode on Windows 10, 8.1, 8, or 7 system.
Now try to open and access the Excel file and check if the issue is resolved. If it’s not, head on to the next solution.
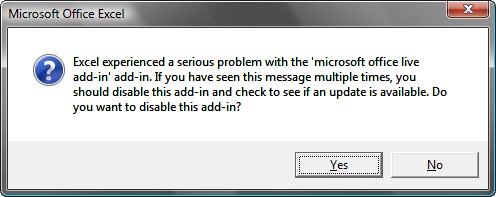
Solution 2: Check and Remove Faulty Add-ins
In case Excel doesn’t crash in Safe Mode, it’s possible that some faulty add-ins are the culprit behind frequent Excel crash and freeze. These Excel add-ins may interfere or conflict with the Excel program.
Find and remove the faulty add-in. It can resolve the issue. To do so, follow these steps,
- Restart Excel in normal mode and go to File> Options> Add-ins
- Choose COM Add-ins from the drop-down and click Go

- Uncheck all the checkboxes and click OK
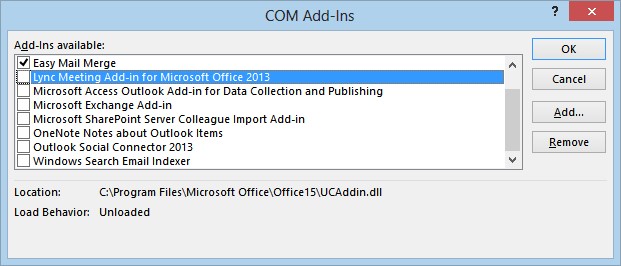
- Restart Excel and check if the issue is resolved
- If Excel doesn’t crash or freeze anymore, open COM Add-ins and enable one add-in at a time followed by Excel restart. Then observe Excel for freeze or crash problem
This will help you find out the faulty add-in, which is causing the problem. Remove the add-in which is causing the problem to resolve the issue. If that doesn’t fix, move to the next solution.
Solution 3: Check and Install the Latest Updates
If you haven’t set Windows to Download and Install Updates automatically, do it now.
Apart from updating the operating system, latest Windows updates sometimes fixes bugs for other applications installed on the system such as MS Office. Often installing an important update that you might have missed may correct the Excel crash problem.
You can also update MS Office manually. Follow these steps,
Go to File > Account
Under Product Information, select Update Options and click Update Now
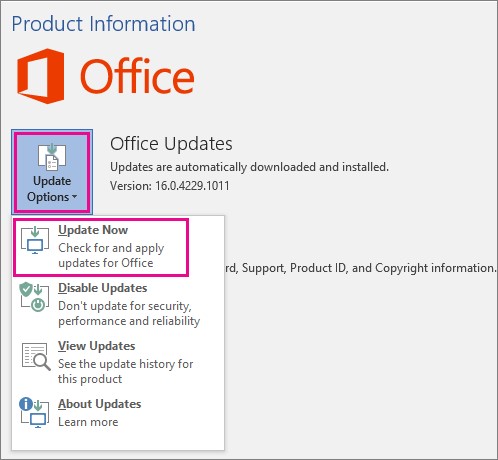
If you have installed MS Excel from Microsoft Store, open the store and update your Office applications.
NOTE: This also works if you can’t open Excel file or Excel crashes after Windows upgrade from Windows 7 or Windows 8/8.1 to Windows 10.
After installing the latest MS Office updates, check if Excel works fine. If not, head to the next solution.
Solution 4: Clear Conditional Formatting Rules
If a sheet is causing Excel to freeze or crash, there might be a problem with that particular sheet. In such a case, you may try clearing the Conditional Formatting rules. The steps are as follows,
- Under Home, click ‘Conditional Formatting > Clear Rules> Clear Rules from Entire Sheet’
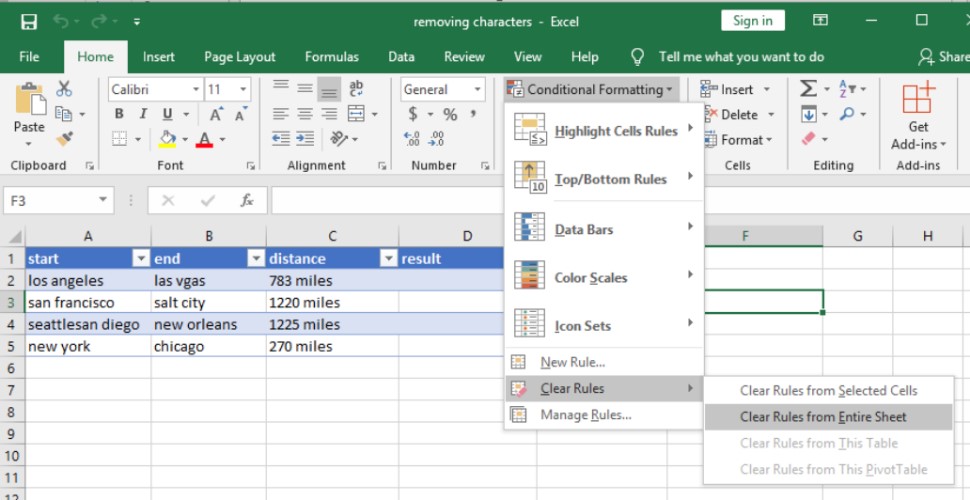
- You may repeat this step for all other sheets in the Excel workbook
- Then click File> Save as and save the Sheet as a new file at a different location
This avoids overwriting or making changes to the original Excel file. Once done, try working on the sheet.
If this doesn’t work out, move to the next solution.
Solution 5: Remove Multiple Cell Formatting and Styles
If a workbook is being shared and edited by others on different platforms then it’s possible that many cells are formatted differently. This can cause issues with Excel such as crash and freeze. It can also lead to Excel file corruption. The problem mostly occurs when a workbook contains multiple worksheets using different formatting.
You can follow this guide to remove different cell formats and styles, and then open the Excel file.
Solution 6: Disable Microsoft Excel Animation
Animations require additional processing power and resources. By disabling animations in Excel, you may resolve Excel freeze and crash issue. This also improves MS Excel performance.
To disable the animations in MS Excel, follow these steps:
- Go to File > Options
- Click ‘Advanced’ and check ‘Disable hardware graphics acceleration’animation
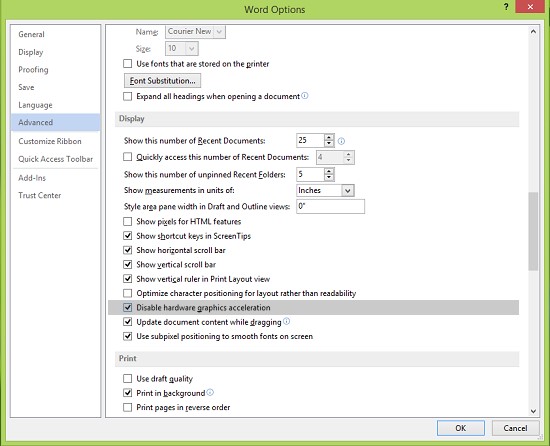
- Click ‘OK’ to close the window and then restart MS Excel
This has helped many users in fixing the Excel crash issue. If it doesn’t work for you, head to the next solution.
Solution 7: Check If Excel File is Generated by a Third-Party Application
There are applications which you may have used to generate Excel files to fetch data. For instance, downloading data from Google Analytics in Excel format.
Sometimes, these Excel files are not generated correctly by such third-party apps. Thus, some features in Excel may not work as intended when you access the files in MS Excel.
In such a case, you should get in touch with the app developer for help with the file or use Stellar Repair for Excel to repair such Excel files.
Solution 8: Check If Antivirus or Other Apps are Conflicting with MS Excel
Ensure your antivirus is up-to-date and not conflicting with MS Excel. An outdated antivirus tool may conflict with Excel which can cause the application to hang, freeze, or crash.
- Update your antivirus
- Try disabling the add-in or integration between Excel and antivirus. See if it works
Alternatively, you may disable the anti-virus tool temporarily to check if it is the culprit behind Excel performance issue and crash. If that resolves the problem, get in touch with your antivirus vendor and report the problem.
They might provide you with a better solution or workaround to fix this problem without disabling the antivirus protection.
IMPORTANT NOTE: Disabling or altering antivirus protection makes your PC vulnerable to malicious attacks and virus or malware intrusion.
Solution 9: Clean Boot Windows to Inspect the Cause Behind Excel Crash
When Windows boot, it starts several processes, services, and application during start up automatically, which runs in the background.
These startup apps and services can interfere with other applications such as MS Excel. To find out if that’s the cause behind Excel crash, you can perform a Clean Boot.
This helps you identify processes, services, or applications that are conflicting with Excel. Steps to perform Clean Boot are as follows,
- Press Windows key + R, type MSConfig, and press ‘Enter’
- In System Configuration window, click on the General tab and choose Selective startup
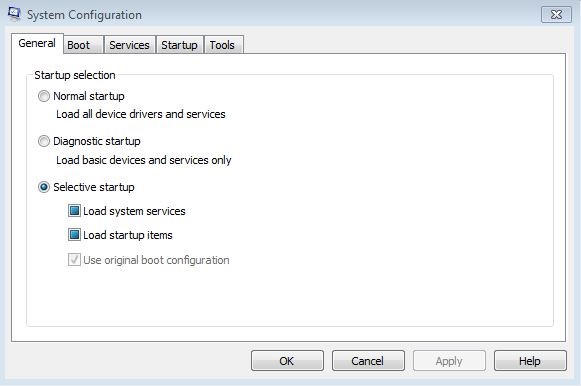
Uncheck ‘Load startup items’ and click ‘OK’
After this, close all running applications and restart your PC
Check if the crash problem with Excel is resolved. Uninstall the conflicting apps or update them. If your issue is not resolved, follow the next solution.
Solution 10: Repair or Reinstall MS Office
Repairing Office programs may also resolve Excel crash issues if caused by damaged MS Excel program or MS Office files. The steps are as follow,
- Close all MS Office apps and open the Control Panel
- Click Uninstall a program under Programs
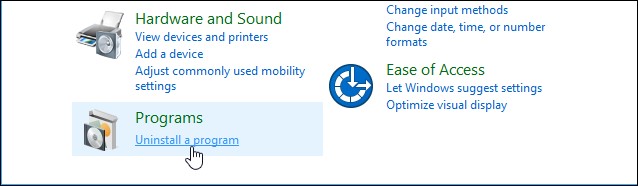
- Click on Microsoft Office and then click on the Change option
- Choose ‘Quick repair’ and then select ‘Repair’
- Click ‘Continue’ to repair MS Office installation
You may also try ‘Online Repair’ if this fails to fix the issue. After repair, if the Excel issue persists, reinstall MS Office.
Need More Help?
If none of the above-mentioned solutions worked for you, it indicates that the problem is not with the Excel program but with the Excel file. If you haven’t tried the Stellar Repair for Excel software, do it now.
Select the Excel file which is causing the problem and repair it with the software. It’s a powerful Excel repair software that can fix all the problems with Excel files (XLS/XLSX). It repairs corrupt and severely damaged Excel files.
The software is compatible with all Excel files created using MS Excel 2019, 2016, 2013, 2010, 2007, 2003 or 2000.
After repairing and saving the Excel file, you can open it in your MS Excel program and work on it without any performance issue. To know more about this software, visit this page.
Easy Steps to Make Excel Hyperlinks Working
Summary: This blog discusses why hyperlinks won’t work in Excel and solutions to fix it. If nothing works, try using Stellar Repair for Excel software to recover your workbook with hyperlinks and all the data intact.

Hyperlinks in your Excel file could be references to a file’s location on the computer or a location within the same worksheet. Or, hyperlinks might be pointing to a URL. Sometimes, the hyperlinks won’t work and any of the following errors may pop up on your screen on clicking a hyperlink:
‘Cannot open the specified file.’

‘This operation has been canceled due to restrictions in effect on this computer. Please contact your system administrator.’

Causes of ‘hyperlinks not working in Excel’ problem, and solutions thereof
Here are some of the possible causes behind the ‘hyperlinks not working’ issue and solutions to fix it:
Cause 1 – Change in the name of the hyperlinked file
If the file name that appears in the hyperlink text is different than the actual file name, it will prevent the hyperlink from working.
Solution – Link to the renamed file
Ensure that the links in the Excel file are updated and points to the renamed file. For this, right-click the hyperlink and select ‘Edit the hyperlink’. Next, in the hyperlink address, replace the current filename with the renamed one in the hyperlink address.
Cause 2 – File name has a pound (#) sign
When you create a hyperlink for a file in Excel, you cannot use a pound character (#) in the file name that appears in the hyperlink. That is because the pound sign is not accepted in hyperlinks and may lead to the ‘Cannot open the specified file’ error.
Note: While you can use a pound character in a file name, it cannot be used in hyperlinks in an MS Office document.
Solution – Rename the file name and remove the pound sign
Open the file that contains the ‘#’ sign and rename it by following these steps.
- Right-click the cell containing the hyperlink that is not working, and click Edit Hyperlink.
- From the Address box, copy the address of the file you are linking to.
- Go to the location where the file is stored, right-click on the file, and click Rename.
- Remove the ‘#’ character from the name of the file.
- Go back to the Excel file, right-click on the problematic hyperlink, and choose Edit Hyperlink. Next, browse and select the renamed file.
- The renamed file without the pound sign will be added in the Address box.
- Click OK.
Now try opening the hyperlink.
Cause 3 – Sudden system shutdown causes abrupt closing of Excel
There may be a discrepancy in the data in hyperlinks when a system shut down suddenly, without properly closing the Excel file. And so, when trying to open a link, it won’t open.
Solution – Enable the option to save hyperlinks
There is an inbuilt option in Excel to update hyperlinks every time the workbook is saved. Follow these steps to enable that option:
Note: The steps may vary based on the Excel version you are using.
For Excel 2013, 2016, or 2019:
- Open Excel Workbook -> Go to File->Options->Advanced
- Scroll down to find the General tab and click on Web Options
- Web Options Window pops-up
- In the Web Options Window, go to Files Tab and select the ‘Update Links on save‘ checkbox
- Click on OK button and your option is saved
The steps are also explained in the image below:

For Excel 2007:
- Click the Office button
- Select Excel Options, then follow Step 1) to Step 5), as mentioned above and get the Excel Hyperlinks to work again.
Still unable to open hyperlinks in Excel?
If you fail to make Excel hyperlinks work using the above-discussed solutions, use an Excel repair tool to fix the hyperlinks issue. Download the Stellar Repair for Excel to repair an XLS/XLSX file and restore the hyperlinks.

See the working of the tool here:
The tool recovers all components of the Excel file including tables, charts, chart sheets, cell comments, images, formulas, and more. You can repair multiple worksheets and fix all dysfunctional Excel hyperlinks across multiple worksheets in a single workbook. Click on the workbook, select all worksheets and start repairing
Conclusion
Carefully read the possible causes behind the ‘Excel Hyperlinks not working’ issue to understand what resulted in the issue in the first place. If nothing helps, use Stellar Repair for Excel to restore the hyperlinks and save the result in a new Excel file, without interfering with worksheet properties and cell formatting.
Summary: Recovering your unsaved Excel file on Windows 10 with some of our tested methods can truly save you a lot of time, money, and effort. Here’s how to do it!
Microsoft provides a wide range of applications to its users that cater to different purposes. Out of all the MS Office applications, Excel is considered the most used native application by several companies and individuals to store and process crucial data. Excel can also be called a go-to data analysis tool that offers great reliability, ease of use, and multiple features. But unfortunately, it’s not immune to human errors and system errors.
What if you accidentally close the Excel file without saving your work or Excel crashes suddenly? Or worse! Your system crashes without any warning and when you reboot your system, you can’t find the unsaved Excel file.
There could be different situations where you may lose access to your unsaved Excel workbook. There is no need to be anxious, though! We’ve covered some easy-to-follow DIY methods in this post to help you recover unsaved Excel files quickly.
4 Ways to Recover Unsaved Excel File
Irrespective of the circumstances, you can recover unsaved Excel files on Windows 10 using the following methods.
Method 1: Use the Search Option
If you remember the name of the Excel file, try to find it using the Search option. Following these steps:
- Go to Windows Search Box and type the name of the file.
- If you find the file there, click Open or Open file location.

- If you click Open file location, it will take you to the exact location of the file, and you’ll be able to regain access to lost/unsaved Excel file easily.
Method 2: Use AutoRecover Feature
Microsoft Excel comes with a built-in AutoRecover feature that saves copies of all open Excel files at a user-definable fixed interval. You can recover the file if you forget to save it and accidentally close it or it closes automatically due to an unexpected system breakdown or power failure. You can follow the given steps to recover unsaved Excel files with the AutoRecover feature:
- Open a new Excel file and go to File > Options.
- Then go to Save > Save workbooks.
- Next, ensure that the ‘Save AutoRecover information every’ and ‘Keep the last autosaved version if I close without saving’ option is already selected.

- Now, copy the file path given against the AutoRecover file location.
- Open the File Explorer, paste the Menu Bar file path there, and hit Enter.
- The unsaved file will appear with the .xlb extension.
- Double-click the file and choose Excel from apps to open the .xlb file.

- Finally, save the file to the desired location.
Method 3: Use the ‘Recover Unsaved Workbooks’ Option
Another way that you can choose is the ‘Recover Unsaved Workbooks’ option. To regain access to your Excel file, follow the given steps:
- Open an Excel sheet and then go to File > Open.
- Now, scroll down and click Recover Unsaved Workbooks.

- The list of unsaved files will show in the Document Recovery pane.
- Locate the file you lost and double-click on it to open.
- Finally, right-click on the version of the file you want to restore and click Save As.

And, save the file to the desired location
Method 4: Restore File with Previous Versions Utility
This feature will help you recover unsaved Excel files when you’ve saved the workbook earlier, but you end up losing access to the file due to an Excel or system crash. It’d help you save the previously saved version of your Excel file. To do so, follow the given steps:
- Open an Excel file and navigate to File > Info > Manage Versions.

- It will show the previously saved versions. You can choose the one you want to restore and click Save/Save As to store the file with a different name.
Hopefully, this blog has helped you learn how to recover unsaved Excel files. You can try any of the above methods.
FAQ
1. How can I repair a corrupted workbook?
Whenever Excel detects a corrupted workbook while opening, it automatically starts running the File Recovery mode and repairing the file. If the File Recovery mode doesn’t start automatically, you can manually repair the corrupted workbook .
How to Fix a Corrupted .xls File? The Everything Guide
Undoubtedly, Excel is so powerful that it can help you to process, analysis, and store data, in masses.
That’s the reason it has been there for years and helping this world in data.
But…
With all those powers comes some nasty problems which no Excel users like to face. Can you guess what I’m talking about?
Think about a Corrupted Excel File. Nightmare? Isn’t it?
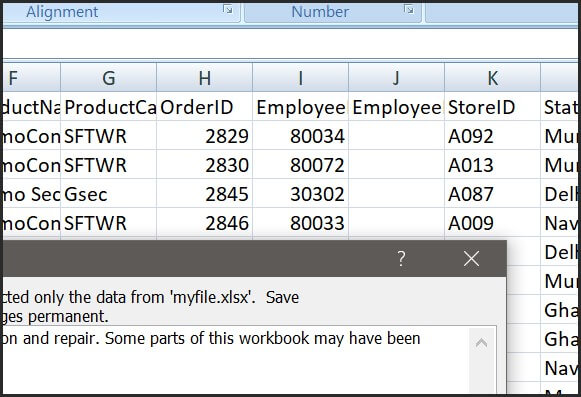
And do you remember that last time when you have opened a workbook and you got a message that this workbook is might corrupt?
The TRUTH is, this is something which you cannot avoid, but, you can prepare yourself in the best way and deal with it like a PRO.
So today, in this post, I’d like to share with you to everything you need to know about a corrupt Excel file (.xls), why it happens, how to fix it like a PRO, and much more.
…let’s get started.

Note: In this post, we’ll be covering the .xls version (which is the extension for the file which is created in Excel 2007 or the earlier versions) and if you want to know about the new version, here’s the quick fix for that.
Why My Excel File Got Corrupted?
There can be one or multiple reasons for an Excel file to get corrupted. Below I have detailed about some of the major of them.
1. Large Excel File
You can store data in a workbook the way you want but sometimes using excessive thing can make an Excel file bigger in size.
And that kind of data files can crash at any point in time. Here are a few things which make the Excel files heavy, like
- Conditional Formatting.
- Colors formatting.
- Using merged cells in place of text alignment.
- Volatile functions: Formulae that iterate every time you open or change a cell value; OFFSET, NOW.
- Using a complete column or row as a reference than the data set range.
- Using complex formulas; VLOOKUP in place of Index/Match, Nested If in place of MAXIFS, MINIFS.
- Calculations or reference across workbooks.
Related: How to Fix Formatting Issues in Excel
2. Abrupt System Shutdown
Shutting down the system without following the procedure can corrupt your data file.
This shut down can be due to a power failure or any other unexpected technical challenges.
So it is always important to follow the procedures and shut down your system properly to avoid data losses.
3. Infected Excel File (Virus Attack)
This is the most common and obvious reason for Excel file corruption.
Although we always keep our system safe using various Antiviruses, still there is always a probability of virus attacks and loss of important files.
It is always advised to use a safe and strong antivirus compatible with your system requirements.
What are the Signs to Know When an Excel File is Corrupted?
In this section, we will discuss what are the signs which you can get when an Excel file is corrupted, let’s dig into it.
1. The File is Corrupt and Cannot Be Opened
This is one of the most common messages you can see when your workbook is corrupted.
But there is also a chance that it is just because of the version compatibility where you have a .xls file but you are using the latest version of Excel check out this detailed post by Priyanka
2. We Found a Problem with some Content in this File…
There’s another error message which you can get while opening a file:
We Found a Problem with some content in Do you want us to recover as much as we can? If you trust the source of this workbook, click yes.

There are a lot of applications out there (I think almost every) which exports the data as a .xls format. Those files have a greater chance of having this kind of error.
3. “Filename.xls” cannot be accessed
There can also be a situation where you get the error:
“Filename.xls” cannot be accessed. The file may be corrupted, located on a server that is not responding.
Well, this message is a bit misleading.
You won’t be able to decide that your file is actually corrupted or just not on the location.
My Excel File Got Corrupted, now What Should I Do?
There are many ways to recover the data from the corrupt excel files. But before you start, it is always advised to create a copy of the corrupted file.
You can save a lot of time with Stellar Repair for Excel, which make data recovery just with few clicks.
But before you go for a data recovery software, let’s try out some manual steps which can help.
When a workbook get corrupted the first thing comes to the mind is to recover data from it…
…and you what there’s a simple option there in the Excel which you can use to do this. Below are the steps you need to follow:
- First of all, open the Excel and click on the office icon.
![]()
After that, go to the “Open” and select the file which is corrupted.
Now, click on the open drop-down and select “Open and Repair”.
- At this point, you have two options:
- Repair File
- Extract Data

Let’s get into both of these options one by one…
1. Repair File
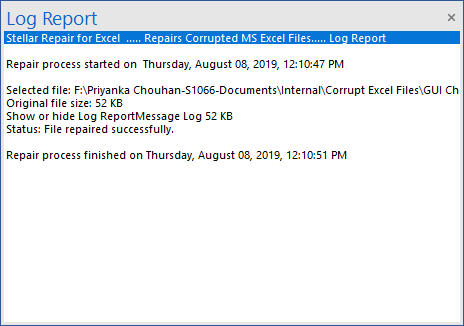
This option helps you to repair the file and the moment you click on it it takes a few seconds afterward and shows you the result with a message box and also provide you a log file.
And once it is done with repairing, you’ll get your file opened and you can save that file as a new copy.
Yes, that’s it.
2. Extract Data
If somehow you aren’t able to get your file repaired, you can also extract data from that file using “Extract Data” option.
Even in this option, you can get data in two ways.

- As Values
- With Formulas
In the first option, Excel simply extracts data as value ignoring all the formulas driving those value (which is the best way if you just need to have that data back ).
But in the second option, Excel tries to recover the formulas as much as possible.
Check out this smart technique by Jyoti which you can use it you aren’t able to recover data from the file.
Preventions to Not to have any Excel File Go Corrupt in Future
Future is fragile, what I’m trying to say is the more you work in Excel and process data there could be a chance that your workbook goes corrupt.
If there’s no security then what an EXCEL POWER user should do?
Well, there are few things which you can do or take care of while working with Excel so that you won’t have to worry about corruption of Excel workbooks.
Let’s see what you can do…
1. Change Recalculation Option
Now here’s the thing when you work with a hell lot of data, there a common thing that you gotta using formulas. Right?
But, the thing these formulas are something which makes your Excel file slows down sometimes make them go corrupt.
There’s one small tweak you can do in your workbook is change the calculation method.
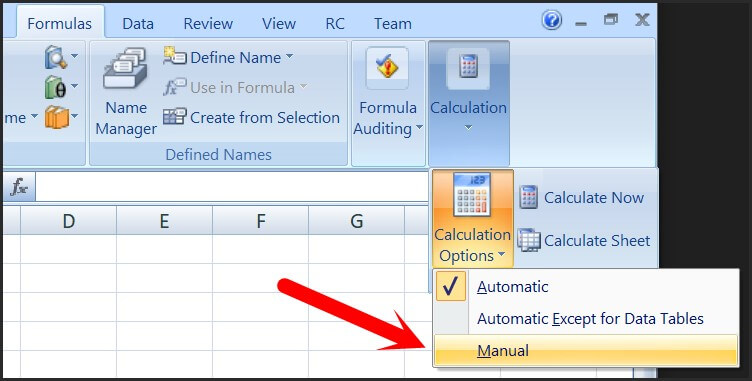
Now with the manual calculation, you just need to whenever you open your file it won’t recalculate all the formulas.
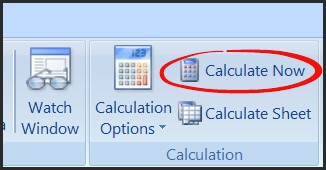
And when you update your data you can simply click on the “Calculate Now” and it will calculate all the formulas again.
Quick Tip: Beware of Volatile Functions and use them with caution as recalculates them every time you change something in the worksheet.
2. Use VBA Codes Instead of Formulas
Now, this is what I do when I need to use complex formulas in a workbook.
Here’s how you can do this: Let’s say you have a formula in the cell A1, like below, which calculates the age.
=“You age is “& DATEDIF(Date-of-Birth,TODAY(),”y”) &” Year(s), “& DATEDIF(Date-of-Birth,TODAY(),”ym”)& “ Month(s) & “& DATEDIF(Date-of-Birth,TODAY(),”md”)& “ Day(s).”
Now, instead of simply entering it into the cell A1 which I would write a macro code which inserts this formula into the cell A1 and then convert it into the a value.
Here’s the code:
Sub CalculateAge()
Range(“B1”).Value = _
“=””Your age is “”” & _
“&DATEDIF(A1,TODAY(),””y””)” & _
“&”” Year(s), “”” & _
“&DATEDIF(A1,TODAY(),””ym””)” & _
“&”” Month(s), and “”” & _
“&DATEDIF(A1,TODAY(),””md””)” & _
“&”” Days(s).”””
Range(“B1”) = Range(“B1”).Value
End Sub

Note: To write these code you need to have basic understading of VBA (make sure check out this guide for this).
3. Use a File Recovery Application
Recently we asked a quick question to our readers on ExcelChamps that if they have ever faced a situation where they got a corruption message in Excel.
You’ll be astonied to hear that 50% percent of the people said “YES” they faced this thing in the past.

Now, this is alarming, if you are heading a team or you have a bunch of people in your company who use Excel…
…there’s a high probability that half of them gonna face this issue. So the best way to deal with this to have an App FIX your Excel file for you.
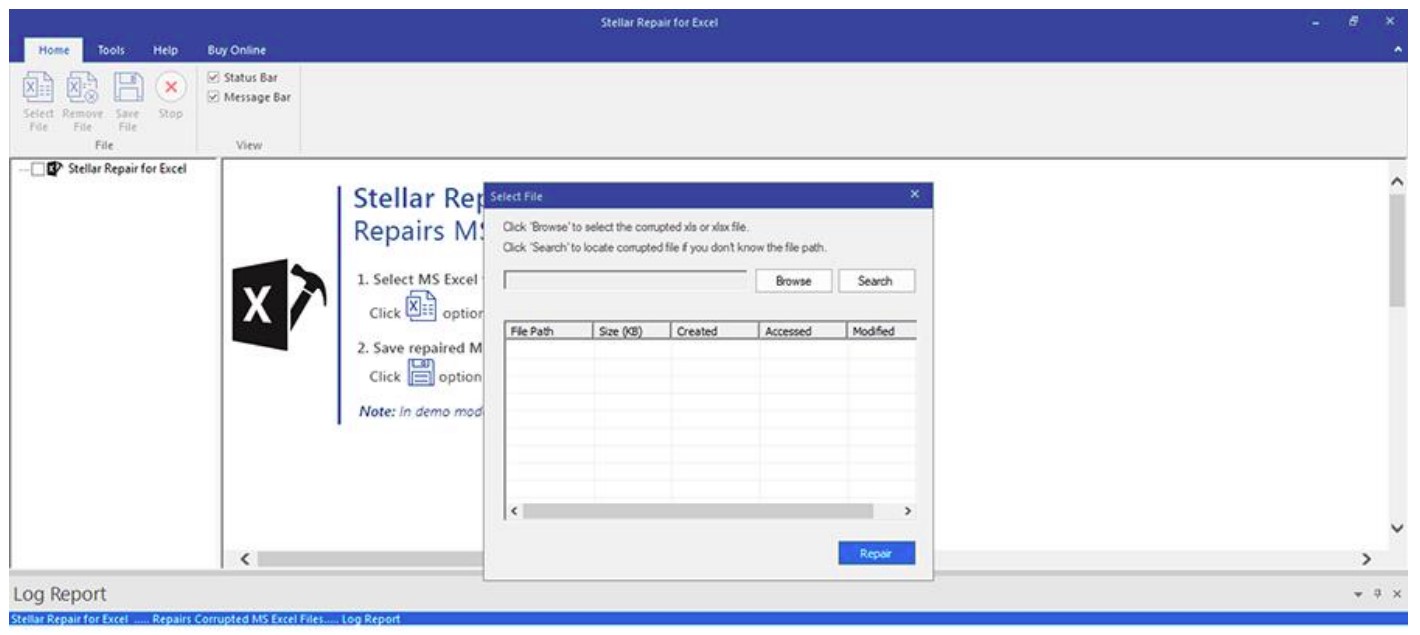
With STELLAR REPAIR FOR EXCEL, you just need a few clicks, yes that’s right. Let me show you with the below steps:
- First of all, download the app and install it (it’s simple).

- After that, open the app and click on the “Browse” and simply select the file which is corrupted.
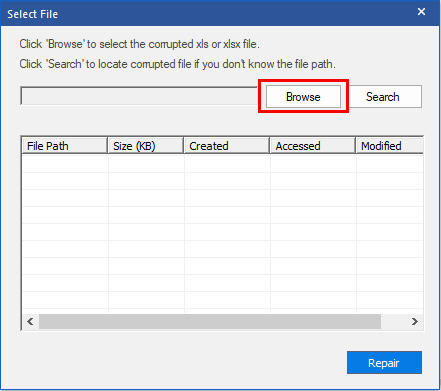
- In the end, click on the REPAIR to let the Excel repair software fix your file (it takes a few seconds).
Once you complete repairing your file, you’ll get a message in your on the status bar and after that, you can open your file.
Final Thoughts
If you are a POWER Excel user then there’s a must for you to have known how to deal with a situation where you got a corrupt Excel file.
But I must recommend you to TRY OUT Stellar Repair for Excel so that’s you don’t have to worry about your Excel files anymore.

I’m sure you found this post helpful, and please don’t forget to share this tip with your colleagues, I’m sure they’ll appreciate it.
How to Fix “File Not Loaded Completely” Error in Excel?
Summary: You may get the “File not loaded completely” error when opening a large-sized Excel file. Read this post to understand the causes behind this issue and the troubleshooting solutions to fix this Excel error. Also, you’ll get to know about an Excel repair tool that can help fix the issue if the cause is corruption in the Excel file.
Several users have reported experiencing the “File not loaded completely” error while opening Excel spreadsheets or when importing CSV file into Excel. This error can occur if the worksheet has crossed the maximum rows and columns limit , i.e., 1048576 rows by 16,386 columns. However, this issue can also occur due to various other reasons. Let’s take a look at the possible causes behind this error.
Why this Error Occurs?
The “File not loaded completely” issue can occur due to one of the following reasons:
- The Excel file you are trying to open is corrupted.
- The Excel file is too large.
- The Excel file has crossed the rows limit.
- Memory issue in your system.
Methods to Resolve the “File not Loaded Completely” Error
Following are some methods you can try to fix the Excel file not loaded completely issue.
Method 1: Try to Import the Spreadsheet into MS Access
A large-sized Excel file takes time and memory to load. When you try opening a large file, you may get the “file not loaded completely” error. It indicates your file contains unwanted rows and columns. In such a case, you can try importing your spreadsheet into Access. By doing this, you can easily access the rows and columns in the database table, and then remove the extra rows. Follow the steps below to import your spreadsheet into Access:
- Open a blank database in Access application.
- Navigate to the External Data tab and then click on the Excel button.

- In the Get Data-Excel Spreadsheet window, click Browse.

- In the File Open dialog box, select the Excel file (in which you are getting the error) and click Open.

- Select Import the source data into a new table in the current database and click OK.

- In the Import Spreadsheet Wizard window, you’ll see all the rows and columns of your Excel file. Click Next.

- In the dialog box that appears, you can modify the field information (extra columns or rows).

Once you performed the changes, click on the Next button.
Provide a name to the table.

- Next, select the option “I would like a wizard to analyze my table after importing the data” (if you want to analyze the data) and click Finish.
- You will get a dialog box with a message. Click Yes.

- The Table Analyzer wizard will appear on the screen.


- Click on the Next button.

- Follow the instructions of the Table Analyzer wizard.
- Once you complete all the steps, select “Save import step” and click Close.

Method 2: Split Your Large Excel File
You may face the Excel file not loaded completely issue when importing a large Excel file. In such a case, you can try splitting your large file into smaller ones. To split the file, you can use VBA codes or the move or copy feature.
Method 3: Stop Unwanted Processes Running in the Background
Sometimes, you get the “File not loaded completely” error if you are running multiple files or programs simultaneously. You can check and stop unnecessary background processes in Windows using your system’s Task Manager. Here are the steps:
- Press the Ctrl+Shift+Esc keys to open the Task Manager window.

- Navigate to the Processes tab and check the Memory section.
- You can see the memory consumption of all the applications in your system.
- Select the unwanted applications and click on End Task.

Now, try to open the Excel file.
Method 4: Repair your Excel File
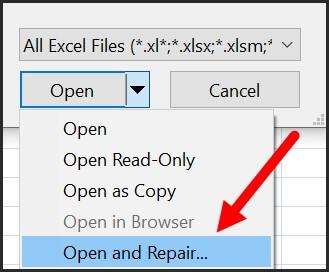
Sometimes, Excel throws the “File not loaded completely” error if it fails to read the data in your file. This might happen if your Excel file is corrupt. You can use the Open and Repair utility in Excel to repair your Excel file. Follow the below steps:
- In Excel, click the File tab and then click Open.
- Click Browse to select the desired file.
- In the Open dialog box, click on the corrupted file.
- Click on the arrow next to the Open button and then select Open and Repair.

- Click on the Repair button.

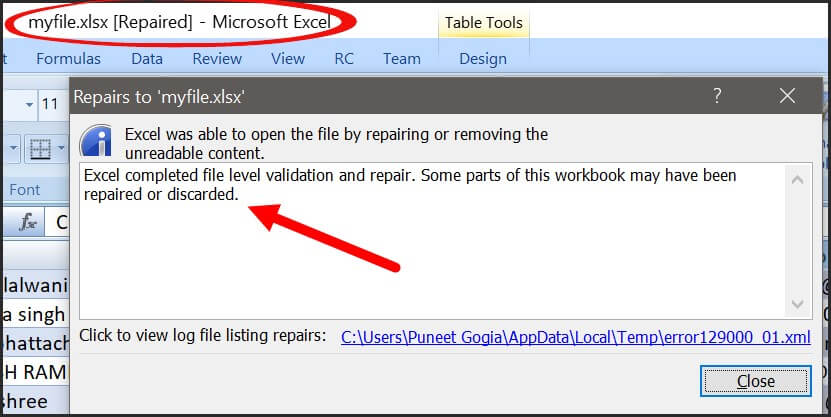
- After repair, you will see a message as shown in the below figure.

- Click Close.
An Alternative Solution
If your file gets corrupted, then repairing it using the “Open and Repair” utility is a good option. However, the Open and Repair utility may not work if the file is severely damaged or corrupted. In such a case, you can use a professional Excel repair tool, such as Stellar Repair for Excel. This tool is primarily designed to repair inaccessible or corrupted Excel files. It can effectively work even if your file is too large or severely damaged. It can recover all the data from the corrupted Excel file without impacting its actual format. The software supports Excel files of almost all Excel versions.
Conclusion
The File not loaded completely issue in Excel may occur due to numerous reasons. Try the troubleshooting methods listed above to resolve the issue. If the Excel file is corrupt, then you can try repairing your file using the Open and Repair tool. However, it can fix only minor corruption issues. If your file is severely corrupted, then use Stellar Repair for Excel . The software offers you the safest way to repair your Excel file without making any changes in the formatting. You can download the free trial version of the software today to scan and preview the Excel file.
[Solved] Excel Spreadsheet Disappears after Opening
Several Excel users have reported about experiencing ‘Excel spreadsheet disappears after opening’ issue. The problem occurs when attempting to open an Excel file by double-clicking on the file icon or name. The Excel file opens blank grey screen.

Figure 1 - Excel Blank Screen
User Instances of ‘Excel Open But Can’t See Spreadsheet’ Issue
Instance 1: The user said that “Excel 2016 opens to a blank screen and everything is greyed out. Ribbons at the top of Excel are also not present”.
Instance 2: The user reported that “Attempting to open a spreadsheet, either by double-clicking the file or by opening Excel, it opens but only a blank Excel window is visible. When trying to save that particular file, Excel behaves as though there is no file open at all and all the file saving options, such as save, save as, print, etc. are greyed out.”
Causes Behind ‘Excel Open But Can’t See Spreadsheet’ Issue & the Solutions Thereof
Following are some of the possible reasons behind the ‘Excel open but can’t see spreadsheet’ issue, along with their solutions:
Cause 1: Excel File is Hidden
You may have saved the Excel sheet as a hidden document.
Solution: Unhide Excel File
Verify if your Excel worksheet is hidden by following these steps:
- In Excel, click the View tab, and then click Unhide.
Note: If the ‘Hide’ tab under the View menu is greyed out, the sheet you’re trying to open is not hidden. In that case, proceed to the next workaround.

Figure 2 - Unhide Excel File
- A dialog box will pop-up showing the worksheet name that can be unhidden. For instance, below is an image of Unhide box that lists ‘Daily_Reports’ spreadsheet under Unhide workbook.

Figure 3 – Select and Unhide Excel Workbook
- Click OK to unhide your Excel sheet.
If this fails to work, there’s a possibility that the spreadsheet window pane may have slided to one side of the visible desktop. To bring back the displayed area, click the ‘Arrange All’ option under the View tab. If the issue persists, try the next solution.
Cause 2: Ignore Dynamic Data Exchange (DDE) Option is Enabled
Another reason behind the ‘Excel opens to a blank screen’ issue could be that the “Ignore other applications that use Dynamic Data Exchange (DDE)” checkbox is checked in Excel options.
Usually, when you double-click an Excel file, a DDE message is sent to Excel instructing it to open that particular file. But, if you have the ‘Ignore DDE’ option selected, the DDE message sent to Excel to open a workbook is ignored. As a result, the Excel workbook opens a blank screen.
Solution: Uncheck the Ignore DDE Option
Make sure that the ‘Ignore DDE’ option is unchecked by performing these steps:
Note: Skip these steps for Excel 2019 and Excel Office 365.
- In your Excel window, click File > Options.

Figure 4 - Select Excel Options
- From the left-side of the ‘Options’ window, choose Advanced.
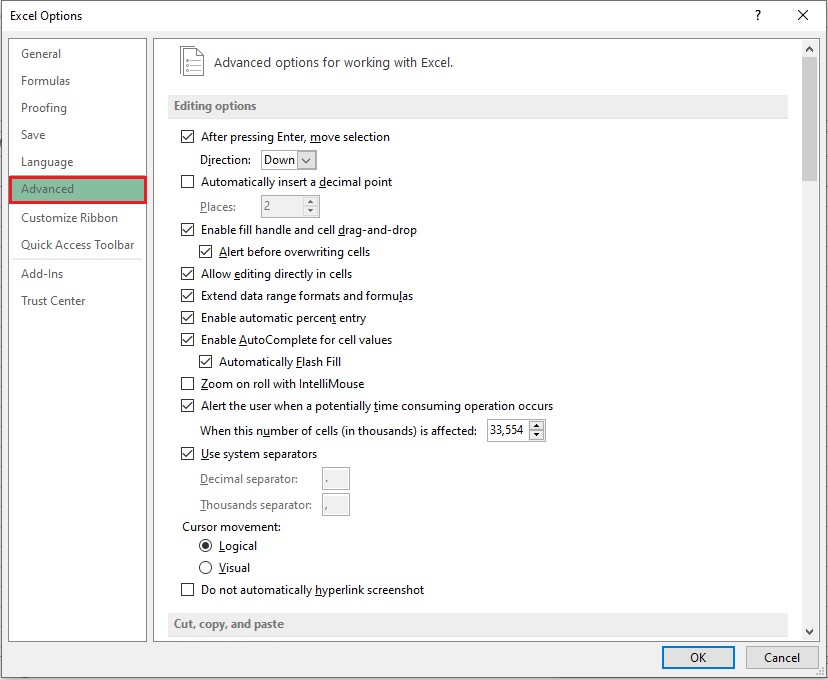
Figure 5 - Excel Options Window
- In ‘Advanced’ window, locate the General section, and then uncheck the “Ignore other applications that use Dynamic Data Exchange (DDE)” checkbox.
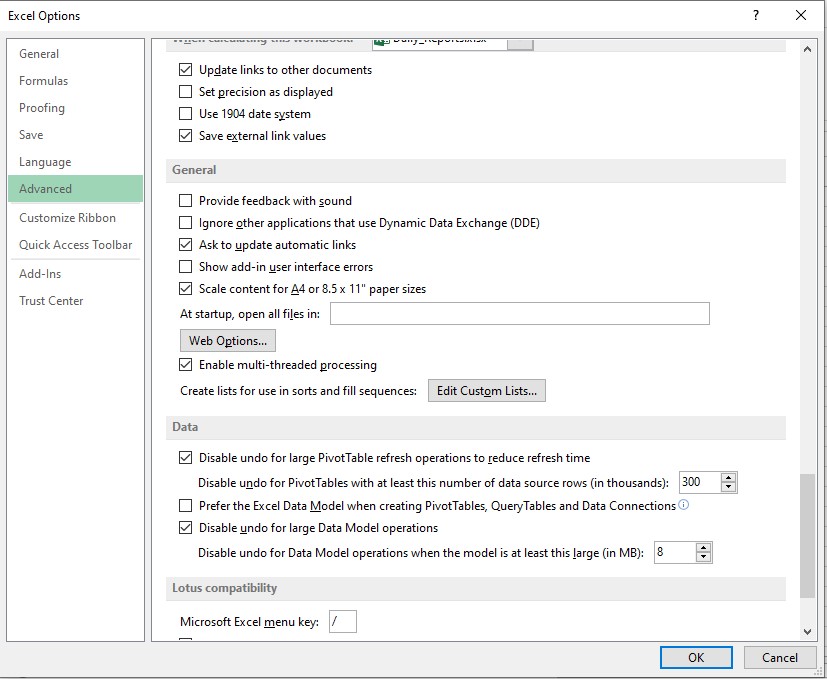
Figure 6 - Uncheck Ignore Other Applications that use DDE
- Click OK to apply the changes.
If these steps don’t work, proceed to the next workaround.
Cause 3: Issue within Office Program
Sometimes, problem within your Microsoft Office program might cause Excel to behave oddly and may result in an Excel spreadsheet disappeared issue.
Solution: Repair Office Program
Try repairing your Office program by executing the steps listed below, based on your Windows OS:
For Windows 10:
- Type Settings in the Windows search box.
- Click Settings.
- In ‘Windows Settings’ screen, select Apps.
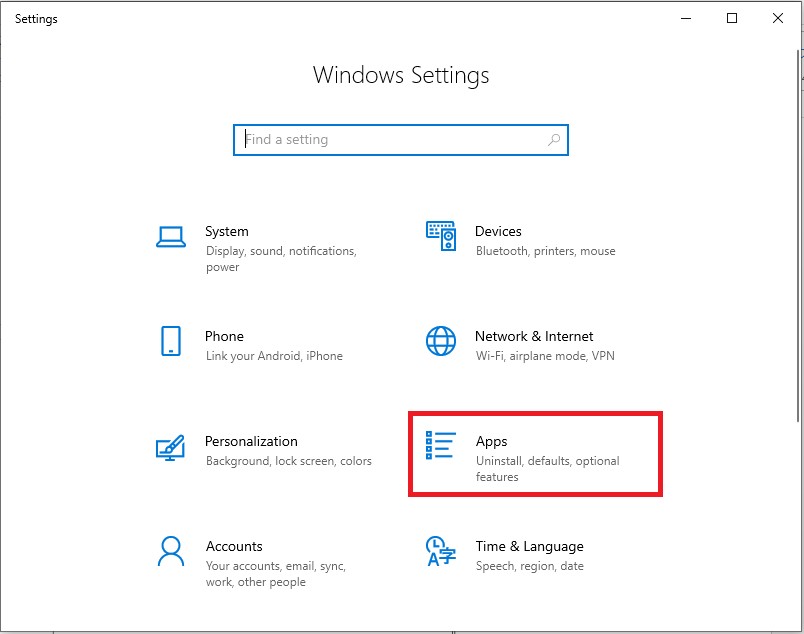
Figure 7 - Windows Settings Screen
- In ‘Apps & features’ screen, scroll down to your Microsoft Office program and tap on it, and then click the Modify

Figure 8 - Modify MS Office Program
- In ‘How would you like to repair your Office programs’ dialog box, select the Online Repairradio button, and then click the Repair
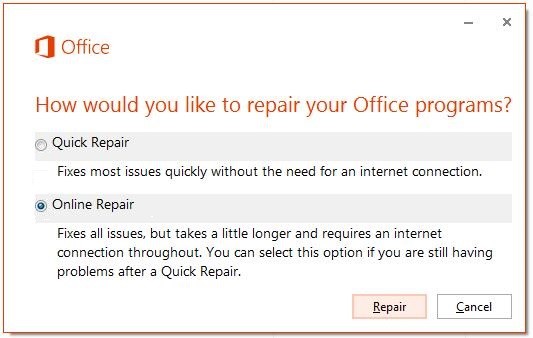
Figure 9 - Repair MS Office Program
For Windows 8:
- Open Control Panel and click the Uninstall a program option under Programs.
- Select Microsoft Office 365 and then click Change.
- In the window that opens, select Online Repair and then hit the Repair
You may be asked to restart your system after completion of the repair process.
For Windows 7:
- In ‘Control Panel’ window, double-click Programs and Features.
- Under Uninstall or change a program section, select the Office program, and then select Change.
- In the dialog box that appears, choose Online Repair and then choose Repair.
If repairing your Office installation fails to resolve the issue, continue to solution 4.
Cause 4: Problematic Excel and COM Add-ins
Sometimes, Excel and COM add-ins may cause Excel file open a blank grey screen problem.
Solution: Disable the Add-ins
Disabling the Excel and COM add-ins one at a time may help resolve the problem. The steps are as follows:
- Click the File menu in your Excel file and select
- From ‘Excel Options’ left-side panel, click Add-Ins, and then choose COM Add-ins from the ‘Manage’ drop-down. Click the Go
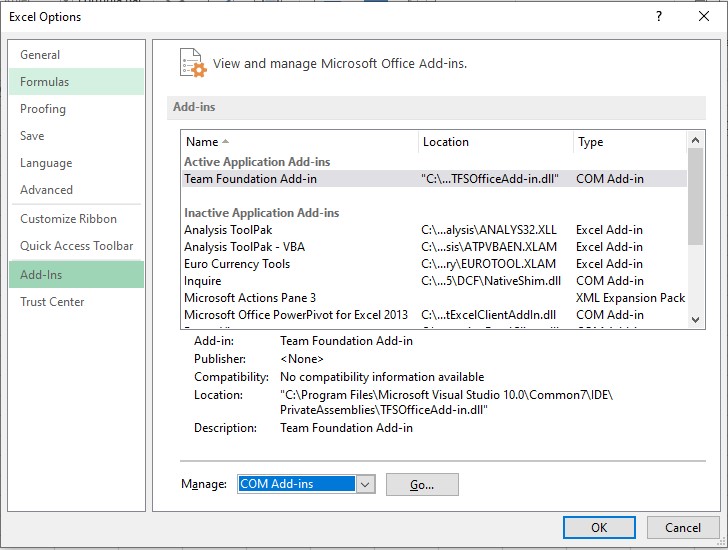
Figure 10 - Select COM Add-ins
- Uncheck one of the add-ins checkbox from the COM Add-ins window, then select OK.
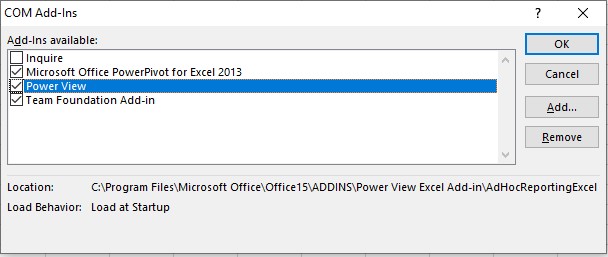
Figure 11 - Uncheck and Disable COM Add-ins
- Restart your Excel program.
If the issue persists, repeat the above steps (1 till 4), except that you need to choose a different add-in in step 3.
If you’re still experiencing the same problem after unchecking all the COM add-ins, repeat all the above steps, except choose ‘Excel Add-ins’ in step 2.
If Excel can load the file, then the add-in that you disabled last leads to the problem. If turning off add-ins does not work, try the next solution.
Cause 5: Problem with Excel File Associations
The Excel file opening a blank screen problem may occur if the file associations are not performing correctly.
Solution: Reset Excel File Associations
Try resetting the file associations in Excel to their default settings. For this, follow the below steps based on your OS.
For Windows 10 and Windows 8.1:
- Select the file that is opening incorrectly and copy it to the desktop.
- Right-click the file and click Properties.
- In the File’s ‘Properties’ window, check your file type next to Type of Filefrom the General tab. For instance, (.docx), (.csv), or (.pdf).
- Next, check to which app your file is associated with from the Opens withoption
If the file type is different than .xlsx, open the file in a different application by following these steps:
- Click the Change button next to the ‘Opens with’ option.
- Click More apps.
- From the list of applications, select the desired app and then check the Always use this app Click OK.
For Windows 8:
- Open Control Panel, click Default Programs, and then select Set your default programs.
- Choose Excel and then tap the Choose default for this program
- In ‘Set Program Associations’ window, choose Select All and then click Save.
For Windows 7:
- In Control Panel, choose Default Programs.
- Click the Associate a file type or protocol with a specific program
- Choose Microsoft Excel Worksheet and click on change program.
- Choose Microsoft Excel under Recommended Programs.
- If you’re unable to find Excel, browse the Excel installation folder.
- Select exe and then choose Excel.
What Next? Use Stellar Repair for Excel to Recover Your File
If the above solutions don’t help recover your Excel file, use an Excel file repair tool, such as Stellar Repair for Excel to recover it. The software can restore the Excel spreadsheet and its components, including tables, pivot tables, charts, formulas, etc. while preserving the spreadsheet properties and formatting.
Check out the video to recover Excel file by using Stellar Repair for Excel software.
Conclusion
This article described the possible causes behind the ‘Excel open but can’t see spreadsheet’ issue, along with their solutions. The manual solutions to resolve the issue require time and efforts. But, if you need to access your Excel file without any delay, use Stellar Repair for Excel software to recover your .xlsx/.xls file in just a few clicks.
How to fix Pivot Table Field Name is not Valid error in Excel?
The Pivot Table field name is not valid error can occur while creating, modifying, or refreshing data fields in the pivot table. It can also appear when using VBA code to modify the pivot table. It usually occurs when there is an issue with the field name in a code or if there is a hidden or empty column in the pivot table. However, there could be many other reasons behind this error.
Why the “Pivot Table Field Name is not Valid” Error Occurs?
You can get the “Pivot Table field name not valid” error in Excel due to several reasons. Some possible causes are:
- Excel file is corrupted
- Damaged fields in the pivot table
- Pivot table is corrupted/damaged
- Hidden columns in the pivot table
- Macro (referring to the pivot table) is corrupted
- Preserve formatting option is enabled
- Missing or incorrect fields in the VBA code
- Issue with workbook.RefreshAll method syntax (if using)
- Pivot Table contains empty columns
- Header values or header column is missing in the Pivot Table
- Pivot table is created without headers
- Columns/rows are deleted from the Pivot Table
Methods to Fix Pivot Table Field Name is not Valid Error in Excel
You can get this error if you have selected the complete data sheet and then trying to create the Pivot Table. Make sure you choose only the data fields that you want to insert in the Pivot Table. If this is not the case, then follow the troubleshooting methods mentioned below.
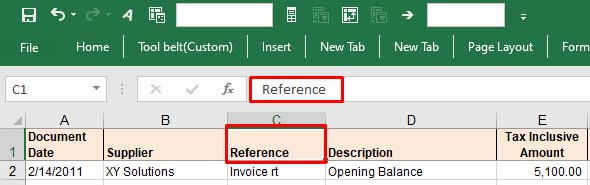
Method 1: Check the Header Value in the Pivot Table
The “Pivot table field name is not valid” error can occur if you have not set up the pivot table correctly. All the columns having data in them should have header and header values. A pivot table without a header value can create issues. You can check the header and its value from the Formula bar. Change the header if the header value is too lengthy or if it contains special characters.
Method 2: Check and Change the Data Range in the Pivot Table
The “Pivot Table field name is not valid” can occur while modifying a field in Pivot Table. It usually occurs if you’re trying to add or modify the field by selecting an incorrect data range in the Create PivotTable dialog box. The “Create PivotTable“ feature helps define how data would be displayed within the pivot table.
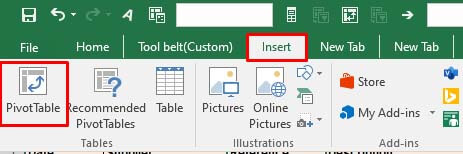
Let’s take a scenario to understand this. Open the Excel file with PivotTable. Click on the fields (you want to add), go to the Insert option, and click PivotTable.
If you select an incorrect range, i.e. A1:E18, instead of correct range - “Expenses**!$A$3:Expenses!$A$4**,” you will immediately get the error message.
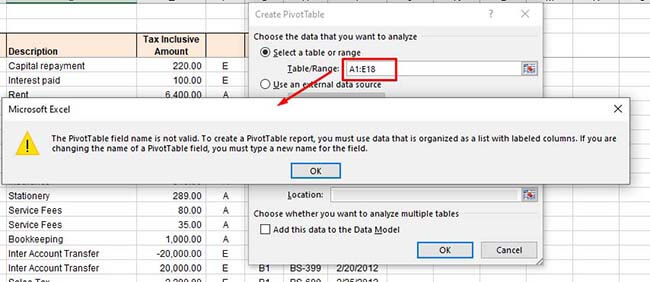
So, type the correct range under the Select a table or range option and click OK.
Method 3: Unhide Excel Columns/Rows
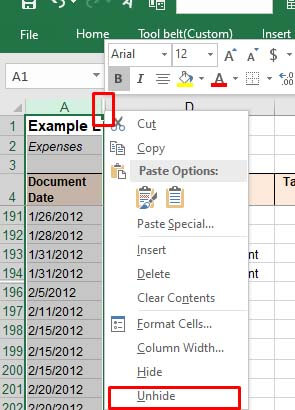
The error can also occur if some columns/rows of the Pivot Table’s data source are hidden. When you try to add a hidden column as a field in the PivotTable, the Excel application will fail to read the data of the hidden column. You can check and unhide the Excel columns by following these steps:
Open the Excel file.
Locate the hidden column number.
Move your cursor on the hidden column number and right-click on the space between the columns. Click Unhide.
Method 4: Check and Delete Empty Excel Columns
Sometimes, you can get the “Pivot Table field name is not valid” error if you are trying to use an empty column as a field in your Pivot Table. Check the columns with no values in all cells. If found, then delete the empty columns. This method is ideal for small-size Excel files. However, for large-sized files, it is a time-consuming process.
Method 5: Unmerge the Column Header (If Merged)
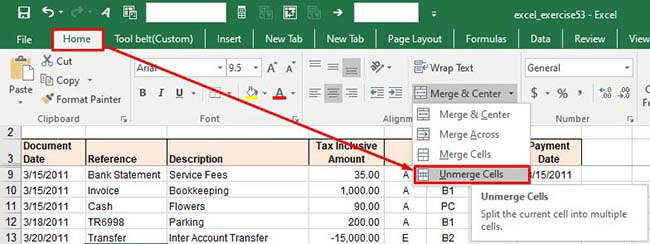
The “Pivot Table field name is not valid” error can also occur due to merged column headers. The pivot table references headers to identify the data inside the rows or columns. The merged headers can sometimes create data inconsistencies. You can try unmerging the column headers to fix the issue. Follow these steps:
In the Excel file, go to the Home
Click the Merge & Center option and select Unmerge Cells from the dropdown.
Method 6: Disable the Background Refresh Option
If the “background refresh” option in the Excel file is enabled, it may also create issues with Pivot Table. The Excel updates all the pivot tables in the background even after a small change if the background refresh option is enabled. This may create issues if the Excel file is large with too many tables. You can try turning off the “background refresh” option in the Excel file to troubleshoot the issue. Here is how to do so:
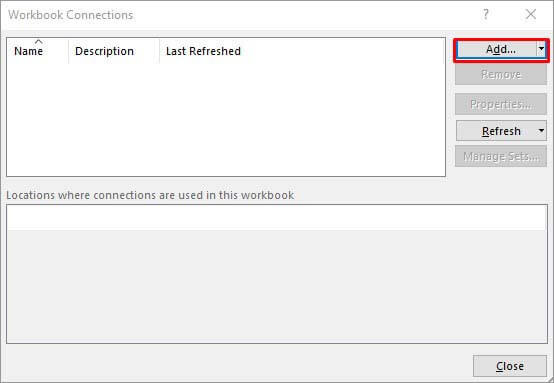
In the Excel file, go to the Data tab and then click Connections.
In the Workbook Connectionsdialog box, click on the ‘Add’ dropdown to add the workbook (in which you need to modify the refresh settings).
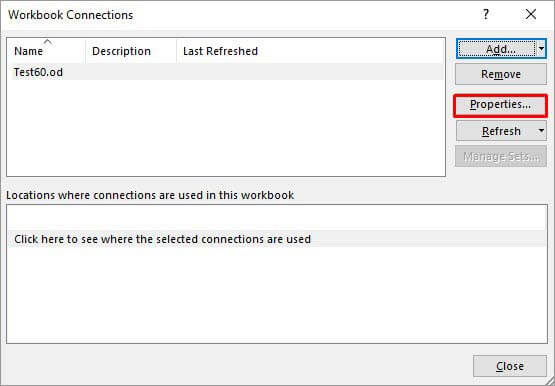
Once you have chosen the Excel file, click Properties.
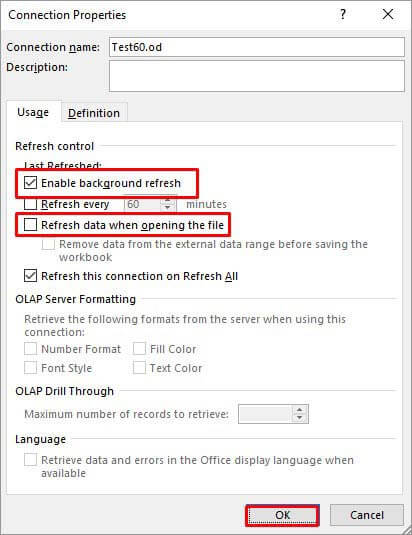
In the Connection Properties window, unselect the **”Enable background refresh”**option, select the “Refresh data when opening the file“, and click **OK.
**

Method 7: Check the VBA Code
The error can also occur when working with PivotTable using VBA code in Excel. Some Excel users reported this error on forums as run-time error 1004: The PivotTable field name is not valid. This error usually occurs when there are issues in the VBA code, affecting the PivotTable data source or field references. You can check field names referring to PivotTable or Workbook.RefreshAll function syntax and other errors in the code.
Method 8: Repair your Excel File
One of the reasons behind the “Pivot Table field name is not valid” error is corruption in the Excel file, containing the Pivot Table. You can repair your Excel file using Microsoft built-in utility - Open and Repair. Here’s how to use this utility:
In Excel, navigate to File > Open.
Click Browse to choose the affected workbook.
The Open dialog box will appear. Click on the corrupted file.
Click the arrow next to the Openbutton and then select Open and Repair.
You will see a dialog box with three buttons - Repair, Extract Data, and Cancel.
Click on the Repair button to recover as much of the data as possible.
After repair, a message is displayed. Click Close.

Method 9: Use a Professional Excel Repair Tool
If the Excel file is heavily damaged or corrupted, then the “Open and Repair” utility may not work or provide the intended results. In such a case, you can opt for a professional Excel repair tool. Stellar Repair for Excel is an advanced Excel file repair tool, which is highly recommended by experts. It can repair severely corrupted Excel files and restore all the data from corrupt file, including pivot tables. This tool comes with a user-friendly interface that even a non-technical user can use. You can try the software’s demo version to check how it works. The software is fully compatible with all Excel versions, including Excel 2019.
Conclusion
The Excel error “Pivot Table field name is not valid” can occur due to hidden or merged column/row headers, empty columns/rows, corrupted pivot table, and various other reasons. You can try the methods mentioned above to fix the error. If this error has occurred due to corruption in the Excel file, then you can use Stellar Repair for Excel - an advanced tool to repair corrupted pivot table, macros, fields, or other elements in an Excel file. It is compatible with all Windows editions, including the latest Windows 11. It can help fix the error if the data source or Pivot table configuration is affected by corruption.
Also read:
- How to Downgrade Apple iPhone 11 to the Previous iOS Version? | Dr.fone
- How to Easily Hard reset my Poco M6 Pro 5G | Dr.fone
- The Easiest Methods to Hard Reset Gionee F3 Pro | Dr.fone
- How to Upgrade Apple iPhone 12 mini to the Latest iOS/iPadOS Version? | Dr.fone
- How to Reset a Vivo Y78+ Phone That Is Locked | Dr.fone
- Recover Apple iPhone 13 mini Data From iOS iTunes Backup | Dr.fone
- Complete Guide to Hard Reset Your Xiaomi Redmi Note 12T Pro | Dr.fone
- What You Need To Know To Improve Your Xiaomi Redmi Note 12T Pro Hard Reset | Dr.fone
- Why are your photos lost from iPhone 15 Pro? | Stellar
- How To Transfer Data From Apple iPhone 13 mini To Other iPhone? | Dr.fone
- Complete Guide to Hard Reset Your Samsung Galaxy F14 5G | Dr.fone
- Reset pattern lock Tutorial for Reno 10 5G
- Best Fixes For Realme Narzo N55 Hard Reset | Dr.fone
- Complete Tutorial for Nubia Red Magic 9 Pro+ Hard Reset | Dr.fone
- Use Device Manager to reinstall your drivers on Windows 11/10
- How to Hard Reset Lava Yuva 3 Pro Without Password | Dr.fone
- Hard Resetting an Realme 12 Pro+ 5G Device Made Easy | Dr.fone
- How to Soft Reset Xiaomi Civi 3 phone? | Dr.fone
- Simple ways to get lost files back from Oppo Find N3 Flip
- How to Factory Reset Nubia Red Magic 9 Pro+ without Losing Data | Dr.fone
- Is your OnePlus Nord CE 3 Lite 5G working too slow? Heres how you can hard reset it | Dr.fone
- How To Transfer Data From Apple iPhone 14 Pro To Others Android Devices? | Dr.fone
- How To Transfer WhatsApp From Apple iPhone SE to other iPhone? | Dr.fone
- How to Factory Reset Honor Play 7T in 5 Easy Ways | Dr.fone
- Full Guide to Hard Reset Your Xiaomi Civi 3 Disney 100th Anniversary Edition | Dr.fone
- Undelete lost pictures from Galaxy Z Flip 5.
- How to Perform Hard Reset on Realme C67 4G? | Dr.fone
- Is your OnePlus Nord N30 SE working too slow? Heres how you can hard reset it | Dr.fone
- Reset pattern lock Tutorial for C65
- Use Device Manager to identify missing or malfunctioning your hardware drivers with Windows Device Manager on Windows 11/10
- Some MP4 won't play on my Galaxy S23
- Undelete lost call logs from Infinix Hot 30i
- Xiaomi Redmi K70E can’t play AVCHD .mts video
- How to Reset Oppo A78 5G Without the Home Button | Dr.fone
- New In 2024, How To Make a Video Podcast
- Hassle-Free Ways to Remove FRP Lock on Vivo V30 Lite 5G Phones with/without a PC
- 3 Effective Ways to Bypass Activation Lock from Apple iPhone 12 Pro Max
- In 2024, Does Life360 Notify When You Log Out On Oppo A18? | Dr.fone
- In 2024, How to Change your HTC U23 Pro Location on Twitter | Dr.fone
- Learn How To Lock Stolen Your iPhone 12 Pro Properly | Dr.fone
- 4 Methods to Turn off Life 360 On Xiaomi Redmi A2 without Anyone Knowing | Dr.fone
- Possible solutions to restore deleted photos from F5 Pro 5G.
- Updated This Article Tells You Several Tips to Make a Better Home Movie. Master the Home Movie Making Tips and Obey the Rules so that You Can Make a Great Movie
- How to Change Spotify Location After Moving to Another Country On Nokia C02 | Dr.fone
- In 2024, How to Transfer Contacts from Infinix Smart 7 HD to Other Android Devices Using Bluetooth? | Dr.fone
- In 2024, How To Remove or Bypass Knox Enrollment Service On Vivo V30 Pro
- Complete Tutorial to Use GPS Joystick to Fake GPS Location On Lava Blaze Pro 5G | Dr.fone
- A Detailed VPNa Fake GPS Location Free Review On Oppo A56s 5G | Dr.fone
- Life360 Circle Everything You Need to Know On Vivo Y78t | Dr.fone
- Top-Notch Solutions for Disabled Apple ID On Apple iPhone 7 Plus Making It Possible
- Android Screen Stuck General Infinix Hot 40i Partly Screen Unresponsive | Dr.fone
- In 2024, Step-by-Step Tutorial How To Bypass Vivo X100 Pro FRP
- Android Screen Stuck General Itel S23+ Partly Screen Unresponsive | Dr.fone
- In 2024, 9 Best Free Android Monitoring Apps to Monitor Phone Remotely For your Vivo T2x 5G | Dr.fone
- Strategies for Apps That Wont Download From Play Store On Sony Xperia 10 V | Dr.fone
- 3 Ways of How to Get Someones Apple ID Off Apple iPhone 11 without Password
- In 2024, How does the stardust trade cost In pokemon go On Nokia C12? | Dr.fone
- New In 2024, Top 5 Best Websites to Add Emojis to Photo Online
- How to Show Wi-Fi Password on Vivo Y27 4G
- Mac OS Slideshow Creator Turn Memories Into Stunning Videos
- Updated Step by Step Guide on Make Gimp Transparent Background PNG for 2024
- 2024 Approved Are You Also a Fan of the Slow Mo Guys? Well! Who Isnt? Learn How You Can Create Compelling Slow-Mo Videos Like the Slow Mo Guys Here
- In 2024, Step-by-Step Tutorial How To Bypass Lava FRP
- 6 Ways to Change Spotify Location On Your Xiaomi Redmi Note 12 Pro 4G | Dr.fone
- In 2024, The Ultimate Guide How to Bypass Swipe Screen to Unlock on Realme Narzo 60x 5G Device
- Title: Solved - How to Fix MS Excel Crash Issue | Stellar
- Author: Ian
- Created at : 2024-05-20 10:20:29
- Updated at : 2024-05-21 10:20:29
- Link: https://techidaily.com/solved-how-to-fix-ms-excel-crash-issue-stellar-by-stellar-guide/
- License: This work is licensed under CC BY-NC-SA 4.0.
