
:max_bytes(150000):strip_icc():format(webp)/GettyImages-962954554-5c338fc146e0fb0001346aec.jpg)
Solved Excel 2023 Spreadsheet Disappears after Opening | Stellar
[Solved] Excel Spreadsheet Disappears after Opening
Several Excel users have reported about experiencing ‘Excel spreadsheet disappears after opening’ issue. The problem occurs when attempting to open an Excel file by double-clicking on the file icon or name. The Excel file opens blank grey screen.

Figure 1 - Excel Blank Screen
User Instances of ‘Excel Open But Can’t See Spreadsheet’ Issue
Instance 1: The user said that “Excel 2016 opens to a blank screen and everything is greyed out. Ribbons at the top of Excel are also not present”.
Instance 2: The user reported that “Attempting to open a spreadsheet, either by double-clicking the file or by opening Excel, it opens but only a blank Excel window is visible. When trying to save that particular file, Excel behaves as though there is no file open at all and all the file saving options, such as save, save as, print, etc. are greyed out.”
Causes Behind ‘Excel Open But Can’t See Spreadsheet’ Issue & the Solutions Thereof
Following are some of the possible reasons behind the ‘Excel open but can’t see spreadsheet’ issue, along with their solutions:
Cause 1: Excel File is Hidden
You may have saved the Excel sheet as a hidden document.
Solution: Unhide Excel File
Verify if your Excel worksheet is hidden by following these steps:
- In Excel, click the View tab, and then click Unhide.
Note: If the ‘Hide’ tab under the View menu is greyed out, the sheet you’re trying to open is not hidden. In that case, proceed to the next workaround.

Figure 2 - Unhide Excel File
- A dialog box will pop-up showing the worksheet name that can be unhidden. For instance, below is an image of Unhide box that lists ‘Daily_Reports’ spreadsheet under Unhide workbook.

Figure 3 – Select and Unhide Excel Workbook
- Click OK to unhide your Excel sheet.
If this fails to work, there’s a possibility that the spreadsheet window pane may have slided to one side of the visible desktop. To bring back the displayed area, click the ‘Arrange All’ option under the View tab. If the issue persists, try the next solution.
Cause 2: Ignore Dynamic Data Exchange (DDE) Option is Enabled
Another reason behind the ‘Excel opens to a blank screen’ issue could be that the “Ignore other applications that use Dynamic Data Exchange (DDE)” checkbox is checked in Excel options.
Usually, when you double-click an Excel file, a DDE message is sent to Excel instructing it to open that particular file. But, if you have the ‘Ignore DDE’ option selected, the DDE message sent to Excel to open a workbook is ignored. As a result, the Excel workbook opens a blank screen.
Solution: Uncheck the Ignore DDE Option
Make sure that the ‘Ignore DDE’ option is unchecked by performing these steps:
Note: Skip these steps for Excel 2019 and Excel Office 365.
- In your Excel window, click File > Options.

Figure 4 - Select Excel Options
- From the left-side of the ‘Options’ window, choose Advanced.
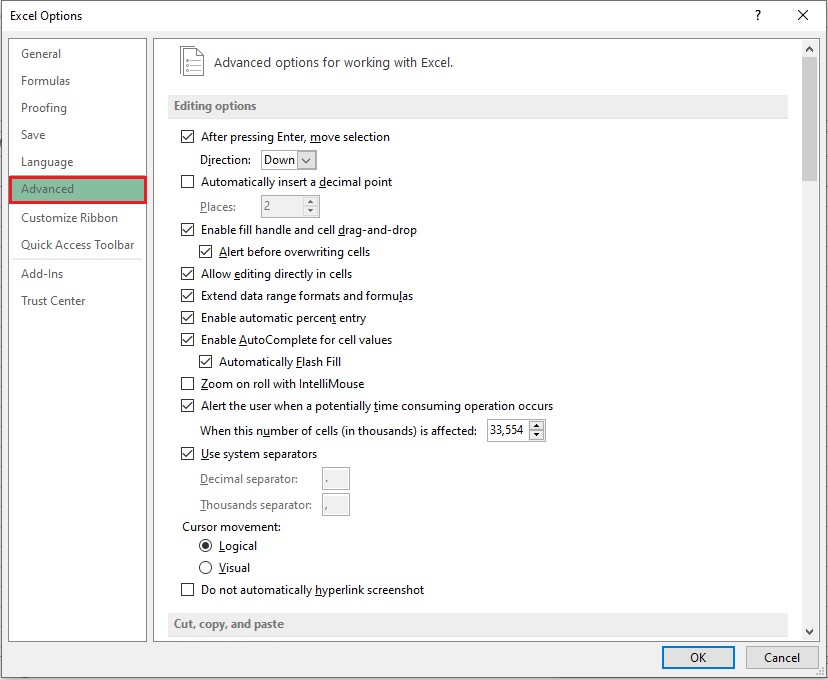
Figure 5 - Excel Options Window
- In ‘Advanced’ window, locate the General section, and then uncheck the “Ignore other applications that use Dynamic Data Exchange (DDE)” checkbox.
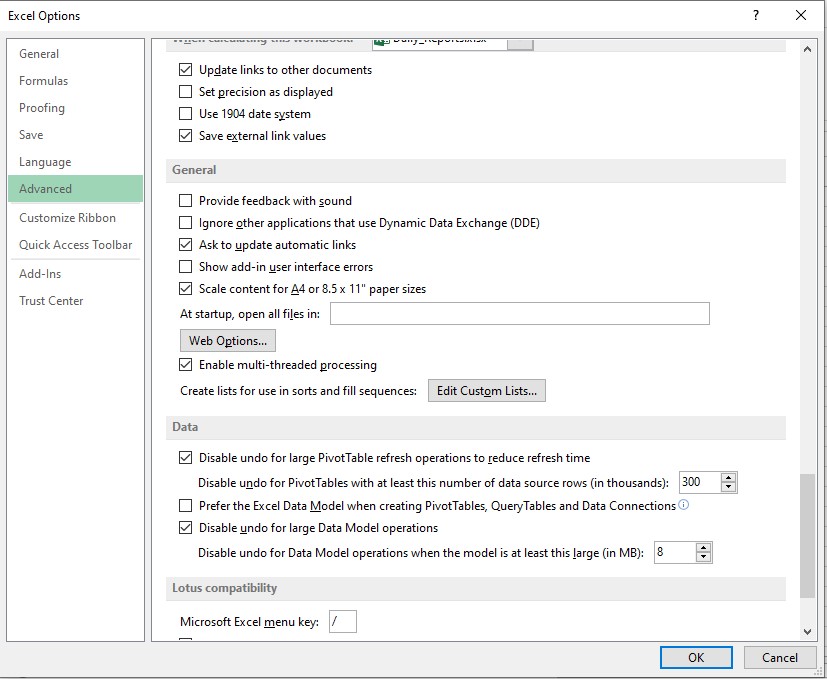
Figure 6 - Uncheck Ignore Other Applications that use DDE
- Click OK to apply the changes.
If these steps don’t work, proceed to the next workaround.
Cause 3: Issue within Office Program
Sometimes, problem within your Microsoft Office program might cause Excel to behave oddly and may result in an Excel spreadsheet disappeared issue.
Solution: Repair Office Program
Try repairing your Office program by executing the steps listed below, based on your Windows OS:
For Windows 10:
- Type Settings in the Windows search box.
- Click Settings.
- In ‘Windows Settings’ screen, select Apps.
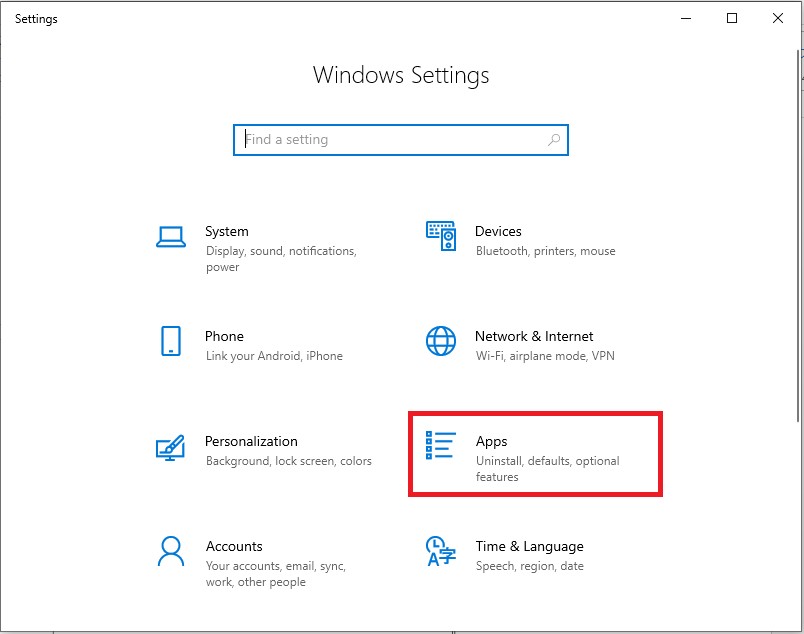
Figure 7 - Windows Settings Screen
- In ‘Apps & features’ screen, scroll down to your Microsoft Office program and tap on it, and then click the Modify

Figure 8 - Modify MS Office Program
- In ‘How would you like to repair your Office programs’ dialog box, select the Online Repairradio button, and then click the Repair
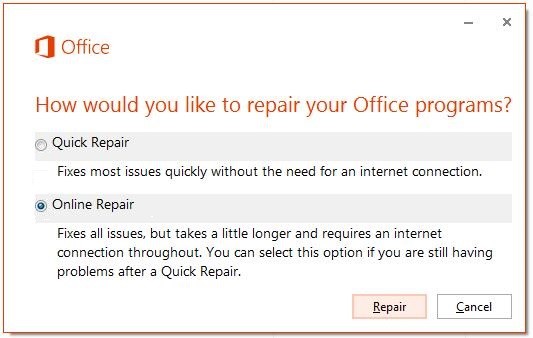
Figure 9 - Repair MS Office Program
For Windows 8:
- Open Control Panel and click the Uninstall a program option under Programs.
- Select Microsoft Office 365 and then click Change.
- In the window that opens, select Online Repair and then hit the Repair
You may be asked to restart your system after completion of the repair process.
For Windows 7:
- In ‘Control Panel’ window, double-click Programs and Features.
- Under Uninstall or change a program section, select the Office program, and then select Change.
- In the dialog box that appears, choose Online Repair and then choose Repair.
If repairing your Office installation fails to resolve the issue, continue to solution 4.
Cause 4: Problematic Excel and COM Add-ins
Sometimes, Excel and COM add-ins may cause Excel file open a blank grey screen problem.
Solution: Disable the Add-ins
Disabling the Excel and COM add-ins one at a time may help resolve the problem. The steps are as follows:
- Click the File menu in your Excel file and select
- From ‘Excel Options’ left-side panel, click Add-Ins, and then choose COM Add-ins from the ‘Manage’ drop-down. Click the Go
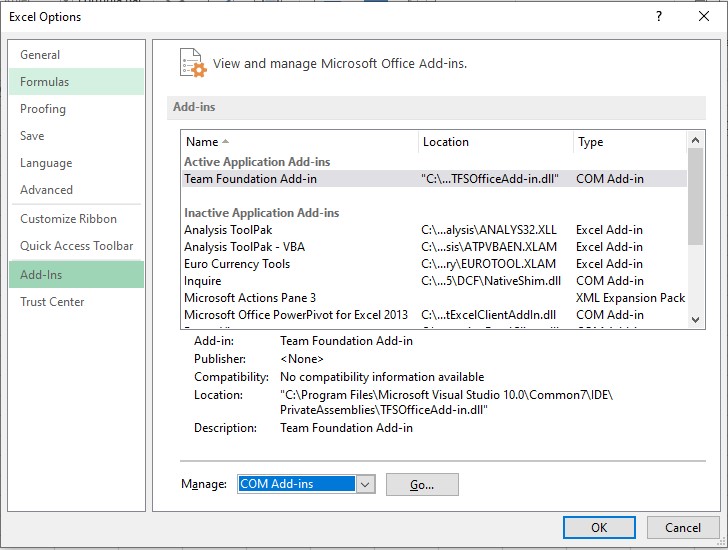
Figure 10 - Select COM Add-ins
- Uncheck one of the add-ins checkbox from the COM Add-ins window, then select OK.
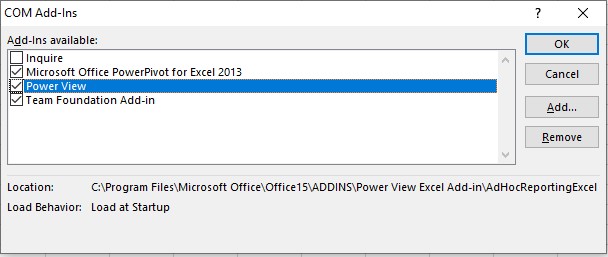
Figure 11 - Uncheck and Disable COM Add-ins
- Restart your Excel program.
If the issue persists, repeat the above steps (1 till 4), except that you need to choose a different add-in in step 3.
If you’re still experiencing the same problem after unchecking all the COM add-ins, repeat all the above steps, except choose ‘Excel Add-ins’ in step 2.
If Excel can load the file, then the add-in that you disabled last leads to the problem. If turning off add-ins does not work, try the next solution.
Cause 5: Problem with Excel File Associations
The Excel file opening a blank screen problem may occur if the file associations are not performing correctly.
Solution: Reset Excel File Associations
Try resetting the file associations in Excel to their default settings. For this, follow the below steps based on your OS.
For Windows 10 and Windows 8.1:
- Select the file that is opening incorrectly and copy it to the desktop.
- Right-click the file and click Properties.
- In the File’s ‘Properties’ window, check your file type next to Type of Filefrom the General tab. For instance, (.docx), (.csv), or (.pdf).
- Next, check to which app your file is associated with from the Opens withoption
If the file type is different than .xlsx, open the file in a different application by following these steps:
- Click the Change button next to the ‘Opens with’ option.
- Click More apps.
- From the list of applications, select the desired app and then check the Always use this app Click OK.
For Windows 8:
- Open Control Panel, click Default Programs, and then select Set your default programs.
- Choose Excel and then tap the Choose default for this program
- In ‘Set Program Associations’ window, choose Select All and then click Save.
For Windows 7:
- In Control Panel, choose Default Programs.
- Click the Associate a file type or protocol with a specific program
- Choose Microsoft Excel Worksheet and click on change program.
- Choose Microsoft Excel under Recommended Programs.
- If you’re unable to find Excel, browse the Excel installation folder.
- Select exe and then choose Excel.
What Next? Use Stellar Repair for Excel to Recover Your File
If the above solutions don’t help recover your Excel file, use an Excel file repair tool, such as Stellar Repair for Excel to recover it. The software can restore the Excel spreadsheet and its components, including tables, pivot tables, charts, formulas, etc. while preserving the spreadsheet properties and formatting.

Check out the video to recover Excel file by using Stellar Repair for Excel software.
Conclusion
This article described the possible causes behind the ‘Excel open but can’t see spreadsheet’ issue, along with their solutions. The manual solutions to resolve the issue require time and efforts. But, if you need to access your Excel file without any delay, use Stellar Repair for Excel software to recover your .xlsx/.xls file in just a few clicks.
Fix Cannot Paste the Data Error in Microsoft Excel
When copying and pasting the cell contents or attributes from one workbook to another, you can encounter the “Cannot paste the data” error. The error indicates that the values you are trying to paste do not match the cell format (Currency, Date, Text, etc.) used in the column. The error can occur if you are attempting to paste information into a merged cell. You can also get this error if the data you are trying to paste contains more columns than the destination worksheet can accept or if the copy area and paste area aren’t the same size.
Why you cannot Paste the Data in Microsoft Excel?
You can experience the “Excel cannot paste the data” error due to one of the following reasons:
- Locked cells
- Data size limitation
- Formatting issues
- The file size is too large
- Overloaded clipboard
- Data type mismatch
- Invalid range
- Lack of permissions
- Excel file is corrupted
- Compatibility issues
- While pasting the merged cells
Methods to Fix MS Excel Cannot Paste the Data Error
The “Microsoft Excel cannot paste the data” error usually appears when copying and pasting data within the spreadsheet. It primarily affects the copy-and-paste feature within the Excel file. However, the impact of this error may vary with the data you are working with. When this error occurs, first try restarting the Excel application. Ensure that you’ve saved all your important data before restarting the application to prevent data loss. If, after performing this basic step, you still face the issue, then try the following troubleshooting methods.
Method 1: Check and Unlock Cells in Excel
You can get the Excel cannot paste the data error if the cells you are trying to paste in the Excel file are locked. You can check and unlock the specific cells in the Excel file using the below steps:
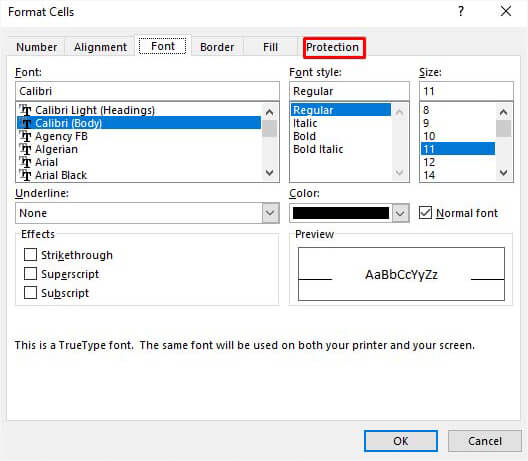
- Go to the Home tab in your Excel file and click Format Cell Font popup launcher.

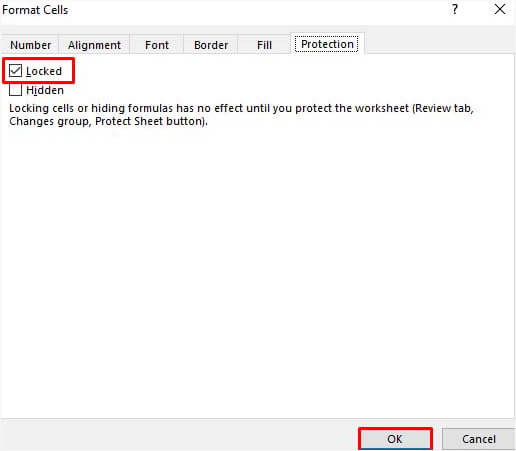
- In the Format Cells dialog box, click Protection.
- Under the Protection option, unselect the locked field and then click OK.
Method 2: Check and Fix the Cell Format
Sometimes, you can get the “Cannot paste the data” error in Excel if there is an issue with the formatting of the cells in the column (in which you are trying to paste the data). You can check whether the cell formats of the columns of the source file (from where you are copying data) match the destination file (in which you are pasting the cell data). If not, then change the cell format. Here’s how to do so:
- In the Excel file, click on the affected column heading (whose cells you need to modify).
- Navigate to the Home tab and click the General dropdown menu.

- Click on the desired cell format that matches the values you are trying to paste into the column.
Method 3: Check Copy and Paste Area Size
The “data cannot be pasted” issue can also occur if Excel detects the copy area of the range of cells is not of the same size and shape as that of the paste area. So, make sure the size of the range of cells for the paste area is same as the copied area. To ensure this, you can try the following:
- Use Upper-left Cell
You can select the upper-left cell instead of the complete range to paste.
Use Paste Special Option
You can use the Paste Special option to paste the data. To use this option, go to Home > Paste Special.
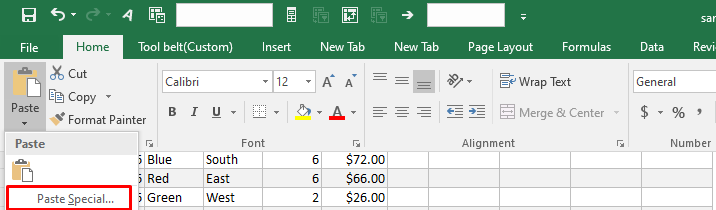
- You can choose from the different options, such as paste all, formulas, operations, Transpose, skip blanks, etc. to take control over how the data is pasted.
Method 4: Check and Unmerge Cells
The merged cells in the workbook can create discrepancies when copying and pasting data. These can create mismatch between the source and destination cell areas, resulting in errors. Make sure you are not pasting the data copied from merged cells. You can check and unmerge the cells using the below steps:
- Open the Excel file (in which you are copying data) and go to the Home tab.
- Click Merge & Center > Unmerge Cells.

Method 5: Unselect the Excel DDE (Dynamic Data Exchange) Option
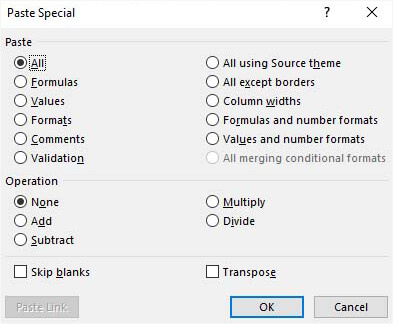
Sometimes, you can get the Excel cannot paste the data error while copying and pasting data from Excel file to external data sources or applications. It usually appears if you have established DDE links between them. To resolve this, you can uncheck the “Ignore other applications that use Dynamic Data Exchange (DDE)” option. Follow the below steps to do so:
- Open your Excel file.
- Go to File > Options.
In Excel Options, click Advanced and unselect “Ignore other applications that use Dynamic Data Exchange (DDE). Click OK.
Here are some additional solutions you can try to fix the “Cannot paste the data” error in Excel
Check the Excel File Format
Sometimes, the copy and paste error can occur if you try to move data from an older version of Excel file (XLS) into a newer version file (XLSX) or vice versa. You can try to change or convert the file format to resolve the issue.
Clear Clipboard
Too many items on the clipboard can prevent you from copying and pasting the data. You can empty your clipboard by deleting all clips. To do this, go to Home and click the Clipboard option.
Change the Column’s Cell Format
You can get the “Cannot paste the data” error when the information you need to paste does not match the cell format in the column. In such a case, you can change the column’s cell format. To do this, navigate to the Home option and then click on the General menu arrow. Then, change the cell format suitable to the type of information you are trying to paste in that column.
Add Columns
The copy-and-paste error in Excel can also occur if there are not enough columns to accept the data that you are trying to paste. You can insert more columns and then try copying and pasting data. To insert additional columns, click on the column heading, click Home, and then select Insert.
Remove Incompatible Add-ins
Sometimes, incompatible or faulty add-ins can also create conflicts with Excel’s clipboard operations, leading to the error. To check if add-ins are causing the issue, open the Excel file in safe mode. In safe mode, if you are able to paste the data, then check and uninstall the incompatible Excel Add-ins.
What to do if Nothing Works?
If the above methods do not work, then corruption in the Excel file could be the cause of the “Cannot paste the data” error. In such a case, you can use Excel’s built-in Open and Repair utility to repair the corrupted file. Here’s how to use this utility to repair the Excel file:
- Open your Excel application.
- Navigate to File and then click Open.
- Click the Browse option to select the affected Excel file.
- The Open dialog box opens up. Click on the corrupted file.
- From the Open dropdown, select the Open and Repair option.
- The Excel will prompt you to choose one of the below options:
- Repair
- Extract
- Cancel
- Select the Repair option to extract maximum data from the file. If the Repair option fails, choose the Extract option to recover the data, excluding formulas and values.
The Open and Repair utility may not be able to repair your Excel file if it is severely corrupted. In such a situation, the best possible way out is to use a professional Excel repair software to repair the file. You can try Stellar Repair for Excel. It can repair highly damaged or corrupted Excel (.xls, .xlsx, .xltm, .xltx, or .xlsm) file and recover all the objects from the file by maintaining the original formatting. The tool supports 2007 and higher editions of MS Excel. You can download the demo version of the software to preview the repaired objects and verify its functionality.
Conclusion
The “Excel cannot paste the data” error in Excel can occur due to different factors. You can check and clear the clipboard, unmerge the cells, unlock the cells, and use various other methods mentioned above to troubleshoot the error. If you fail to copy and paste the data due to file corruption, then opt for an advanced Excel repair software, like Stellar Repair for Excel. It is a reliable tool that can help you repair highly damaged/corrupted Excel files. It enables you to recover all the objects from the corrupted Excel file, with complete integrity.
How to repair ‘recovered’ Excel file that won’t open
Summary: You may unable to open the Excel file after file recovery. When you try to open the file you may prompt up with error messages. This blog will discuss those errors and their solutions. Besides this, it also mentions Stellar Repair for Excel to repair and recover the severely corrupted Excel file with no data loss.

Consider a scenario: A Windows 10 user accidentally deletes a folder containing multiple Excel (XLSX) files created in Excel 2013. The worst part was all the deleted files were important, and he did not have a backup, which would help him in restoring the data. Nonetheless, he was able to recover those data using a professional data recovery software. Next, he tried opening each of the recovered Excel files one by one. In doing so, his happiness turned into disappointment. And the reason was, some of the recovered Excel files failed to open prompting error messages, of course, due to corruption. In this scenario, all he needed was to repair ‘recovered’ Excel files that did not open. Know how to fix damaged Excel files that were recovered after deletion in this blog!
Before delving into the Excel file repair methods, acquaint yourself with the probable causes leading to damaged or corrupt Excel files. Although not essential, it shall be an added advantage in helping you to prevent Excel file corruption issues in the future.
The standard Excel file(s) Corruption Causes
- Power Outage – A power outage due to which a system closes suddenly or unexpectedly is a common cause of damaged Excel files.
- Forced System Shutdown – Shutting down the system forcibly without closing MS Excel files is another common cause of corrupt Excel files.
- PC Virus or Bug – Computer viruses or bugs may affect one or more data file if owners do not protect their PCs with powerful updated antivirus. Same is the case with malware attacks. The chances are that your computer is infected with one of these and has affected a few Excel files.
- Issues with Storage Devices – Damaged or corrupted Excel files can also be the outcome of hard drive issues in the data storage systems. Logical hard drive damage is one of the most significant issues.
The damaged Excel files may prompt up with error messages. These may be:
- ‘Excel unable to read file’
- ‘Filename is not valid’
- ‘This file is not in a recognizable format’
- ‘abc.xls file cannot be accessed. The file may be read-only’
- ‘Excel found unreadable content in (filename)’, ‘The file is corrupt and cannot be opened’
- ‘Microsoft Excel has encountered a problem and needs to close’
There exist multiple methods to repair Excel files which got damaged after recovery, and are as follows: XML method,
- Open Excel files with HTML
- Inbuilt ‘Open and Repair’ feature/tool in Excel
- Repair damaged Excel file from TMP file by using Excel AutoRecover and AutoBackup features
- Recover data by configuring ‘calculation option’ as manual
- Moving/copying or transferring data to a different location
- Stellar Repair for Excel software
Taking Stellar software versus other methods, the former is a software solution that repairs damaged (XLS and XLSX) file quickly in major three steps: Select->Repair->Save, whereas others fall into the category of manual processes and consume both time and resources. Among the manual processes ‘Open and Repair’ method is the least time and resource consuming, which you can try quickly by following the below steps:
Open and Repair method
- Click MS Excel tab and then the Open tab
- Select the damaged Excel file for repairing purpose
- Click the arrow present beside the Open Next, click Open and Repair tab
- Click either of the following:
- Repair tab (recovers maximum data)
- Extract Data tab (Recovers values and formulas if the repair process fails in recovering the complete data.)
Note – Use ‘Extract Data’ if ‘Repair’ is not successful.
If the Manual method is not competent enough to repair recovered Excel files that don’t open then opt for a software-based solution of deploying Stellar Repair for Excel software.
Software with 100% integrity and precision

Conclusion
As an automated software, Stellar Repair for Excel is easy-to-use. You do not need technical know-how and skill set, as required to execute the manual processes. On analyzing all these methods, it is suggested to use Stellar Repair for Excel having a user-friendly GUI to repair Excel files that became damaged after recovery, or if the recovered Excel file(s) that you once deleted accidentally has become corrupt now. Above all, it is an excellent software with multiple features and advantages. Use it to address all your MS Excel issues or if any recovered Excel file is corrupt.
[Fixed]: Freeze Panes not Working in Excel
Summary: This blog discusses the “freeze panes not working” issue in Excel. It mentions the possible reasons behind the issue and offers workarounds and methods to fix it. If the issue is associated with corruption in the Excel file, you can use the specialized Excel repair tool mentioned in the blog to repair the affected file.
The freeze panes feature in Excel is used to freeze the row/column headings to keep them visible while scrolling the worksheet. It is a useful feature when you’re working on a large worksheet containing data that exceeds the rows and columns on the screen. Sometimes, you notice that the ‘Excel freeze panes feature is not working’. There could be numerous factors that can trigger this issue. Let’s know the reasons for the freeze pane not working issue in Excel and how to resolve this issue.
Why can’t I freeze panes in excel?
Several factors may contribute to the Excel freeze panes not working issue in Excel. A few of them are:
- The cell editing mode is enabled in the workbook in which you are trying to use the Freeze Panes feature.
- The Excel file is corrupted.
- The worksheet is protected.
- Advanced Options are disabled in Excel Settings.
- The Excel application is not up-to-date.
- You might be trying to lock rows in the middle of the worksheet.
- Your Excel workbook is not in normal file preview mode.
- Wrong/incorrect positioning of the frozen panes.
How to fix ‘Freeze Panes not Working’ in Excel?
The freeze panes option is available in the View bar. Sometimes, you’re unable to see the View option. It usually occurs if you are using the Excel Started version. Check and try to open the file in the advanced Excel version, which supports all the features. If you are using the advanced Excel version, then try the below workarounds to fix the freeze panes not working issue in Excel.
Workaround 1: Exit the Cell Editing Mode
If your Excel file is switched from normal file view mode to cell editing mode, you can encounter the freeze panes not working issue. In cell editing mode, certain features in Excel, such as the freeze panes, are temporarily disabled to prevent any conflicts. You can disable cell editing mode by pressing the ESC or Enter key. Now locate the View tab and check whether the freeze pane feature is working. If not, then try the next workaround.
Workaround 2: Change the Page Layout View
The Excel freeze panes not working issue can also occur if your workbook is opened in Page Layout view. The Page Layout view doesn’t support freeze panes. If you select page layout, the freeze panes option gets disabled.

To enable the freeze pane option, go to View and click the Page Break Preview tab.

Workaround 3: Check and Remove Options under the Data Tab
Sometimes, you can experience the “freeze panes not working” issue if Sorting, Data Filter, Group, and Subtotal options are enabled in Excel workbook. Such options, when enabled, can lead to unexpected problems with the freeze panes’ functionality. You can check and remove these features from your workbook. To do so, follow these steps:
- Open the Excel file in which you are getting the issue.
- Navigate to the Data tab.
- Check and remove the below features (if enabled):
- Sort
- Filter
- Group
- Subtotal

Workaround 4: Check and Unprotect Worksheet
The freeze panes feature may stop working if your worksheet is protected. You can try to disable the worksheet protection option. Here are the steps:
- In the Excel file, go to the Review tab.
- Click Unprotect Sheet.

After unprotecting the sheet, check whether the “freeze panes not working” issue is resolved. If not, follow the next workaround.
Workaround 5: Use Correct Cell Positioning
The freeze pane is not working issue in Excel can also occur when you use incorrect cell positioning to apply the freeze panes feature. Several users have reported facing this issue when trying to lock multiple rows with the wrong cell selection. So, use correct cell positioning to freeze the rows. For example, if you are trying to lock two rows in an Excel worksheet, then you need to click on 3rd row’s column.

What if the above Workarounds Fail to Fix the Freeze Panes not Working Issue?
If none of the above workarounds works, then there are chances that the workbook is damaged or corrupt. In such a case, you can try the below methods to repair the corrupt Excel workbook.
Run Open and Repair Utility
In case of corruption in the Excel file, you can use the Open and Repair tool in Excel to repair the file. To use this utility, follow these steps:
- In the Excel application, navigate to File and then click Open.
- Click Browse to select the workbook in which you are facing the issue.
- The Open dialog box is displayed. Click on the affected file.
- Click the arrow next to the Open option and then click Open and Repair.

- Click on the Repair option to recover as much data as possible.
- You can see a completion message once the repair process is complete. Click Close.
Use a Professional Excel Repair Tool
If the Open and Repair tool doesn’t work to resolve complex file-related issues and your Excel file is severely corrupted, you can opt for a reliable third-party Excel repair tool, such as Stellar Repair for Excel. This tool can help you repair the Excel file and recover all the data with complete integrity. You can try the software’s demo version to scan the affected file and preview the recoverable data. The software is compatible with all MS Excel versions and Windows operating systems, including Windows 11.
Closure
The “freeze panes not working” issue in Excel can occur due to several reasons, like protected worksheet, incompatible Excel version, and incorrect cell position. Try the workarounds shared in the blog to fix the issue. If the Excel file is corrupt, you can use Stellar Repair for Excel to fix the corruption issues in the file. This tool can quickly repair the Excel file and recover all the data from the file with 100% integrity.
How to fix “damage to the file was so extensive that repairs were not possible” Excel error?
Summary: Unable to resolve “damage to the file was so extensive that repair was not possible” error in Excel? Read this post to discover more details about the error, possible causes, and how to rectify the error. To save time & efforts, you can also try an Excel file repair software to resolve the “damage to the file…” error in a few clicks.
When opening a workbook in Microsoft Excel 2003 or later, you may encounter an error message,
“Damage to the file was so extensive that repairs were not possible. Excel attempted to recover your formulas and values, but some data may have been lost or corrupted.”

The error message may also occur while exporting an Excel file. Let’s find out what causes this error and what we can do to fix it.
Reasons Behind “Damage to the File Was So Extensive That Repairs Were Not Possible” Error
Your Excel file may be corrupt, oversized, virus-afflicted, etc., which can trigger this error and make the repair impossible. Below are some common reasons.
- Large or oversized excel files hindering export
- Data restore errors
- Field length of a cell is more than 256 characters
- Software conflicts, viruses, network failure
- Unable to open files in upgraded versions
- Errors on output exceeding 64000 rows
- Limited system resources (such as RAM, internal memory)
In a nutshell, the error generally happens if Excel discovers unreadable content, which may also interrupt file saving in Excel.
How to Resolve “Damage to the File Was So Extensive That Repairs Were Not Possible” Error?
Here are a few methods you can follow to fix or resolve the Excel repair error.
Method 1: Perform Basic Troubleshooting
When opening a corrupt workbook, Microsoft Excel automatically initiates the file recovery mode to repair the corrupt file. However, if it fails to perform automatic recovery, then follow these basic troubleshooting steps:
- This error mainly happens when you try to open the Excel file in an upgraded version. Try to open the file in an older version of Excel. You might be able to open it.
- Try saving the file with a different file name.
- Use a different file extension to save the file.
- You can save the Excel file as HTML and then open it. However, an HTML file might not save conditional formatting.
- Close other opened applications on the system which may be causing the error.
- Select less data for export at once.
- Delete worksheets if copied from another document; for instance, delete any file or screenshots you have imported.
- Open the file on another system.
If the error persists, then use the manual method to repair a workbook using the below steps:
- Go to the “File” tab.

- Select Open and select the damaged spreadsheet from the Recent Workbooks section on the right, if listed. However, if you cannot find the file in the Recent Workbooks section, click on “Browse” and choose the corrupted workbook.

- Click the drop-down arrow on the Open tab and select Open and Repair.

Method 2: Check if exporting a Heavy File is Causing Resource Limitations in Excel
Sometimes, when you try to export an Excel sheet carrying a huge database, you may face memory errors in older Excel versions like Excel 2003. Here, you’ll have to decrease the amount of data as Excel 2003 does not permit exporting extensive data beyond a limit. However, modern versions such as Excel 2007, 2010 & 2016 allow exporting a large amount of data and utilize more RAM than the older versions.
Following are some other workarounds:
- Use a lesser number of query presentation fields to re-generate the query. Then, again re-enter those fields.
- Decrease the multi-line string field data text up to 8000 characters.
Method 3: Copy Macros and Data to Another Workbook (Empty) in an Advanced Excel version
If the issue is occurring due to version incompatibility, i.e., if the file opens easily in the older version but shows errors in the new version. You can:
Use the older version to open the file or copy the data or macros in an empty workbook of the new version of Excel.
Copying the Macros in the Workstation
In Microsoft Excel, you can use the Visual Basic Editor to open the workbook with macro on another workbook by copying the macro. Both VBA tools and Macros appear in the Developer section of the excel file. This option is disabled by default. So first, you need to enable it.
Follow the instructions to enable it:
- Open Excel and go to File > Options.

- Click “**Customize Ribbon.**”

- Look at the right side of the pane and ensure the Developer tab is checked.

- Click OK.
Once you have enabled the Developer tab, follow the steps to copy the macro from one workbook to another:
- First, open both the workbooks- the workbook containing the macro and the workbook in which you need to copy the macros.
- Locate the Developer tab.

- Select Visual Basic to display the “Visual Basic Editor.”

- Go to the View menu in the Visual Basic Editor.

- Select Project Explorer.

- In the Project Explorer window, drag the module you need to copy to the destination workbook. For example:

Module 1 has been copied from Book2.xlsm to Book1.xlsm
Method 4- Restore the backup file
The workbook backup helps to open the corrupted or mistakenly deleted file. Sometimes, the issue can be fixed using the Recover Unsaved Workbook option in Excel. Here’s the list of steps to recover the files in Microsoft Excel:
- Go to the File tab on Excel.

- Click Open.

- Search on the top-left of the screen to click Recent Workbooks as below:

- Next, scroll down to the bottom.
- Click the “Recover unsaved workbooks” button.

- Scroll and find the lost file.
- Now double-click on the file to open.
Conclusion
“Damage to the file was so extensive that repairs were not possible” error can be fixed with the above troubleshooting methods or by using a third-party Excel repair tool, like Stellar Repair for Excel . Although There are no standard resolutions to fix the excel error as they may vary with different scenarios. In some cases, the manual methods might be time-consuming or fail to fix the error or recover the excel file. Hence, using an excel file repair tool may be the best option! It extracts data from the corrupted file and saves it to a new Excel workbook, which you can open and edit.
How to Repair Corrupt Excel Workbook?
Summary: Corruption in an Excel workbook could lead to data loss. This blog outlines the possible reasons behind corrupted workbook and describes how to repair the workbook manually and using an Excel repair tool.
Is your Excel behaving differently, for instance, stops responding or freezes? Or have you encountered a warning or an error message indicating corruption in the Excel workbook?
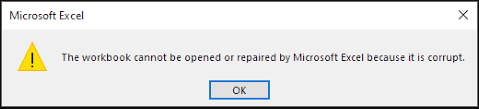
Figure 1 - Corruption Warning in Excel: The corrupt workbook cannot be opened or repaired
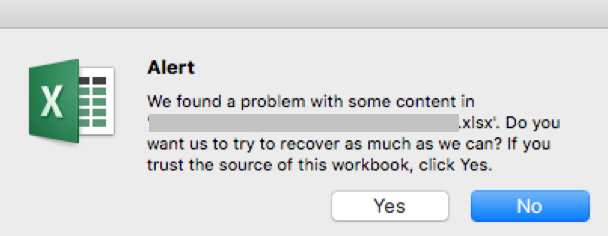
Figure 2 - Excel File Corruption Message
In any of these situations, you won?t be able to open your Excel workbook.
TIP! If you?re unable to open an Excel workbook, it does not necessarily mean that the workbook is corrupt. Try a few workarounds to resolve the issue, like disabling the ?Protected View Settings?, disabling add-ins, or moving the workbook to another drive.
You will need to repair the corrupted Excel workbook to make it usable. Before discussing the repair methods, let?s first look at the possible reasons behind file corruption.
To jump to methods to repair the workbook, click here .
Possible Reasons behind Corrupted Excel Workbook
- Large size of a workbook: A workbook containing lots of information or objects like images, shaded cells, or other visual representations is prone to corruption.
- Unexpected system shutdown or power loss: If you haven?t saved your Excel file, abrupt system shutdown or power failure can corrupt the data and render the file inaccessible.
- Bad sectors on storage media: Accumulation of bad sectors on storage media on which Excel files are saved is another reason that may lead to Excel file corruption.
Other common reasons causing Excel file corruption are virus attack, network errors, etc.
Methods to Repair Corrupted Excel Workbook
Note: Repairing the corrupt workbook may result in data loss. And so, it?s recommended to back up the workbook before attempting to repair the file.
Method 1 ? Repair the Excel Workbook Manually
Use the Excel ?Open and Repair? feature to repair your corrupt workbook manually. Here?s how:
Step 1: In Excel, click the File tab and then click Open.
Step 2: Select the corrupt Excel file, click the arrow button next to the Open button and then select Open and Repair.
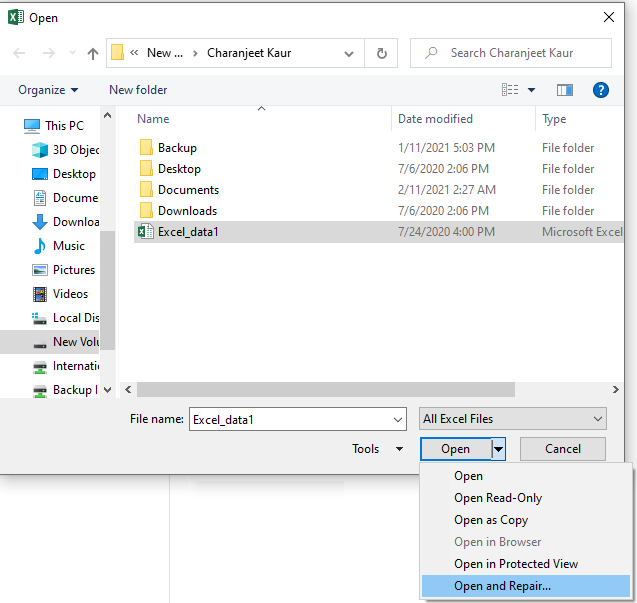
Figure 3 - Excel Open and Repair Feature
Step 3: In Microsoft Excel dialog box that opens, click Repair to begin repairing your corrupt workbook.

Figure 4 - Repair the Microsoft Excel File
Note: If the Excel repair process fails, repeat Steps 1 till 3 and click the ?Extract Data? button. This will help you extract values and formulas from the corrupted workbook.
Performing these steps will repair your Excel file. If the issue persists, skip to the next method.
Method 2 ? Use Excel File Repair Software
If the above method failed to fix corruption in the workbook, use Excel file repair software to repair your workbook quickly. This Excel repair tool is purpose-built to help users repair large-sized Excel files (.xlsx and .xls) in just a few clicks. Also, it helps recover all the data from the corrupted workbook while preserving the cell formatting and worksheet properties.
Steps to Repair Corrupt Excel File Using the Software
Step 1: Download, install, and open Stellar Repair for Excel software.
Free Download for windows ](https://tools.techidaily.com/stellardata-recovery/repaire-for-excel/ )
Step 2: Click Browse to select your corrupted .xlsx or .xls file. If you are not aware of the file location, click Search to locate and select the file.

Figure 5 - Select Corrupt Excel Workbook
Step 3: Once the file is selected, click Repair.
Step 4: A preview of recoverable workbook data gets displayed.
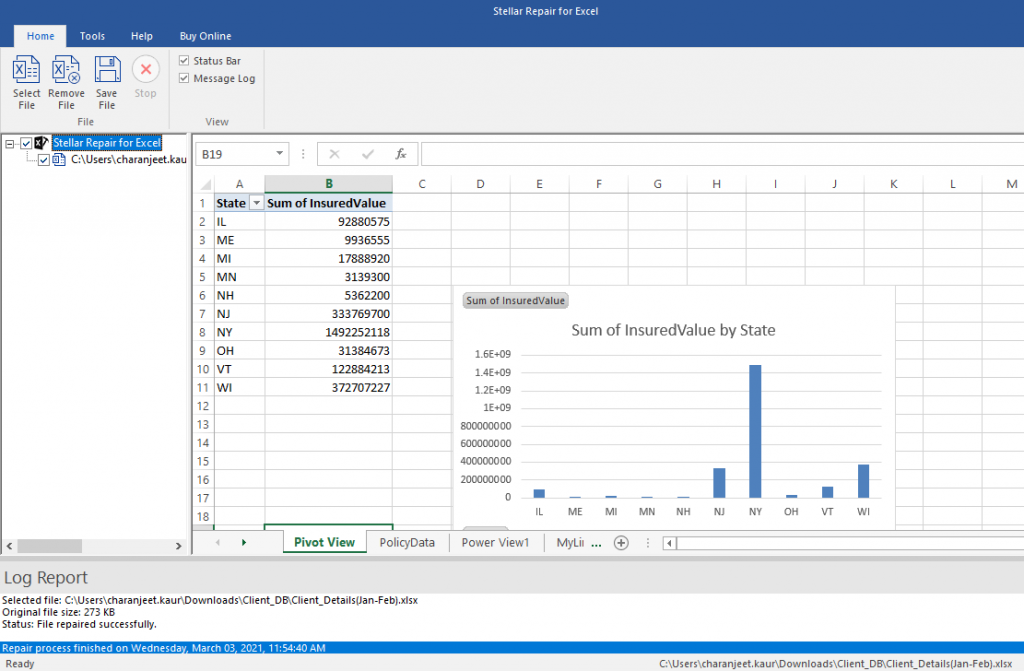
Figure 6 - Preview of Recoverable Excel Workbook Data
Note: You will need to activate the licensed version of Stellar Repair for Excel software for saving the repaired file. Once activated, proceed with the steps below to save the repaired file.
Step 5: Click Save File on the File menu. This will open a Save File dialog box with options to save the repaired .xlsx/.xls file at default or new location. After choosing the appropriate option, click OK.
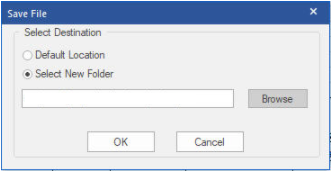
Figure 7 - Save Repaired Excel File
The repaired file will get saved at the selected location.
Key Features of Stellar Repair for Excel Software
- Repairs severely corrupt Excel file and recovers pivots, pivot tables, conditional formatting rules, chart, chart sheets, etc.
- Can repair multiple Excel files in a batch simultaneously
- Can handle all types of Excel file corruption errors, like ?Excel found unreadable content in filename.xls?, ?Excel cannot open the file filename.xlsx?, etc.
- Supports repairing corrupt workbooks of Excel 2019, 2016, 2013, 2007, 2003, and lower versions.
End Note
If your Excel workbook has turned corrupt, try using the methods discussed in this blog to repair the workbook. Once it is repaired, you must follow preventive measures to avoid your Excel file from getting corrupt. Some of these measures are as follows:
Reduce the size of your workbook by:
- Removing unused data
- Saving images at lower resolutions
- Avoid saving pivot table cache
Turn on the ?AutoRecover? and ?AutoSave? features in Excel
Top 5 Ways to Fix Excel File Not Opening Error
Summary: MS Excel users sometimes face issues while using the MS Excel application. One such issue is the Excel file not opening error. In this post, we’ve mentioned the reasons that may result in this error and the ways to resolve it. Also, you’ll find about an Excel repair software that can help you repair corrupt Excel files.
Several Microsoft Excel users have reported encountering the ‘Excel file not opening’ error when opening their Excel file. There are several reasons that may cause this error. In this post, we’ll be discussing the reasons that may lead to the ‘Excel file not opening’ error and the top 5 ways to fix this error.
Why Does the ‘Excel File Not Opening’ Error Appear?
Following are some possible causes that may result in the ‘Excel file not opening’ error:
- There may be a problem with an add-in that is preventing you from opening the Excel files.
- There’s a chance that your Excel application is faulty.
- Your Excel program is unable to communicate with other programs or the operating system.
- The file association might have been broken. This is a common problem faced by users who have upgraded their Excel application or operating system.
- The file you’re trying to open is corrupted.
5 Ways to Fix Excel File Not Opening Error
Let’s explore the ways to resolve the Excel file not opening error:
1. Uncheck the Ignore DDE Checkbox
Dynamic Data Exchange (DDE)allows Excel to communicate with other programs. The Excel error may occur due to incorrect DDE settings. You need to ensure that the correct DDE configuration is enabled. Follow the steps provided below:
- Launch your MS Excel file.
- Go to File > Options.

- Now click on Advanced.

- Further, find the General option on the screen.

- Uncheck the option **‘Ignore other applications that use Dynamic Data Exchange (DDE)**’.
- Click OK to save the changes.
2. Reset Excel File Associations
When you launch your Excel file, the file association ensures that the Excel application is used to open the file. You can try to reset these associations and see if Excel opens after this. Proceed with the following steps to do so:
- Navigate to Start Menu and launch Control Panel.
- Now, navigate to Programs > Default Programs > Set Your Default Programs.

- A new window will open. Herein, find the Excel program in the list and select it. Now, select the option ‘Choose defaults for this program’. Click OK.

- A new window for ‘Set Program Associations’ will open.
- Check the box against the ‘Select All’ option.
- Further, click Save to reset the Excel File Associations settings.

3. Disable Add-Ins
Many people install third-party add-ins to enhance the application’s functionality. Sometimes, these add-ins can create an issue. Follow the below-mentioned steps to disable the problem creating add-ins:
- Launch MS Excel application.
- Navigate to File > Options > Add-ins.

- In the window that opens, go to the Manage option at the bottom.
- Herein, select the COM Add-ins option from the dropdown list. Click Go.

- In the COM Add-ins window, uncheck all the boxes to disable the add-ins. Click OK.

4. Repair MS Office Program
Sometimes the issue is not with your Excel file. Instead, the reason for the error can be a corrupt MS Office application. You can repair the program to fix the Excel file not opening error. Here are the steps:
- Press the Windows + R keys to launch the ‘Run’ dialog box.

- Enter the text ‘appwiz.cpl’ to launch the program and features window.

- Find the MS Office program in the list of applications.

- Right-click on it and select Change.

- In the new window, select the Quick Repair radio button. Click Repair.

- Follow the on-screen instructions to repair the Office application. Once the repair process is completed, you can try opening the Excel file to see if the problem is resolved.
5. Disable Hardware Graphics Acceleration
The hardware graphics acceleration assists in the system’s better performance, especially when you use MS Office applications, like MS Excel or Word. Sometimes, this causes the Excel file not opening issue. You can disable this option to try to resolve the issue. Here are the steps:
- Launch your MS Excel application.
- Navigate to File > Options > Advanced.
- Herein, go to the Display option.
- Uncheck the Disable hardware graphics acceleration checkbox. Click OK.

What If These Solutions Do Not Work?
If you have applied all the methods mentioned above and still cannot open your Excel file, there are chances that your file is corrupted. You can use a specialized Excel repair tool , such as Stellar Repair for Excel to repair the corrupted Excel file. This software has powerful algorithms that can scan and repair even severely corrupt Excel files, without any file size limitation. After repairing the file, it restores all the data, including tables, charts, rules, etc. to a new Excel, with 100% integrity.
To know how the software works, see the video below:
Conclusion
Before you proceed with resolving the Excel file not opening error, try to find out the root cause of this error. If you know the real reason, you can try the method right away. If the reason for the error is corruption in the Excel file, the best option is to repair the file using a professional Excel repair tool, such as Stellar Repair for Excel .
Also read:
- Use Device Manager to identify some outdated your drivers in Windows 11/10
- Things You Dont Know About Nubia Red Magic 8S Pro+ Reset Code | Dr.fone
- How To Transfer Data From Apple iPhone 12 Pro To Other iPhone 13 devices? | Dr.fone
- How to Reset a Honor 70 Lite 5G Phone That Is Locked | Dr.fone
- The way to get back lost videos from Motorola Moto G04
- The way to recover deleted photos on Vivo X Fold 2 without backup.
- Your Complete Guide To Reset Poco F5 Pro 5G | Dr.fone
- Will MOV files play on HTC ?
- Unlock a disable iPhone 15 Pro without a computer
- All Things You Need to Know about Wipe Data/Factory Reset For Oppo A1 5G | Dr.fone
- All Things You Need to Know about Wipe Data/Factory Reset For Xiaomi Redmi K70 Pro | Dr.fone
- Is your Tecno Spark 20 working too slow? Heres how you can hard reset it | Dr.fone
- The Easiest Methods to Hard Reset Poco M6 5G | Dr.fone
- The Easiest Methods to Hard Reset Xiaomi Redmi Note 12T Pro | Dr.fone
- How to Reset Realme V30T without Losing Data | Dr.fone
- Simple ways to get lost music back from Realme 11 Pro
- Undelete lost music from GT 10 Pro
- Full Guide to Hard Reset Your Samsung Galaxy A15 4G | Dr.fone
- Undelete lost pictures from Xiaomi Redmi Note 12 Pro 4G.
- What You Need To Know To Improve Your Xiaomi Redmi A2 Hard Reset | Dr.fone
- How To Recover Lost Data from Apple iPhone 14 Pro? | Dr.fone
- How to Easily Hard reset my Realme 10T 5G | Dr.fone
- How to Downgrade Apple iPhone 15 Plus without Losing Any Data? | Dr.fone
- Solutions to restore deleted files from Itel
- The way to get back lost messages from Realme 12 Pro 5G
- How to Factory Reset Vivo S18e without Losing Data | Dr.fone
- Solved Bad and Corrupt Videos that won't Play on Oppo A59 5G
- Unlock iPhone SE (2022) without Passcode
- How to Perform Hard Reset on Oppo Reno 10 5G? | Dr.fone
- Complete Guide to Hard Reset Your Itel A05s | Dr.fone
- Update drivers with Device Manager in Windows 11
- Resolve Compile Error in Hidden Module in Excel 2007 Causes & Solutions | Stellar
- Repair damaged, unplayable video files of Oppo F23 5G on Windows
- How To Repair iOS of Apple iPhone 12 Pro? | Dr.fone
- Solutions to restore deleted files from Motorola Edge+ (2023)
- Video Fixer Software for all Corrupt Videos of Motorola Moto G73 5G
- Is your Samsung Galaxy S21 FE 5G (2023) working too slow? Heres how you can hard reset it | Dr.fone
- Simple ways to get lost videos back from Motorola Edge 40
- Apple iPhone 13 Pro Asking for Passcode after iOS 17/14 Update, What to Do?
- Methods to Change GPS Location On Samsung Galaxy F54 5G | Dr.fone
- How To Unlock a Oppo A18 Easily?
- In 2024, How to Cast Oppo Reno 10 Pro 5G Screen to PC Using WiFi | Dr.fone
- In 2024, How To Change Nokia C02 Lock Screen Password?
- How to Hide/Fake Snapchat Location on Your Vivo Y100A | Dr.fone
- Best Itel P40 Pattern Lock Removal Tools Remove Android Pattern Lock Without Losing Data
- The Ultimate Guide to Get the Rare Candy on Pokemon Go Fire Red On Samsung Galaxy F14 5G | Dr.fone
- Complete guide for recovering music files on Nokia G42 5G
- How Can We Unlock Our Itel S23+ Phone Screen?
- In 2024, How To Activate and Use Life360 Ghost Mode On Realme 12 Pro 5G | Dr.fone
- How to Transfer Data from Nubia Red Magic 9 Pro to Samsung Phone | Dr.fone
- Will the iPogo Get You Banned and How to Solve It On Samsung Galaxy M14 5G | Dr.fone
- 3 Ways to Fake GPS Without Root On Huawei P60 | Dr.fone
- Recover your pictures after Honor Magic5 Ultimate has been deleted.
- Title: Solved Excel 2023 Spreadsheet Disappears after Opening | Stellar
- Author: Ian
- Created at : 2024-05-20 10:20:29
- Updated at : 2024-05-21 10:20:29
- Link: https://techidaily.com/solved-excel-2023-spreadsheet-disappears-after-opening-stellar-by-stellar-guide/
- License: This work is licensed under CC BY-NC-SA 4.0.
