
Solved Excel 2013 Spreadsheet Disappears after Opening | Stellar
[Solved] Excel Spreadsheet Disappears after Opening
Several Excel users have reported about experiencing ‘Excel spreadsheet disappears after opening’ issue. The problem occurs when attempting to open an Excel file by double-clicking on the file icon or name. The Excel file opens blank grey screen.

Figure 1 - Excel Blank Screen
User Instances of ‘Excel Open But Can’t See Spreadsheet’ Issue
Instance 1: The user said that “Excel 2016 opens to a blank screen and everything is greyed out. Ribbons at the top of Excel are also not present”.
Instance 2: The user reported that “Attempting to open a spreadsheet, either by double-clicking the file or by opening Excel, it opens but only a blank Excel window is visible. When trying to save that particular file, Excel behaves as though there is no file open at all and all the file saving options, such as save, save as, print, etc. are greyed out.”
Causes Behind ‘Excel Open But Can’t See Spreadsheet’ Issue & the Solutions Thereof
Following are some of the possible reasons behind the ‘Excel open but can’t see spreadsheet’ issue, along with their solutions:
Cause 1: Excel File is Hidden
You may have saved the Excel sheet as a hidden document.
Solution: Unhide Excel File
Verify if your Excel worksheet is hidden by following these steps:
- In Excel, click the View tab, and then click Unhide.
Note: If the ‘Hide’ tab under the View menu is greyed out, the sheet you’re trying to open is not hidden. In that case, proceed to the next workaround.

Figure 2 - Unhide Excel File
- A dialog box will pop-up showing the worksheet name that can be unhidden. For instance, below is an image of Unhide box that lists ‘Daily_Reports’ spreadsheet under Unhide workbook.

Figure 3 – Select and Unhide Excel Workbook
- Click OK to unhide your Excel sheet.
If this fails to work, there’s a possibility that the spreadsheet window pane may have slided to one side of the visible desktop. To bring back the displayed area, click the ‘Arrange All’ option under the View tab. If the issue persists, try the next solution.
Cause 2: Ignore Dynamic Data Exchange (DDE) Option is Enabled
Another reason behind the ‘Excel opens to a blank screen’ issue could be that the “Ignore other applications that use Dynamic Data Exchange (DDE)” checkbox is checked in Excel options.
Usually, when you double-click an Excel file, a DDE message is sent to Excel instructing it to open that particular file. But, if you have the ‘Ignore DDE’ option selected, the DDE message sent to Excel to open a workbook is ignored. As a result, the Excel workbook opens a blank screen.
Solution: Uncheck the Ignore DDE Option
Make sure that the ‘Ignore DDE’ option is unchecked by performing these steps:
Note: Skip these steps for Excel 2019 and Excel Office 365.
- In your Excel window, click File > Options.

Figure 4 - Select Excel Options
- From the left-side of the ‘Options’ window, choose Advanced.
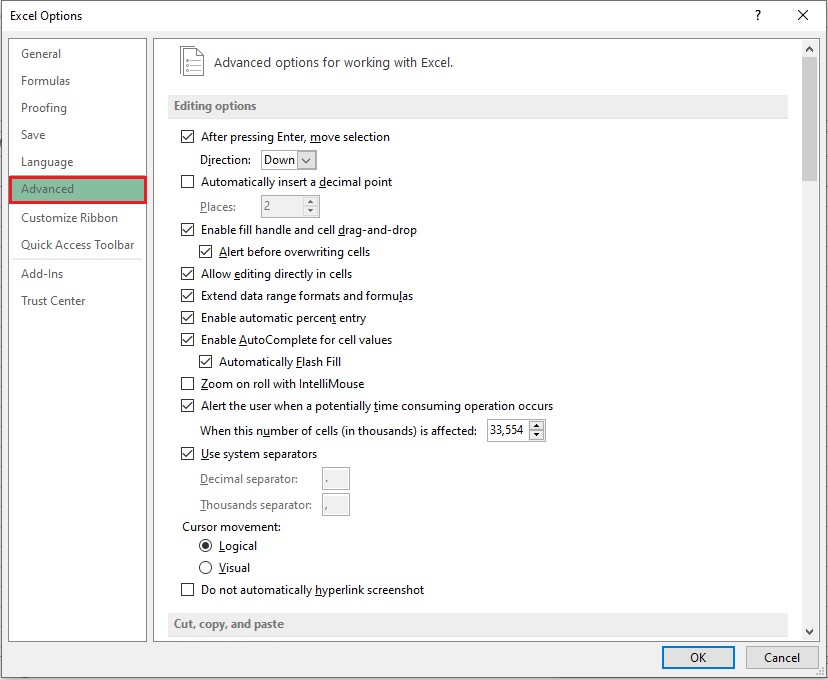
Figure 5 - Excel Options Window
- In ‘Advanced’ window, locate the General section, and then uncheck the “Ignore other applications that use Dynamic Data Exchange (DDE)” checkbox.
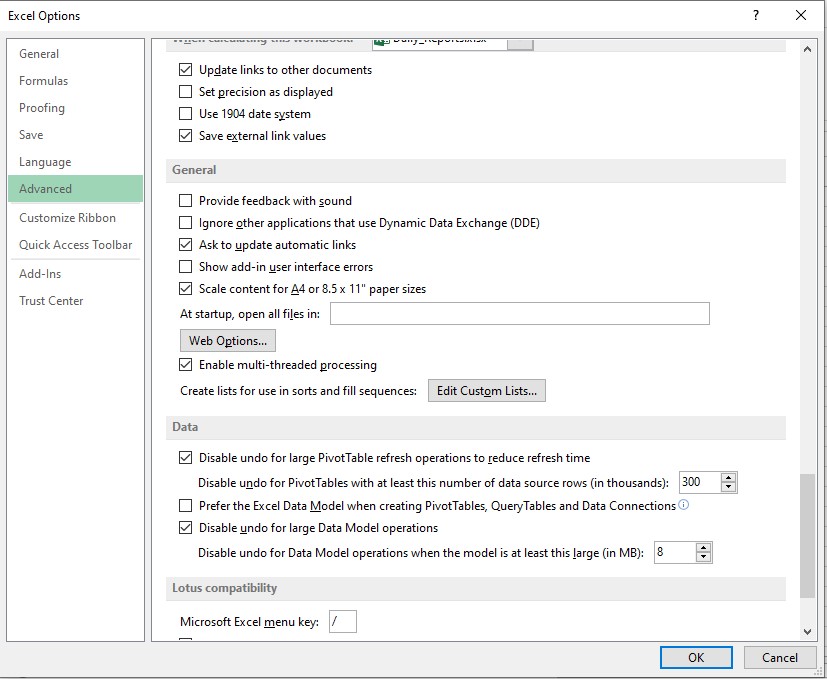
Figure 6 - Uncheck Ignore Other Applications that use DDE
- Click OK to apply the changes.
If these steps don’t work, proceed to the next workaround.
Cause 3: Issue within Office Program
Sometimes, problem within your Microsoft Office program might cause Excel to behave oddly and may result in an Excel spreadsheet disappeared issue.
Solution: Repair Office Program
Try repairing your Office program by executing the steps listed below, based on your Windows OS:
For Windows 10:
- Type Settings in the Windows search box.
- Click Settings.
- In ‘Windows Settings’ screen, select Apps.
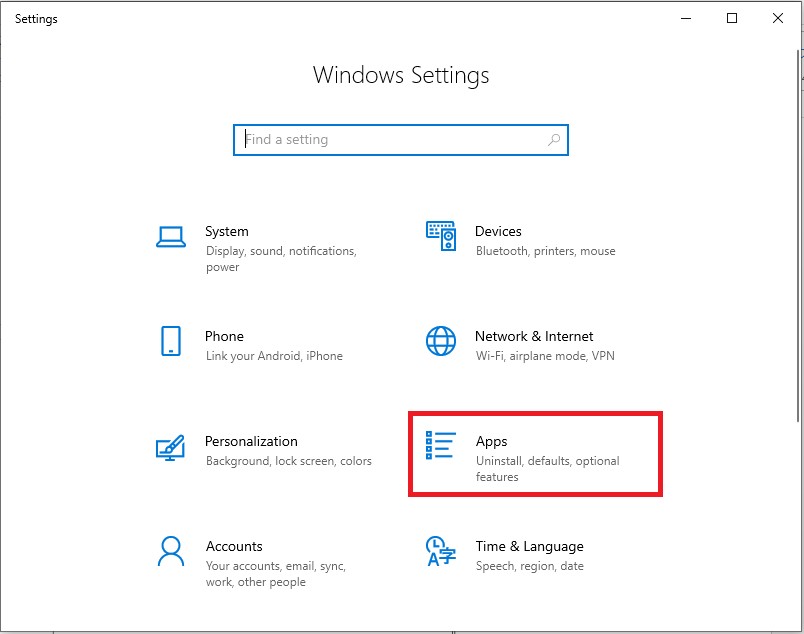
Figure 7 - Windows Settings Screen
- In ‘Apps & features’ screen, scroll down to your Microsoft Office program and tap on it, and then click the Modify

Figure 8 - Modify MS Office Program
- In ‘How would you like to repair your Office programs’ dialog box, select the Online Repairradio button, and then click the Repair
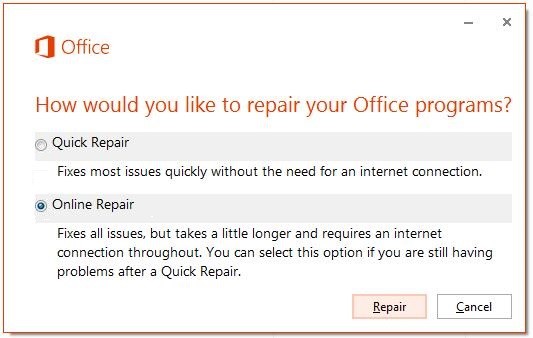
Figure 9 - Repair MS Office Program
For Windows 8:
- Open Control Panel and click the Uninstall a program option under Programs.
- Select Microsoft Office 365 and then click Change.
- In the window that opens, select Online Repair and then hit the Repair
You may be asked to restart your system after completion of the repair process.
For Windows 7:
- In ‘Control Panel’ window, double-click Programs and Features.
- Under Uninstall or change a program section, select the Office program, and then select Change.
- In the dialog box that appears, choose Online Repair and then choose Repair.
If repairing your Office installation fails to resolve the issue, continue to solution 4.
Cause 4: Problematic Excel and COM Add-ins
Sometimes, Excel and COM add-ins may cause Excel file open a blank grey screen problem.
Solution: Disable the Add-ins
Disabling the Excel and COM add-ins one at a time may help resolve the problem. The steps are as follows:
- Click the File menu in your Excel file and select
- From ‘Excel Options’ left-side panel, click Add-Ins, and then choose COM Add-ins from the ‘Manage’ drop-down. Click the Go
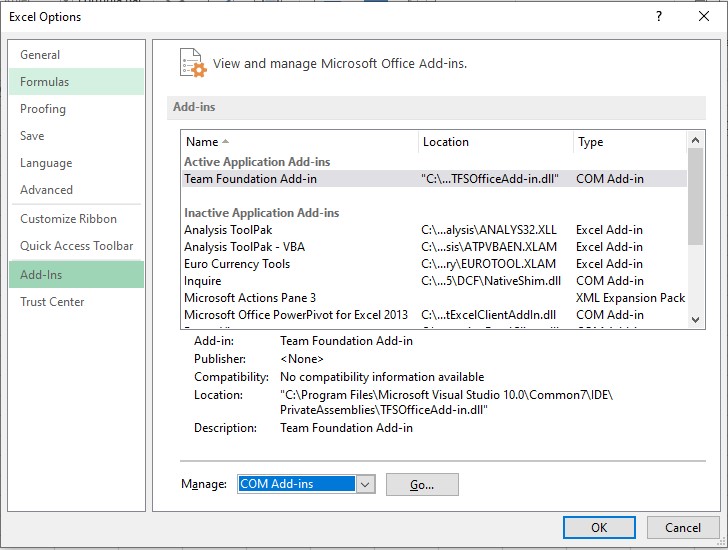
Figure 10 - Select COM Add-ins
- Uncheck one of the add-ins checkbox from the COM Add-ins window, then select OK.
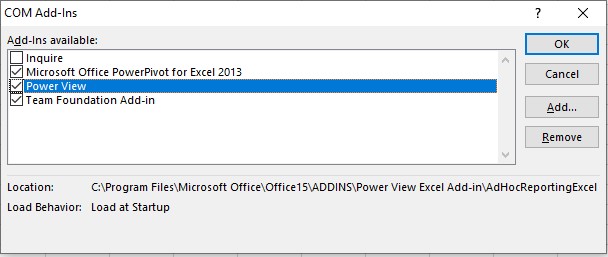
Figure 11 - Uncheck and Disable COM Add-ins
- Restart your Excel program.
If the issue persists, repeat the above steps (1 till 4), except that you need to choose a different add-in in step 3.
If you’re still experiencing the same problem after unchecking all the COM add-ins, repeat all the above steps, except choose ‘Excel Add-ins’ in step 2.
If Excel can load the file, then the add-in that you disabled last leads to the problem. If turning off add-ins does not work, try the next solution.
Cause 5: Problem with Excel File Associations
The Excel file opening a blank screen problem may occur if the file associations are not performing correctly.
Solution: Reset Excel File Associations
Try resetting the file associations in Excel to their default settings. For this, follow the below steps based on your OS.
For Windows 10 and Windows 8.1:
- Select the file that is opening incorrectly and copy it to the desktop.
- Right-click the file and click Properties.
- In the File’s ‘Properties’ window, check your file type next to Type of Filefrom the General tab. For instance, (.docx), (.csv), or (.pdf).
- Next, check to which app your file is associated with from the Opens withoption
If the file type is different than .xlsx, open the file in a different application by following these steps:
- Click the Change button next to the ‘Opens with’ option.
- Click More apps.
- From the list of applications, select the desired app and then check the Always use this app Click OK.
For Windows 8:
- Open Control Panel, click Default Programs, and then select Set your default programs.
- Choose Excel and then tap the Choose default for this program
- In ‘Set Program Associations’ window, choose Select All and then click Save.
For Windows 7:
- In Control Panel, choose Default Programs.
- Click the Associate a file type or protocol with a specific program
- Choose Microsoft Excel Worksheet and click on change program.
- Choose Microsoft Excel under Recommended Programs.
- If you’re unable to find Excel, browse the Excel installation folder.
- Select exe and then choose Excel.
What Next? Use Stellar Repair for Excel to Recover Your File
If the above solutions don’t help recover your Excel file, use an Excel file repair tool, such as Stellar Repair for Excel to recover it. The software can restore the Excel spreadsheet and its components, including tables, pivot tables, charts, formulas, etc. while preserving the spreadsheet properties and formatting.

Check out the video to recover Excel file by using Stellar Repair for Excel software.
Conclusion
This article described the possible causes behind the ‘Excel open but can’t see spreadsheet’ issue, along with their solutions. The manual solutions to resolve the issue require time and efforts. But, if you need to access your Excel file without any delay, use Stellar Repair for Excel software to recover your .xlsx/.xls file in just a few clicks.
How to fix runtime error 424 object required error in Excel
The Runtime error 424: Object required occurs when Excel is not able to recognize an object that you are referring to in a VBA code. The object can be a workbook, worksheet, range, variable, class, macro, etc. Some users have also reported that this error occurred when they tried to copy the values of the cells from one workbook to another.
Let’s understand the error through a small scenario. Suppose, I want to check the last field row in a table in a spreadsheet named “First” using the VBA code. To do this, I have added a command button and double-clicked on it and entered the below code in the backend:
Private Sub CommandButton2_Click()
Dim LRow As Integer
LRow = Worksheets(“First”).Cells(Rows.Count, 2).End(xlUp).Row
MsgBox (“Last Row “ & LRow)
End Sub
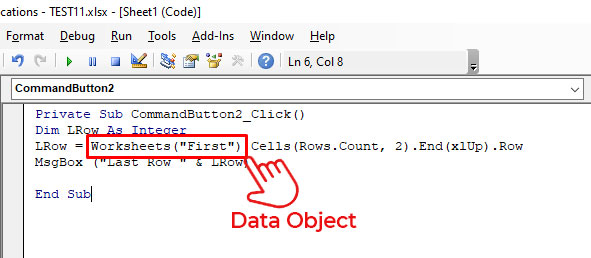
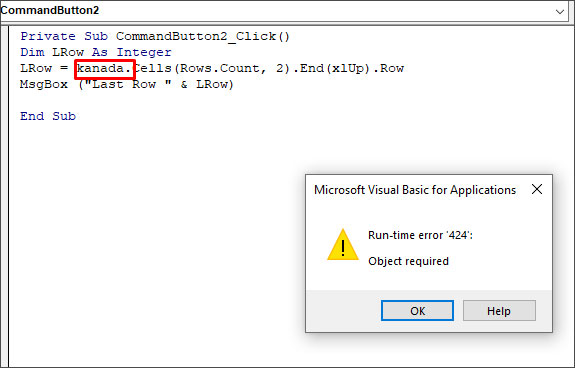
In this code, Worksheets(“First”) is a data object. If I mistakenly delete this data object and insert any random name (for example - kanada), then it will not be recognized by Excel. When I run this code, I will get the “Run-time error 424”.
Causes of Runtime Error 424 in Excel
The Runtime error 424: Object required can occur due to the following reasons:
- Incorrect name of the object you are trying to refer to in a code.
- You have provided an invalid qualifier to an object.
- You have not used the Set statement while assigning an object reference.
- The object is corrupted.
- Missing objects in a workbook.
- Objects you are trying to call in a code are mistakenly deleted or unavailable.
- You have used an incorrect syntax for object declaration.
- You are trying to perform an invalid action on an object in a code.
- Workbook is corrupted.
Solutions to Fix Runtime Error 424: Object Required in Excel
The VBA error ‘object required’ may occur due to different reasons. Based on the reason, you can follow the solutions mentioned below to fix the error.
1. Check the Name of the Object
The Runtime error 424 can occur when you run the VBA code using an incorrect name of the object. For example, the object name is ‘MyObject’ but you’re using “Backcolor”.
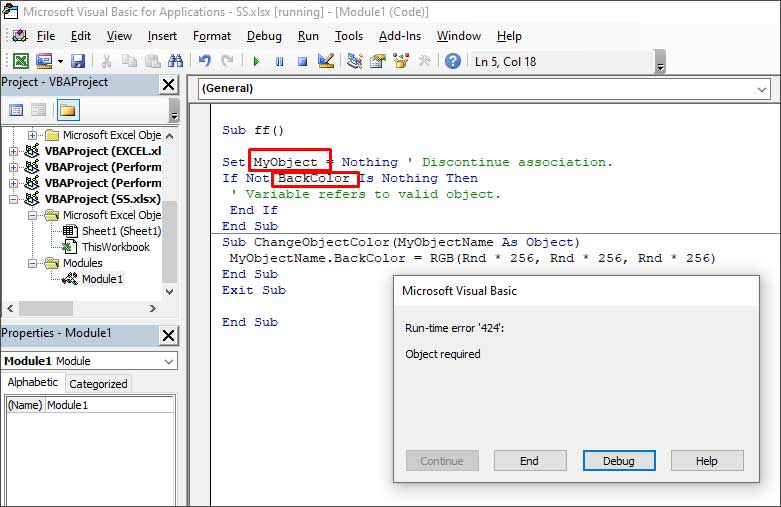
When you click the Debug button, the line with the error will highlight.

To fix the issue, you need to provide the correct name of the object.
2. Check if the Object is Missing
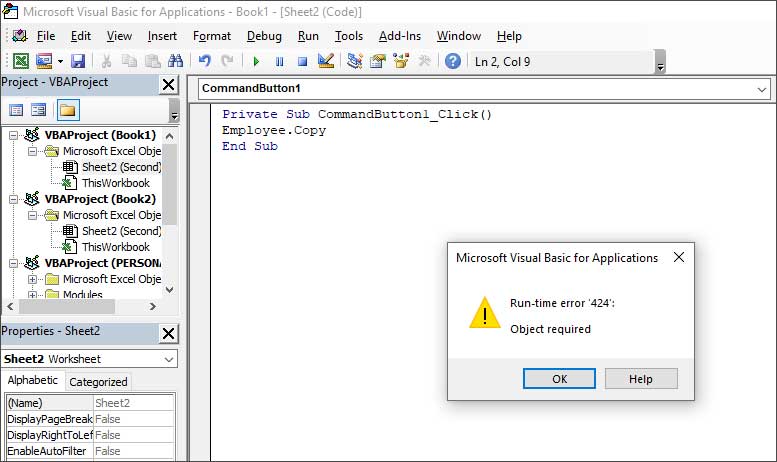
The Runtime error 424 can occur if the object you are referring to as a method is not available or you are using the wrong object in a code. In the below example, you can see that the error occurs when an object named “Employee” is not available in the Project list.
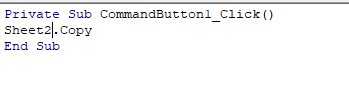
You can check and mention the object which is available. For instance, Sheet2 in the below code.
3. Check All References are Declared in the Code
You can get the Runtime error 424 if all the references are not declared. So, make sure you have declared all the references in the code. To verify this, you can use the debug mode by pressing F5 or clicking on the Debug option.

4. Check the Macro Security Settings
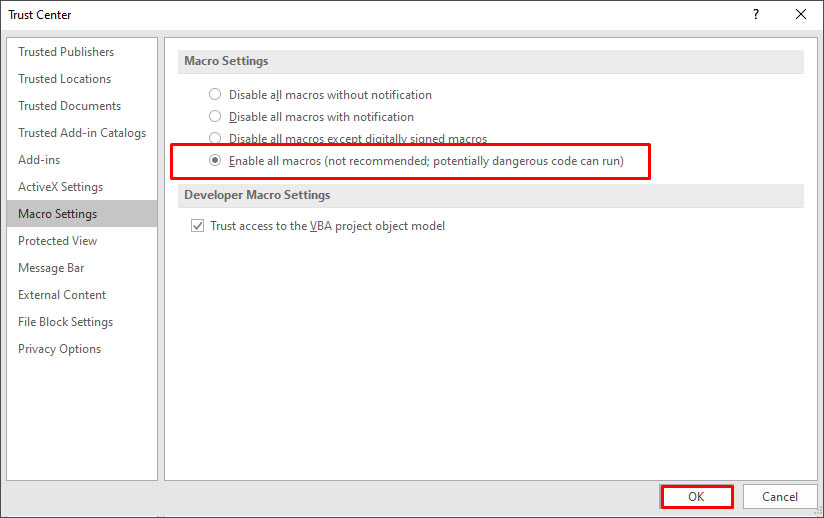
Sometimes, the error can occur if macros are disabled in the Macro Security settings. You can check and change the settings by following these steps:
- On the Developer tab, in the Code section, click Macro Security.
- In the Trust Center window, select Enable all macros.

- Click OK.
5. Repair your Workbook
Sometimes, the ‘Object required’ error can occur if your Excel file is damaged or corrupted. In such a case, you can try repairing the file using Microsoft’s in-built utility - Open and Repair. To use this utility, follow these steps:
- In Excel, go to File > Open > Browse.
- In the Open dialog box, click on the corrupted Excel file.
- Click the arrow next to the Open button and select Open and Repair from the dropdown.
- Select Repair to recover as much data from the file as possible.
If the Open and Repair utility fails or stops working, then you can try a professional Excel repair tool, such as Stellar Repair for Excel . It is an advanced tool that can repair severely corrupted Excel files (.xls, .xlsx, .xltm, .xltx, and .xlsm). It helps recover all the file components, including images, charts, tables, pivot tables, cell comments, chart sheets, formulas, etc., without impacting the original structure.
Conclusion
The Runtime error 424 usually occurs when there is an issue with the objects in your VBA code. In this article, we have covered some effective methods to resolve the “object required” error in Excel. If the error occurs due to corruption in Excel file, then you can repair the corrupt file using Stellar Repair for Excel. It is a reliable tool that can repair severely corrupted Excel file without changing its actual formatting. You can download the free trial version of the software to evaluate its functionality.
Filter Not Working Error in Excel [Fix 2024]
Summary: The filter is not working issue in Excel can occur due to several reasons, like blank rows, hidden rows, merged cells, corrupted data, etc. In this post, we will mention the reasons why the filter is not working correctly in Excel and several fixes to resolve the issue. We will also mention an advanced Excel repair tool to repair the Excel file if corruption in file is the cause of the issue.

You can use the Filter function in Excel to filter data in large-sized Excel files quickly. While using Excel filters, sometimes, you face a situation where the filter is disabled or may fail to function properly.

The Excel filter usually fails to work if you have not selected the complete and correct range of data. Let’s learn more about the “Sort and Filter not working in Excel” issue and look at the possible methods to fix it.
Why the Filter is not Working in Excel?
You can face the “filter is not working” issue if you are applying the filter on a protected worksheet or trying to find the data from a hidden row. Besides this, there could be many other reasons contributing to this issue, such as:
- The data you are trying to filter is in merged cells.
- The Excel file automatically selected the data up to the first empty cell, excluding the remaining rows.
- Grouped sheets in Excel file.
- Blank row in the Excel sheet.
- You are trying to apply a filter on an invalid data range.
- The workbooks in which you’re facing the filter issues are corrupted.
- You are specifying incorrect criteria in the filter columns.
Solutions to Resolve the Filter is not Working Issue in Excel
There might be two scenarios: the Excel filter option is disabled/grayed out or the filters fail to function properly. You can follow the given troubleshooting solutions to resolve the issue based on the scenario you’re facing.
Scenario 1 – Filter Option is Disabled or Grayed Out
Method 1: Check and Un-group the Worksheet
When you apply filters to a single sheet in a grouped set, Excel disables the filter option in other sheets within the group. You can check the grouped sheets and try ungrouping them to enable the filter option. Here’s how to do so:
- In the Excel file, go to the Group section.

- Right-click on the Ungroup Sheets.
Alternatively, you can press the Shift + Alt + Left keys to ungroup the sheets.
Method 2: Unprotect Worksheet
The “disabled Excel filter” issue can also occur if your worksheet is protected. You can unprotect the worksheet to enable the filter option. To do so, go to the Review tab and then select Unprotect Sheet.

Method 3: Check and Uninstall Excel Add-ins
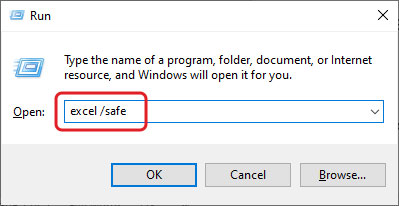
Sometimes, the Excel filter gets disabled due to faulty or corrupted Excel add-ins. You can run the Excel in Safe mode to check whether the issue has occurred due to add-ins. To do this, type excel /safe in the Run window and click OK.

In safe mode, if you see the filter option, it indicates some problematic Excel add-ins were causing the issue. In such a case, you can check and uninstall the faulty Excel add-ins to fix the issue.
Scenario 2 – Filter is not Working
Method 1: Try Clearing Filters
Sometimes, the Excel filter fails to work correctly if some filters from the previous sessions are still active. In such a case, you can clear the applied filters. Follow the below steps:
- In Excel file, click Sort & Filter option.
- Select clear.

Method 2: Select Entire Data
The filter not working issue in Excel can occur when the range selected for filtering is incomplete or incorrect. You need to make sure that you’ve selected the entire data range in Excel. You can use the Ctrl+A keys to select the entire content in the worksheet.
Method 3: Check and Delete Blank Cells from the Table’s Columns
When you apply a filter to the data, Excel expects data to be in a continuous range. Excel filters do not consider the blank cells, thereby resulting in incorrect functioning of the filter. To resolve this issue, check and delete all blank cells. In case your Excel file is too large to delete the blank cells, then you can add a “Serial number” row as an alternative. Adding serial number row creates a data continuity, thus helping in fixing the filter-related issue.
Method 4: Unhide Hidden Rows and Columns
Hidden rows or columns in worksheets can also affect the filter functionality. You can check and unhide rows/columns to troubleshoot the issue. Here is how to do so:
- In the affected Excel file, go to Home.
- Click on Format > Hide & Unhide.

- Click Unhide Rows or Unhide Columns (as required).

Method 5: Unmerge Cells
You can experience the filter in Excel is not working issue if you are using the filter to extract data from merged cells. Ensure to unmerge the “merged cells” before applying a filter in Excel. Follow the below steps to unmerge the merged cells in Excel:
- Navigate to the Home option.
- In the toolbar, select the Merge & Center option.
- Click Unmerge Cells.
Method 6: Repair the Workbook
Sometimes, the Filter Not Working in Excel issue can occur due to inconsistencies in file structure. If these issues occurred due to corruption in the worksheet, you can repair it using the Open and Repair tool. It is an in-built tool in Excel that is used to repair corrupted Excel files. Here are the steps to use this tool:
- In the Excel application, navigate to the File option.
- Click Open and then click Browse to choose the Excel file.
- In the Open dialog box, click the problematic Excel file.
- Click the arrow next to the Open option and select Open and Repair.
- Click Repair to recover as much data as possible.
- The application prompts a message after the repair process is complete. Click Close.
In most cases, the Open and Repair tool can easily fix corruption issues in the Excel file. However, for any reason, if the open and repair tool doesn’t work you can consider repairing the file using a professional Excel Repair tool. Stellar Repair for Excel is one such advanced and secure tool to repair Excel files. With this tool’s powerful scanning capabilities, you can repair highly corrupted Excel files and recover all their objects with complete integrity. The tool is compatible with all Windows editions, including the latest Windows 11.
Closure
Several reasons are associated with the filter not working issue in Excel. The filter option may not work as expected if you have not selected the complete and correct range of data or for many other reasons. You can follow the troubleshooting methods discussed above to fix the issue. If the filter fails to work due to corruption in the workbook, then try Stellar Repair for Excel . It is an advanced tool that can even repair severely damaged files. It also helps to recover all the data from corrupted files without changing the original formatting. You can check the tool’s functionality by downloading its demo version. It allows you to preview all the repairable objects in the corrupted Excel file.
How Do I Repair and Restore Excel File?
When an Excel file turns corrupt, the file might become inaccessible or you might receive errors. You may encounter errors, such as ‘the file is corrupt and cannot be opened,’ ‘Excel found unreadable content in “filename>”,’ ‘Excel cannot open “filename” because the file format or extension is not valid,’ etc.
Common Reasons for Excel File Corruption
There are several reasons that can turn the file corrupt. The most common reason is a damaged hard drive. Other factors that can cause corruption in an Excel file are as follows:
- System crash or abrupt shutdown of the system while the file is still open
- Viruses infecting the file with malicious code
- Bug in the operating system
- Bad sectors on the drive where the file is stored
- Large spreadsheets with formulas and other components
Whatever be the reason, if your business is dependent on an Excel file, corruption in the file could hamper your business continuity. Also, you may lose crucial data. In such a situation, you could try to repair the file.
Before We Begin
It is important to identify the root cause behind Excel file corruption. If the problem has occurred due to a faulty hard disk drive, contact your hardware vendor to get it fixed. Also, move the file to another local drive and check if it opens. If nothing works, proceed with the methods discussed below to repair and restore the file.
Methods to Repair and Restore Excel File
Try the following methods to fix corruption in an Excel file and restore it.
Method 1 – Use the Built-in ‘Open and Repair’ Tool
You can use the Excel built-in Open and Repair utility to repair the corrupt file. Follow these steps:
- Open your Excel application and click on Blank workbook.
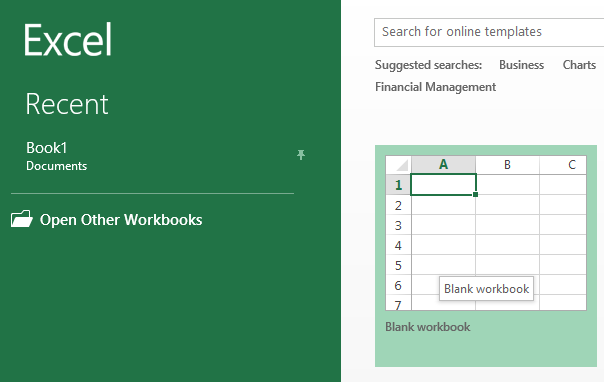
- On the blank workbook screen, click on the File tab.
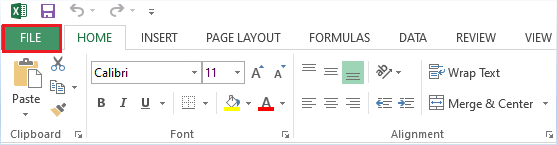
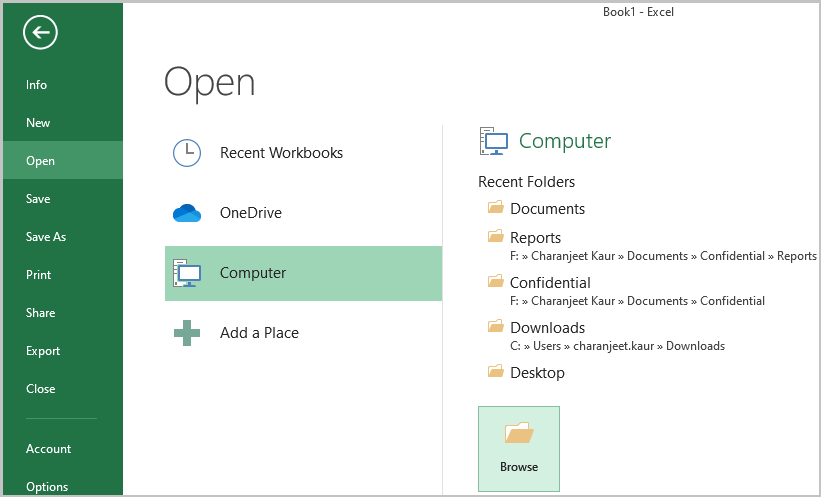
- Click Open > Computer > Browse.
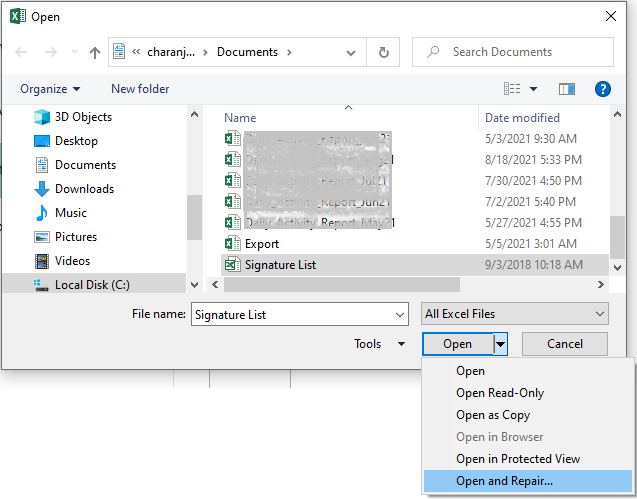
- Select the file you want to repair and then click on Open and Repair from the Open dropdown box.
- Click Repair to fix corruption in the Excel file and recover maximum data.
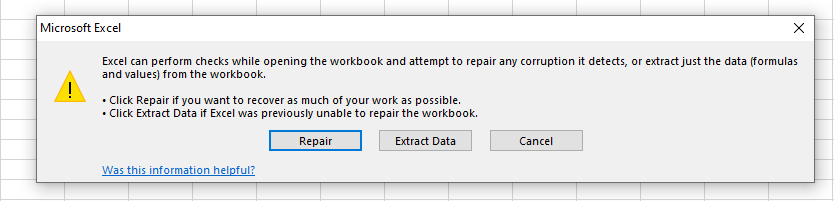
- If you get the following error message, click Yes to open the file.

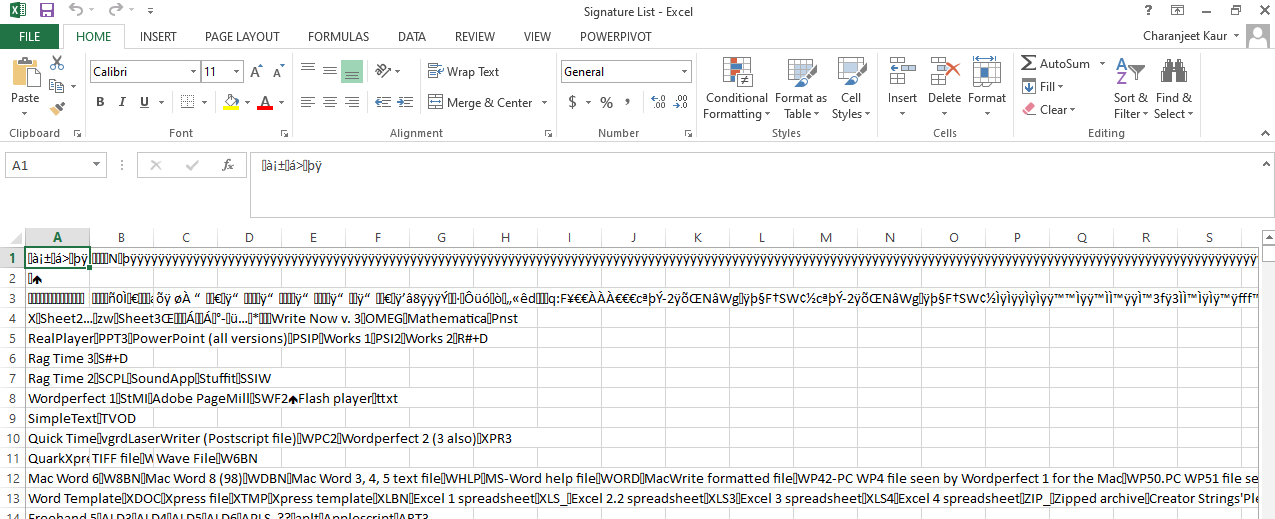
- If clicking Yes opens the file with garbage entries (see the image below), perform Step 1 – 5 and click Extract Data. This will only help you recover data without formulas and values.
Note: You may also try to recover the data from a corrupted workbook by using the methods suggested by Microsoft .
A better way to repair and restore an Excel file with complete data is to use a specialized Excel file repair tool .
Method 2 – Use Excel File Repair Tool
Stellar Repair for Excel is a powerful tool designed to help users fix corrupted .xls or .xlsx files without any technical assistance. Also, the tool recovers all the components from a corrupted workbook, including tables, pivot tables, cell values, formulas, charts, images, etc. You can preview the repaired file and its contents by downloading the free demo version from the link below. It is a useful feature that allows the user to validate the data before saving it.
[
](https://tools.techidaily.com/stellardata-recovery/repaire-for-excel/ “Free Download For Windows”)
Here’s the step-by-step instructions to repair a corrupt Excel file using the software:
- Run the software. The software main interface opens with an instruction to add some add-ins if you’ve engineering formulas in the file you want to repair.
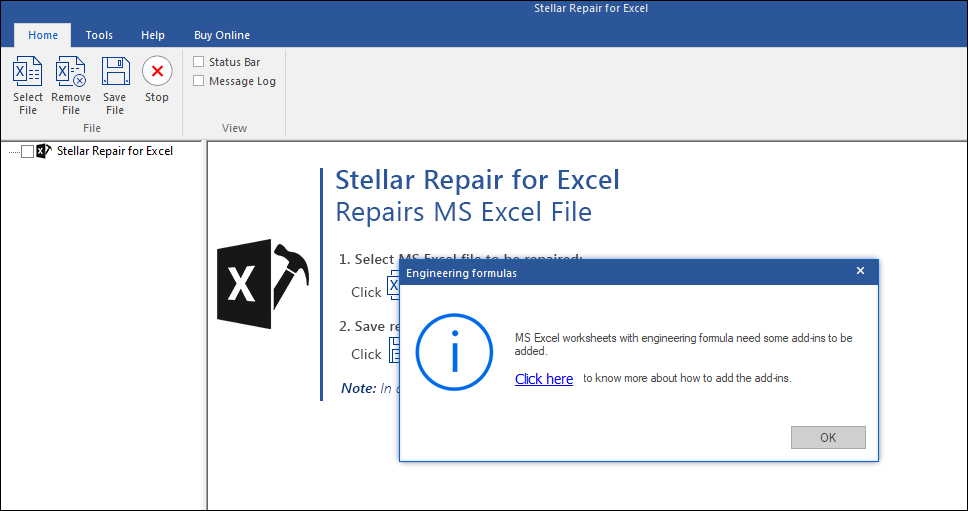
Click OK to proceed.
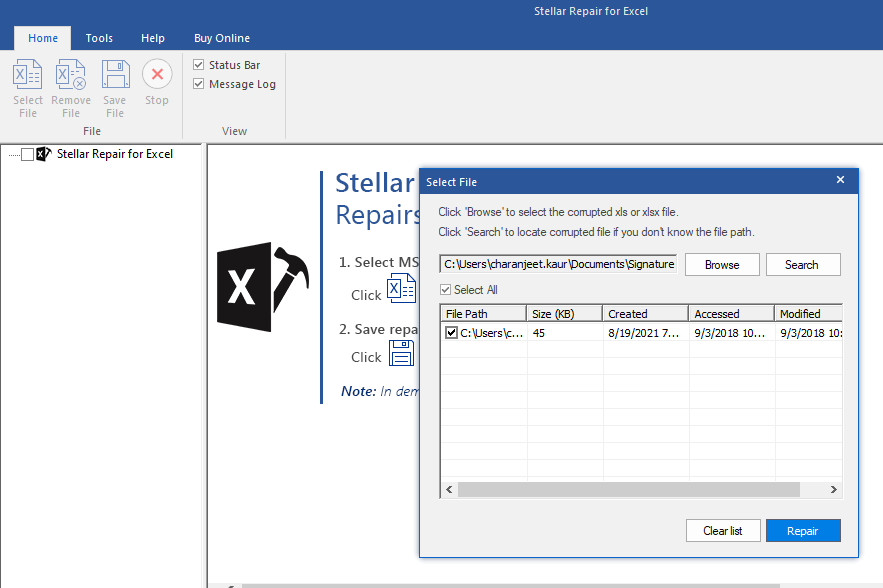
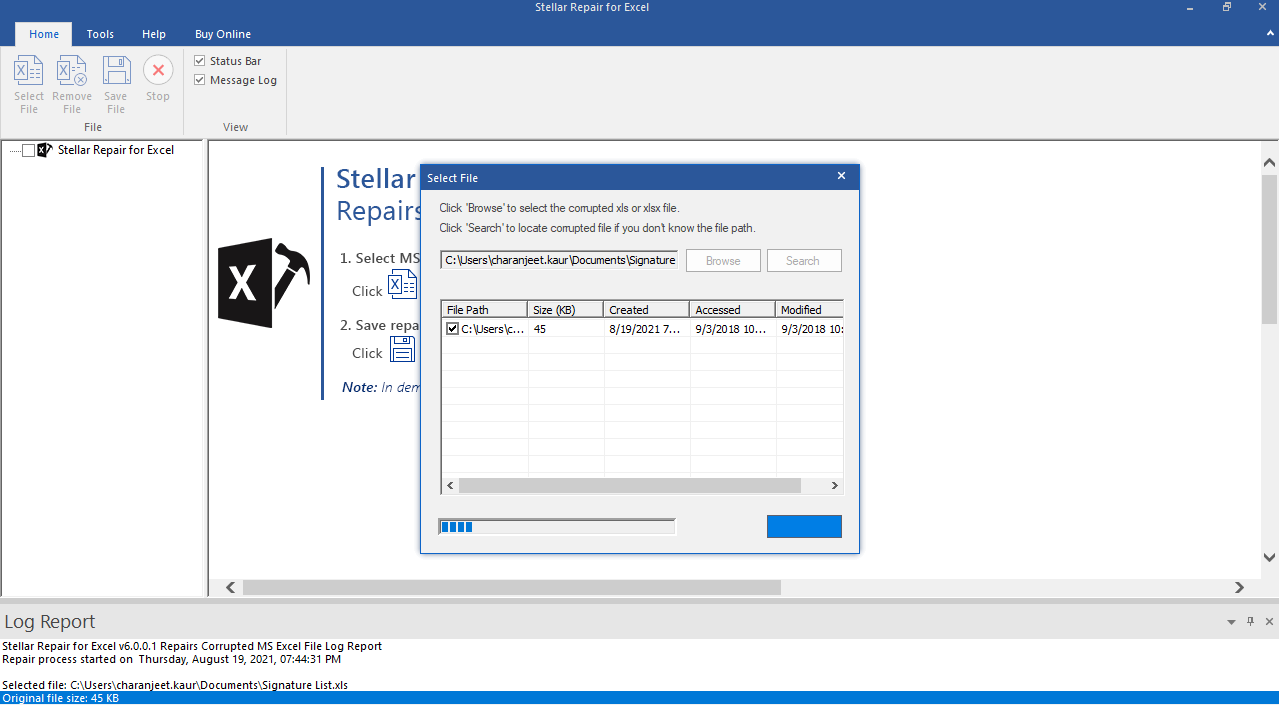
Select the file you wish to repair by using the Browse option.
Note: If you’re not aware of the file location, choose the ‘Search’ option to locate the file.
- A screen showing progress of the Excel file repair process is displayed.
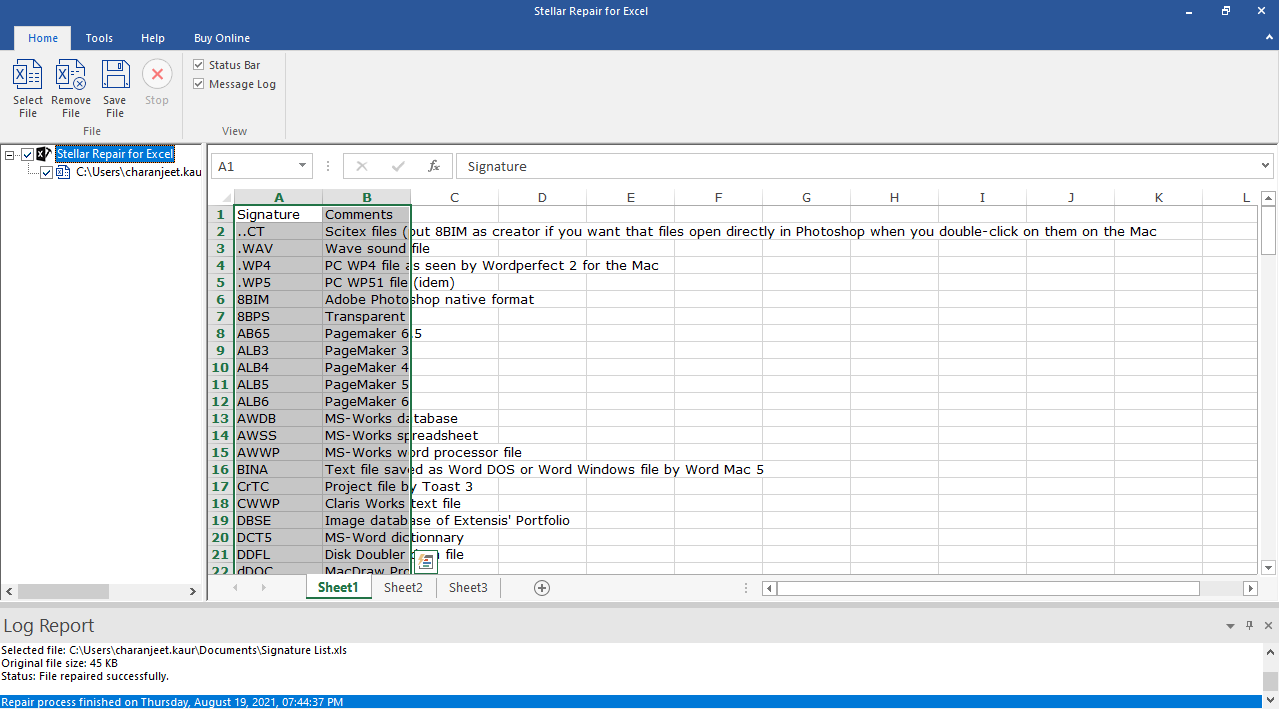
- Preview of the repaired Excel file and its recoverable data is displayed.
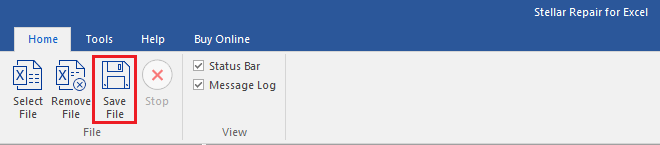
- After verifying the data, click on the Save File button on the File menu to save the repaired file.
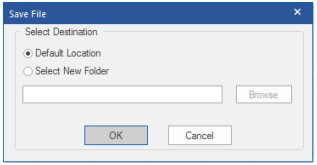
- Select the location where you wish to save the repaired file on the Save File window and then click OK.
A confirmation message will pop-up after completion of the repair process. You can now try to open the file in your Excel program.
End Note
Even if you’re taking preventive measures, you might still experience corruption in an Excel file. So, it’s crucial to take regular backups of your workbooks. For this, ensure that the ‘Always create backup’ option is enabled in Excel. You can find it in General Options by clicking on the Tools button in the Save As dialog box. Enabling it will ensure that the Excel backup file is updated with the changes made in a spreadsheet.
Additionally, ensure that the Excel ‘AutoRecover’ feature is set to save a version of your Excel file after every 10 minutes. You can increase or shorten the interval as per your requirement.
How to Fix Excel File Couldn’t Open in Protected View
Summary: This blog discusses about the Excel error ‘The file couldn’t open in Protected View’ and workarounds to fix the error. If you cannot access the Excel file data, using an Excel file repair tool can help you quickly restore the data to its original state.
Protected View is a feature in Microsoft Excel that opens a file in read-only mode while disabling the editing functions. An Excel file opens in Protected View if the file is from an unsafe location. For example, the file may be opened from an insecure Internet location or downloaded as an Outlook attachment from suspicious senders. In that case, your Excel application won’t let you open the file to protect it against malware or virus attacks.
However, the Protected View feature sometimes prevents an Excel file from opening even if it is from a safe location. Also, opening an Excel file may return an error message ‘file couldn’t open in protected view’.

You may be able to resolve the issue by closing all the open Excel files, closing the Excel application, and then re-opening the problematic file. But this process can take a significant amount of time as you need to close and re-open the Excel application and the file continuously.
How to Fix the Excel File Couldn’t Open in Protected View Error?
Here are some workarounds to fix the error:
Workaround 1 – Disable the Protected View Settings
Note: Before disabling the protected view settings, ensure you have a reliable antivirus software installed on your computer to safeguard files against malware or virus attacks.
- Open the Excel file throwing the error, go to File and click the Options tab.
- From the Options dialog box, go to Trust Center and click on Trust Center Settings.
- From the Trust Center Settings dialog box, select the Protected View tab.
- Uncheck the appropriate option under the Protected View section, and then click OK to apply the changes. For instance, uncheck the “Enable Protected View for Outlook attachments” option if the file is a downloaded Outlook attachment.

- Click OK again.
Now try opening the problematic Excel file. If it still doesn’t open, try the following workaround.
Workaround 2 – Repair the Office Installation
Sometimes, corruption in the Office installation may cause Excel to return the ‘file could not open in protected view’ error. So, try repairing your Office installation and check if it solves the problem.
- Open the Control Panel and click the Uninstall a program option under Programs.
- Click Uninstall a program under the Programs tab.
- Right-click the Microsoft Office program you have installed and click the Change button.
- Select the Repair option and click Continue.

Once the repair operation is complete, check if you can open the Excel file without any issue.
Workaround 3 – Install Latest MS Office Updates
Several Excel users have reported about experiencing issues (such as the Protected View issue) on opening an Office document like Excel, Word, or others – after upgrading Windows to a newer version. This problem may occur due to incompatibility between the Office app and the updated Windows version. You can try to fix the problem by upgrading the Office app, and here’s how:
- Click on the File tab in the Excel file that throws an error.
- Click the Account tab at the left-hand bottom of the screen.
- From Office Updates, expand Update Options, and then click Update Now.

After installing the updates, restart your PC and open the Excel file. If this doesn’t work, use the following workaround.
Workaround 4 – Convert the File and Rename It
Some Excel users resolved the ‘Protected view’ issue by renaming their Excel files. But before that, ensure that the file you are trying to open is saved with .xlsx format. If the file type is .xls, you need to convert it to .xlsx format and then rename it. Before converting the file, save a copy of the original file in the desired location.
If the file type is .xlsx, copy the problematic file. Next, open a blank Excel document and paste the copied file. The file will appear as an icon, double-click on it. If it opens without any error, save it with a different name. Hopefully, reaming the Excel file may help resolve the problem.
Conclusion
There is no fixed solution to resolve the Excel error ‘The file could not open in Protected View’. However, the workarounds discussed in the blog have helped users resolve the ‘Protected View’ issue. Make sure to use the workarounds in the same order as explained in the blog.
If you’re having an issue loading the Excel file data due to the ‘Protected View’ error, consider restoring the data using an Excel file repair tool .

How to Fix “Errors were detected while saving Excel” Error?
When trying to save the Excel file, you might face unexpected errors. The “Errors were detected while saving Excel” is one such error. It can also occur when using VBA in Excel. The complete error message appears as:
**“Errors were detected while saving [file name]. Microsoft Excel may be able to save the file by removing or repairing some features. To make the repairs in a new file, click Continue. To cancel saving the file, click Cancel.”
**
The error can occur if the features (Pivot tables, charts, macros) used in the Excel file get corrupted . However, there could be several other reasons behind the occurrence of the error. Let’s discuss them.
What Causes the “Errors were detected while saving Excel” Error?
There are various reasons why you encounter this error. Here are some of them:
- Incompatible pivot table in the Excel file
- Large or uncompressed images in the Excel file
- File-sharing properties are not allowing file saving
- Excel file is corrupted
- Large-sized Excel file
- File version incompatibility
- VBA code is corrupted
Ways to Fix the “Errors were detected while saving Excel” Error
You’re not able to save the Excel file if there is no storage space on your hard drive. So, first check if your hard drive has sufficient storage space to save the file. If this is not the case, then it might happen that your antivirus program is interrupting the saving process. To check this, temporarily disable your antivirus program and then try to save the file. If still your Excel is throwing the “Errors were detected while saving Excel” error, then follow the below given methods to fix the error:
Method 1: Open the Excel in Safe Mode and Disable the Add-ins
When you open Excel in safe mode, it opens without the third-party add-ins. This helps in finding out if any add-ins are causing the error.
Here’s how to open the Excel in safe mode:
Open the Run window by pressing Windows key + R.
Type excel /safe in the Run window.
 ?
?Next, click on OK.
It will open Excel in safe mode.
Now, try to open and save the affected file.
 ?
?If you are able to save the file without any issue, then this means that the error has occurred due to third-party add-ins or settings. You can try disabling the add-ins to fix the issue. To do this, follow these steps:
- First, open Excel.
- Then, go to the File tab and click Options.

- In Excel Options, click on the Add-ins

- Under the Manage section, select Excel Add-ins and then click on the Go
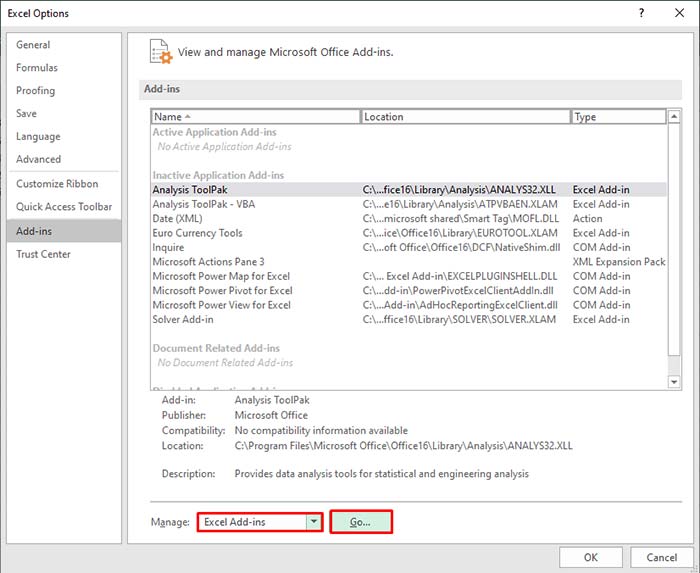
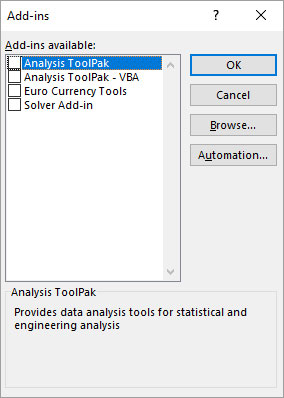
In the Add-ins dialog box, unselect the add-ins under the Add-ins available option and click OK.
Note: Disabling add-ins does not remove them from the system. To remove them permanently, you need to uninstall them.
Method 2: Check the Excel File Name
Some users have observed this error when saving the Excel file with an invalid name. You can check the file name and ensure that it should not contain more than 218 characters. If the name exceeds the required limit, then try shortening the file name or move the file to a folder with a short path name.
Method 3: Copy the Data from the Affected File to a New File
If you are not able to save the Excel document, then try copying the data from the affected file to a new Excel file. Then, save the new file with a different name. This helps in resolving the issue.
Method 4: Check and Provide File Permissions
You may experience the “Errors were detected while saving Excel” issue when you do not have desired permissions to modify the folder in which your Excel file is located. To modify the folder, you should have read, write, and create permissions. You can check and provide the desired permissions using the below steps:
- Navigate to the Windows Program Files and then find the desired folder (where the Excel file is saved).
- Right-click on the folder and then choose Properties.
- Select the Security tab and then click
- Click on Change Permissions in the Advanced Settings
- Click Administrators and then click Edit.
- Now set the Apply to drop-down button to This Folder, Subfolder, and Files.
- Click on the Full Control field and then click Apply > OK.
Method 5: Check Pivot Tables in Excel Sheet
You can review Pivot tables to see if they are causing the “Errors were detected while saving Excel” error. To do so, follow the below steps:
Click Power Pivot > Manage.
Check the tabs in the Power Pivot
Check if all the formulas used in the table are correct. Sometimes, even a small typo can create an issue in Excel.

Method 6: Repair Your Excel File
The “Errors were detected while saving Excel” issue can also occur if the Excel file is corrupted. In such a case, you can take the help of the built-in utility in Excel – Open and Repair to repair your Excel file. Here’s how to use the tool:
- In Excel, click the File tab and then click Open.
- Click Browse to select the desired file.
- The Open dialog box is displayed. Click on the corrupted file.
- Click on the arrow next to the Open button and then click Open and Repair.
- Click on the Repair

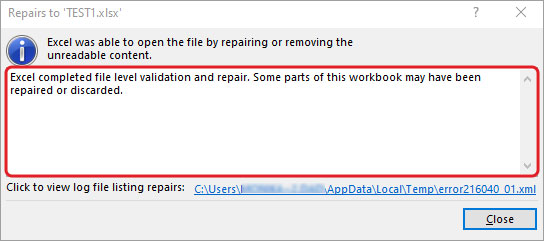
After repair, a message will appear (as shown in the below figure).
Click Close.
However, sometimes, the Open and Repair utility fails to fix the file if it is severely corrupted or large-sized. In such a case, you can take the help of a third-party Excel repair software, such as Stellar Repair for Excel. The tool performs a comprehensive scan of the corrupted Excel file to fix the issues and recover all the items from the file without changing the original formatting. It can recover pivot tables, charts, images, engineering formulas, etc. The tool is compatible with Windows 11/10/8.1/8/7. You can download the free trial version of the tool to evaluate its functionality.
Closure
Many Excel users reported facing the situation when they are saving the Excel file. You can check the file’s compatibility to fix the “Errors were detected while saving Excel” issue. If you are getting this error in a Macro-enabled file then you can try deleting the VBA project from a document to resolve the issue. However, deleting the entire VBA code cannot be a better solution as it can lead a data loss in the Project you are working on. In the above article, you have learned the reasons behind the issue and discovered how to fix the error. Follow the methods and if none of them works then try using Stellar Repair for Excel. It is an advanced tool that can quickly repair corruption in Excel worksheets at any level. It lets you restore the corrupted components from the corrupted file without removing the existing data.
Top 5 Ways to Fix Excel File Not Opening Error
Summary: MS Excel users sometimes face issues while using the MS Excel application. One such issue is the Excel file not opening error. In this post, we’ve mentioned the reasons that may result in this error and the ways to resolve it. Also, you’ll find about an Excel repair software that can help you repair corrupt Excel files.
Several Microsoft Excel users have reported encountering the ‘Excel file not opening’ error when opening their Excel file. There are several reasons that may cause this error. In this post, we’ll be discussing the reasons that may lead to the ‘Excel file not opening’ error and the top 5 ways to fix this error.
Why Does the ‘Excel File Not Opening’ Error Appear?
Following are some possible causes that may result in the ‘Excel file not opening’ error:
- There may be a problem with an add-in that is preventing you from opening the Excel files.
- There’s a chance that your Excel application is faulty.
- Your Excel program is unable to communicate with other programs or the operating system.
- The file association might have been broken. This is a common problem faced by users who have upgraded their Excel application or operating system.
- The file you’re trying to open is corrupted.
5 Ways to Fix Excel File Not Opening Error
Let’s explore the ways to resolve the Excel file not opening error:
1. Uncheck the Ignore DDE Checkbox
Dynamic Data Exchange (DDE)allows Excel to communicate with other programs. The Excel error may occur due to incorrect DDE settings. You need to ensure that the correct DDE configuration is enabled. Follow the steps provided below:
- Launch your MS Excel file.
- Go to File > Options.

- Now click on Advanced.

- Further, find the General option on the screen.

- Uncheck the option **‘Ignore other applications that use Dynamic Data Exchange (DDE)**’.
- Click OK to save the changes.
2. Reset Excel File Associations
When you launch your Excel file, the file association ensures that the Excel application is used to open the file. You can try to reset these associations and see if Excel opens after this. Proceed with the following steps to do so:
- Navigate to Start Menu and launch Control Panel.
- Now, navigate to Programs > Default Programs > Set Your Default Programs.

- A new window will open. Herein, find the Excel program in the list and select it. Now, select the option ‘Choose defaults for this program’. Click OK.

- A new window for ‘Set Program Associations’ will open.
- Check the box against the ‘Select All’ option.
- Further, click Save to reset the Excel File Associations settings.

3. Disable Add-Ins
Many people install third-party add-ins to enhance the application’s functionality. Sometimes, these add-ins can create an issue. Follow the below-mentioned steps to disable the problem creating add-ins:
- Launch MS Excel application.
- Navigate to File > Options > Add-ins.

- In the window that opens, go to the Manage option at the bottom.
- Herein, select the COM Add-ins option from the dropdown list. Click Go.

- In the COM Add-ins window, uncheck all the boxes to disable the add-ins. Click OK.

4. Repair MS Office Program
Sometimes the issue is not with your Excel file. Instead, the reason for the error can be a corrupt MS Office application. You can repair the program to fix the Excel file not opening error. Here are the steps:
- Press the Windows + R keys to launch the ‘Run’ dialog box.

- Enter the text ‘appwiz.cpl’ to launch the program and features window.

- Find the MS Office program in the list of applications.

- Right-click on it and select Change.

- In the new window, select the Quick Repair radio button. Click Repair.

- Follow the on-screen instructions to repair the Office application. Once the repair process is completed, you can try opening the Excel file to see if the problem is resolved.
5. Disable Hardware Graphics Acceleration
The hardware graphics acceleration assists in the system’s better performance, especially when you use MS Office applications, like MS Excel or Word. Sometimes, this causes the Excel file not opening issue. You can disable this option to try to resolve the issue. Here are the steps:
- Launch your MS Excel application.
- Navigate to File > Options > Advanced.
- Herein, go to the Display option.
- Uncheck the Disable hardware graphics acceleration checkbox. Click OK.

What If These Solutions Do Not Work?
If you have applied all the methods mentioned above and still cannot open your Excel file, there are chances that your file is corrupted. You can use a specialized Excel repair tool , such as Stellar Repair for Excel to repair the corrupted Excel file. This software has powerful algorithms that can scan and repair even severely corrupt Excel files, without any file size limitation. After repairing the file, it restores all the data, including tables, charts, rules, etc. to a new Excel, with 100% integrity.
To know how the software works, see the video below:
Conclusion
Before you proceed with resolving the Excel file not opening error, try to find out the root cause of this error. If you know the real reason, you can try the method right away. If the reason for the error is corruption in the Excel file, the best option is to repair the file using a professional Excel repair tool, such as Stellar Repair for Excel .
Also read:
- [New] In 2024, Comprehensive Step-by-Step on Zoom's Video Broadcasting
- [Updated] A Comprehensive List of Top Virtual Classrooms Not Inspired by Udemy for 2024
- [Updated] Mastering Windows 11 Photos Incorporating Filters & Tunes
- [Updated] Window Wisdom Taking Precise Screen Captures for 2024
- 2024 Approved Unlock Your YouTube Personality Top 6 Creator Categories
- Complete Review & Guide to Techeligible FRP Bypass and More For Tecno Phantom V Flip
- Different Methods for Resetting Tecno Camon 30 Pro 5G Phones with Screen Locked and Not | Dr.fone
- Here are Some of the Best Pokemon Discord Servers to Join On Vivo Y78+ (T1) Edition | Dr.fone
- How to Reset Honor 70 Lite 5G without Losing Data | Dr.fone
- How to Soft Reset Nubia Z50 Ultra phone? | Dr.fone
- How To Transfer Data From Apple iPhone XS Max To Android? | Dr.fone
- Maxed Out on Free iCloud Space - Unsubscribe & Avoid Extra Costs
- Solved: Resolving Complete Lack of Sound in Roblox for Windows Users
- The way to recover deleted contacts on Infinix without backup.
- Undelete lost contacts from Nokia 130 Music.
- Undelete lost data from Vivo Y36
- Xiaomi Redmi Note 13 Pro 5G won’t play HEVC H.265 media, how to fix?
- Title: Solved Excel 2013 Spreadsheet Disappears after Opening | Stellar
- Author: Ian
- Created at : 2025-01-16 17:32:16
- Updated at : 2025-01-21 16:27:42
- Link: https://techidaily.com/solved-excel-2013-spreadsheet-disappears-after-opening-stellar-by-stellar-guide/
- License: This work is licensed under CC BY-NC-SA 4.0.