
Solved Excel 2010 Spreadsheet Disappears after Opening | Stellar

[Solved] Excel Spreadsheet Disappears after Opening
Several Excel users have reported about experiencing ‘Excel spreadsheet disappears after opening’ issue. The problem occurs when attempting to open an Excel file by double-clicking on the file icon or name. The Excel file opens blank grey screen.

Figure 1 - Excel Blank Screen
User Instances of ‘Excel Open But Can’t See Spreadsheet’ Issue
Instance 1: The user said that “Excel 2016 opens to a blank screen and everything is greyed out. Ribbons at the top of Excel are also not present”.
Instance 2: The user reported that “Attempting to open a spreadsheet, either by double-clicking the file or by opening Excel, it opens but only a blank Excel window is visible. When trying to save that particular file, Excel behaves as though there is no file open at all and all the file saving options, such as save, save as, print, etc. are greyed out.”
Causes Behind ‘Excel Open But Can’t See Spreadsheet’ Issue & the Solutions Thereof
Following are some of the possible reasons behind the ‘Excel open but can’t see spreadsheet’ issue, along with their solutions:
Cause 1: Excel File is Hidden
You may have saved the Excel sheet as a hidden document.
Solution: Unhide Excel File
Verify if your Excel worksheet is hidden by following these steps:
- In Excel, click the View tab, and then click Unhide.
Note: If the ‘Hide’ tab under the View menu is greyed out, the sheet you’re trying to open is not hidden. In that case, proceed to the next workaround.

Figure 2 - Unhide Excel File
- A dialog box will pop-up showing the worksheet name that can be unhidden. For instance, below is an image of Unhide box that lists ‘Daily_Reports’ spreadsheet under Unhide workbook.

Figure 3 – Select and Unhide Excel Workbook
- Click OK to unhide your Excel sheet.
If this fails to work, there’s a possibility that the spreadsheet window pane may have slided to one side of the visible desktop. To bring back the displayed area, click the ‘Arrange All’ option under the View tab. If the issue persists, try the next solution.
Cause 2: Ignore Dynamic Data Exchange (DDE) Option is Enabled
Another reason behind the ‘Excel opens to a blank screen’ issue could be that the “Ignore other applications that use Dynamic Data Exchange (DDE)” checkbox is checked in Excel options.
Usually, when you double-click an Excel file, a DDE message is sent to Excel instructing it to open that particular file. But, if you have the ‘Ignore DDE’ option selected, the DDE message sent to Excel to open a workbook is ignored. As a result, the Excel workbook opens a blank screen.
Solution: Uncheck the Ignore DDE Option
Make sure that the ‘Ignore DDE’ option is unchecked by performing these steps:
Note: Skip these steps for Excel 2019 and Excel Office 365.
- In your Excel window, click File > Options.

Figure 4 - Select Excel Options
- From the left-side of the ‘Options’ window, choose Advanced.

Figure 5 - Excel Options Window
- In ‘Advanced’ window, locate the General section, and then uncheck the “Ignore other applications that use Dynamic Data Exchange (DDE)” checkbox.

Figure 6 - Uncheck Ignore Other Applications that use DDE
- Click OK to apply the changes.
If these steps don’t work, proceed to the next workaround.
Cause 3: Issue within Office Program
Sometimes, problem within your Microsoft Office program might cause Excel to behave oddly and may result in an Excel spreadsheet disappeared issue.
Solution: Repair Office Program
Try repairing your Office program by executing the steps listed below, based on your Windows OS:
For Windows 10:
- Type Settings in the Windows search box.
- Click Settings.
- In ‘Windows Settings’ screen, select Apps.

Figure 7 - Windows Settings Screen
- In ‘Apps & features’ screen, scroll down to your Microsoft Office program and tap on it, and then click the Modify

Figure 8 - Modify MS Office Program
- In ‘How would you like to repair your Office programs’ dialog box, select the Online Repairradio button, and then click the Repair

Figure 9 - Repair MS Office Program
For Windows 8:
- Open Control Panel and click the Uninstall a program option under Programs.
- Select Microsoft Office 365 and then click Change.
- In the window that opens, select Online Repair and then hit the Repair
You may be asked to restart your system after completion of the repair process.
For Windows 7:
- In ‘Control Panel’ window, double-click Programs and Features.
- Under Uninstall or change a program section, select the Office program, and then select Change.
- In the dialog box that appears, choose Online Repair and then choose Repair.
If repairing your Office installation fails to resolve the issue, continue to solution 4.
Cause 4: Problematic Excel and COM Add-ins
Sometimes, Excel and COM add-ins may cause Excel file open a blank grey screen problem.
Solution: Disable the Add-ins
Disabling the Excel and COM add-ins one at a time may help resolve the problem. The steps are as follows:
- Click the File menu in your Excel file and select
- From ‘Excel Options’ left-side panel, click Add-Ins, and then choose COM Add-ins from the ‘Manage’ drop-down. Click the Go

Figure 10 - Select COM Add-ins
- Uncheck one of the add-ins checkbox from the COM Add-ins window, then select OK.

Figure 11 - Uncheck and Disable COM Add-ins
- Restart your Excel program.
If the issue persists, repeat the above steps (1 till 4), except that you need to choose a different add-in in step 3.
If you’re still experiencing the same problem after unchecking all the COM add-ins, repeat all the above steps, except choose ‘Excel Add-ins’ in step 2.
If Excel can load the file, then the add-in that you disabled last leads to the problem. If turning off add-ins does not work, try the next solution.
Cause 5: Problem with Excel File Associations
The Excel file opening a blank screen problem may occur if the file associations are not performing correctly.
Solution: Reset Excel File Associations
Try resetting the file associations in Excel to their default settings. For this, follow the below steps based on your OS.
For Windows 10 and Windows 8.1:
- Select the file that is opening incorrectly and copy it to the desktop.
- Right-click the file and click Properties.
- In the File’s ‘Properties’ window, check your file type next to Type of Filefrom the General tab. For instance, (.docx), (.csv), or (.pdf).
- Next, check to which app your file is associated with from the Opens withoption
If the file type is different than .xlsx, open the file in a different application by following these steps:
- Click the Change button next to the ‘Opens with’ option.
- Click More apps.
- From the list of applications, select the desired app and then check the Always use this app Click OK.
For Windows 8:
- Open Control Panel, click Default Programs, and then select Set your default programs.
- Choose Excel and then tap the Choose default for this program
- In ‘Set Program Associations’ window, choose Select All and then click Save.
For Windows 7:
- In Control Panel, choose Default Programs.
- Click the Associate a file type or protocol with a specific program
- Choose Microsoft Excel Worksheet and click on change program.
- Choose Microsoft Excel under Recommended Programs.
- If you’re unable to find Excel, browse the Excel installation folder.
- Select exe and then choose Excel.
What Next? Use Stellar Repair for Excel to Recover Your File
If the above solutions don’t help recover your Excel file, use an Excel file repair tool, such as Stellar Repair for Excel to recover it. The software can restore the Excel spreadsheet and its components, including tables, pivot tables, charts, formulas, etc. while preserving the spreadsheet properties and formatting.
Check out the video to recover Excel file by using Stellar Repair for Excel software.
Conclusion
This article described the possible causes behind the ‘Excel open but can’t see spreadsheet’ issue, along with their solutions. The manual solutions to resolve the issue require time and efforts. But, if you need to access your Excel file without any delay, use Stellar Repair for Excel software to recover your .xlsx/.xls file in just a few clicks.
How to fix runtime error 424 object required error in Excel
The Runtime error 424: Object required occurs when Excel is not able to recognize an object that you are referring to in a VBA code. The object can be a workbook, worksheet, range, variable, class, macro, etc. Some users have also reported that this error occurred when they tried to copy the values of the cells from one workbook to another.
Let’s understand the error through a small scenario. Suppose, I want to check the last field row in a table in a spreadsheet named “First” using the VBA code. To do this, I have added a command button and double-clicked on it and entered the below code in the backend:
Private Sub CommandButton2_Click()
Dim LRow As Integer
LRow = Worksheets(“First”).Cells(Rows.Count, 2).End(xlUp).Row
MsgBox (“Last Row “ & LRow)
End Sub
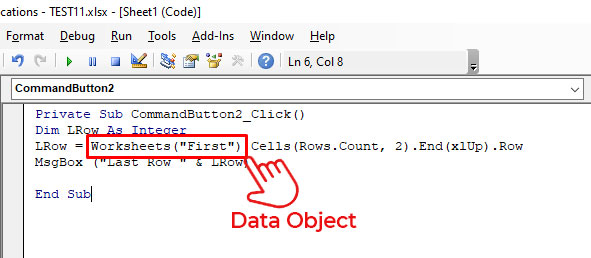
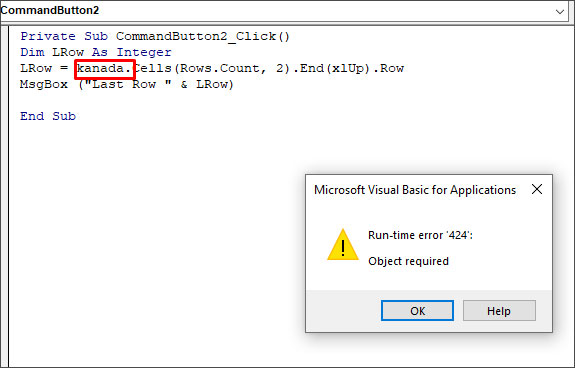
In this code, Worksheets(“First”) is a data object. If I mistakenly delete this data object and insert any random name (for example - kanada), then it will not be recognized by Excel. When I run this code, I will get the “Run-time error 424”.
Causes of Runtime Error 424 in Excel
The Runtime error 424: Object required can occur due to the following reasons:
- Incorrect name of the object you are trying to refer to in a code.
- You have provided an invalid qualifier to an object.
- You have not used the Set statement while assigning an object reference.
- The object is corrupted.
- Missing objects in a workbook.
- Objects you are trying to call in a code are mistakenly deleted or unavailable.
- You have used an incorrect syntax for object declaration.
- You are trying to perform an invalid action on an object in a code.
- Workbook is corrupted.
Solutions to Fix Runtime Error 424: Object Required in Excel
The VBA error ‘object required’ may occur due to different reasons. Based on the reason, you can follow the solutions mentioned below to fix the error.
1. Check the Name of the Object
The Runtime error 424 can occur when you run the VBA code using an incorrect name of the object. For example, the object name is ‘MyObject’ but you’re using “Backcolor”.
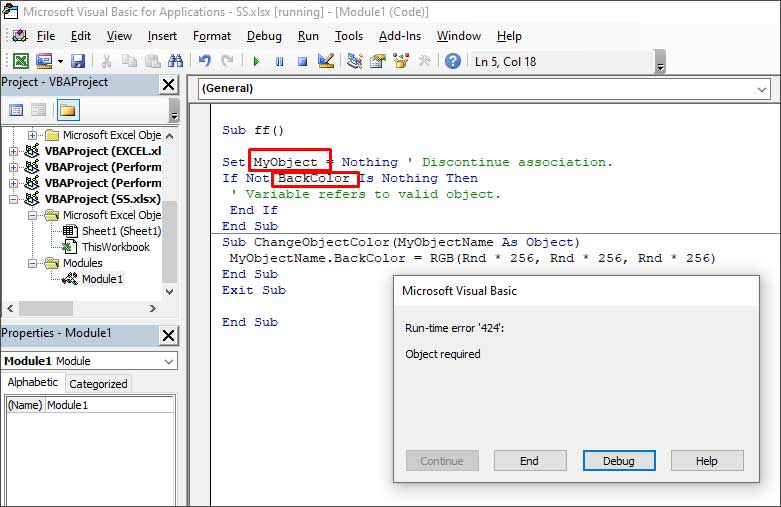
When you click the Debug button, the line with the error will highlight.
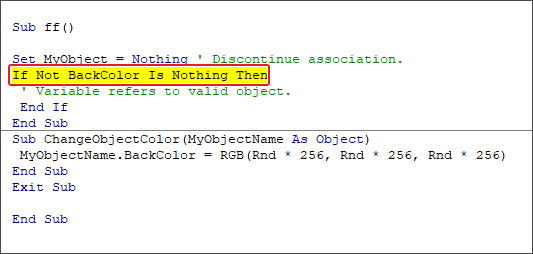
To fix the issue, you need to provide the correct name of the object.
2. Check if the Object is Missing
The Runtime error 424 can occur if the object you are referring to as a method is not available or you are using the wrong object in a code. In the below example, you can see that the error occurs when an object named “Employee” is not available in the Project list.
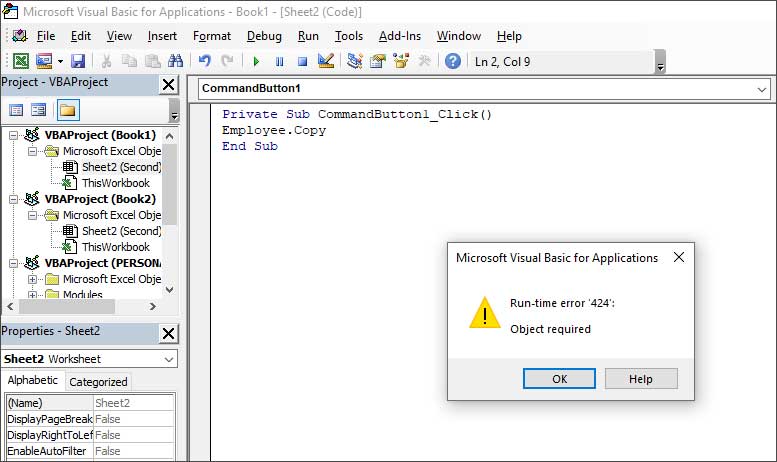
You can check and mention the object which is available. For instance, Sheet2 in the below code.

3. Check All References are Declared in the Code
You can get the Runtime error 424 if all the references are not declared. So, make sure you have declared all the references in the code. To verify this, you can use the debug mode by pressing F5 or clicking on the Debug option.

4. Check the Macro Security Settings
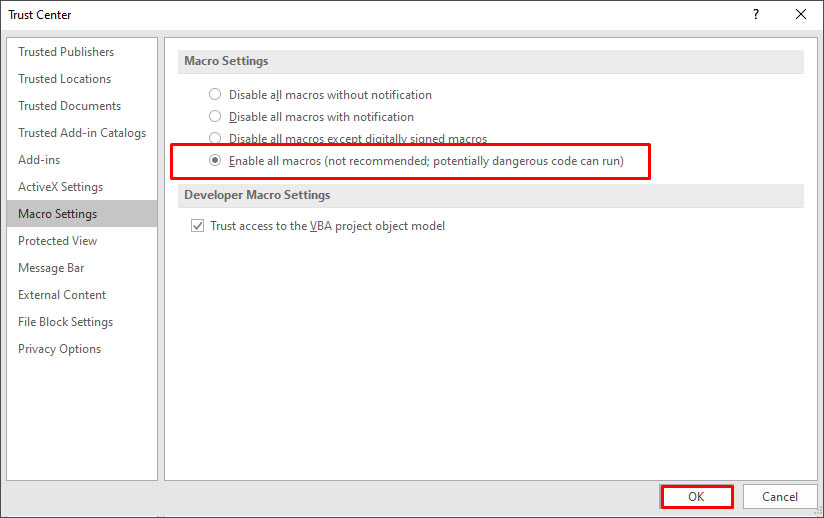
Sometimes, the error can occur if macros are disabled in the Macro Security settings. You can check and change the settings by following these steps:
- On the Developer tab, in the Code section, click Macro Security.
- In the Trust Center window, select Enable all macros.

- Click OK.
5. Repair your Workbook
Sometimes, the ‘Object required’ error can occur if your Excel file is damaged or corrupted. In such a case, you can try repairing the file using Microsoft’s in-built utility - Open and Repair. To use this utility, follow these steps:
- In Excel, go to File > Open > Browse.
- In the Open dialog box, click on the corrupted Excel file.
- Click the arrow next to the Open button and select Open and Repair from the dropdown.
- Select Repair to recover as much data from the file as possible.
If the Open and Repair utility fails or stops working, then you can try a professional Excel repair tool, such as Stellar Repair for Excel . It is an advanced tool that can repair severely corrupted Excel files (.xls, .xlsx, .xltm, .xltx, and .xlsm). It helps recover all the file components, including images, charts, tables, pivot tables, cell comments, chart sheets, formulas, etc., without impacting the original structure.
Conclusion
The Runtime error 424 usually occurs when there is an issue with the objects in your VBA code. In this article, we have covered some effective methods to resolve the “object required” error in Excel. If the error occurs due to corruption in Excel file, then you can repair the corrupt file using Stellar Repair for Excel. It is a reliable tool that can repair severely corrupted Excel file without changing its actual formatting. You can download the free trial version of the software to evaluate its functionality.
How to Fix the #Value! Error in Excel?
Summary: #Value! is a common error that occurs when using formulas in Excel. It can be due to an issue with the cells you are referencing or use of formulas in the wrong type or format. This blog will discuss some cases when this error may occur and the solutions to fix the issue. You’ll also find about an Excel repair software that can help fix the error if it has occurred due to corruption in Excel file.
You may experience the #Value! error in Excel when trying to enter invalid data type into the formulas. Sometimes, it appears when a value is not the expected type or when dates are given a text value. This Excel error may occur due to several reasons. However, the exact cause of this error is difficult to find. Below, we will be discussing some cases where you may get this error and the solutions to resolve the issues.
Case 1: Wrong Argument Data Type in Formulas
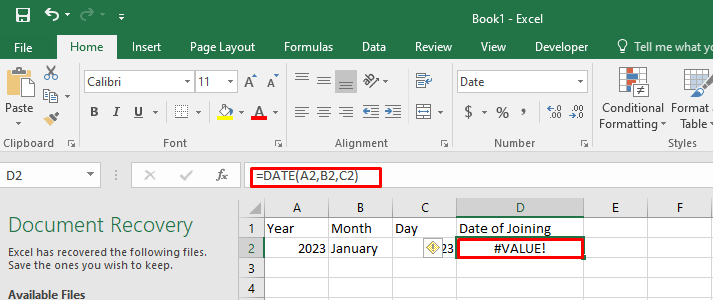
Sometimes, Excel throws the “#Value!” error if it recognizes incompatible arguments in the formulas.
For example: The Date function in the sheet expects only numerical values as arguments. In the below image you can see that when the formula’s string value is used in the month (January), it resulted in the #VALUE! error.
Solution
To fix the issue,
- Double-click the formula to verify the type of arguments.
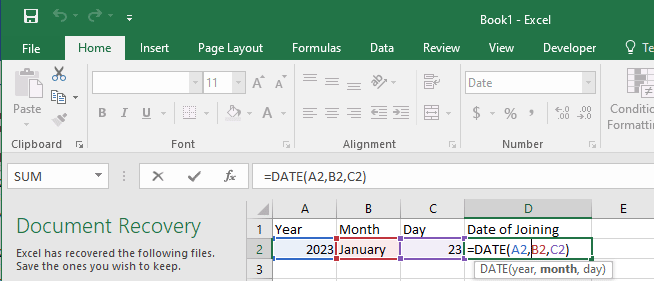
- Correct the argument in the cell (B2).
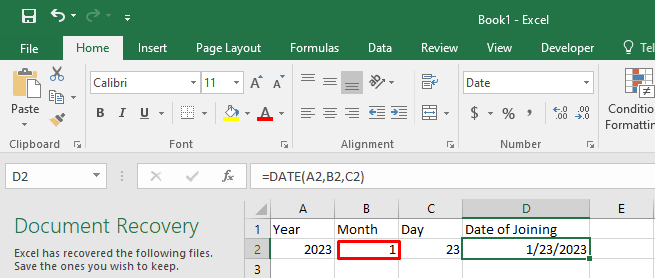
The formula will work as expected.
Case 2: Using the Basic Subtraction Formula
Users often experience the #Value! error, when using the basic subtraction formula in Excel.
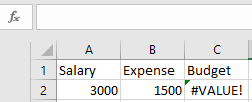
Solution
Check the formula and the type of values in the cell. If these are correct and the error persists, then follow these steps:

- Go to the Start button on Windows, type Control Panel, and double-click on it.
- Click Clock and Region > Region.

- On the Format tab, click Additional Settings.
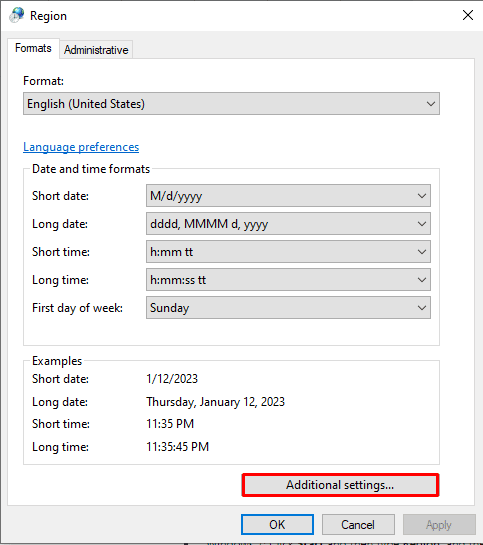
- In the Customized Format window, search for List Separator.
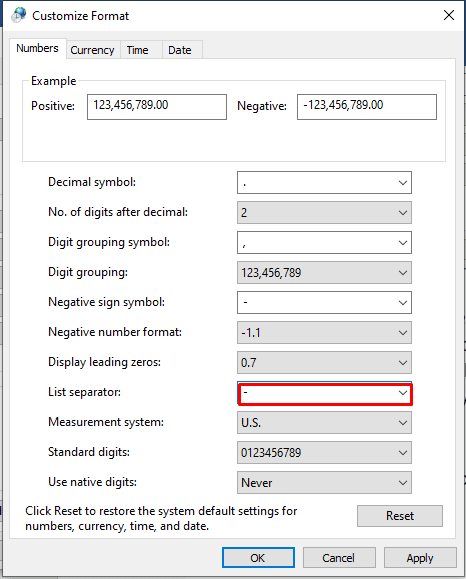
- Check if the List Separator is set to minus (-). Change it to comma (,).
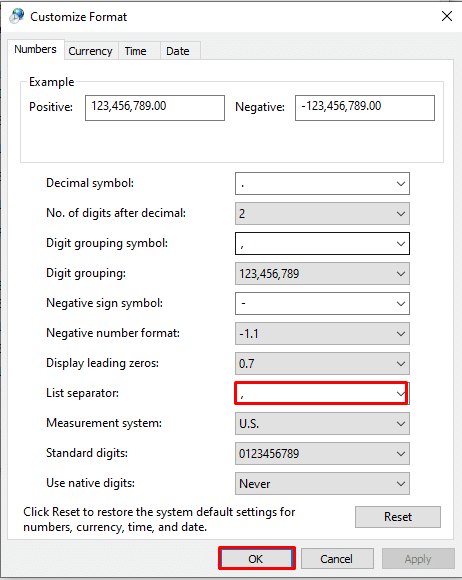
- Click OK.
- Now, open the Excel file and again try to use the formula.
Case 3: Wrong Text Value
The #Value! error can also occur due to the formula’s wrong value.
For example: If you are using the formula to add values in cells and Excel recognizes the unexpected text value, you may get a #Value error.
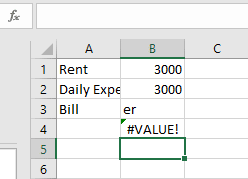
Solution
To fix the issue, you can correct the value or use the SUM function. It is recommended to use functions instead of operations to reduce the errors. In Excel, the formulas with math operators may not able to calculate the text in the cells. The SUM function automatically ignores the text value(er), calculates everything as numbers, and displays the result without the #Value! error.
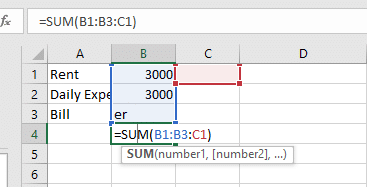
Case 4: Blank Space in Cells
You may get the #Value! error if your formula refers to other cells with space or hidden space. Sometimes, spaces that make a cell display blank but actually they are not blank.
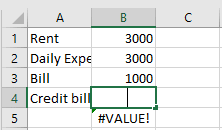
Solution
You can either delete the space or replace the blank space. Here’s how:
1. Delete the Blank Space
First, check if a cell is blank or not. To do this,
- Select the cell that looks blank.
- Press F2.
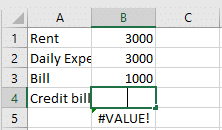
The blank cell won’t show space.
Then, press the Backspace key to delete the space. It will fix the error.
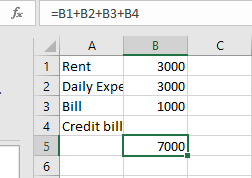
2. Replace Blank Space
You can also use the “Find and Select” option to replace the blank space in Excel. Here are the steps:
- Open the Excel file that shows #Value! error.
- On the Home tab, click Find & Select > Replace.

- In the Find what field, type a single space and delete everything in the “Replace with” field.
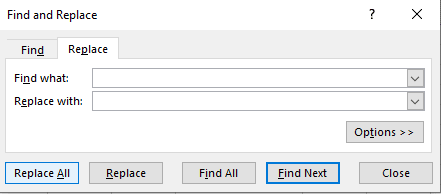
- Click Replace All > OK.
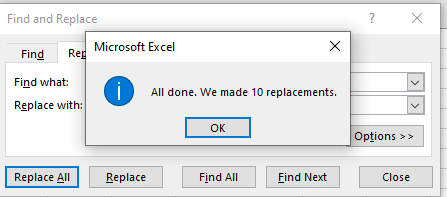
Case 4: Problem with Network Connection
Many users have reported experiencing errors when using Excel online due to problems with the network connection.
Solution
Check your Internet connection and see if it is working properly.
Case 5: Wrong Formula Format
If you enter the wrong formula with a missing parenthesis or comma, then Excel can throw the #Value! error. The error can also occur if the application finds a special character within a cell.
Solution
Correct the formula and use the ISTEXT function to find the cells with issues.
Case 6: Corruption in the Excel File
If none of the above works, then it indicates the Excel file is corrupt. The formulas in the Excel file do not work due to corruption.
Solution
You can use the Open and Repair utility in Excel if you are getting the error due to corruption in Excel file. In case the utility fails or the Excel file is severely corrupt, you can use a third-party Excel repair software, such as Stellar Repair for Excel. It is a powerful tool to repair corrupted or damaged Excel files and recover all its data, with 100% integrity. The tool supports Excel 2019, 2016, and older versions.
Closure
There are several reasons that can trigger Excel to throw the #Value! error. It can occur if there is an incorrect argument data type in formulas or blank space, text, or special characters within a cell. This blog discussed the possible scenarios when this error occurs. You can apply the solutions mentioned above to fix the error. If the #Value! error occurs due to corruption in the Excel file, then you can use Stellar Repair for Excel . It is a reliable tool that helps in fixing corruption-related errors in Excel.
How to repair corrupt Excel file
Stellar Repair for Excel is an excellent tool to repair corrupt or damaged MS Excel files. Mentioned below are the steps to perform Excel repair with this tool:
- Download & Run the Stellar Repair for Excel.
- A dialog box appears on your screen, click ‘OK’ to proceed.
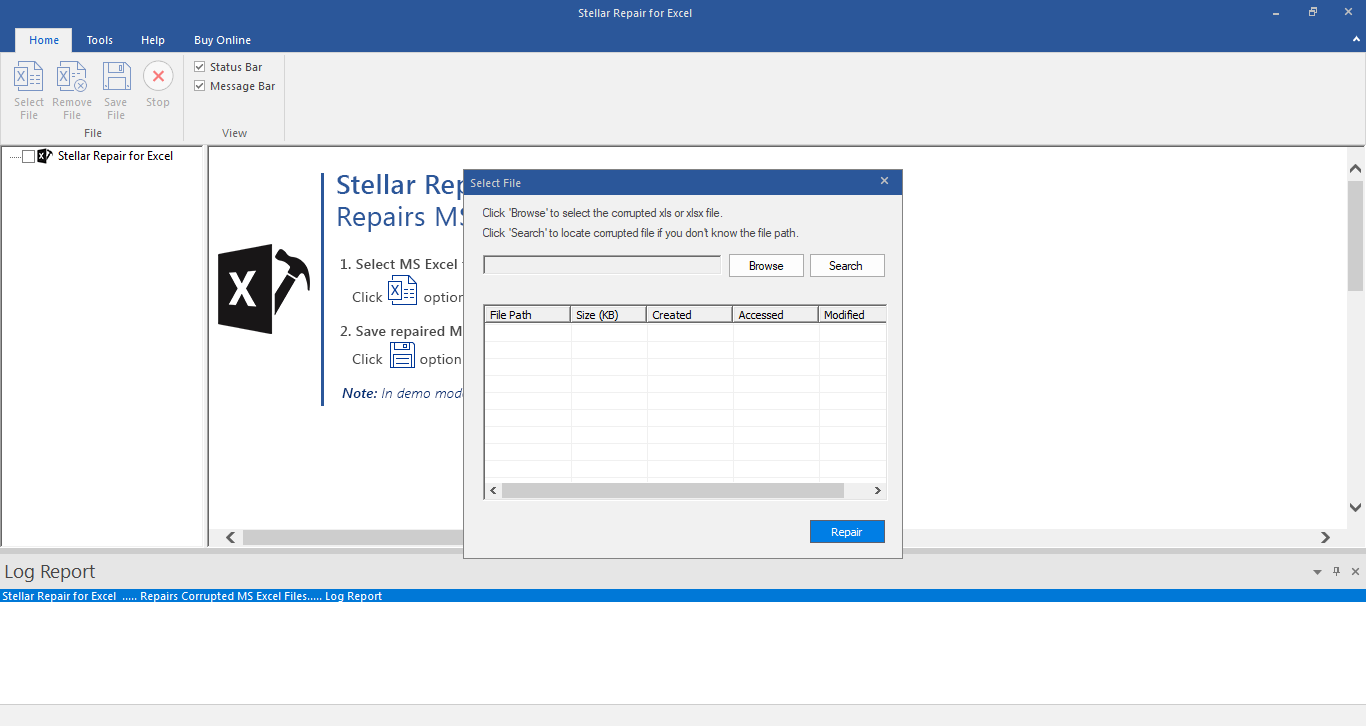
- To select your corrupt .XLS or .XLSX file, click ‘Browse’ button. However, if you do not know the location of your .XLS or .XLSX file, the software provides you the option ‘Search’ to search for your corrupt Excel files.
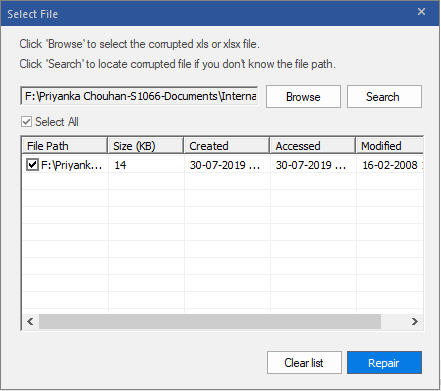
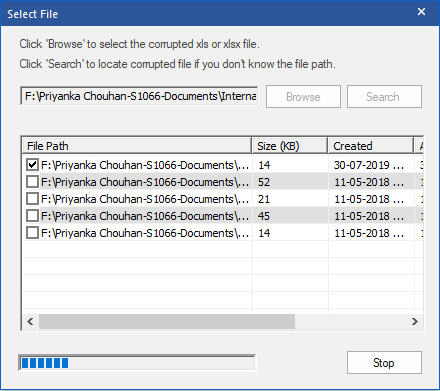
- Select the checkboxes against the files that you want to repair and click ‘Repair’. This starts the scanning process.
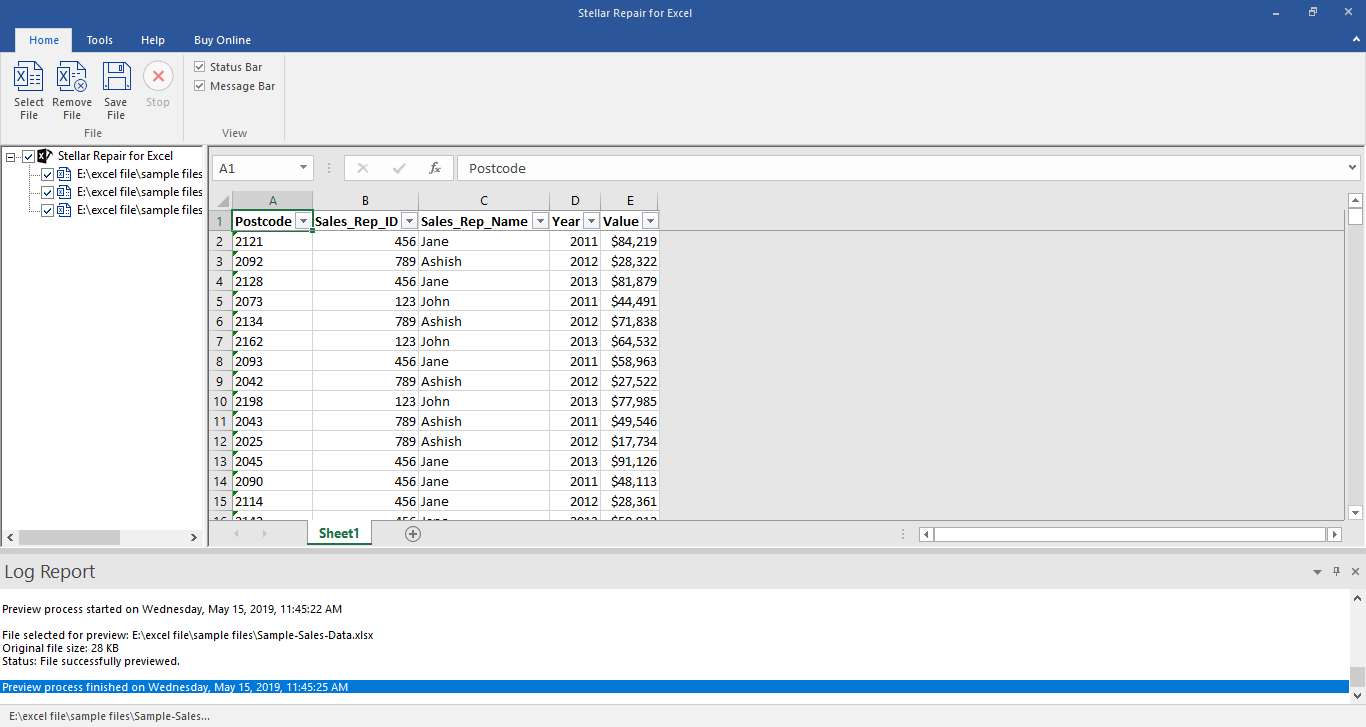
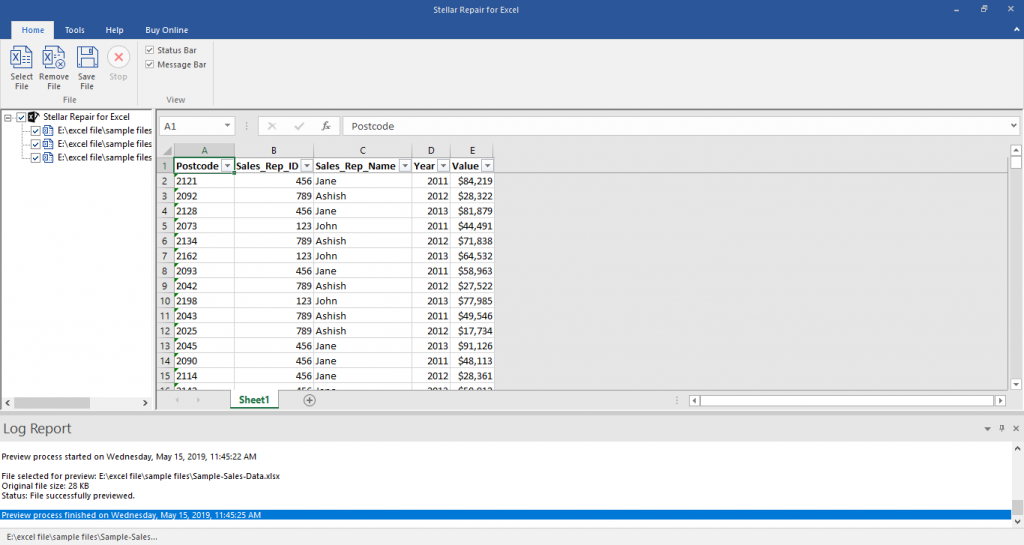
- The list of all the files that the software has scanned is displayed in the tree-view in the left pane. Click on a file from this tree-view to see its preview in the middle pane. From this list, you can select the file that you want to recover.
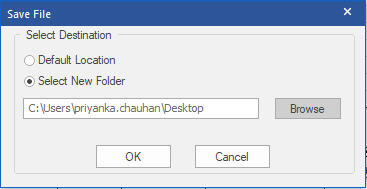
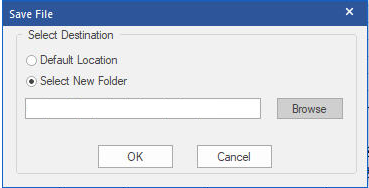
- You can either select the ‘Default location of file’ or ‘Select New Folder’ in the ‘Save Document’ dialog box to save the repaired files.
Stellar Repair for Excel Stellar Repair for Excel is the best choice for repairing corrupt or damaged Excel (.XLS/.XLSX) files. This Excel recovery software restores everything from corrupt file to a new blank Excel file.
[Fixed] Excel Cannot Open the File Because the File Format or File Extension Is Not Valid
When opening an older version of an Excel file in a newer version, you may encounter the “Excel cannot open the file because the extension is not valid” error. This happens if you have accidentally renamed the file with a different file format or an incorrect file extension. Also, you may get the ‘Excel cannot open the file’ error if the file has become unreadable or corrupted.
This is how the complete Excel error message looks like:
“Excel cannot open the file filename.xlsx because the file format or file extension is not valid. Verify that the file has not been corrupted and that the file extension matches the format of the file.”

Check out this video for a quick demonstration of how to fix “Excel Cannot Open the File Because the File Format or File Extension Is Not Valid”
How to Fix the ‘Excel Cannot Open the File Because the File Format or Extension Is Not Valid’ Error?
Try any of these workarounds to fix the error and regain access to your Excel file data:
Workaround 1 – Change the Default File Format
By default, an Excel file is saved in .xlsx or .xls file format. Trying to open the file with a different or incorrect extension may cause the ‘Excel cannot open the file because the extension is not valid’ error. To fix the error, try changing the Excel default file format by following these steps:
Note: Take a backup of the Excel file that you cannot open and try the steps on the backup copy.
- In Excel 2010 and newer versions, click on the File menu.
Note: For Excel 2007 and earlier versions, click on the Office button.
- On the left panel, click on Options.
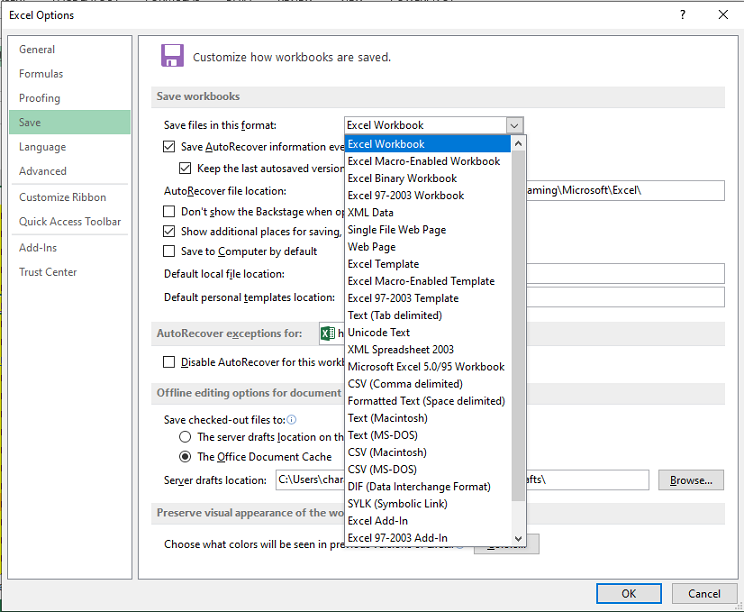
- In ‘Excel Options’ window, under Save workbooks section, click on the Save files in this file format: drop-down. Select a file format (i.e., the one supported by your Excel version).
- Click OK.
Check if you can open your Excel file. If not, try the next workaround.
Workaround 2 – Edit the Excel File Permissions
You may receive the ‘Excel file format or file extension is not valid’ error if you lack sufficient permissions to open the file. Usually this happens when you try to open an Excel file received from some other user. Follow these steps to change the file permissions and see if it fixes the problem:
- Right-click on the file that won’t open and click Properties.
- In the file properties dialog box, click the Security tab and then hit the Edit button.
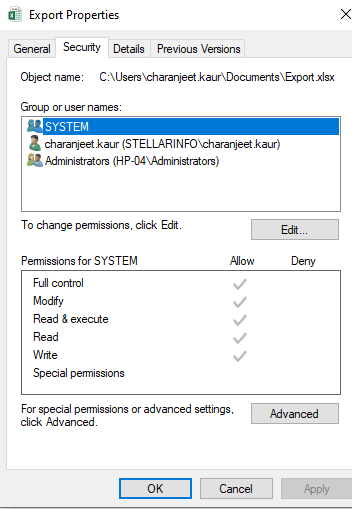
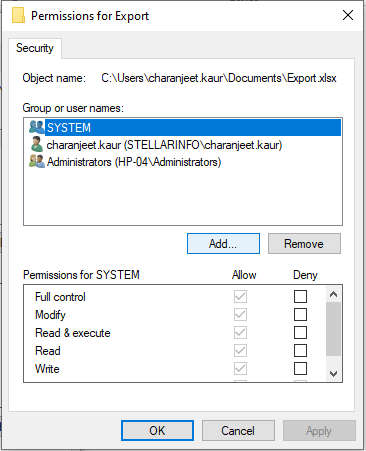
- When the file’s permissions dialog box appears, click on the Add button.
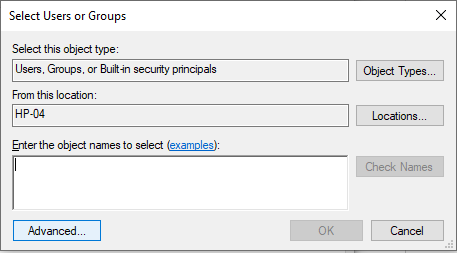
- Click on the Advanced button from the ‘Select Users or Groups’ window.
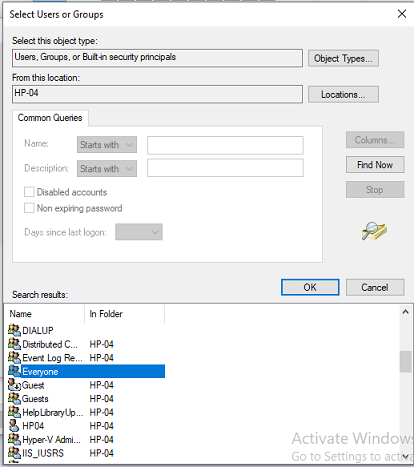
- Select Find Now. A list of all users and groups will get displayed in a search results box. Choose Everyone group from the list and hit OK.
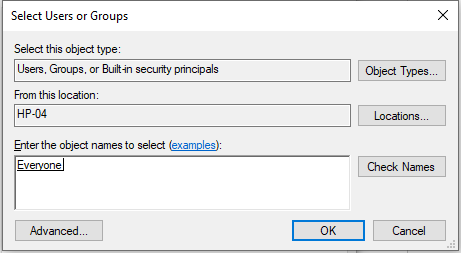
- You can see the ‘Everyone’ group in the ‘Enter the object names to select’ textbox. Click OK once again to return to the file’s permission dialog box.
- Click Everyone from the Group or user names: box and check all the checkboxes under Allow.
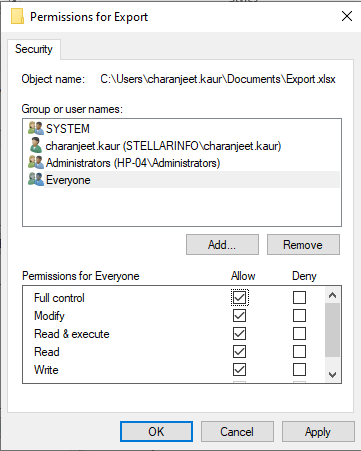
- Click on Apply and then OK.
Now try to open the Excel file. If you’re still getting the Excel file cannot open error, use the following workaround.
Workaround 3 – Recover Unsaved Workbook
If the ‘Excel file extension not valid error’ occurs when attempting to open an unsaved workbook, do the following to recover the unsaved workbook:
- In Excel, click File.
- From the Info screen, under Manage Versions, click Recover Unsaved Workbooks.
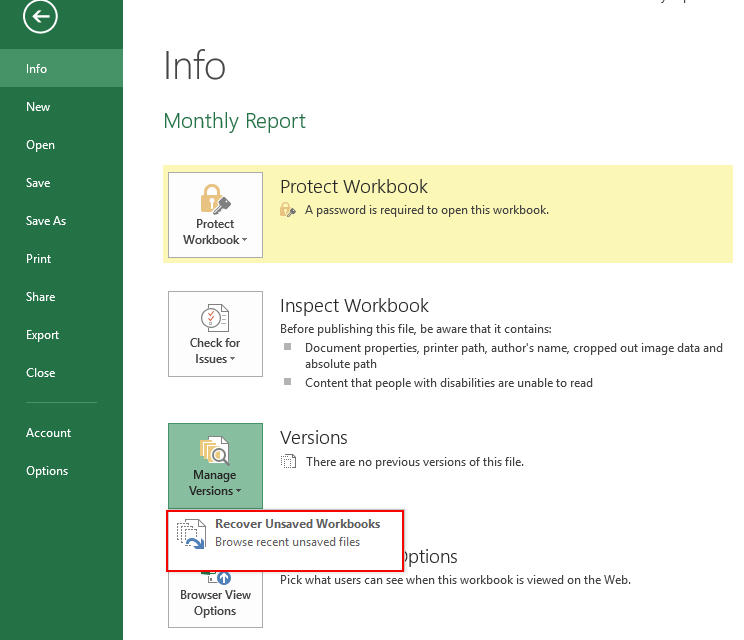
Excel will list any unsaved files. Try opening the file and save it. If this doesn’t work, skip to the next workaround.
Workaround 4 – Repair the Workbook
If none of the above workarounds has worked for you, chances are that the Excel file has become corrupted. Try to repair the file using the Excel inbuilt ‘Open and Repair’ utility by following these steps:
- In your Excel application, click on File > Open.
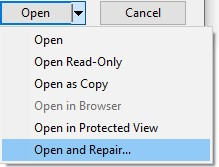
- In the ‘Open’ dialog box that pops-up, select the Excel file you want to repair and click the arrow next to the Open button.
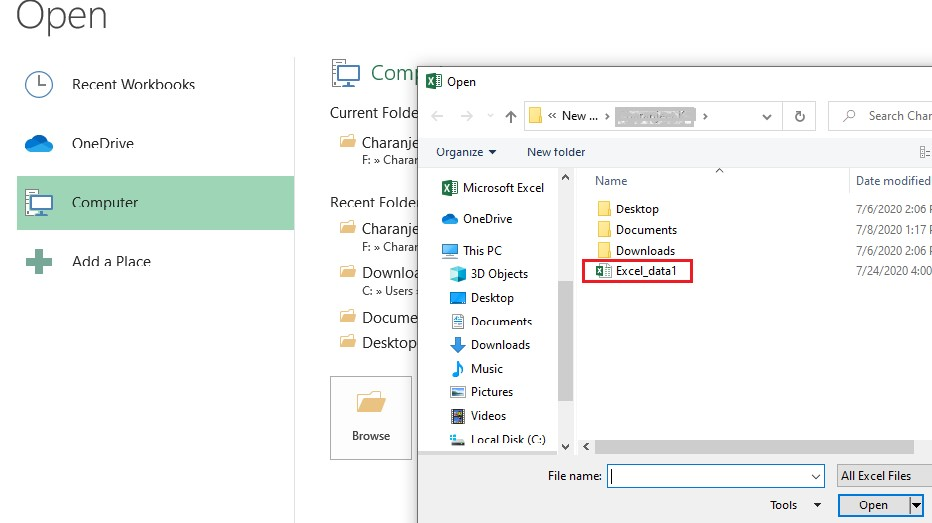
- From the dropdown list, select Open and Repair.
- Excel will ask you to attempt to repair the file or extract data from it. Click Repair to retrieve maximum data. If the Repair option fails, click on Extract Data to recover the data without formulas and values.

If the ‘Open and Repair’ utility doesn’t help fix the corrupted file and/or recover the data, use an Excel repair tool such as Stellar Repair for Excel to regain access to your file and its data.
Stellar Repair for Excel software can help repair severely corrupted XLS and XLSX files. Also, it helps recover all the file components, including tables, pivot tables, cell comments, charts, chart sheets, images, formulas, etc., without impacting the original structure of the Excel file.
To learn how the software works, read this: How to repair corrupt Excel file using Stellar Repair for Excel?
Conclusion
You may encounter the error ‘Excel cannot open the file because the extension is not valid’ when opening a workbook with a different file format or an incorrect file extension. Also, the error may occur if the Excel file has turned corrupt. This article has covered some of the most effective workarounds to resolve the error. But if nothing works, you can try to repair the Excel file and retrieve its data using the Stellar Repair for Excel software.
How to Resolve ‘Excel found unreadable content in filename.xlsx’ Error in MS Excel?
When opening an Excel spreadsheet in MS Office 2010/2007, you may get the following error message:
“Excel found unreadable content in ‘[filename].xlsx’. Do you want to recover the contents of this workbook? If you trust the source of this workbook, click Yes.”

On clicking ‘Yes’, you may face any of these scenarios:
Note: If you choose to click ‘No’, then open your MS Excel application and click file > Open. When the Open dialog box opens, browse and select the file showing the ‘Excel found unreadable content’ error and then choose ‘Open and Repair’ option. If this didn’t help, try using a third-party Excel repair tool to save time troubleshooting the issue and restoring the file with all its data intact.
Scenario 1: The following message may pop-up.
“Excel was able to open the file by repairing or removing the unreadable content. Excel recovered your formulas and cell values, but
. Click to view log file listing repairs errorxxx.xml.”
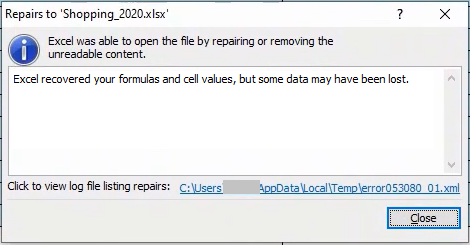
The message clearly states that your Excel file might open, but images may be lost and other such inconsistencies can crop up.
Scenario 2: The error is followed by another error message, like “The file is corrupt and cannot be opened“.
Watch our short video for a quick overview of the solutions to fix “Excel found unreadable content in filename.xlsx”
What Causes ‘Excel Unreadable Content’ Error?
You may encounter the ‘Excel file unreadable content’ error due to corruption of complete Excel file or corruption in certain areas (like Pivot Table, Formulas, Styles, or other objects) in the file. According to Microsoft, you may find it difficult to determine the root cause behind Excel file corruption. Corruption could occur in different scenarios, like power surge, a network glitch, copying and pasting corrupted data from another file, etc.
Also Read: How to recover data from corrupt or damaged Excel file 2010 & 2007?
Workarounds to Resolve the ‘Excel found unreadable content in filename.xls’ Error
There is no permanent solution to fix the ‘Excel found unreadable content’ error. But, following are some workarounds you can try to resolve the error.
Note: Before you try any of these workarounds, run Excel with administrator privileges and try opening the Excel file that is throwing the ‘unreadable content’ error. If this doesn’t fix the error, proceed with the workarounds below.
Workaround 1 – Try Opening the File in Excel 2003
Sometimes a problem in the current Excel version might prevent a file from opening. To resolve this error, try opening the problematic file in Excel 2003. If the file opens, save the data in a web page file format (.html) and then try opening the .html file in MS Excel 2010/2007. The detailed step-wise instructions are as follows:
- Open the .xls file in Excel 2003.
- When the file opens, click on File > Save.
- In the ‘Save As’ dialog box, choose Web Page (.html) as the ‘Save as type’ and then click ‘Save.’ Doing so will save everything from your .xls file, opened with 2003, in .html file format.
- Open the .html file in Excel 2010/2007. And then, save the file with .xlsx extension with a new name to avoid overwriting the original file.
Now, open the Excel 2010/2007 file and check if the error is fixed. If not, use the next workaround.
Workaround 2 – Make the Excel File ‘Read-only’
Try to open your ‘.xlsx’ file by making it ‘read-only’. Follow these steps:
- In Excel, click ‘File’ from the main menu.
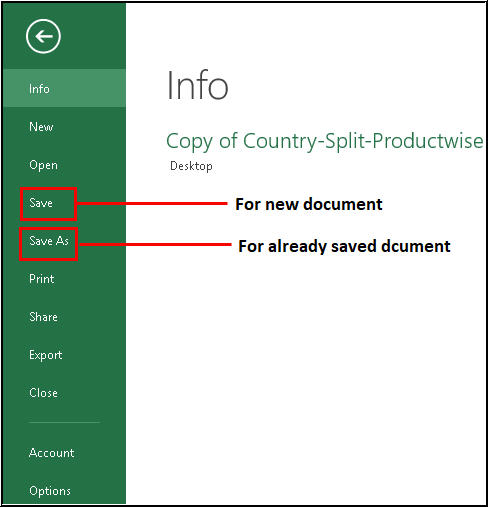
- Select ‘Save’ for a new document or ‘Save As’ for a previously saved document in the screen that appears.
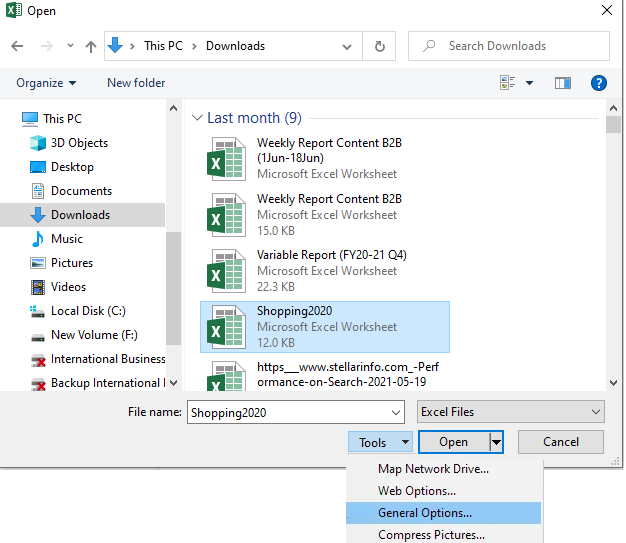
- From the ‘Save As’ dialog box, click Tools > General Options.
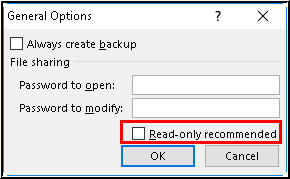
- Click on the ‘Read-only recommended’ checkbox to make the document read-only and then click ‘OK’.
Now open a new ‘.xlsx’ file and copy everything from the corrupt Excel file to this new file. Finally, save this file and try to open it again.
Workaround 3 – Move Excel File to a New Folder
Some users have reported that they could open their Excel file, following the ‘Excel unreadable content’ error, by simply moving the file to a different folder and saving it under a new name. You can also move the affected file to a new folder and try opening it. If this didn’t help resolve the error, follow the next workaround.
Workaround 4 – Install Visual Basic Component
At times, it is seen that installing the ‘Visual Basic’ component of MS Office 2010 resolves the ‘Excel found unreadable content 2010’ error. To do so, follow these steps:
- Navigate to Control Panel > Programs and select Microsoft Office 2010.
- Click ‘Change’ and then select ‘Add or Remove Programs’.
- Next, click the ‘plus’ sign provided next to Office Shared Features.
- Click ‘Visual Basic for Applications’. After that, right-click and choose ‘Run from My Computer’ and hit the ‘Continue’ button.
- Reboot your system when this process finishes.
Now check if the issue has been resolved or not.
What Next?
If none of the workarounds mentioned above works for you, use a professional Excel repair software, such as Stellar Repair for Excel. The software repairs corrupt MS Excel sheets without modifying their original content and formatting. In addition, it can repair single or multiple Excel (XLS/XLSX) files in a few simple steps.
Steps to Repair Corrupt Excel File using Stellar Repair for Excel Software
Install and run Stellar Repair for Excel software.
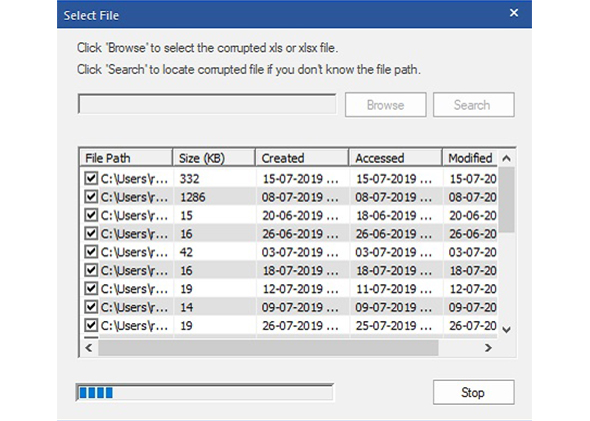
From the software main interface window, click ‘Browse’ to select the corrupt file. If you are not aware of the corrupt Excel file location, click on the ‘Search’ button.
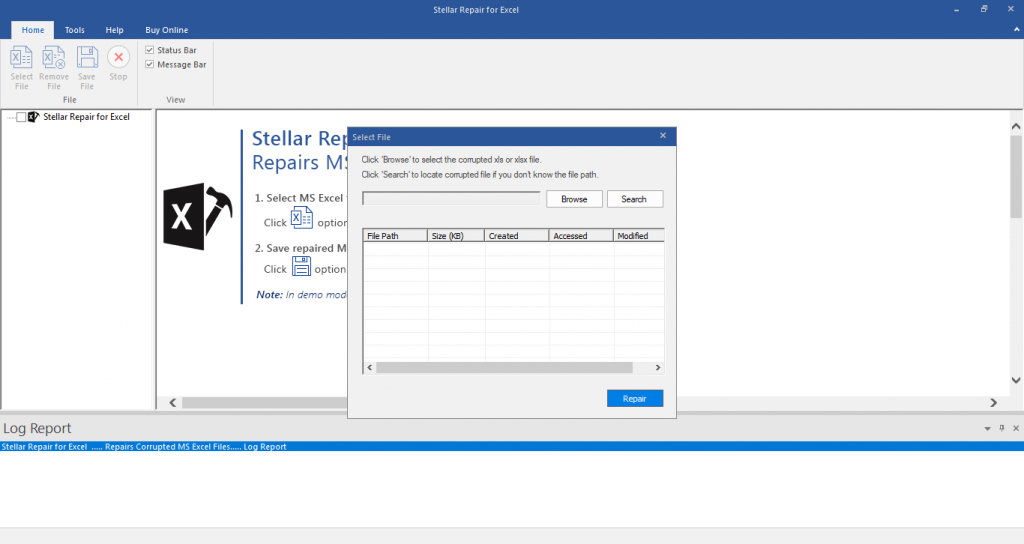
- Click on the ‘Repair’ button to scan and repair the selected file.
- A preview window will open with recoverable Excel file data. Once satisfied with the preview result, click on the ‘Save File’ button on the ‘File’ menu to start the repair process.
- Select the destination to save the file.
- Click ‘OK’ when the ‘Repaired file saved successfully’ message appears.
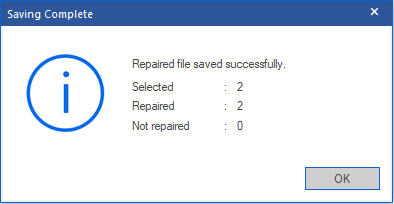
The repaired Excel file will get saved at the selected location.
How to Repair Multiple Excel Files by Using Stellar
With Stellar Repair for Excel, it is quite easy and simple to repair multiple MS Excel (XLS and XLSX) files that are damaged. This is because the software has a self-explanatory interface and hence is a Do-it-yourself software. Nonetheless, when using this software to repair multiple Excel files, you would have to add all of the files into the software by following a few pre-defined steps. Follow the steps mentioned below:
- Launch Stellar Repair for Excel software.
- Under Home menu, click Select file
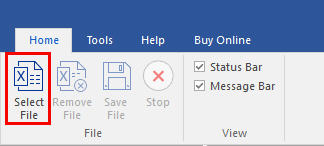
- Click Browse and select corrupt Excel files. Select the checkbox to repair multiple files.
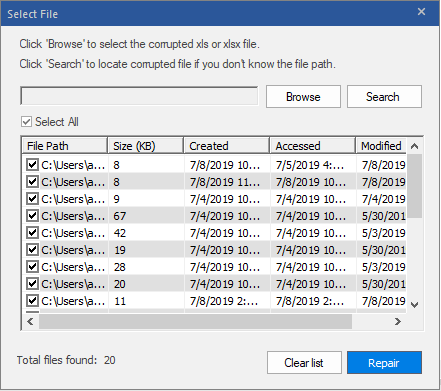
- Click Repair
- The software provides the preview facility. You can check the it on left pane.

- Save the repired filr ether Default location or Select New Folder radio button.

Stellar Repair for Excel Stellar Repair for Excel is the best choice for repairing corrupt or damaged Excel (.XLS/.XLSX) files. This Excel recovery software restores everything from corrupt file to a new blank Excel file.
Also read:
- [New] 2024 Approved A Guide to Upload Twitch Streams to YouTube
- [New] 2024 Approved Explore and Understand What Does PFP Mean on TikTok?
- [New] The Complete Guide to iPhone Voice Memos Setup for 2024
- 2024 Approved The Symphony of Stories Music Tips for Social Media Gems
- How to Factory Reset Honor Magic V2 in 5 Easy Ways | Dr.fone
- How to Reset a Realme 11 5G Phone That Is Locked | Dr.fone
- How to Reset a Xiaomi Civi 3 Phone That Is Locked | Dr.fone
- ISOワークショップ向けコピーガードを解除不能にする方法とそれに伴うリスク
- New 2024 Approved From Novice to Pro The Top Animation Maker Tools You Need to Know
- Remove Google FRP lock on Vivo X Fold 2
- Solutions to restore deleted files from Itel
- Start at Vector's Beginning A Short Overview of Forms & Tools for 2024
- What You Need To Know To Improve Your Motorola Edge+ (2023) Hard Reset | Dr.fone
- Title: Solved Excel 2010 Spreadsheet Disappears after Opening | Stellar
- Author: Ian
- Created at : 2025-01-18 18:55:21
- Updated at : 2025-01-21 18:37:25
- Link: https://techidaily.com/solved-excel-2010-spreadsheet-disappears-after-opening-stellar-by-stellar-guide/
- License: This work is licensed under CC BY-NC-SA 4.0.


