Reviving Retro Windows Audio: A Step-by-Step Guide to Restoring Classic System Sounds in Windows 11

Reviving Retro Windows Audio: A Step-by-Step Guide to Restoring Classic System Sounds in Windows 11
Quick Links
- How to Get Sound Packs of Old Windows Sounds
- Change System Sounds in Settings
- How to Enable Changing the Login Sound
Key Takeaways
- Make sure you have downloaded the necessary sound pack for the Windows version you want to emulate sonically; ensure its files are in WAV format.
- Create a new sound scheme so you can revert to the default one when needed.
- To change the system sounds, open the sound settings, pick the Windows event, and switch it with the appropriate one in the sound pack.
If you long for the old Windows sounds, wishing you could hear them again on Windows 11, you’re in luck. We’re going to show you how to download the necessary sound packs and create a retro sound scheme.
How to Get Sound Packs of Old Windows Sounds
The first thing you need to do is download a sound pack containing the sounds from an old Windows version. Also, ensure that every sound it contains is in WAV file format.
An example of where to find sound packs is the Sound Schemes Gallery page on the WinCustomize website . You can find sounds for Windows XP, Vista, 7, 8, 8.1, 10, and more. Select the one you want and click “Download” to save it to your computer.
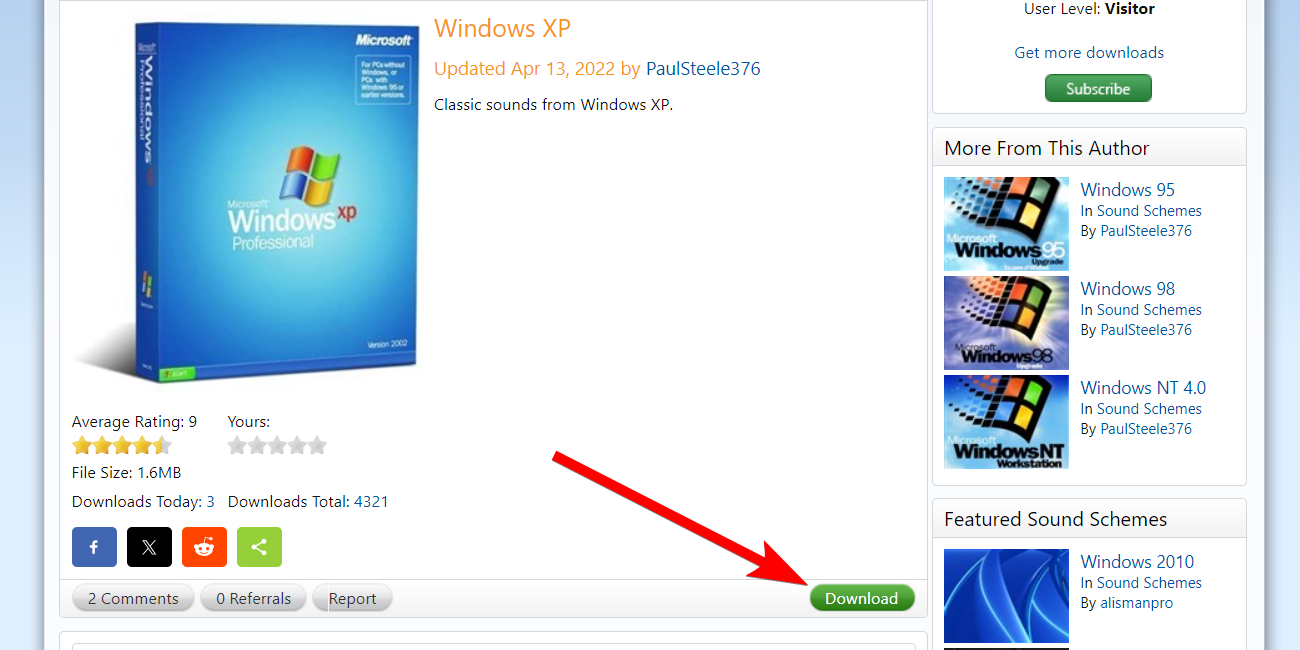
The sound pack’s file extension will be SOUNDPACK, which Windows will not recognize. You need to change it to a ZIP file just so you can extract the sounds.
If you can’t see the file extension, ensure you’ve enabled the option to see file extensions .
Next, right-click the sound pack and select Show More Options > Rename in the context menu.
Close
Then, delete soundpack from the file name and replace it with zip. Click “Yes” in the prompt to confirm that you want to change the file extension
Close
The sound pack will now be a ZIP folder. Next, extract the zip file to view the contents of the sound pack. You should see several WAV files, so go through them and confirm it has all the sounds you want by listening to them.
Change System Sounds in Settings
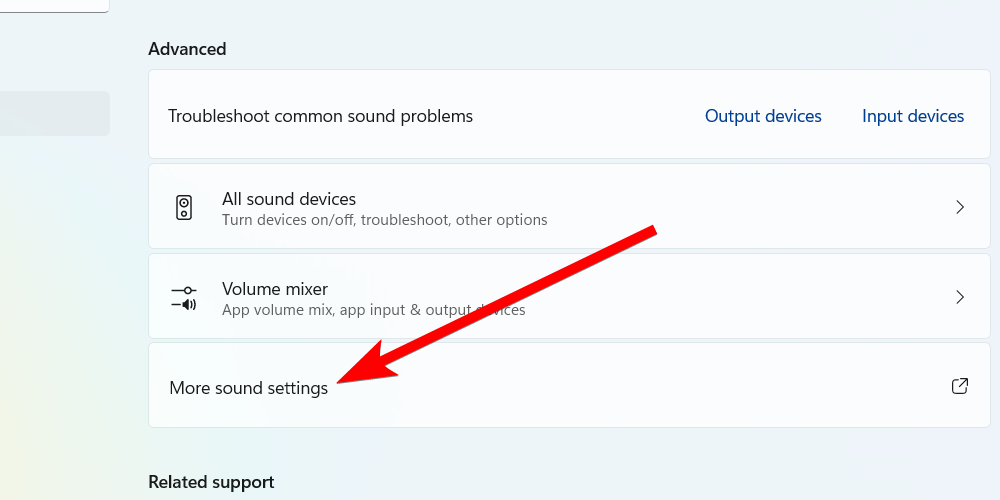
Once the sound pack is downloaded and extracted, it’s time to change the system sounds. To do this, go to Settings > System > Sound and click “More Sound Settings” in the Advanced Section.
Next, select the “Sound” tab, and click the “Save As” button. This will allow you to create a new sound scheme so you don’t mess up the Windows default (you can revert to it whenever you want). Now, give the new scheme a name, and click the “OK” to save it.
Close
Next, you must change the sounds for various system events in the Program Events section. For example, to change the Windows startup sound, select the “Windows Logon” event. Then, click “Browse” in the Sounds section.
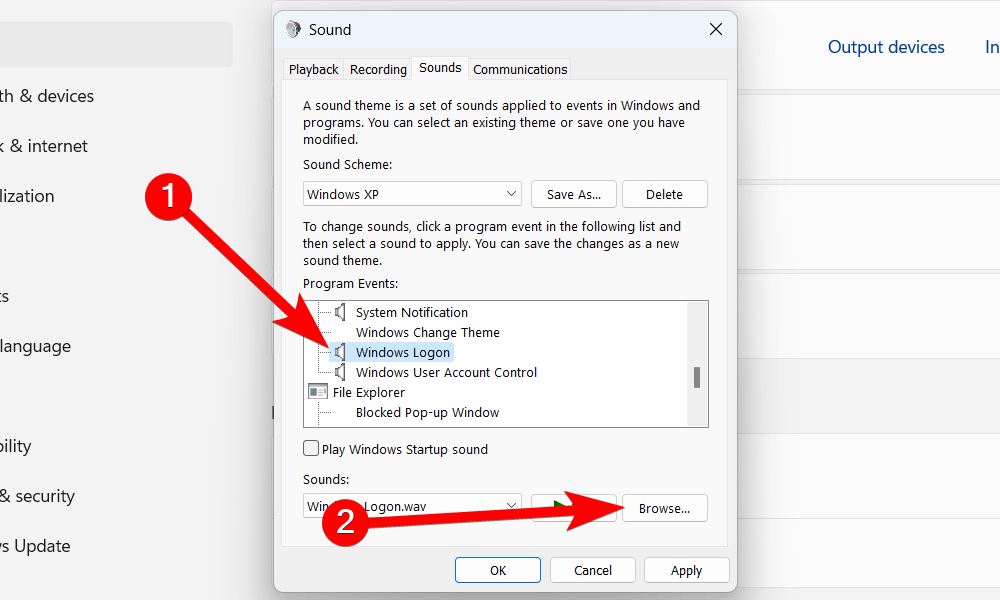
Navigate to where you extracted the sound pack, highlight the logon sound, and click “Open” to select it. For example, in the Windows XP sound pack we downloaded, it was the “Windows XP Startup.wav” file.
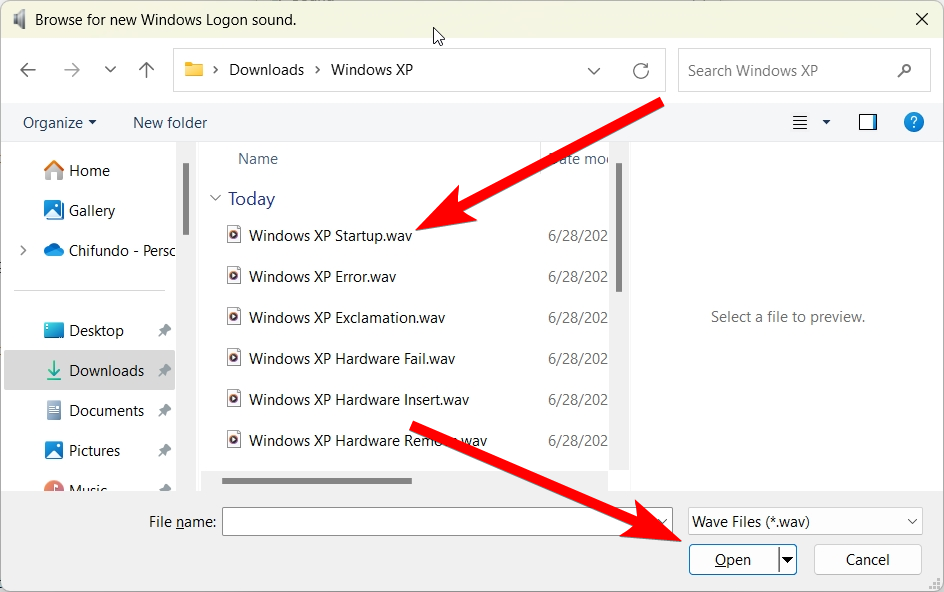
You can click “Test” on the left side of the “Browse” button to verify you have selected the right sound. Then, go ahead and change the rest of the sounds. Afterward, click “OK” to close the dialogue box and save the changes.
How to Enable Changing the Login Sound
If you find that the “Windows Logon” and “Windows Logoff” events are missing in the Program Events section, you can unhide them in the Registry Editor.
One important thing to do before you proceed is to create a system restore point . This will back up a copy of the Windows Registry. That way, if you make a mistake, you can use the restore point to undo it.
To do this, press Win+R to open the Registry Editor and paste the following file path into the address bar:
Computer\HKEY_CURRENT_USER\AppEvents\EventLabels\WindowsLogon
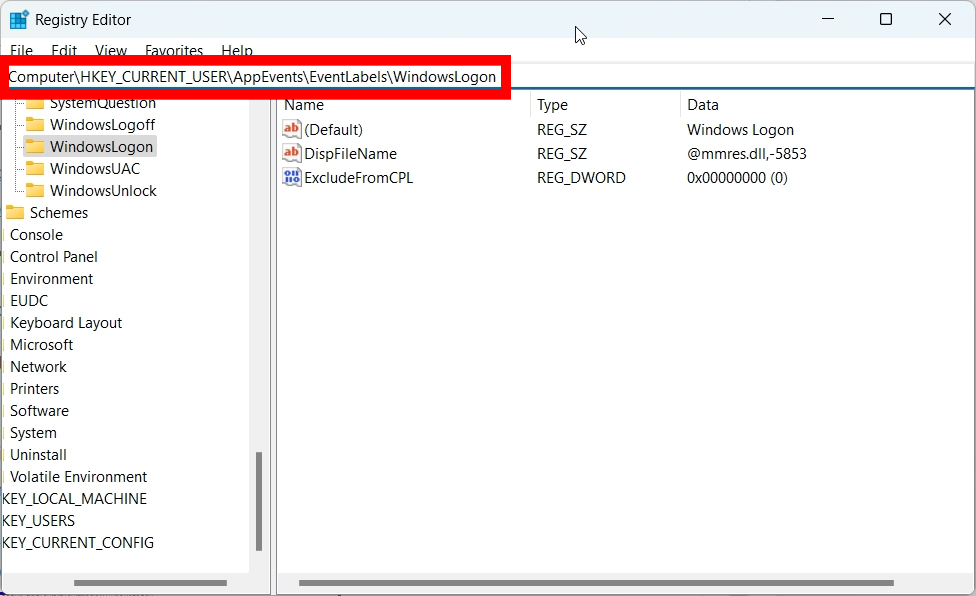
Then, double-click the “ExcludeFromCPL” value to edit it. Set “Value Data” to 0 and then click “OK” to save the changes. Afterward, you should be able to see the “Windows Logon” event when changing system sounds.
Close
Do the same for the “ExcludeFromCPL” value at the following file path to unhide the “Windows Logoff” event:
Computer\HKEY_CURRENT_USER\AppEvents\EventLabels\WindowsLogoff
So, that’s how you bring back those nostalgic Windows sounds you miss. You can create as many sound schemes as you need for different Windows versions.
You can take the retro overhaul a step further, beyond sounds. For example, if you’re creating a Windows 2000 sound scheme, you can also make Windows 11 look like Windows 2000 .
Also read:
- [New] Apex Online Video Streaming Applications
- [New] In 2024, Authentic Audience Growth Practical Advice for Content Creators
- [New] The Complete Guide to iTunes Podcast Upload
- [Updated] 9 Solutions to Facebook Video Black Screen Issues on Chrome/Safari/Firefox
- Fixing the Faulty ISArcExtract Error on Windows 11 Devices
- Full Guide to Hard Reset Your Xiaomi Redmi 13C 5G | Dr.fone
- Get Your M-Audio Sound Card Drivers Here – Works on Win 10, 7, 8 & 8.1!
- How to Reset Asus ROG Phone 8 without Losing Data | Dr.fone
- How to Transfer Data from Nokia 150 (2023) to Other Android Devices? | Dr.fone
- In 2024, How to Transfer Photos from Oppo A18 to Laptop Without USB | Dr.fone
- Resolve Compile Error in Hidden Module in Excel Causes & Solutions
- Resolving Non-Operational Window Start Button
- Solved Mac Doesnt Recognize my iPhone 15 | Stellar
- The Filmmaker's Edge Mastering Kinemaster's Zoom Functionality for 2024
- The way to recover deleted contacts on Realme 11X 5G without backup.
- Undelete lost call logs from Vivo G2
- Undelete lost music from Tecno
- What You Need To Know To Improve Your Infinix Smart 7 HD Hard Reset | Dr.fone
- What You Need To Know To Improve Your ZTE Nubia Flip 5G Hard Reset | Dr.fone
- Title: Reviving Retro Windows Audio: A Step-by-Step Guide to Restoring Classic System Sounds in Windows 11
- Author: Ian
- Created at : 2025-02-13 21:57:05
- Updated at : 2025-02-19 22:01:36
- Link: https://techidaily.com/reviving-retro-windows-audio-a-step-by-step-guide-to-restoring-classic-system-sounds-in-windows-11/
- License: This work is licensed under CC BY-NC-SA 4.0.