Reset pattern lock Tutorial for S23+

Have you encountered the same situation? Don't worry. You can try our software to unlock the screen lock without losing your data on Itel S23+. It supports to remove Android phone password, PIN, pattern and fingerprint.
Let’s see how it works.
- Part 1: Remove Screen Lock Without Losing Data for Part Itel Devices
- Part 2: Screen Lock Removal For Most Android Device Brands
The first method involves removing the screen lock of the Android device without putting the data at risk. The platform does not perform in-depth operations for this particular mechanism, which is why the data is protected in this case. To know how this is achieved, follow the guidelines provided next:
This tool can remove the Android lock screen without losing data only for part of the Itel devices in this list. For other devices, you can direct to Part 2, which can remove the lock screen by erasing data.
Step 1: Open Screen Unlock Tool
Install the latest version of Wondershare Dr.Fone - Screen Unlock (Android) on your computer and connect your Android device with a USB cable. Once it connects, navigate under the Toolbox > Screen Unlock to open the unlock screen tool.

Dr.Fone Mac version still has the old interface, but it does not affect the use of Dr.Fone function, we will update it as soon as possible.
Step 2: Proceed to Select Android Screen Unlocking
As you are directed to a new screen, select the Android option to continue unlocking your Android screen lock.

Step 3: Continue With Appropriate Operation
Proceed to select Unlock Android Screen out of the two options on the next screen.

Step 4: Select to Remove Screen Lock Without Data Loss
Following this, you will be directed to another screen where you have to select the device brand, Samsung. And choose Remove without Data Loss.


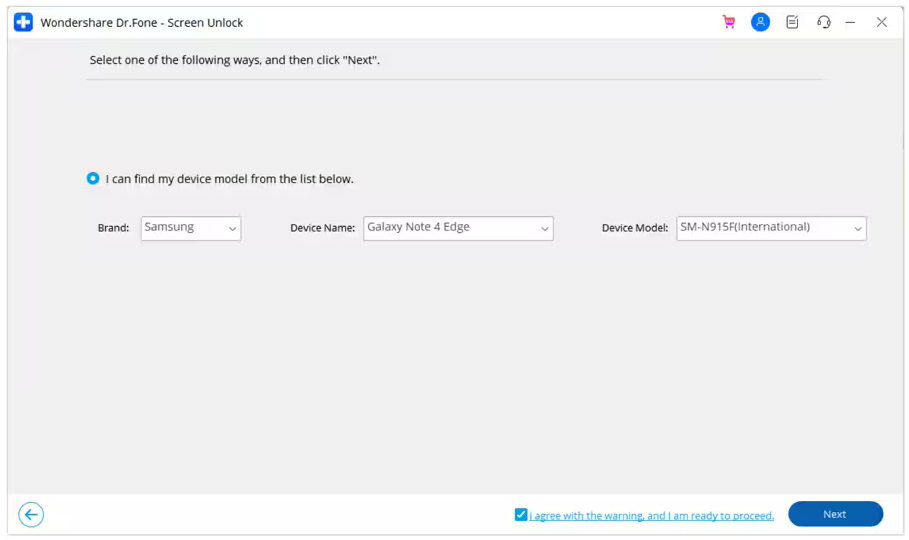
Step 5: Define Device Details
Next, you will have to select the Brand, Device Name, and Device Model to unlock the Android screen. Turn on the checkmark showing the option of I agree with the warning, and I am ready to proceed. Continue by clicking Next to unlock the screen.
eg. your device is Samsung Galaxy Note 4 Edge, you can select the brand as Samsung, the device name as Galaxy Note 4 Edge, and the device model as SM-N915F.
Step 6: Confirm to Unlock Screen
You will be prompted to confirm the process by typing “000000”. On writing the code, click Confirm to execute the required operation.

Step 7: Put Android in Download Mode
Wondershare Dr.Fone - Screen Unlock (Android) will guide you to put your Android device into Download Mode according to the model you have identified. Once you have followed the instructions, the platform automatically leads to the next screen to execute the process.

Step 8: Observe the Unlock Process
The following screen shows the progress of the screen unlocking process, where the required drivers and the configuration file are downloaded on the platform.

Step 9: Remove Screen Lock Successfully
You will be prompted with a new screen showing the completion of the process.

Unlock Android screen without data loss is restricted to specific Itel devices. If you don’t find your device in the supported device list and feel a problem unlocking the device screen, you can try removing the lock screen in another way Wondershare Dr.Fone - Screen Unlock (Android) provided. The guidelines are as below:
Step 1: Look for the Method to Remove Locks of Most Android Devices
After you have accessed Screen Unlock > Android, continue to select the Unlock Android Screen option.

Step 2: Select Device Brand and Put Device into Specific Mode to Wipe All data.
Select the device brand that you want to unlock the screen.
For other Itel devices that are not supported to unlock without losing data, choose “100% Remove Screen lock” after taping Itel icon.

Choosing the Itel brand will automatically lead you to enter the specific mode. Dr.Fone will start to unlock Android screen after getting into the specific mode. Note that the processes to enter specific modes vary according to different device brands. Here taking Google phones as an example:

Step 3: Screen Unlocked Successfully
Wait for the unlock process to complete. If it has failed, click Try Again to make another effort. If you have successfully unlocked the screen of your Android device, tap Done.

Also read:
- [New] In 2024, Mastering the Art of Adding Linktree to Your TikTok Info
- [Updated] 2024 Approved Step-by-Step Adding Subsections and Chapters to Your YouTube Tutorials
- [Updated] In 2024, JestJungle Your Gateway to Universal Comedy
- 2024 Approved Top 9 Mic Technology Advances A Deep Dive Analysis
- Cutting-Edge Computing Redefined: In-Depth Analysis of the Lightest 4K OLED Laptop on Market - Acer's Swift Edge Showcase
- Different Methods for Resetting Google Pixel Fold Phones with Screen Locked and Not | Dr.fone
- Hard Resetting an Oppo Reno 11 Pro 5G Device Made Easy | Dr.fone
- How do I reset my Asus ROG Phone 7 Phone without technical knowledge? | Dr.fone
- How to Factory Reset Tecno Pop 8 If I Forgot Security Code or Password? | Dr.fone
- How to Soft Reset Xiaomi Redmi K70 phone? | Dr.fone
- In 2024, How PGSharp Save You from Ban While Spoofing Pokemon Go On Google Pixel 8? | Dr.fone
- MovaviでのAACファイルからMP3への自由なWeb上変換ツール
- New 2024 Approved Transform MP4 Videos Into MP3 Audio Files Top Converters
- Professional Video Quality at Your Fingertips OIS-Powered Choices
- Reliability and Quality Assessment: Apeman C450 for Savvy Shoppers
- The way to get back lost data from Xiaomi
- Undelete lost call logs from Realme Narzo N53
- Video File Repair - How to Fix Corrupted video files of Samsung Galaxy A54 5G?
- What You Need To Know To Improve Your Xiaomi Redmi Note 13 Pro 5G Hard Reset | Dr.fone
- Title: Reset pattern lock Tutorial for S23+
- Author: Ian
- Created at : 2025-02-13 20:35:26
- Updated at : 2025-02-20 09:28:38
- Link: https://techidaily.com/reset-pattern-lock-tutorial-for-s23plus-by-drfone-android-unlock-android-unlock/
- License: This work is licensed under CC BY-NC-SA 4.0.