
Reset pattern lock Tutorial for 11 5G
Have you encountered the same situation? Don't worry. You can try our software to unlock the screen lock without losing your data on OnePlus 11 5G. It supports to remove Android phone password, PIN, pattern and fingerprint.
Let’s see how it works.
- Part 1: Remove Screen Lock Without Losing Data for Part OnePlus Devices
- Part 2: Screen Lock Removal For Most Android Device Brands
The first method involves removing the screen lock of the Android device without putting the data at risk. The platform does not perform in-depth operations for this particular mechanism, which is why the data is protected in this case. To know how this is achieved, follow the guidelines provided next:
This tool can remove the Android lock screen without losing data only for part of the OnePlus devices in this list. For other devices, you can direct to Part 2, which can remove the lock screen by erasing data.
Step 1: Open Screen Unlock Tool
Install the latest version of Wondershare Dr.Fone - Screen Unlock (Android) on your computer and connect your Android device with a USB cable. Once it connects, navigate under the Toolbox > Screen Unlock to open the unlock screen tool.

Dr.Fone Mac version still has the old interface, but it does not affect the use of Dr.Fone function, we will update it as soon as possible.
Step 2: Proceed to Select Android Screen Unlocking
As you are directed to a new screen, select the Android option to continue unlocking your Android screen lock.

Step 3: Continue With Appropriate Operation
Proceed to select Unlock Android Screen out of the two options on the next screen.

Step 4: Select to Remove Screen Lock Without Data Loss
Following this, you will be directed to another screen where you have to select the device brand, Samsung. And choose Remove without Data Loss.


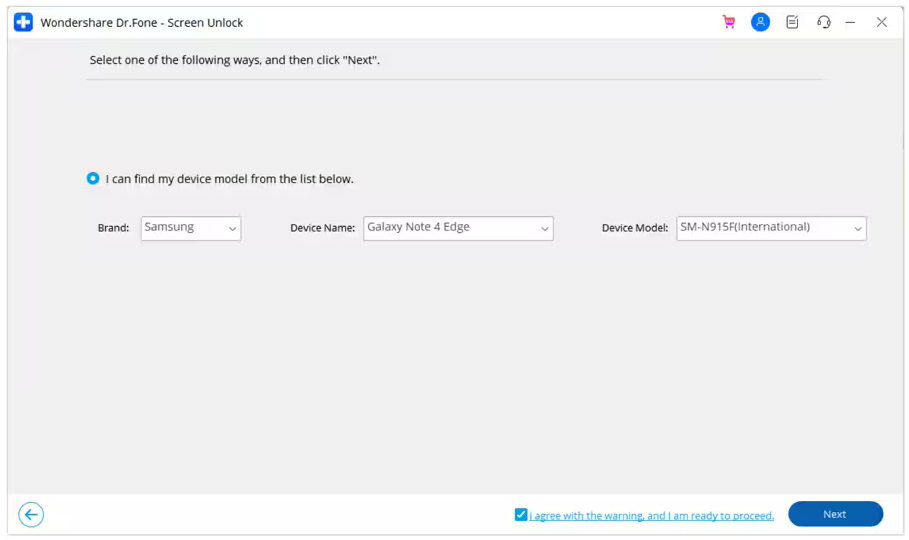
Step 5: Define Device Details
Next, you will have to select the Brand, Device Name, and Device Model to unlock the Android screen. Turn on the checkmark showing the option of I agree with the warning, and I am ready to proceed. Continue by clicking Next to unlock the screen.
eg. your device is Samsung Galaxy Note 4 Edge, you can select the brand as Samsung, the device name as Galaxy Note 4 Edge, and the device model as SM-N915F.
Step 6: Confirm to Unlock Screen
You will be prompted to confirm the process by typing “000000”. On writing the code, click Confirm to execute the required operation.

Step 7: Put Android in Download Mode
Wondershare Dr.Fone - Screen Unlock (Android) will guide you to put your Android device into Download Mode according to the model you have identified. Once you have followed the instructions, the platform automatically leads to the next screen to execute the process.

Step 8: Observe the Unlock Process
The following screen shows the progress of the screen unlocking process, where the required drivers and the configuration file are downloaded on the platform.

Step 9: Remove Screen Lock Successfully
You will be prompted with a new screen showing the completion of the process.

Unlock Android screen without data loss is restricted to specific OnePlus devices. If you don’t find your device in the supported device list and feel a problem unlocking the device screen, you can try removing the lock screen in another way Wondershare Dr.Fone - Screen Unlock (Android) provided. The guidelines are as below:
Step 1: Look for the Method to Remove Locks of Most Android Devices
After you have accessed Screen Unlock > Android, continue to select the Unlock Android Screen option.

Step 2: Select Device Brand and Put Device into Specific Mode to Wipe All data.
Select the device brand that you want to unlock the screen.
For other OnePlus devices that are not supported to unlock without losing data, choose “100% Remove Screen lock” after taping OnePlus icon.

Choosing the OnePlus brand will automatically lead you to enter the specific mode. Dr.Fone will start to unlock Android screen after getting into the specific mode. Note that the processes to enter specific modes vary according to different device brands. Here taking Google phones as an example:

Step 3: Screen Unlocked Successfully
Wait for the unlock process to complete. If it has failed, click Try Again to make another effort. If you have successfully unlocked the screen of your Android device, tap Done.

Also read:
- [New] Examining the Effectiveness of iScreen Recording for 2024
- All Things You Need to Know about Wipe Data/Factory Reset For Samsung Galaxy S23 FE | Dr.fone
- Choosing the Right Apple Laptop: MacBook Air Vs. MacBook Pro - A Detailed Comparison | ZDNet
- Elite Environmentally Friendly Cinematography Tech for 2024
- Experience Epic Savings on the HP Victus 15 for Gamers: Score It for Only $515 with Best Buy’s Hot Deal This Anti-Prime Day 'S Insider Tips
- Facebook Adds New Gear with Ray-Bans Stories - Functions and Pricing?
- Factory Reset on Apple iPhone 14 Pro | Dr.fone
- Full Guide to Hard Reset Your Tecno Spark 10 Pro | Dr.fone
- How to Stop XCOM 2 From Crashing on Your Windows Computer: Effective Fixes
- How To Transfer Data From Apple iPhone 14 Pro Max To Other iPhone 13 Pro devices? | Dr.fone
- How To Upgrade or Downgrade iPhone 14 Plus Without iTunes? | Dr.fone
- New No-Cost Split Screen Video Creators Web-Based and Downloadable Options
- Simple ways to get lost videos back from Honor
- Some MP4 won't play on my Samsung Galaxy A34 5G
- Undelete lost contacts from Xiaomi Redmi 13C.
- Undeleted lost videos from Civi 3 Disney 100th Anniversary Edition
- VN Video Editor for Mac The Ultimate Guide to Installation and Alternatives
- Title: Reset pattern lock Tutorial for 11 5G
- Author: Ian
- Created at : 2025-02-18 19:02:35
- Updated at : 2025-02-19 23:29:02
- Link: https://techidaily.com/reset-pattern-lock-tutorial-for-11-5g-by-drfone-android-unlock-android-unlock/
- License: This work is licensed under CC BY-NC-SA 4.0.