
Maximizing Your Data Security: The Benefits of Storing Time Machine Backups on a Mac's Built-In Hardware

Maximizing Your Data Security: The Benefits of Storing Time Machine Backups on a Mac’s Built-In Hardware
Key Takeaways
- Creating a Time Machine backup locally enables you to restore older versions of a file or retrieve deleted files. It’s a valuable backup solution if you don’t have an external storage drive.
- To back up your files locally, you must create a partition and designate it as the primary location for Time Machine backup.
- While this method is convenient, it’s important to note that if your local drive becomes corrupted or fails, you could lose both your original data and the backup.
Using an external storage drive for Time Machine backups is the recommended way to back up your Mac. But what if you don’t have an external storage drive? You can still make use of Time Machine by placing backups on your local drive. Here’s why I use this method to back up my files and why you should consider it too.
Why I Use Local Storage for Time Machine Backup Despite the Risks
Apple recommends using an external drive for Time Machine backups to ensure you can quickly restore your data if your internal drive becomes corrupted.
However, if you’re like me and don’t have an external storage drive, you can back up your files to your local drive. This method can be a lifesaver if you accidentally delete a file, encounter file corruption, or unintentionally modify a document. Using your local drive for backups, you can revert to previous versions of files or restore deleted items.
Yet, it’s important to note that using the same drive for storage and backups carries risks. If the drive gets corrupted or you accidentally erase its contents, you could lose your original data and the backups. You will still need to find a suitable external backup solution, such as using an online backup service .
But despite the risks involved, having any form of backup is preferable to having none at all, as it provides a way to restore deleted or older versions of files.
With these considerations in mind, let’s explore how you can use your internal storage drive as the backup location for Time Machine.
First, Partition Your Internal Storage Drive
If you’ve never partitioned your storage drive, you’ll need to create a partition dedicated solely to the Time Machine backup. You can easily do this using the Disk Utility app .
Press Command+Space, type “Disk Utility,” and hit Enter.

Then, select the main volume, usually “Macintosh HD,” and click “Partition.”

Next, click the “+” icon and select “Add Partition” from the popup menu.
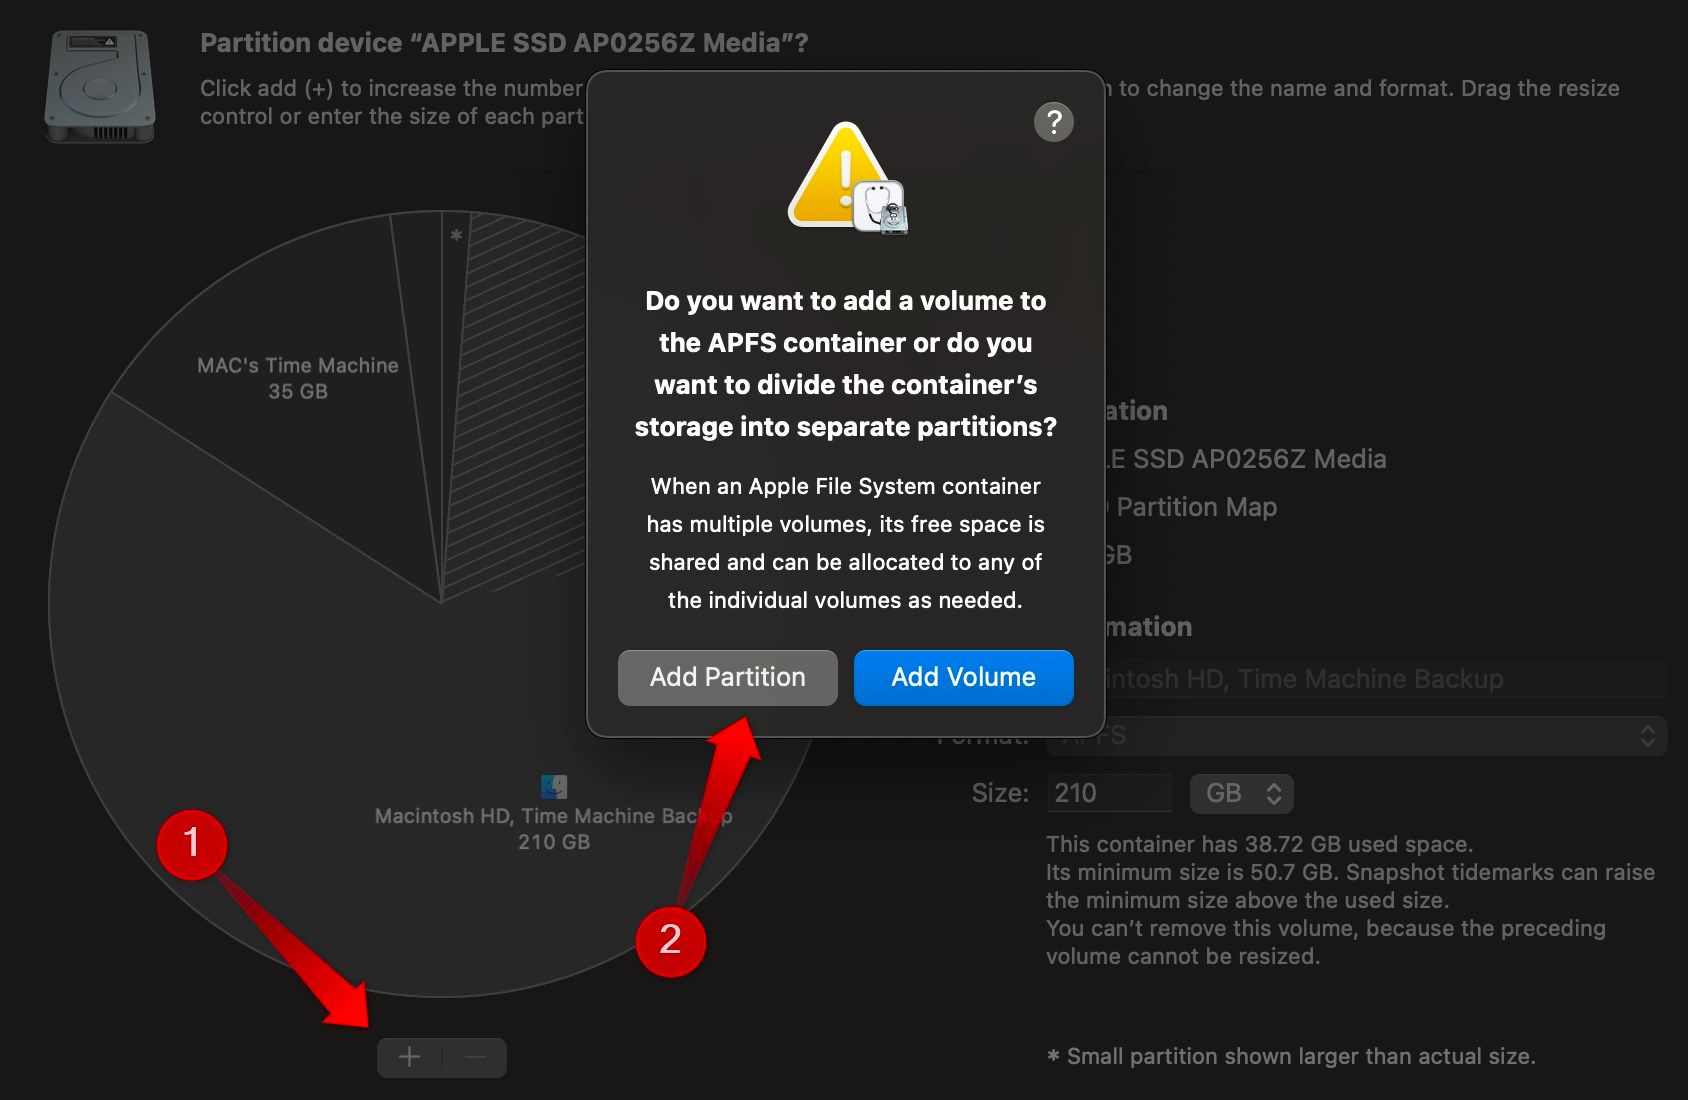
Name the newly created partition, choose “APFS” as the format, and allocate the desired size for the partition. Click “Apply,” then “Partition,” and finally “Continue” in the warning popup.
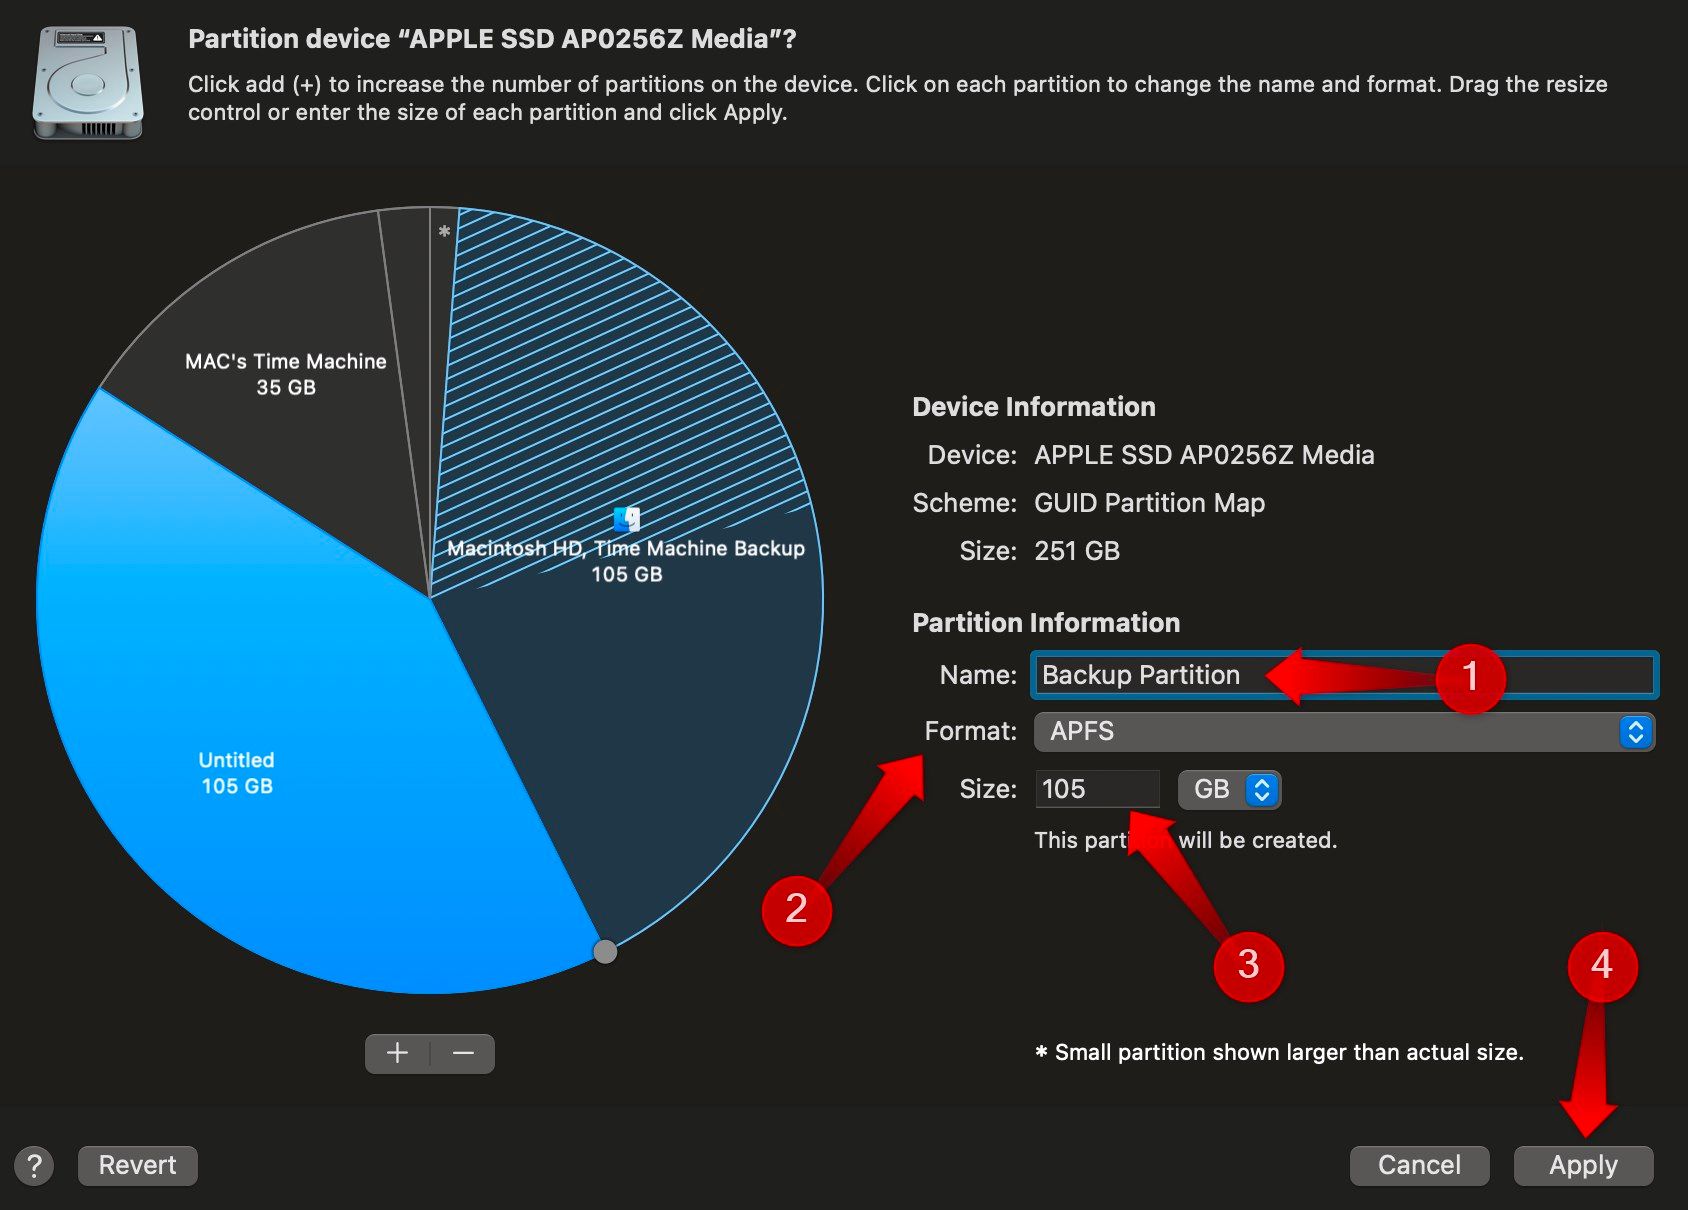
Now, wait for the process to finish. This may take several minutes, so please be patient. Once the partition is successfully created, you can proceed to the next step.
Use the Newly Created Partition for the Backup
If you’re setting up the Time Machine backup for the first time, press Command+Space, type “Time Machine,” and open the Time Machine app.
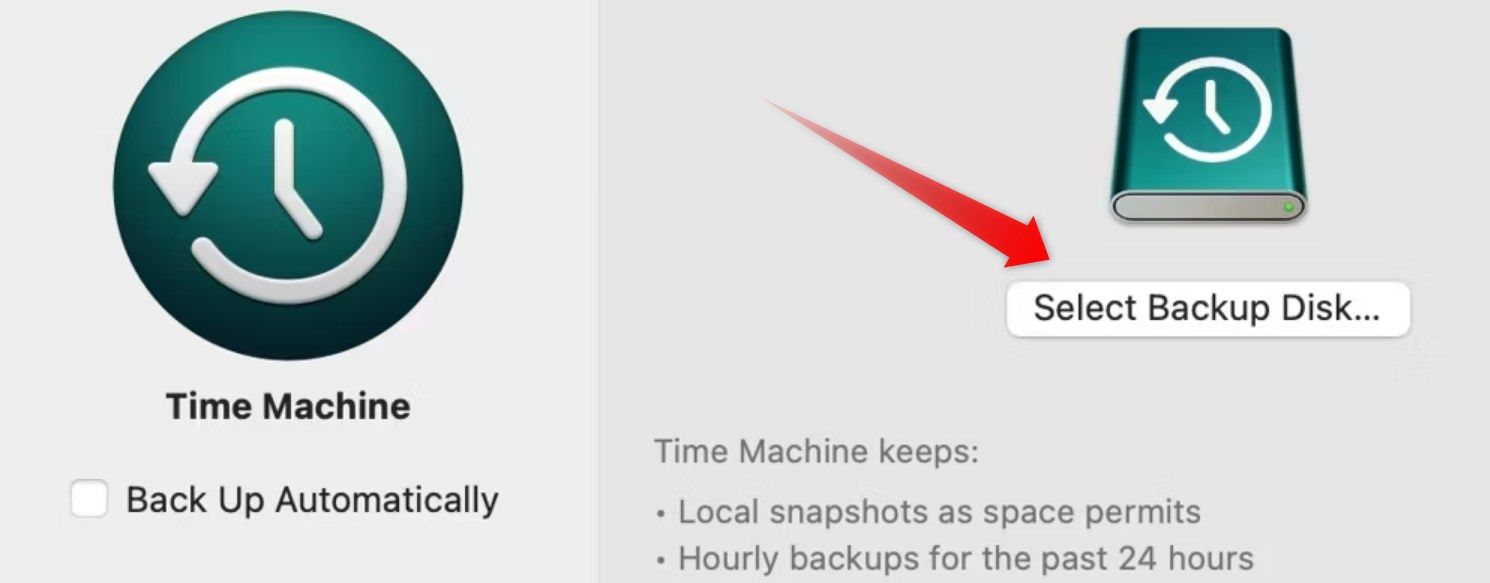
Next, click “Select Backup Disk,” choose the newly created partition, and click “Use Disk.” Afterward, wait a few seconds, and Time Machine will begin your first backup.
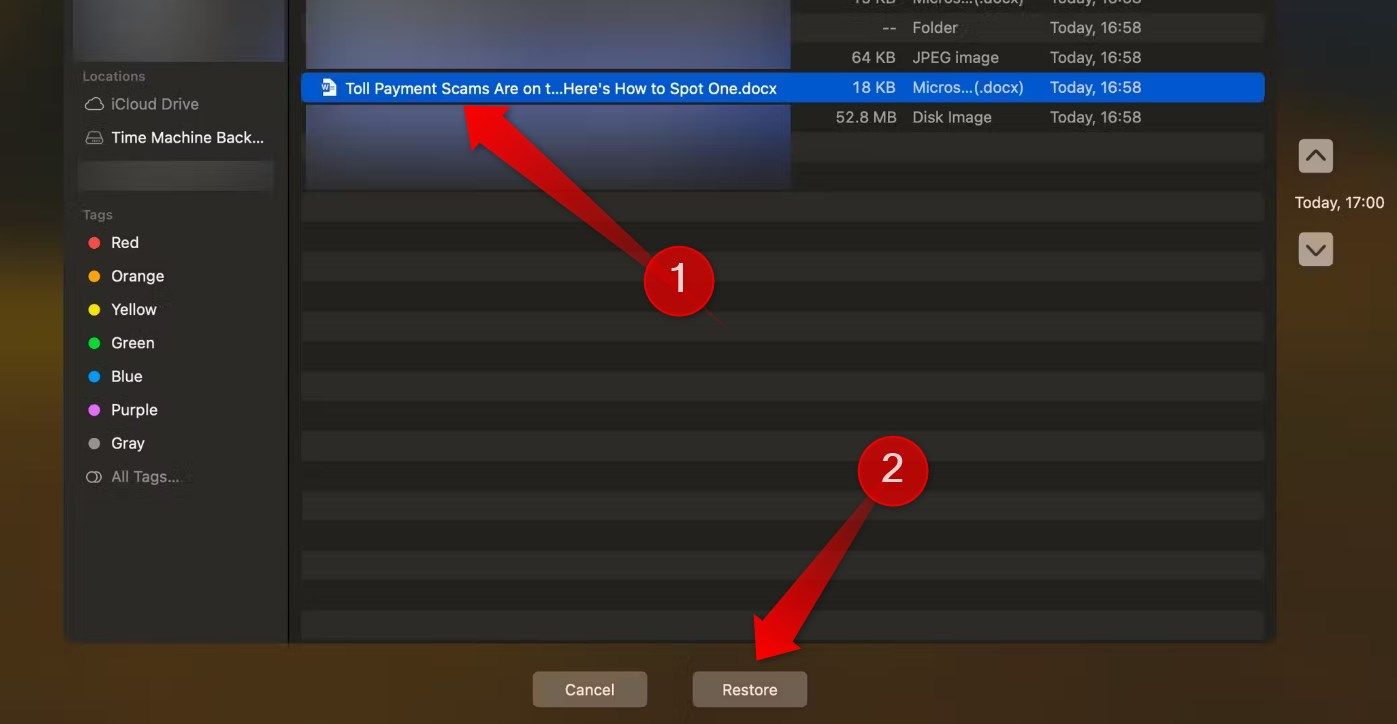
To restore a deleted or older file version from the backup, open the Time Machine utility. Navigate through the snapshots that Time Machine has taken and locate the file you want to restore. Then, click on “Restore” to recover the file.
Don’t Let Your Backup Drive Get Clogged Up
Since you’re backing up your data locally, there’s a risk of quickly filling up your backup drive if you have large amounts of data and limited storage space on the partition you’ve allocated for it. To prevent this issue, I suggest only backing up essential files and excluding less important ones.
To exclude files from the backup, open the System Settings, and go to General > Time Machine. Then, click the “Options” button, followed by the “+” button, and select the folders you want to exclude from the backup.
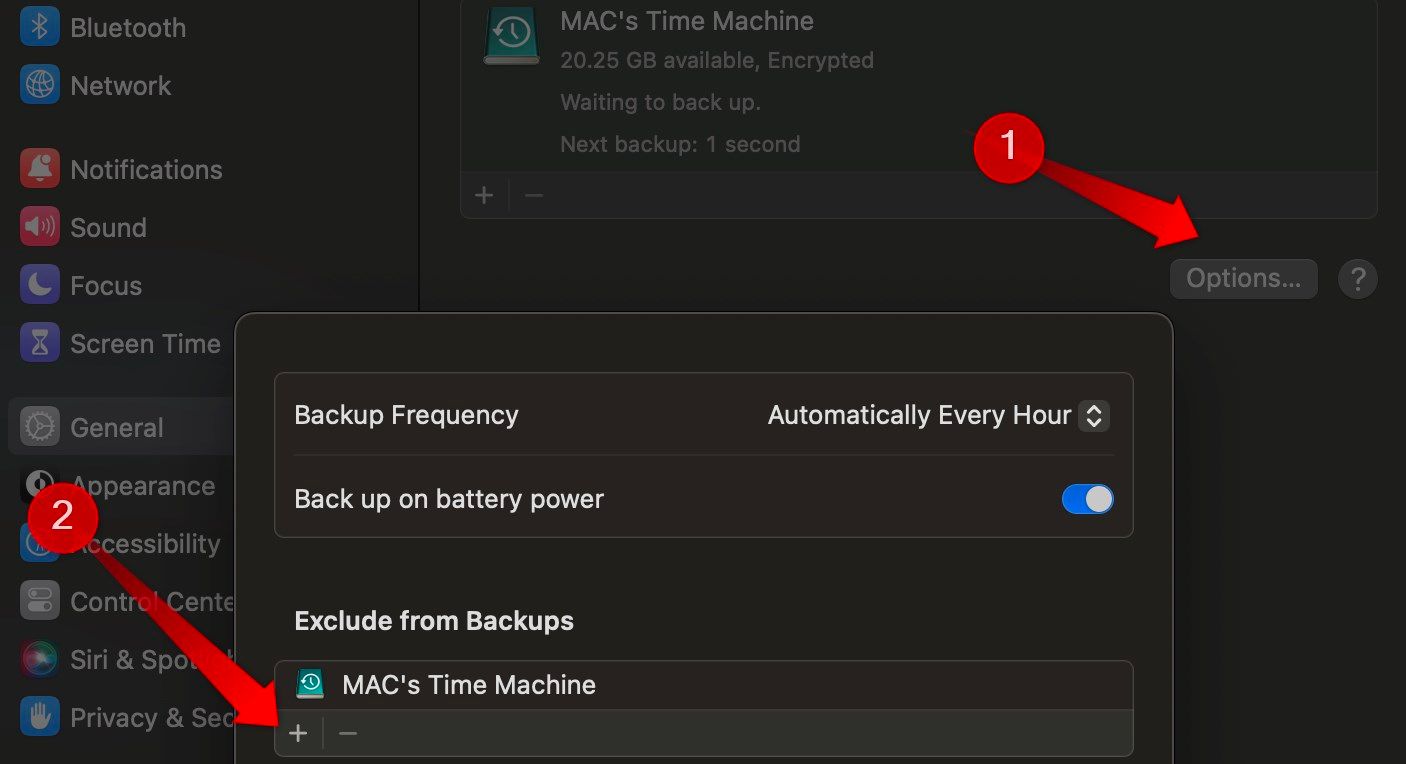
That’s how you can back up your files locally on your Mac using Time Machine. Only choose this method if you don’t have an external storage drive. Also, remember the risks of losing your backup if the local drive gets corrupted. If you have an external storage drive available, you should use that for safe and secure backup.
If you find this method too risky, consider exploring other options for backing up your Mac without using Time Machine .
Also read:
- [New] Comprehensive SRT to XML/SSA Transformation Guide
- [New] In 2024, Exclusive Win Audio Experience
- [New] In 2024, The Symphony of Social Sharing Adding Audio to Instagram
- Compromises of the HP Stream 14: A Closer Look at This Economical Windows Device
- How to Factory Reset Realme GT 5 Pro without Losing Data | Dr.fone
- How To Install the Latest iOS/iPadOS Beta Version on Apple iPhone 15 Plus? | Dr.fone
- How to Repair Your Logitech G935 Headset Microphone for Windows Users
- How To Transfer Data From Apple iPhone 15 Plus To Other iPhone 11 Pro Max devices? | Dr.fone
- How To Transfer Data From Apple iPhone 6s To Others Android Devices? | Dr.fone
- How To Upgrade or Downgrade Apple iPhone 15 Pro Max? | Dr.fone
- In 2024, Altering Username on Google Meet via PC & Mobile
- Leveraging Hashtags to Enhance FB User Engagement for 2024
- Remove Samsung Lock Screen without Password(Samsung Galaxy S23 FE)
- The Battle of Broadcasting Is XSplit Better Than OBS for Livestreams?
- The Easiest Methods to Hard Reset Oppo Find X6 Pro | Dr.fone
- Three Solutions to Hard Reset Vivo S18 Pro? | Dr.fone
- Troubleshooting Overwatch PTT: How to Get Your Microphone Working in the Game
- Vizio TV Wi-Fi Connection Issues? Here's How You Can Solve Them!
- What is Google SERP?
- Title: Maximizing Your Data Security: The Benefits of Storing Time Machine Backups on a Mac's Built-In Hardware
- Author: Ian
- Created at : 2025-02-16 23:14:18
- Updated at : 2025-02-19 23:50:42
- Link: https://techidaily.com/maximizing-your-data-security-the-benefits-of-storing-time-machine-backups-on-a-macs-built-in-hardware/
- License: This work is licensed under CC BY-NC-SA 4.0.