
Is your Nokia 105 Classic working too slow? Heres how you can hard reset it | Dr.fone
Is your Nokia 105 Classic working too slow? Here’s how you can hard reset it
If Nokia 105 Classic 3.4 hard reset or Nokia 105 Classic hard reset is the only option for your mobile phone, you can perform a factory reset to make your device function as it did on the first day. You may need a hard reset if it works slowly, hangs, you want to bypass screen lock, your memory is full, and you want to erase everything, you want to sell or give your device away, and you don’t want anyone to be able to access your files or passwords.
The following instructions will show you how to completely wipe up all of your data and restore the Nokia 105 Classic to its factory-fresh condition.
Part 1: Why do I Need to Hard Reset My Nokia 105 Classic?
We advise you to remove all accounts from the Nokia 105 Classic device before performing a factory reset, especially if you plan to sell, give away, or donate the 3.4. It is also a good idea to unlink the Google account. By doing this, we can prevent issues for new users as some more recent smartphones have a feature called FRP, or Factory Reset Protection, which requires the Google account or PIN number that was originally used to set up the Nokia 105 Classic when a device is factory restored.
Part 2: How to Hard Reset My Nokia 105 Classic
1. Fastboot Mode
- Shut down your phone.
- Add a USB cord to your computer or laptop.
- Your phone should now start up in Fastboot Mode after you press and hold the Volume Down + Power buttons for a few seconds. Nokia 105 Classic Recovery Mode and Fastboot Mode
- Using the ADB command, start Nokia 105 Classic in Bootloader Mode or Fastboot Mode.
- If your computer has ADB and Fastboot drivers installed, and your phone has USB debugging turned on, execute the command below after connecting it.
- Launch Command Prompt (CMD) on your PC, then type the command listed below.
reboot bootloader using adb
- After some time, you will see that your Nokia 105 Classic has been hard reset.
2. Hard reset with hardware key button
- Choose “wipe data/factory reset” on your Nokia 105 Classic to do a hard reset. Scroll down with the Volume buttons, and press the Power key to agree.
- Next, choose yes from the menu if further confirmation is required, and then click the Power button once.
- Lastly, press the Power key and choose the Reboot system.
- Do not forget to charge your phone.
- Initially, turn off your phone.
- Now Press the Volume Up + Power key for a few seconds to enter recovery mode.
- Press and hold the Power and Volume Up buttons at the same time until the Nokia 105 Classic device vibrates. Release all the presses if the Nokia 105 Classic logo or Recovery screen shows.
- You can give your phone up to 30 seconds to display the recovery screen.
Bonus Tips
Dr.Fone - Data Eraser (delete all data completely)
Dr.Fone - Data Eraser helps you quickly get rid of all the unwanted information and all of your data however it is always advisable to back it up using the Dr.Fone - Phone Backup.
Let’s see how you can delete completely all the data using Dr.Fone - Data Eraser. do not worry the next section is about how you can back up and restore the data before erasing it completely using Dr.Fone - Phone Backup.
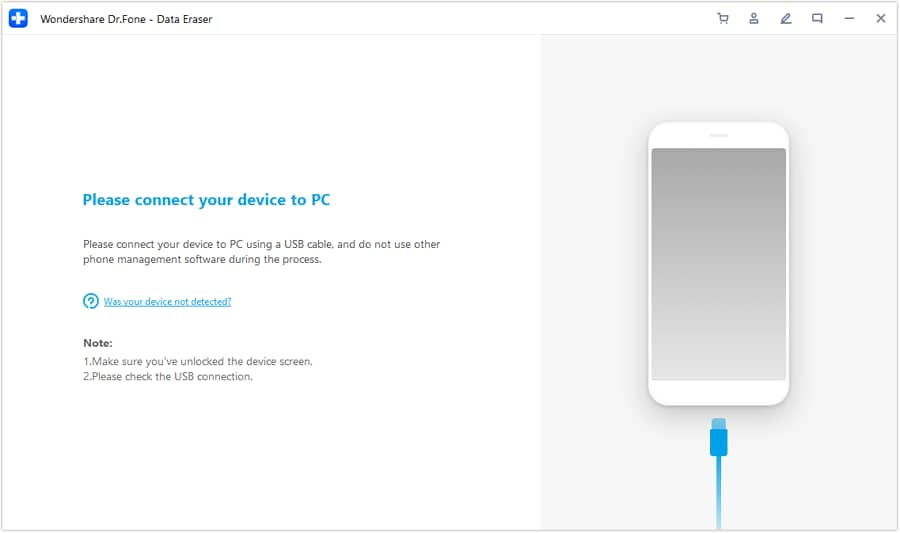
Step 1: Connect your Nokia 105 Classic smartphone to your computer. Start Dr.Fone on your computer. Select “Data Eraser” from the tool list.

Connect your Nokia 105 Classic to the PC via a USB wire. Ensure that your phone has USB debugging turned on. You will see a pop-up window on your phone asking you to approve USB debugging.

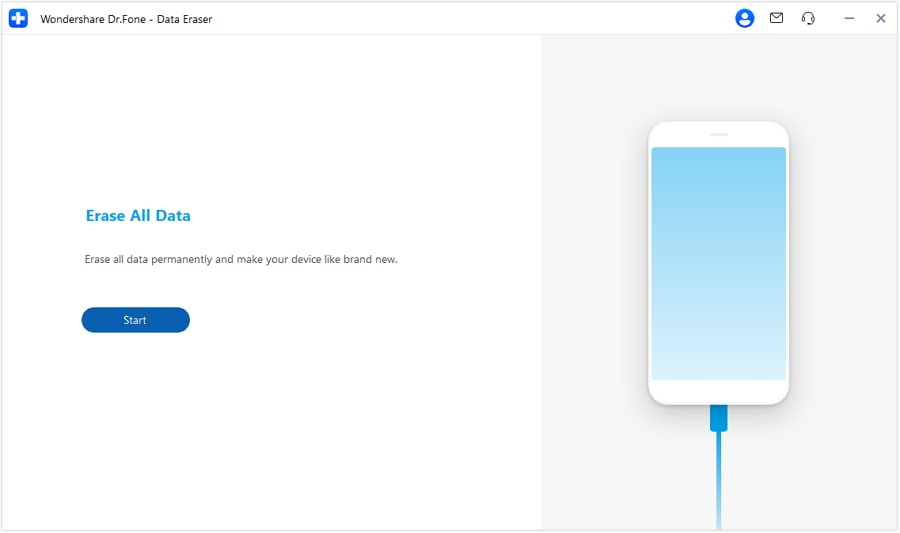
Step 2: Begin wiping your Nokia 105 Classic phone.
Dr.Fone will then automatically recognize and connect to your Nokia 105 Classic smartphone. To begin wiping all of your data, select “Erase All Data.”.
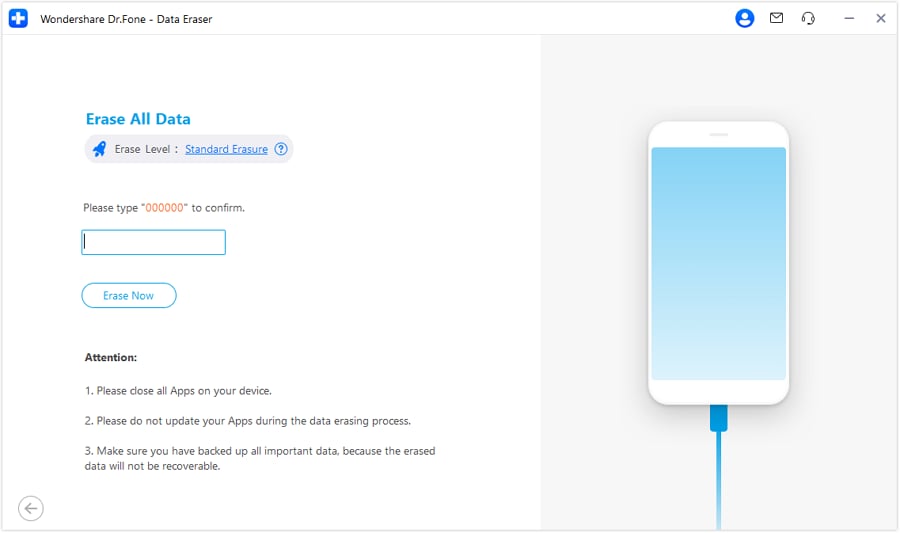
Before proceeding, ensure that you have backed up any critical data because deleted data cannot be retrieved. After that, type “000000” to confirm your activity.
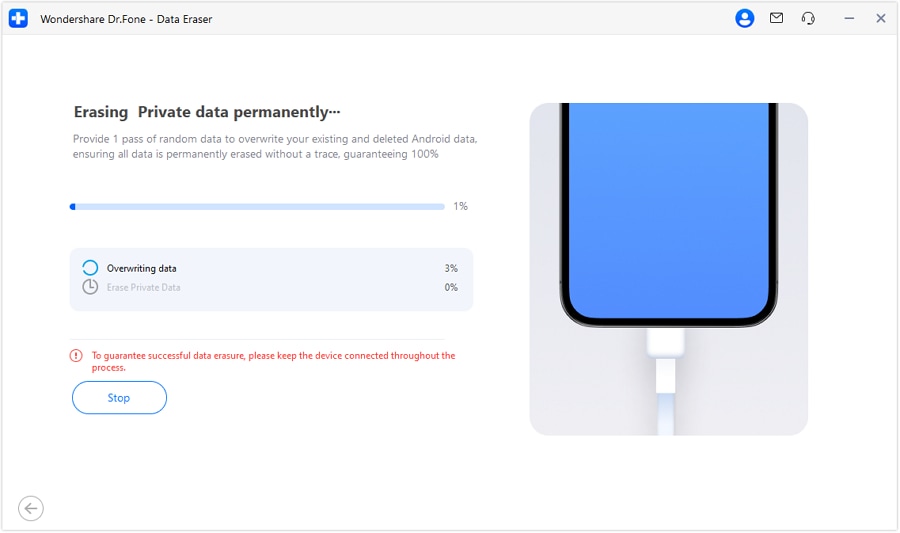
Dr. Fone will next proceed to wipe the data on your Nokia 105 Classic phone. The entire procedure takes only a few minutes. Turn off the phone and do not run any phone administration programs on the PC.
Step 3: Reset your phone’s factory data.
Once all app data, photos, and other private data have been completely erased, Dr.Fone will advise you to touch on Factory Data Reset or Erase All Data on the phone. You may use this to completely delete the phone’s settings.
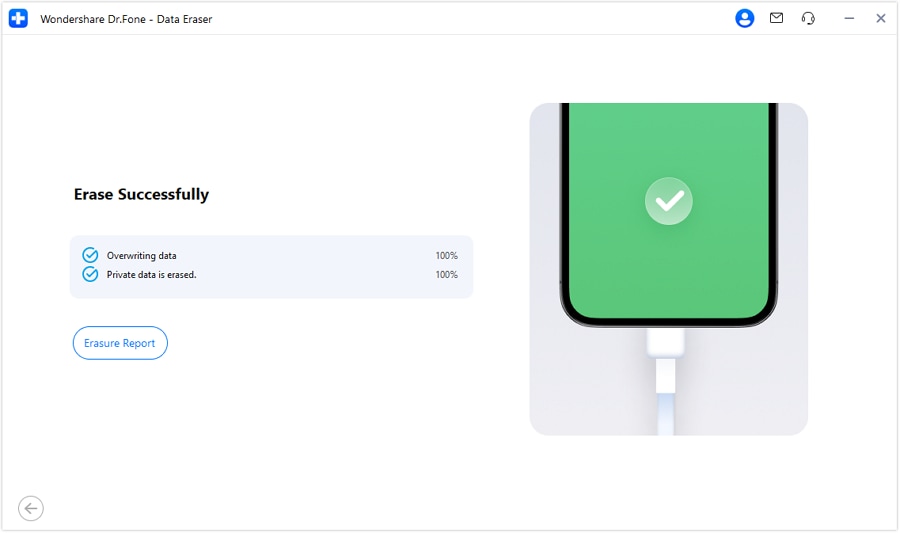
Your Nokia 105 Classic phone has now been completely wiped, giving it the appearance of being brand new.
 safe & secure
Dr.Fone - Phone Backup (easy backup before a new hard reset)
Step 1: Connect your Nokia 105 Classic phone to your PC.
Launch Dr.Fone on your PC and choose “Phone Backup” from the list of options.
Then, connect your Nokia 105 Classic phone to the computer using a USB cord. Please ensure that the phone is in USB debugging mode. If your Nokia 105 Classic version is 4.2.2 or higher, a pop-up window on the Nokia 105 Classic phone will prompt you to accept USB Debugging. Please press the OK button.

To begin backing up the data on your Nokia 105 Classic phone, click Backup.
If you have previously used this application to back up your device, you may examine your backup history by clicking on “View backup history.”
Step 2: Choose which file types to back up.
After connecting the Nokia 105 Classic phone, pick the file types you wish to back up. Dr.Fone has already tested all of the file kinds for you. Then, to begin the backup process, click Backup.

The backup will take a few moments. Please do not detach your Nokia 105 Classic phone, use it, or erase any data from it during the backup process.

When the backup is finished, you can view the contents of the backup file by clicking the View the backup button.
safe & secure
The Bottom Line
Now that you know how to hard reset Nokia 105 Classic it is time to implement all the possible ways and see which one works for you. We also recommend you to proceed with backing up and restoration of all the information so that you will not have to repent in the end. It is all about using smart tools like Dr.Fone - Data Eraser and Dr.Fone - Phone Backup.
Is your Nokia 105 Classic working too slow? Here’s how you can hard reset it
If Nokia 105 Classic 3.4 hard reset or Nokia 105 Classic hard reset is the only option for your mobile phone, you can perform a factory reset to make your device function as it did on the first day. You may need a hard reset if it works slowly, hangs, you want to bypass screen lock, your memory is full, and you want to erase everything, you want to sell or give your device away, and you don’t want anyone to be able to access your files or passwords.
The following instructions will show you how to completely wipe up all of your data and restore the Nokia 105 Classic to its factory-fresh condition.
Part 1: Why do I Need to Hard Reset My Nokia 105 Classic?
We advise you to remove all accounts from the Nokia 105 Classic device before performing a factory reset, especially if you plan to sell, give away, or donate the 3.4. It is also a good idea to unlink the Google account. By doing this, we can prevent issues for new users as some more recent smartphones have a feature called FRP, or Factory Reset Protection, which requires the Google account or PIN number that was originally used to set up the Nokia 105 Classic when a device is factory restored.
Part 2: How to Hard Reset My Nokia 105 Classic
1. Fastboot Mode
- Shut down your phone.
- Add a USB cord to your computer or laptop.
- Your phone should now start up in Fastboot Mode after you press and hold the Volume Down + Power buttons for a few seconds. Nokia 105 Classic Recovery Mode and Fastboot Mode
- Using the ADB command, start Nokia 105 Classic in Bootloader Mode or Fastboot Mode.
- If your computer has ADB and Fastboot drivers installed, and your phone has USB debugging turned on, execute the command below after connecting it.
- Launch Command Prompt (CMD) on your PC, then type the command listed below.
reboot bootloader using adb
- After some time, you will see that your Nokia 105 Classic has been hard reset.
2. Hard reset with hardware key button
- Choose “wipe data/factory reset” on your Nokia 105 Classic to do a hard reset. Scroll down with the Volume buttons, and press the Power key to agree.
- Next, choose yes from the menu if further confirmation is required, and then click the Power button once.
- Lastly, press the Power key and choose the Reboot system.
- Do not forget to charge your phone.
- Initially, turn off your phone.
- Now Press the Volume Up + Power key for a few seconds to enter recovery mode.
- Press and hold the Power and Volume Up buttons at the same time until the Nokia 105 Classic device vibrates. Release all the presses if the Nokia 105 Classic logo or Recovery screen shows.
- You can give your phone up to 30 seconds to display the recovery screen.
Bonus Tips
Dr.Fone - Data Eraser (delete all data completely)
Dr.Fone - Data Eraser helps you quickly get rid of all the unwanted information and all of your data however it is always advisable to back it up using the Dr.Fone - Phone Backup.
Let’s see how you can delete completely all the data using Dr.Fone - Data Eraser. do not worry the next section is about how you can back up and restore the data before erasing it completely using Dr.Fone - Phone Backup.
Step 1: Connect your Nokia 105 Classic smartphone to your computer. Start Dr.Fone on your computer. Select “Data Eraser” from the tool list.
Connect your Nokia 105 Classic to the PC via a USB wire. Ensure that your phone has USB debugging turned on. You will see a pop-up window on your phone asking you to approve USB debugging.
Step 2: Begin wiping your Nokia 105 Classic phone.
Dr.Fone will then automatically recognize and connect to your Nokia 105 Classic smartphone. To begin wiping all of your data, select “Erase All Data.”.
Before proceeding, ensure that you have backed up any critical data because deleted data cannot be retrieved. After that, type “000000” to confirm your activity.
Dr. Fone will next proceed to wipe the data on your Nokia 105 Classic phone. The entire procedure takes only a few minutes. Turn off the phone and do not run any phone administration programs on the PC.
Step 3: Reset your phone’s factory data.
Once all app data, photos, and other private data have been completely erased, Dr.Fone will advise you to touch on Factory Data Reset or Erase All Data on the phone. You may use this to completely delete the phone’s settings.
Your Nokia 105 Classic phone has now been completely wiped, giving it the appearance of being brand new.
safe & secure
Dr.Fone - Phone Backup (easy backup before a new hard reset)
Step 1: Connect your Nokia 105 Classic phone to your PC.
Launch Dr.Fone on your PC and choose “Phone Backup” from the list of options.
Then, connect your Nokia 105 Classic phone to the computer using a USB cord. Please ensure that the phone is in USB debugging mode. If your Nokia 105 Classic version is 4.2.2 or higher, a pop-up window on the Nokia 105 Classic phone will prompt you to accept USB Debugging. Please press the OK button.
To begin backing up the data on your Nokia 105 Classic phone, click Backup.
If you have previously used this application to back up your device, you may examine your backup history by clicking on “View backup history.”
Step 2: Choose which file types to back up.
After connecting the Nokia 105 Classic phone, pick the file types you wish to back up. Dr.Fone has already tested all of the file kinds for you. Then, to begin the backup process, click Backup.
The backup will take a few moments. Please do not detach your Nokia 105 Classic phone, use it, or erase any data from it during the backup process.
When the backup is finished, you can view the contents of the backup file by clicking the View the backup button.
safe & secure
The Bottom Line
Now that you know how to hard reset Nokia 105 Classic it is time to implement all the possible ways and see which one works for you. We also recommend you to proceed with backing up and restoration of all the information so that you will not have to repent in the end. It is all about using smart tools like Dr.Fone - Data Eraser and Dr.Fone - Phone Backup.
Full Guide to Hard Reset Your Nokia 105 Classic
Nokia 105 Classic hard reset is needed when you wish to sell your phone or give it to someone. In such situations, you must have your data removed from the phone. So, to remove the whole data with a single click, there is no better method than a hard reset. A hard reset will remove photos, videos, contacts, applications, messages, etc. Therefore, you should use a reliable source to help save your system files. In this regard, we suggest Wondershare Dr.Fone.
Dr.Fone by Wondershare is a reliable tool for all your Android needs. It can erase, recover, unlock, back up, and do other things with just a single software. Therefore, this article explains how to reset Nokia 105 Classic and use Dr.Fone. We assure you that your privacy will be safe, and no file corruption will occur while using this program.
Part 1: Some Common Causes About Nokia 105 Classic Hard Reset
Some of the most common situations that require Nokia 105 Classic Hard Reset are:
- When you try to sell your Nokia 105 Classic phone or give it to others, you must delete your data. To do so, you must hard reset your phone.
- Too many wrong password/pattern attempts can lock your device. Hence, a hard reset will unlock your phone in recovery mode.
- If your device functions too slowly, a hard reset will make it faster. A hard reset will clear the cache and unwanted files, so your phone runs smoothly.
- Lastly, an Nokia 105 Classic hard reset prevents your device from constant crashes. Therefore, if your phone has some software issue, look no further.
Part 2: Easy Ways for Your Nokia 105 Classic Hard Reset
1. Hard Reset from Settings
Step 1: Before you continue with the hard reset or factory reset on your Nokia 105 Classic smartphone. However, make sure you have a backup of the important data put away on the phone.
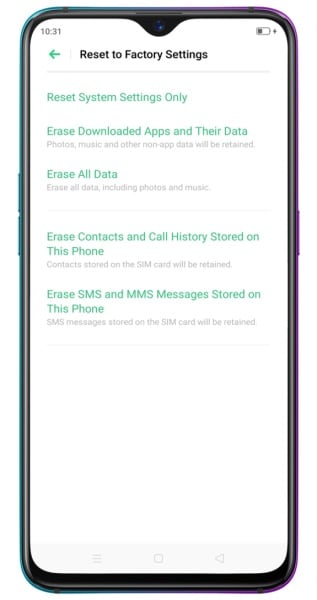
Step 2: If you wish to do a straightforward hard reset, head to the Settings menu and search “Erase All Data” or “Factory Reset”.
Step 3: Tap the “Erase All Data” choice and snap on “OK” once you find it.
Step 4: Approve the command in the popup window. However, ensure that your Nokia 105 Classic phone has an adequate battery to start and reset. You can put your phone on charging if the battery levels are low.
2. Recovery Mode
Recovery mode assists you in opening the hidden features on your Nokia 105 Classic. By utilizing the Recovery mode, you can perform a hard reset on your device and wipe data. The following are the steps to get to the recovery mode on Nokia 105 Classic and complete the hard reset:
Step 1: Firstly, your Nokia 105 Classic must be turned off to perform a hard reset. Press and hold the power key on your Nokia 105 Classic smartphone for around 10 seconds to turn it off.
Step 2: Simultaneously, press and hold Power and the volume down keys until the Nokia 105 Classic logo springs up on the screen. That will raise the Recovery mode screen.
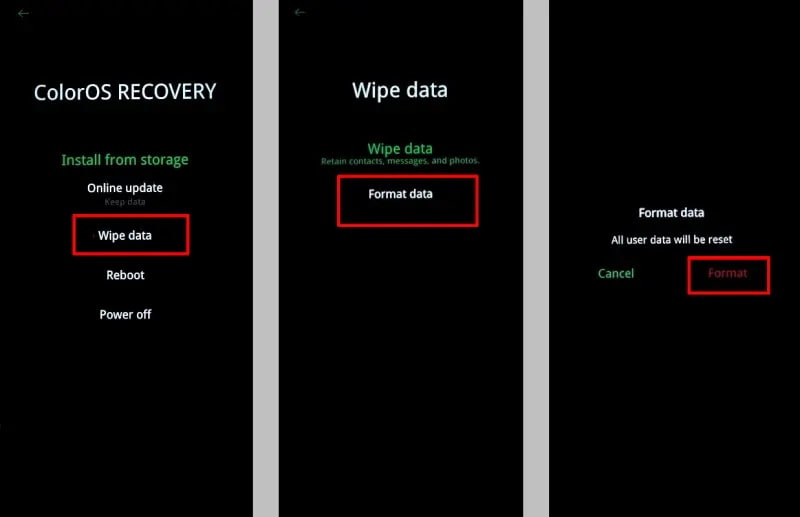
Step 3: Select your preferred language and tap on “Wipe Data”.
Step 4: You will be approached to enter the confirmation code (screen lock PIN).
Step 5: Complete the above steps and select the Format Data choice afterward.
Step 6: Click OK to finish the process, and that’s how to reset Nokia 105 Classic phone.
3. Dr.Fone-Data Eraser
Whether you intend to Change your phone/tablet or give them to somebody, you should delete your data. However, the physically deleted records on Android can be restored, especially with some expert tools. In light of this, the Dr.Fone Data Eraser ensures you erase information on Nokia 105 Classic permanently. It can’t be recovered using any means, including proficient tools. Here’s how:
- Open Dr.Fone on your PC and select “Data Eraser,” among other tools.
- Connect your Nokia 105 Classic phone to the PC through a USB cable.
- Click the “Erase All Data” button to eradicate all your data.
- Key in “000000” into the popup window to affirm your activity.
- Then, at that point, Dr.Fone will begin deleting all data on your Nokia 105 Classic phone.
- Then click the Factory Data Reset or Erase All Data on the phone. That will assist you with totally cleaning all the settings on the phone.
safe & secure
4. Dr.Fone-Phone Backup
Dr.Fone Phone Backup (Android) is a wonderful tool for backups and restoration that you can depend on totally. It has a backup feature that can back up a large portion of the Nokia 105 Classic files. Not just those, the backup tool can likewise recover files from your Android phone or tablet PC if you lose them unexpectedly. The method involved with backing up is quick enough. At the same time, you can select a few files to recover, which will save time. Here’s what you need to do:
- Open Dr.Fone on your PC, and select the “Phone Backup” tool.
- Then, at that point, connect your Nokia 105 Classic phone to the PC through a USB cable and tap on OK.
- Click Backup to begin the Backup of Nokia 105 Classic phone data.
- After the Android phone is connected, select the File types you need to back up. Of course, Dr.Fone has checked all the document types for you. Then click on Backup to begin.
- The process will require a couple of minutes.
- After it is finished, you can tap on View the backup button to see what’s in the backup record.
safe & secure
Conclusion
Above are some strategies with which you can do an Nokia 105 Classic hard reset. However, a backup is needed if you don’t want to lose your data after a reset. Therefore, in the end, we have mentioned the best tools for that purpose. You must consider these tools before going for a simple reset. Anybody can perform the last two sections (Dr.Fone tools) without issue. Therefore, we strongly suggest you download and install the Dr.Fone tool by Wondershare.
- Title: Is your Nokia 105 Classic working too slow? Heres how you can hard reset it | Dr.fone
- Author: Ian
- Created at : 2024-09-23 03:01:29
- Updated at : 2024-09-24 00:20:10
- Link: https://techidaily.com/is-your-nokia-105-classic-working-too-slow-heres-how-you-can-hard-reset-it-drfone-by-drfone-reset-android-reset-android/
- License: This work is licensed under CC BY-NC-SA 4.0.