
How To Recover Lost Data from Apple iPhone SE (2020)? | Dr.fone
How To Recover Data from Apple iPhone SE (2020)?
Data recovery is a process that is quite essential for users who find it important to retrieve their important data before shifting to a new device. If it comes to a point where your data is inaccessible from a particular device directly, you will need a recovery service. Dr.Fone - Data Recovery (iOS) comes as an optimal solution to recover from iOS devices directly.
Upgrade to the Newest Dr.Fone Manage Your Phone Wherever You Go
Note: You can easily utilize the services of data recovery for any iOS device. Furthermore, the platform helps users recover data file types such as photos, contacts, messages, notes, calendars, reminders, attachments, Safari bookmarks, voice memos, call history, Safari history, FaceTime, app photos and videos and documents.
Recover Data From iOS Device Directly
Since you are seeking to recover from iTunes, the process of executing this entire thing is quite simple. You are just required to follow the steps provided next for effective data recovery.
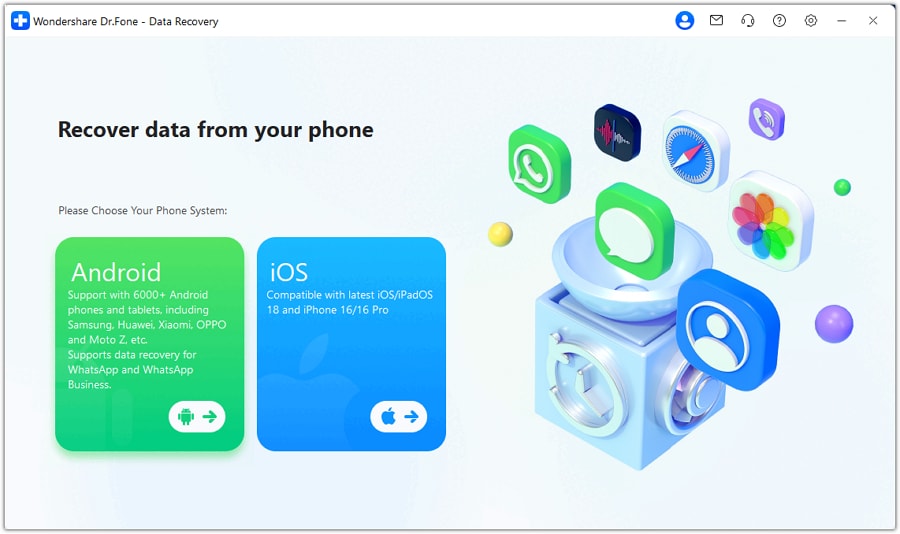
- Step 1 Open Data Recovery Tool for iOS
You will have to initiate the process by launching Dr.Fone on your computer after its successful installation. Continue to Toolbox > Data Recovery to start the tool.

Dr.Fone Mac version still has the old interface, but it does not affect the use of Dr.Fone function. We will update it as soon as possible.
- Step 2 Select iOS Device Type
Continue to select the option of iOS from the next screen, as you will be working on an iOS device for data recovery.
- Step 3 Proceed to Initiate Recovery
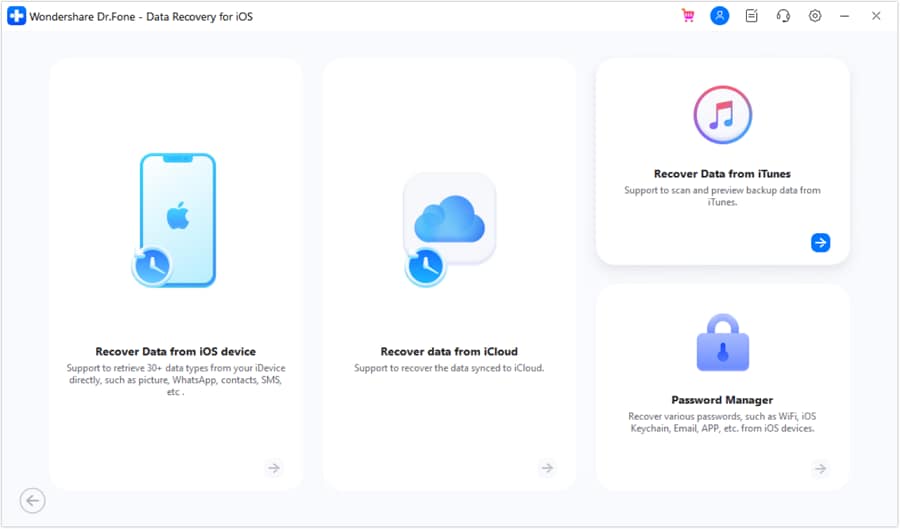
As you come to the next screen, select the option of Recover Data from an iOS device out of all the available options.

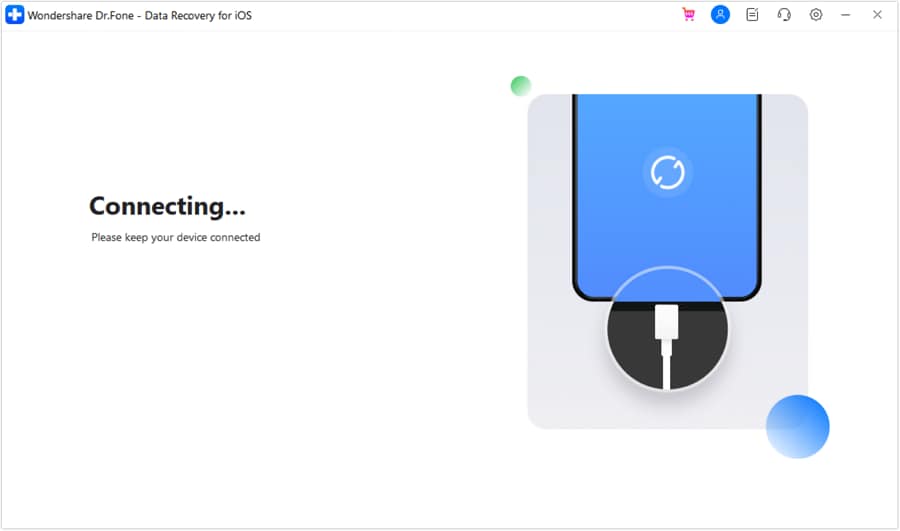
- Step 4 Connect iDevice to Computer
The next screen will prompt you to connect the iOS device to the computer. Attach the Apple iPhone SE (2020) device with a USB cable and let the platform detect it for you.
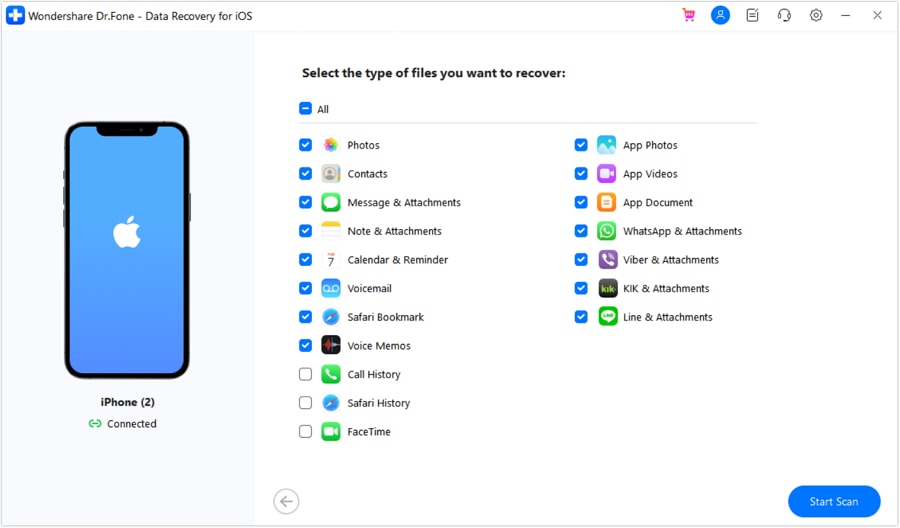
- Step 5 Select File Types to Recover
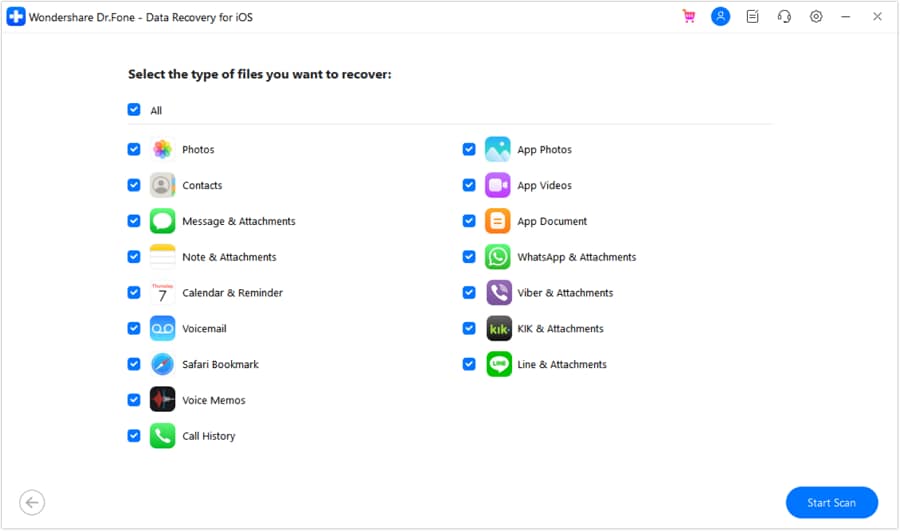
As the Apple iPhone SE (2020) is detected, the next screen displays all the file types that can be recovered through the process. You can select any specific file types that you want or do not want to recover from the Apple iPhone SE (2020). Once done, click Start Scan on the bottom-right of the screen.
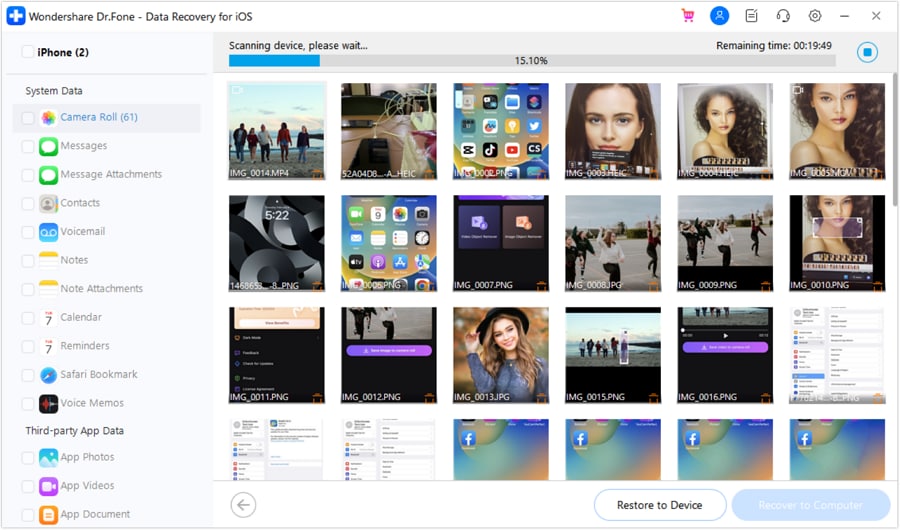
- Step 6 Let Platform Scan Data
For the next window, you will be provided with a preview of all the data that is being recovered from the iOS device. Let the platform conclude the scanning of the iOS device, after which you can easily preview all the recovered data.
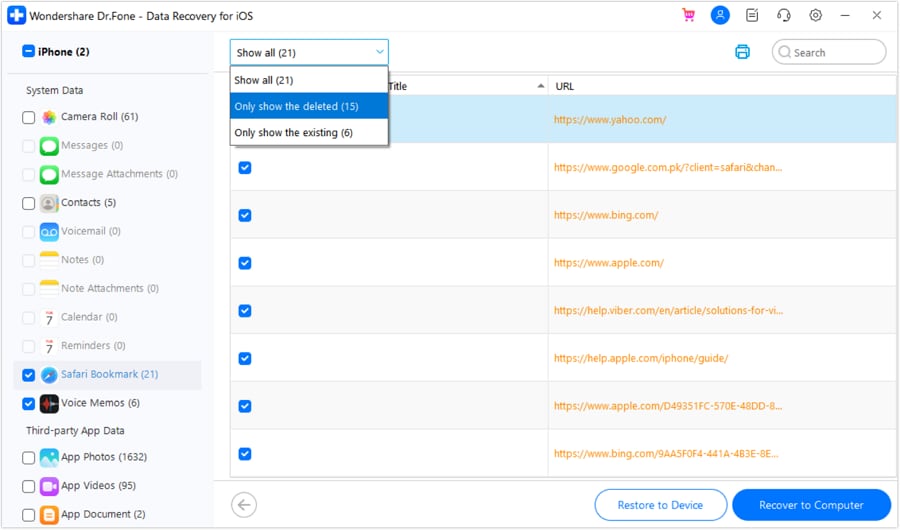
- Step 7 Preview Data and Proceed to Restore
After the scanning concludes, you can select and preview any specific data that you want to recover. For filtering out the display results, select the tab on the top and define if you want to view all the data or the existing or deleted data. Following this, select the data you want to recover and continue to the Restore to Device button on the bottom.
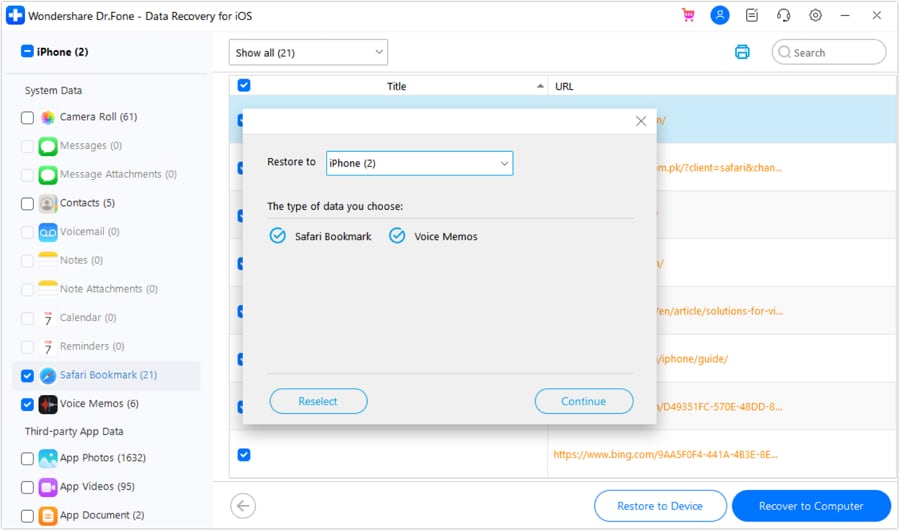
- Step 8 Select Device to Restore
As you tap on the specific button, a window appears asking you to select the Apple iPhone SE (2020) where you want to restore the data. Select the Apple iPhone SE (2020) device and view which data is recoverable. Proceed by clicking the Continue button.
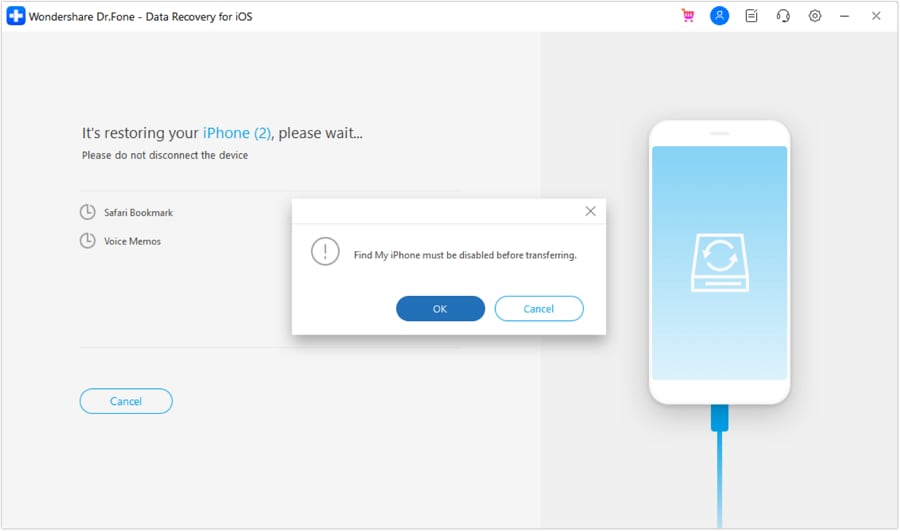
- Step 9 Disable Find My Service
You will have to disable the Find My service on your iDevice to restore the data to the Apple iPhone SE (2020) device. Once you have disabled it from your iDevice, continue to click OK on the computer.
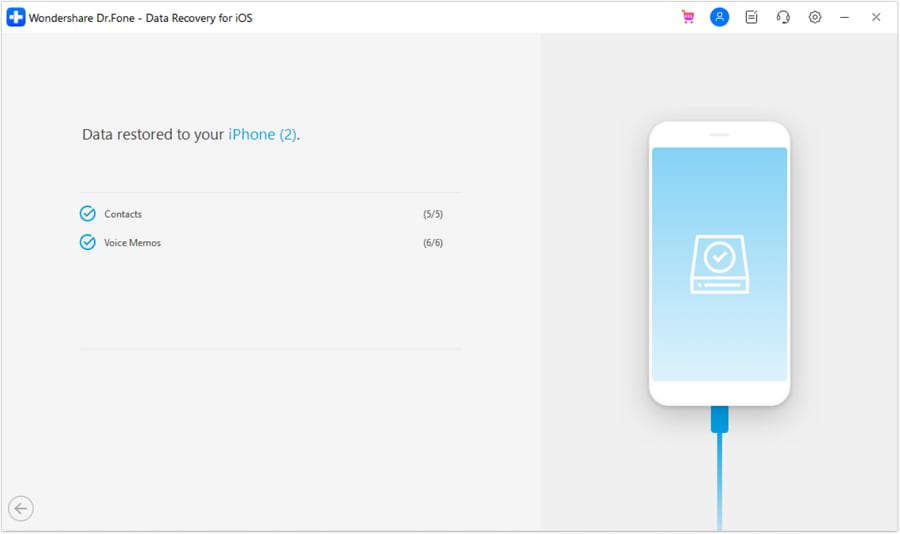
- Step 10 Successfully Restore Data to the Device
The data will be successfully restored and prompted on the screen.
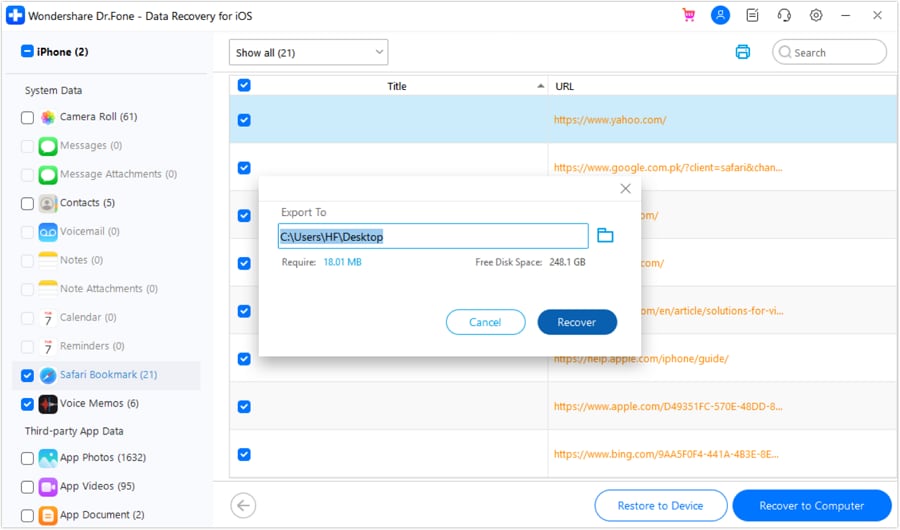
- Step 11 Recover Data to Computer
If you wish to recover the data back into the computer, select the required data and click Recover to Computer. A prompt appears asking to set a location for the Apple iPhone SE (2020) device. Define the location and click Recover to execute the process.

How To Recover Apple iPhone SE (2020) Data From iTunes?
Keeping backups of your data at multiple locations saves you from the drill of losing something essential. Users may find it difficult to comprehend to recover data from iTunes. While there are many services offering this option, not many are effective and efficient. This is where Dr.Fone - Data Recovery (iOS) comes in handy in helping users recover from iTunes.
Upgrade to the Newest Dr.Fone Manage Your Phone Wherever You Go
Note: The tool holds support for all iOS versions, along with the latest iOS versions. It supports various data types, such as photos, contacts, messages, attachments, notes, calendar, reminders, voicemail, Safari bookmarks, voice memos, call history, application photos and videos, application documents.
Recover Apple iPhone SE (2020) Data From iOS iTunes
Since you are seeking to recover from iTunes, the process of executing this entire thing is quite simple. You are just required to follow the steps provided next for effective data recovery.
- Step 1 Start Data Recovery Tool
You will have to initiate the process by launching Dr.Fone on your computer after its successful installation. Continue to Toolbox > Data Recovery to start the tool.
Dr.Fone Mac version still has the old interface, but it does not affect the use of Dr.Fone function. We will update it as soon as possible.
- Step 2 Select Device Type
As it opens on a new window, continue to select iOS as the Apple iPhone SE (2020) device type, which will be dealt with in the process.
- Step 3 Proceed to Recover From iTunes
Once you continue to the next screen, select the Recover Data from iTunes option and initiate data recovery from iTunes.
- Step 4 Select Backup and Start Scanning
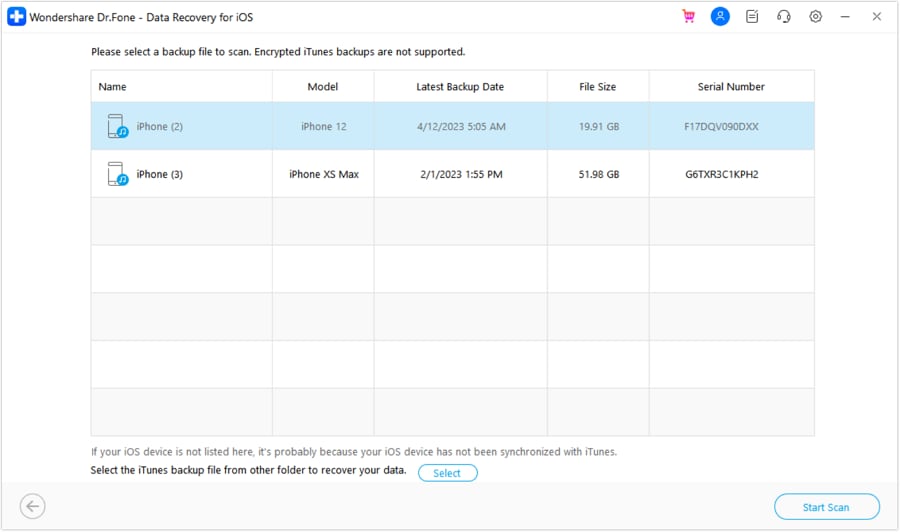
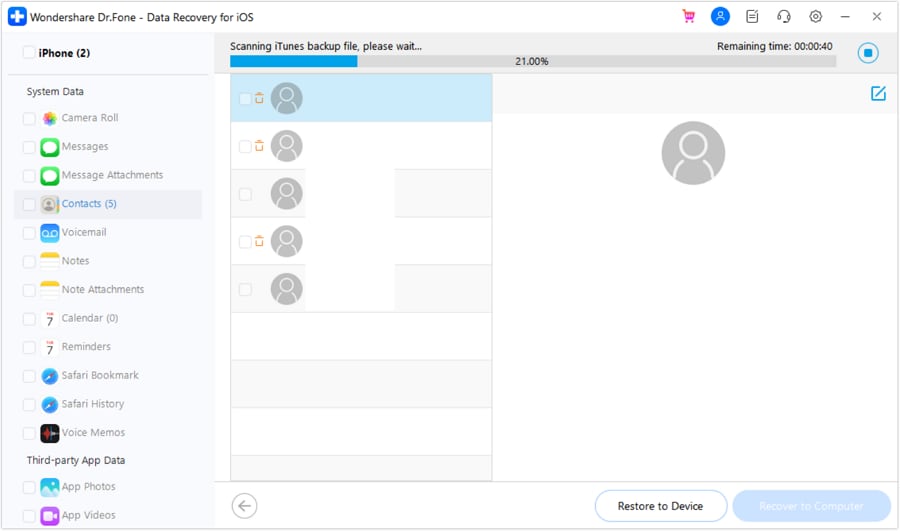
The next screen shows the list of iTunes backups that are detected by the platform on the Apple iPhone SE (2020) device. Once the list comes in display on the screen, proceed to select any specific backup and hit Start Scan on the bottom-right of the screen.
- Step 5 Select Data Types to Scan
On continuing to the next screen, select the file types that you want to recover. Checkmark all the data types you wish to recover and click Start Scan to scan the iTunes backup file.
- Step 6 Preview Progress
The next screen shows the progress of the scanning backup file, where the available data comes in the preview window.
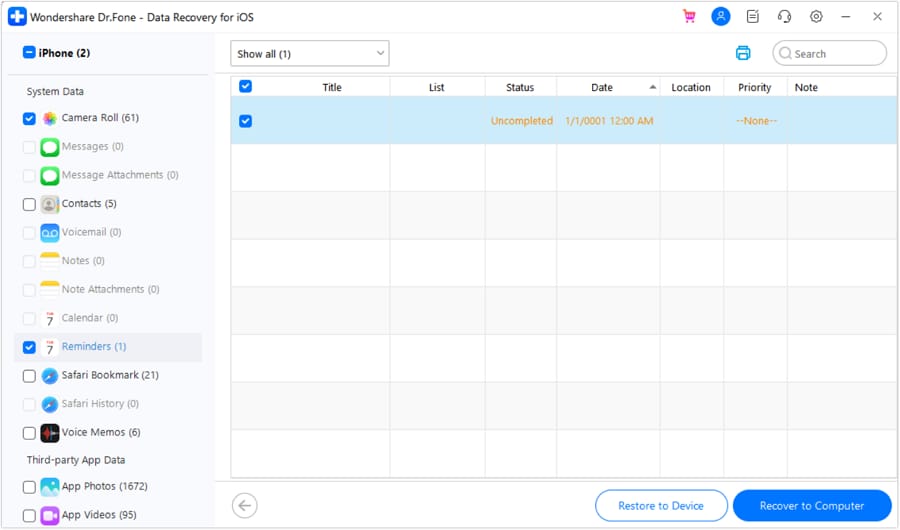
- Step 7 Continue to Restore to Device
As the entire backup data appears on the screen, you can continue and preview any respective data type you want. If you wish to restore it to the Apple iPhone SE (2020) device, select the data and proceed to the Restore to Device option at the bottom of the screen.
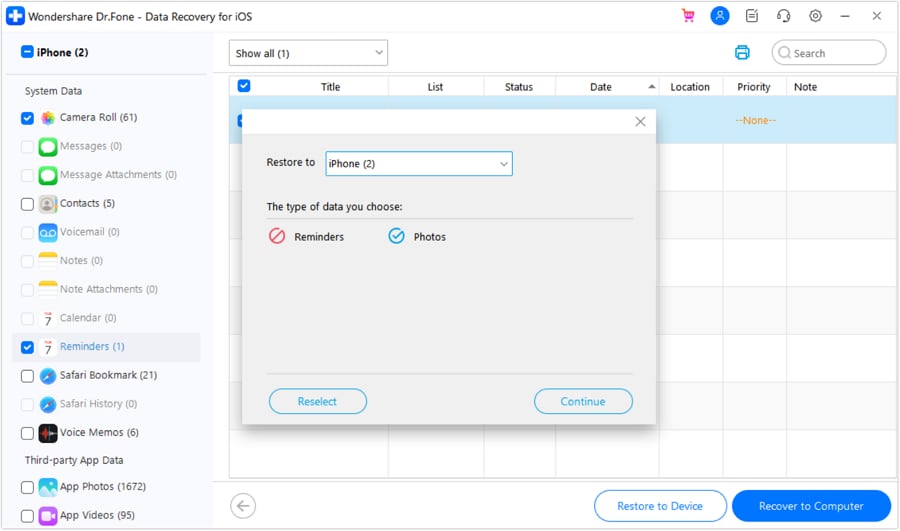
- Step 8 Select iDevice to Restore
A pop-up window asks you to select the Apple iPhone SE (2020) where you wish to restore the data types. The pop-up also shows the data types that can be restored to the Apple iPhone SE (2020) device. Once done, click Continue to initiate the restoration.
- Step 9 Trust iDevice To Restore the Data
The following window shows the user to trust and unlock the Apple iPhone SE (2020) device to execute the restoration process.

- Step 10 Complete Data Recovery From iTunes
As you continue to the next screen, the restoration progress is displayed properly. You can click Cancel to stop the process. Once it is completed, the platform prompts it by displaying it on the screen.

- Step 11 Recover iTunes Data to Computer
Moreover, if you wish to restore the data to the computer for saving it as a backup, select the data types and click Recover to Computer on the bottom-right of the screen. A pop-up appears asking the user to set a location where it would export the entire selected data. Click Recover to execute the process with ease.

How To Recover Data from Apple iPhone SE (2020)?
Data recovery is a process that is quite essential for users who find it important to retrieve their important data before shifting to a new device. If it comes to a point where your data is inaccessible from a particular device directly, you will need a recovery service. Dr.Fone - Data Recovery (iOS) comes as an optimal solution to recover from iOS devices directly.
Upgrade to the Newest Dr.Fone Manage Your Phone Wherever You Go
Note: You can easily utilize the services of data recovery for any iOS device. Furthermore, the platform helps users recover data file types such as photos, contacts, messages, notes, calendars, reminders, attachments, Safari bookmarks, voice memos, call history, Safari history, FaceTime, app photos and videos and documents.
Recover Data From iOS Device Directly
Since you are seeking to recover from iTunes, the process of executing this entire thing is quite simple. You are just required to follow the steps provided next for effective data recovery.
- Step 1 Open Data Recovery Tool for iOS
You will have to initiate the process by launching Dr.Fone on your computer after its successful installation. Continue to Toolbox > Data Recovery to start the tool.
Dr.Fone Mac version still has the old interface, but it does not affect the use of Dr.Fone function. We will update it as soon as possible.
- Step 2 Select iOS Device Type
Continue to select the option of iOS from the next screen, as you will be working on an iOS device for data recovery.
- Step 3 Proceed to Initiate Recovery
As you come to the next screen, select the option of Recover Data from an iOS device out of all the available options.
- Step 4 Connect iDevice to Computer
The next screen will prompt you to connect the iOS device to the computer. Attach the Apple iPhone SE (2020) device with a USB cable and let the platform detect it for you.
- Step 5 Select File Types to Recover
As the Apple iPhone SE (2020) is detected, the next screen displays all the file types that can be recovered through the process. You can select any specific file types that you want or do not want to recover from the Apple iPhone SE (2020). Once done, click Start Scan on the bottom-right of the screen.
- Step 6 Let Platform Scan Data
For the next window, you will be provided with a preview of all the data that is being recovered from the iOS device. Let the platform conclude the scanning of the iOS device, after which you can easily preview all the recovered data.
- Step 7 Preview Data and Proceed to Restore
After the scanning concludes, you can select and preview any specific data that you want to recover. For filtering out the display results, select the tab on the top and define if you want to view all the data or the existing or deleted data. Following this, select the data you want to recover and continue to the Restore to Device button on the bottom.
- Step 8 Select Device to Restore
As you tap on the specific button, a window appears asking you to select the Apple iPhone SE (2020) where you want to restore the data. Select the Apple iPhone SE (2020) device and view which data is recoverable. Proceed by clicking the Continue button.
- Step 9 Disable Find My Service
You will have to disable the Find My service on your iDevice to restore the data to the Apple iPhone SE (2020) device. Once you have disabled it from your iDevice, continue to click OK on the computer.
- Step 10 Successfully Restore Data to the Device
The data will be successfully restored and prompted on the screen.
- Step 11 Recover Data to Computer
If you wish to recover the data back into the computer, select the required data and click Recover to Computer. A prompt appears asking to set a location for the Apple iPhone SE (2020) device. Define the location and click Recover to execute the process.
- Title: How To Recover Lost Data from Apple iPhone SE (2020)? | Dr.fone
- Author: Ian
- Created at : 2024-09-17 16:50:00
- Updated at : 2024-09-24 16:08:11
- Link: https://techidaily.com/how-to-recover-lost-data-from-apple-iphone-se-2020-drfone-by-drfone-ios-data-recovery-ios-data-recovery/
- License: This work is licensed under CC BY-NC-SA 4.0.