
:max_bytes(150000):strip_icc():format(webp)/family-hanging-out-watching-videos-online-1166432791-309c6f7ac8cb4cc99875db5a77fd6f35.jpg)
How to Hard Reset Vivo Y100A Without Password | Dr.fone
How to Reset Vivo Y100A without Losing Data
Nothing good lasts forever, not even your all-singing, all-dancing new Android smartphone. The warning signs are obvious, apps taking forever to load, constant force close notifications, and a battery life shorter than an episode of Westworld. If you recognize these symptoms then listen up, because your phone may be headed for a meltdown and there’s only one thing left to do. It’s time to reset your Android phone.
Before taking the plunge, there are a number of factors to consider. We’ve put together a quick guide to let you know what you need to know… and what you need to do. Before we start deleting stuff, however, it’s important to understand what a Factory reset is.
Part 1: What is Factory Reset?
There are two types of reset for every Android device, soft and hard resets. A soft reset is just a way to force the Android operating system to shut down in the event of a freeze and you only risk losing any data which wasn’t saved prior to the reset.
A hard reset, also known as a factory reset and a master reset, returns the Vivo Y100A device to the condition it was in when it left the factory. Performing a factory reset will permanently delete any and all personal data you have on your device. This includes any personal settings, apps, pictures, documents, and music stored on your device. A factory reset is irreversible, which means before considering taking this step, it is a good idea to back your data and settings up. A factory reset is a great way to purge buggy updates and other malfunctioning software and can give your phone a new lease of life.
Signs You Need to Reset Phone
You’ll probably already know if your phone needs a reset, but if you’re unsure, look for some of the following signs. If you recognize any of the following symptoms then a factory reset is probably a good idea.
- If your phone is running slowly and you’ve already tried deleting Apps and data, but it hasn’t resolved anything.
- If your Apps are crashing or you keep getting ‘force close’ notifications from your operating system.
- If your Apps are taking longer to load than usual, or your browser is running slow.
- If you find your battery life is worse than usual and you need to charge your phone more often.
- If you are selling, exchanging, or just giving your phone away. If you don’t reset it, the new user can gain access to cached passwords, personal details, and even your pictures and videos.
Remember factory resetting will erase everything on your device, so it’s essential that you back up anything you can’t afford to lose.
Part 2: Back Up Your Data Before Factory Reset
There are a number of Android data backup software for PC out there. Having a Google account will help you save your contacts and settings, but it won’t save your pictures, documents, or music. There are numerous cloud-based systems available like Dropbox and Onedrive where your data is saved onto a cloud-based server, but you’ll need a data connection or wi-fi to restore to your device and of course, you are trusting a third party with your data. We recommend Dr.Fone Basic . It’s easy to use and will save everything and best of all you know exactly where it is.
Dr.Fone - Phone Backup (Android) enables you to backup all your data, including contacts, messages, call history, calendar, video and audio files, etc. You can choose to individually back up data or everything directly to your computer and then restore it whenever you like.
Back up and restore data from your device to a computer with a single click. It’s a tried and tested program and compatible with over 8000+ devices. To use it, click the link, download it and follow these instructions.
![]()
Dr.Fone Basic
Backup & Restore Data Turns Flexible
- One-click to back up the whole iOS and Android device to your computer.
- Export what you want from the backup to your computer.
- Your device’s data remains intact during the restore process.
- Fully compatible with the latest iOS and Android version.
3,823,152 people have downloaded it
How to backup Android phone with Dr.Fone Basic
Step 1. Open Dr.Fone on your computer and connect your Android device. Go to My Backup > Back Up Now. Set the Dr.Fone Link app as your default SMS app on your Android device.

Step 2. Wait for the backup process to complete. A progress bar will show you how far along it is.

Step 3. Once the backup is done, it’ll show up in your window. To see the backup on your PC, click Open in Folder. If you want to see all backups, select View Backups.

Also, you can watch this video to learn more details.
 safe & secure
Part 3: How to Factory Reset Android Phone
After your data is safely tucked away, it’s time to tackle the reset itself. There are a few different ways to reset your device and we’ll look at them all in turn.
Method 1. Using the Settings Menu To Factory Reset Your Device
You can factory data reset your Android device via the settings menu by following these steps.
Step 1. Open your phone, drag down the ‘Options’ menu and select the ‘Settings’ menu. Look for the little cog in the top right of your screen.
Step 2. Find the option for ‘Back up and Restore’ (please note - using Google to back up your account is a good idea, but it won’t save your music, documents, or pictures.)
Step 3. Press the button for ‘Factory Data Reset’ (please note - this is irreversible)
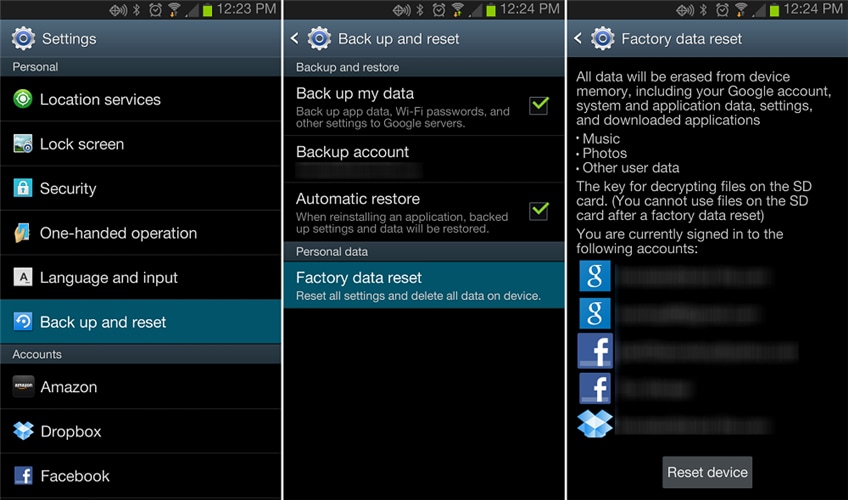
Step 4. If you have done this correctly a little Android robot will appear on your screen as the Vivo Y100A device resets itself.
Method 2. Resetting Your Phone in Recovery Mode
If your phone is misbehaving it might be easier to reset it via Recovery Mode. To do this you must turn your device off first.
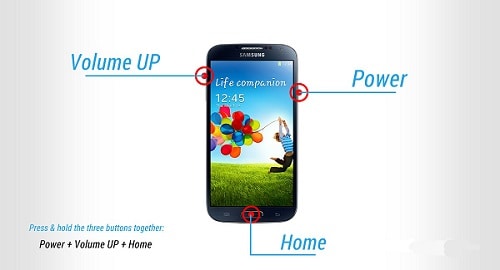
Step 1. Press and hold the Volume up button and the Power button at the same time. The phone will now boot in Recovery Mode.
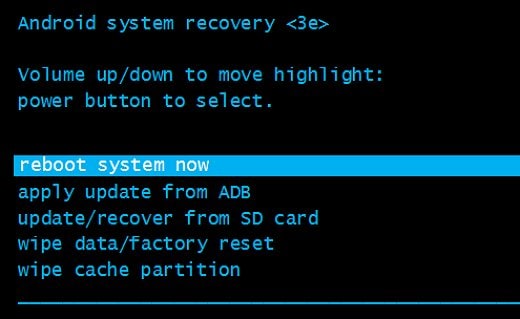
Step 2. Use the Volume down button to choose Recovery Mode. To navigate use the Volume up button to move the arrow and the Volume down button to select.
Step 3. If done correctly. You’ll find an image of an Android robot alongside a red exclamation mark and the words ‘No command’.
Step 4. Hold down the Power button and press the Volume up button then release it.
Step 5. Using the volume buttons scroll to ‘wipe data/factory reset’ and then press the Power button.
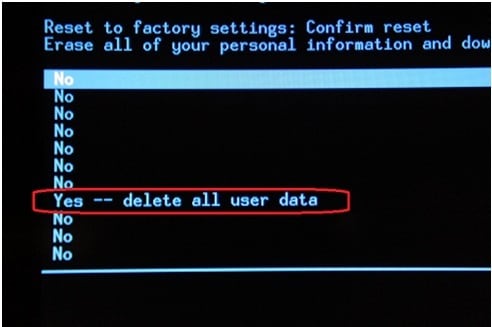
Step 6. Scroll to ‘Yes - erase all user data’ and to complete the process press the Power button.
Please note: Devices running Android 5.1 or above, will still require you to enter your Google Password to complete this reset.
Method 3. Resetting Your Phone Remotely With Android Device Manager
You can also perform a factory reset by using the Android Device manager App. Obviously, you’ll need to have Android Device Manager installed on your phone for which you’ll need a Google Account.
Step 1. Sign in to the App and locate your device on whatever medium you are currently using. With Android Device Manager it is possible to Factory Reset a device remotely by using a PC or other device, but your phone must be logged into your Google account and have an active internet connection.
Step 2. Select erase all data. This is particularly effective if you have lost or had your phone stolen and your device is running Android 5.1 or higher as whoever has your phone will still need your Google Password to be able to reset the Phone.
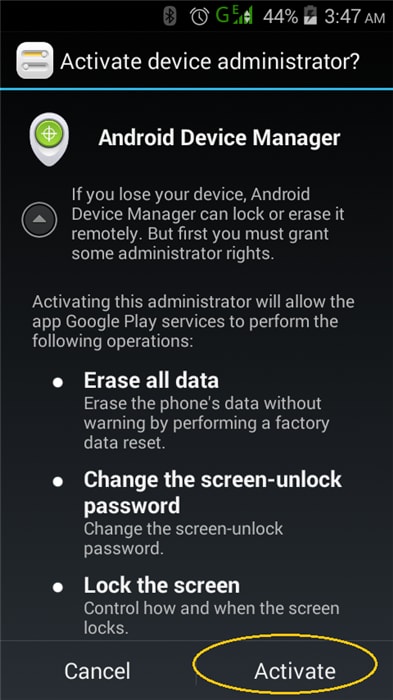
Please note: this reset will also delete Android Device Manager and you will therefore be unable to locate or track your device.
Once you have successfully reset your Android device to its factory settings, all you need to do is restore your original data. After you’ve completed this step your device should be just like new.
Part 4: Restoring Your Phone After a Reset
It can be quick and scary seeing your phone return to its original state. But don’t panic. Your data is still safely tucked away on your computer. To restore your contacts and Apps just connect your Vivo Y100A to the Internet and login into your Google account when prompted.
Once you have restarted your mobile, connect it to your PC and open Dr.Fone on your computer. Select Phone Backup, and click on the Restore button to start restoring the data to your phone.
Dr.Fone will display all the backup files. Select the backup file you would like to restore and click View.
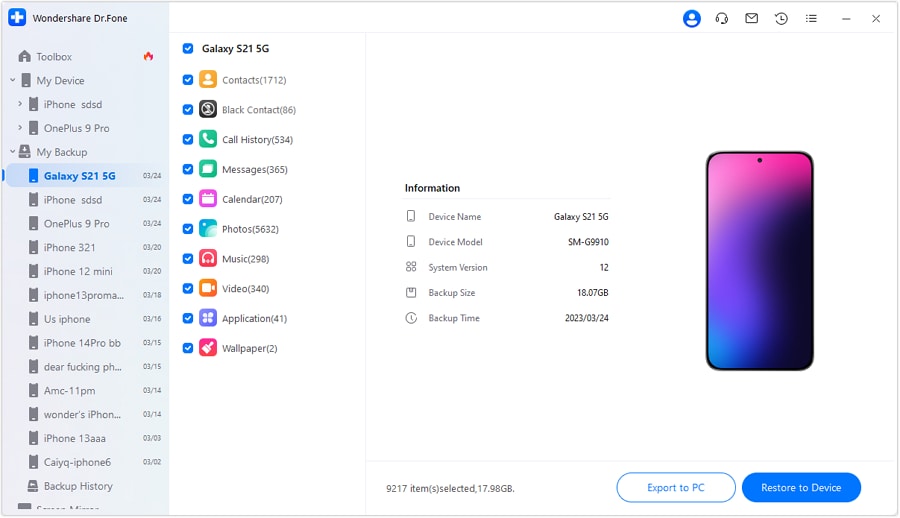
Then you will be able to select what files you want to restore. You can click Restore to Device to restore them all to your phone or just select individual data to restore.
Once you’ve successfully completed your first reset, you’ll realize how simple the whole process is and the next time you need to perform one, you’ll be able to do it with your eyes closed.
safe & secure
Bonus Tip: Are You Preparing to Exchange Your Phone?
After factory resetting your Android Phone, your phone should work smoothly. But what should we do if your phone is still not working as before? The App still crashes or your phone is still running slow, which may be caused by an old operating system or the phone is too old. It is time to change to a new phone. In this case, you may want to switch the data from the old phone to the new phone. How do achieve that? Dr.Fone - Phone Transfer is here. It is a dedicated tool to transfer everything from one old device to the new one! You can transfer data without any hassle because of user-friendly instructions.
![]()
Dr.Fone - Phone Transfer
Transfer Everything from Old Devices to New Devices in 1 Click!
- Works directly and transfer data between two cross-operating system devices in real-time.
- Works perfectly with Apple, Vivo Y100A, HTC, LG, Sony, Google, HUAWEI, Motorola, ZTE, Vivo Y100A, and more smartphones and tablets.
- Fully compatible with major providers like AT&T, Verizon, Sprint, and T-Mobile.
- Fully compatible with the latest iOS and Android.
3981454 people have downloaded it
Conclusion
Resetting your Android device can resolve performance issues and prepare it for resale or gifting. However, a factory reset erases all personal data, making it essential to back up your data before proceeding.
Tools like Dr.Fone Basic are recommended for this purpose. You can perform a factory reset using the settings menu, recovery mode, or Android Device Manager. Remember, a factory reset is irreversible, so take every precaution necessary to safeguard your important data.
Thank you for reading and if we’ve been of some help please take the time to bookmark our page.
Is your Vivo Y100A working too slow? Here’s how you can hard reset it
If Vivo Y100A 3.4 hard reset or Vivo Y100A hard reset is the only option for your mobile phone, you can perform a factory reset to make your device function as it did on the first day. You may need a hard reset if it works slowly, hangs, you want to bypass screen lock, your memory is full, and you want to erase everything, you want to sell or give your device away, and you don’t want anyone to be able to access your files or passwords.
The following instructions will show you how to completely wipe up all of your data and restore the Vivo Y100A to its factory-fresh condition.
Part 1: Why do I Need to Hard Reset My Vivo Y100A?
We advise you to remove all accounts from the Vivo Y100A device before performing a factory reset, especially if you plan to sell, give away, or donate the 3.4. It is also a good idea to unlink the Google account. By doing this, we can prevent issues for new users as some more recent smartphones have a feature called FRP, or Factory Reset Protection, which requires the Google account or PIN number that was originally used to set up the Vivo Y100A when a device is factory restored.
Part 2: How to Hard Reset My Vivo Y100A
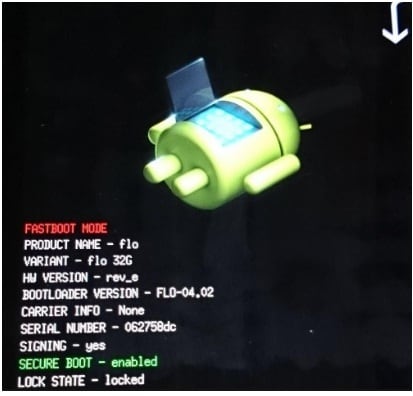
1. Fastboot Mode
- Shut down your phone.
- Add a USB cord to your computer or laptop.
- Your phone should now start up in Fastboot Mode after you press and hold the Volume Down + Power buttons for a few seconds. Vivo Y100A Recovery Mode and Fastboot Mode
- Using the ADB command, start Vivo Y100A in Bootloader Mode or Fastboot Mode.
- If your computer has ADB and Fastboot drivers installed, and your phone has USB debugging turned on, execute the command below after connecting it.
- Launch Command Prompt (CMD) on your PC, then type the command listed below.
reboot bootloader using adb
- After some time, you will see that your Vivo Y100A has been hard reset.
2. Hard reset with hardware key button
- Choose “wipe data/factory reset” on your Vivo Y100A to do a hard reset. Scroll down with the Volume buttons, and press the Power key to agree.
- Next, choose yes from the menu if further confirmation is required, and then click the Power button once.
- Lastly, press the Power key and choose the Reboot system.
- Do not forget to charge your phone.
- Initially, turn off your phone.
- Now Press the Volume Up + Power key for a few seconds to enter recovery mode.
- Press and hold the Power and Volume Up buttons at the same time until the Vivo Y100A device vibrates. Release all the presses if the Vivo Y100A logo or Recovery screen shows.
- You can give your phone up to 30 seconds to display the recovery screen.
Bonus Tips
Dr.Fone - Data Eraser (delete all data completely)
Dr.Fone - Data Eraser helps you quickly get rid of all the unwanted information and all of your data however it is always advisable to back it up using the Dr.Fone - Phone Backup.
Let’s see how you can delete completely all the data using Dr.Fone - Data Eraser. do not worry the next section is about how you can back up and restore the data before erasing it completely using Dr.Fone - Phone Backup.
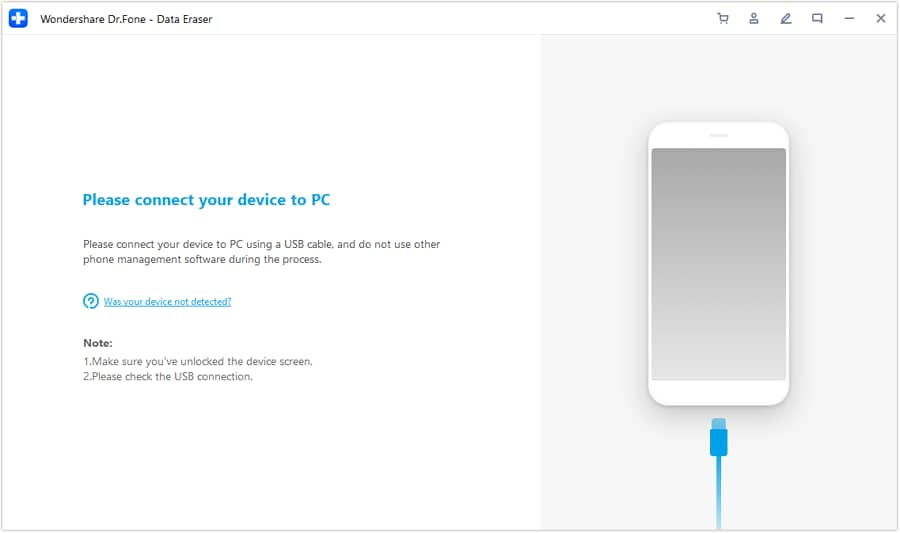
Step 1: Connect your Vivo Y100A smartphone to your computer. Start Dr.Fone on your computer. Select “Data Eraser” from the tool list.

Connect your Vivo Y100A to the PC via a USB wire. Ensure that your phone has USB debugging turned on. You will see a pop-up window on your phone asking you to approve USB debugging.
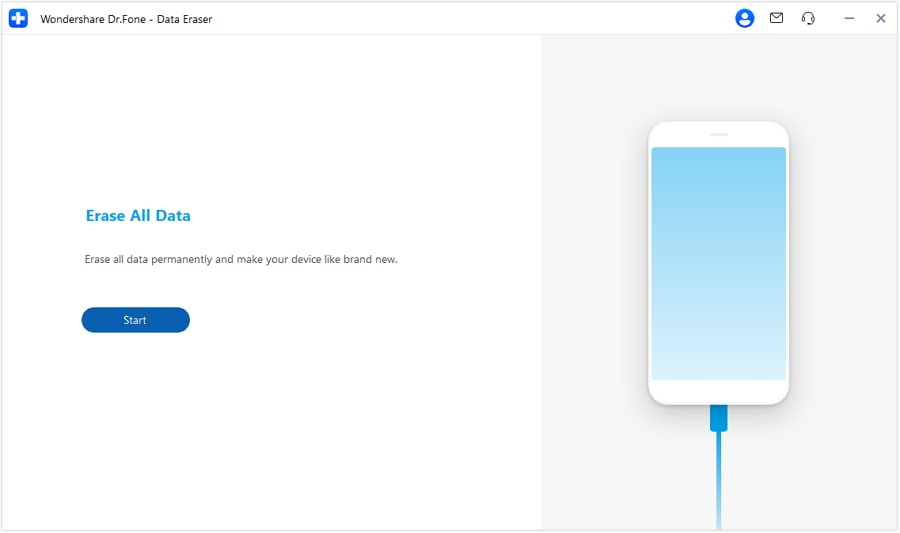
Step 2: Begin wiping your Vivo Y100A phone.
Dr.Fone will then automatically recognize and connect to your Vivo Y100A smartphone. To begin wiping all of your data, select “Erase All Data.”.
Before proceeding, ensure that you have backed up any critical data because deleted data cannot be retrieved. After that, type “000000” to confirm your activity.
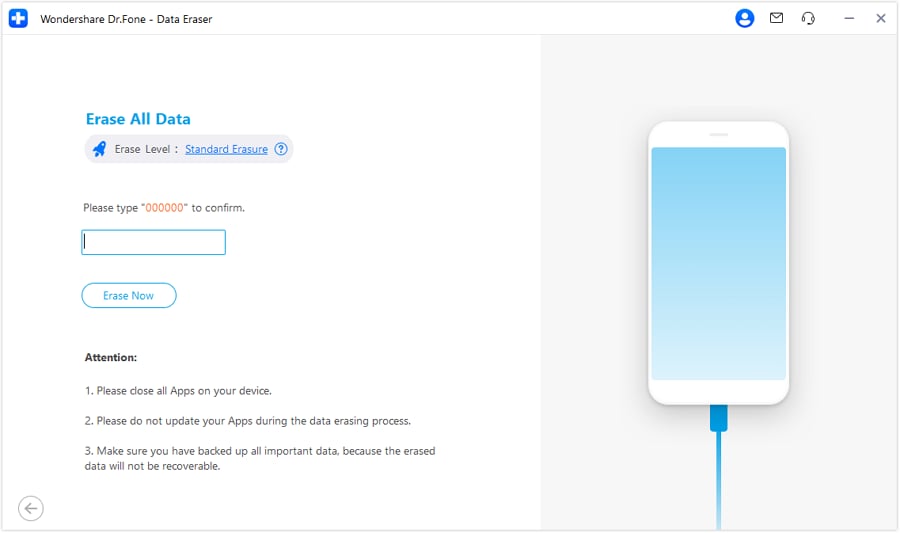
Dr. Fone will next proceed to wipe the data on your Vivo Y100A phone. The entire procedure takes only a few minutes. Turn off the phone and do not run any phone administration programs on the PC.
Step 3: Reset your phone’s factory data.
Once all app data, photos, and other private data have been completely erased, Dr.Fone will advise you to touch on Factory Data Reset or Erase All Data on the phone. You may use this to completely delete the phone’s settings.
Your Vivo Y100A phone has now been completely wiped, giving it the appearance of being brand new.
safe & secure
Dr.Fone - Phone Backup (easy backup before a new hard reset)
Step 1: Connect your Vivo Y100A phone to your PC.
Launch Dr.Fone on your PC and choose “Phone Backup” from the list of options.
Then, connect your Vivo Y100A phone to the computer using a USB cord. Please ensure that the phone is in USB debugging mode. If your Vivo Y100A version is 4.2.2 or higher, a pop-up window on the Vivo Y100A phone will prompt you to accept USB Debugging. Please press the OK button.
To begin backing up the data on your Vivo Y100A phone, click Backup.
If you have previously used this application to back up your device, you may examine your backup history by clicking on “View backup history.”
Step 2: Choose which file types to back up.
After connecting the Vivo Y100A phone, pick the file types you wish to back up. Dr.Fone has already tested all of the file kinds for you. Then, to begin the backup process, click Backup.

The backup will take a few moments. Please do not detach your Vivo Y100A phone, use it, or erase any data from it during the backup process.
When the backup is finished, you can view the contents of the backup file by clicking the View the backup button.
safe & secure
The Bottom Line
Now that you know how to hard reset Vivo Y100A it is time to implement all the possible ways and see which one works for you. We also recommend you to proceed with backing up and restoration of all the information so that you will not have to repent in the end. It is all about using smart tools like Dr.Fone - Data Eraser and Dr.Fone - Phone Backup.
All Things You Need to Know about Wipe Data/Factoy Reset For Vivo Y100A
Wiping data or carrying out a factory reset on an Android device is an effective solution for various issues on your Android phone. Even if you are contemplating selling your phone and you need all your device data to be wiped out, you carry out a factory reset. But, before you proceed, what’s important is to understand about wipe data/ factory reset, because, if you don’t, you might end up losing all your important data before it is backed up, serving no purpose. So, before you wipe data/ factory reset Android, here’s what you should know about it.
Part 1: What data will be wiped by Wipe Data/Factory Reset?
Doing a factory reset on the Android device will remove all the applications installed on the Vivo Y100A device along with the data associated with them. This brings back all the default settings of the Vivo Y100A device as it was when the phone was new, giving you a clean slate to start all over again.

Since Wipe data/factory reset deletes all applications, app data, and information (documents, videos, images, music, etc) stored in the internal space, it is required for you to perform a data backup operation before you reset the Android device to factory settings. However, wipe data/factory reset does not affect the SD card in any way. So, even if you have the SD card inserted with videos, images, documents, and any other personal information in the Android device while carrying out a factory reset, everything will remain safe and intact.
Part 2: How to perform Wipe Data/ Factory Reset?
Performing wipe data/factory reset on your Android device e is very simple. It is a matter of time before you wipe out everything lying on the internal storage of your Android device. Here’s how you can perform Wipe data/ Factory Rest on your device:
Step 1: First of all, turn off the Vivo Y100A device. Then, use the volume up button, volume down button, and Power button on your Android device simultaneously and hold on to the buttons until the phone turns on.
Step 2: Release the buttons when the Vivo Y100A device is powered on. Now, use the volume up and down button to sift through the options given on the screen. Use the power button to select “Recovery Mode” on the screen. Your phone will restart into “Recovery Mode’ and you will find the below screen:
Step 3: Holding the power button down, use the volume up button, and the Android system recovery menu will pop up.
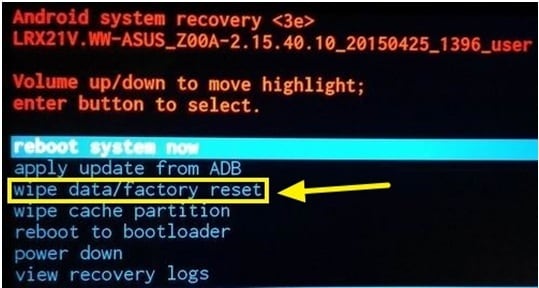
Now, scroll down to “wipe data/factory reset” option from the list of commands and use the Power button to select it.
Now, scroll down to “Yes – delete all user data” using the volume button and then push the power button to select.
In some time your device will be reset into factory settings with all your data erased. The entire process will take a few minutes. Ensure that you have the phone at least 70% charged so that it does not run out of charge midway.
Part 3: Does Wipe Data/ Factory Reset wipe all your data?
There are various instances where you would require performing a wipe/factory reset on your device. It might be because of some glitch that you would like to troubleshoot on your Android device. Wiping data from the phone is a universal solution in such cases. Even in cases where you want to sell your device, performing a factory reset seems the best option. What’s important is to make sure you don’t leave a trace of your personal information on the Vivo Y100A device. Therefore, wipe data/factory reset is never the ultimate solution to rely on. It is neither the best option anyway.
Contrary to conventional thought of relying on wipe data/factory reset Android believing it to be the best solution for wiping out complete data from the phone, all research outcomes have proved something different. It is easier to recover account tokens used to authenticate you when you enter a password for the first time, from service providers like Facebook, WhatsApp, and Google. Hence it is easier to restore the user’s credentials as well.
So, to protect your privacy and completely wipe data off the Vivo Y100A device, you can use Dr.Fone - Data Eraser. This is an amazing tool that erases everything on the Vivo Y100A device without leaving an ounce of data in it. Here’s how you can use Dr.Fone - Data Eraser to completely wipe the data and protect privacy:
![]()
Dr.Fone - Data Eraser
Fully Erase Everything on Android and Protect Your Privacy
- Simple, click-through process.
- Wipe your Android completely and permanently.
- Erase photos, contacts, messages, call logs, and all private data.
- Supports all Android devices available in the market.
4,683,556 people have downloaded it
Step 1: Install and launch Dr.Fone - Data Eraser
First of all, install Dr.Fone on your computer and launch it by double-clicking on the icon. You will find the below window. You will find various toolkits on the interface. Select Erase from various toolkits.
Step 2: Initiate the Process
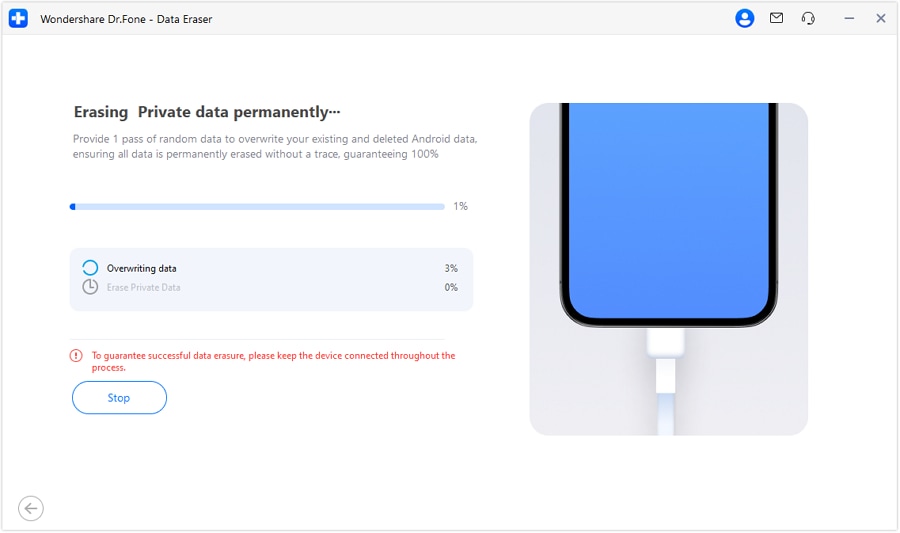
When the tool’s window opens, click Start to trigger the operation.
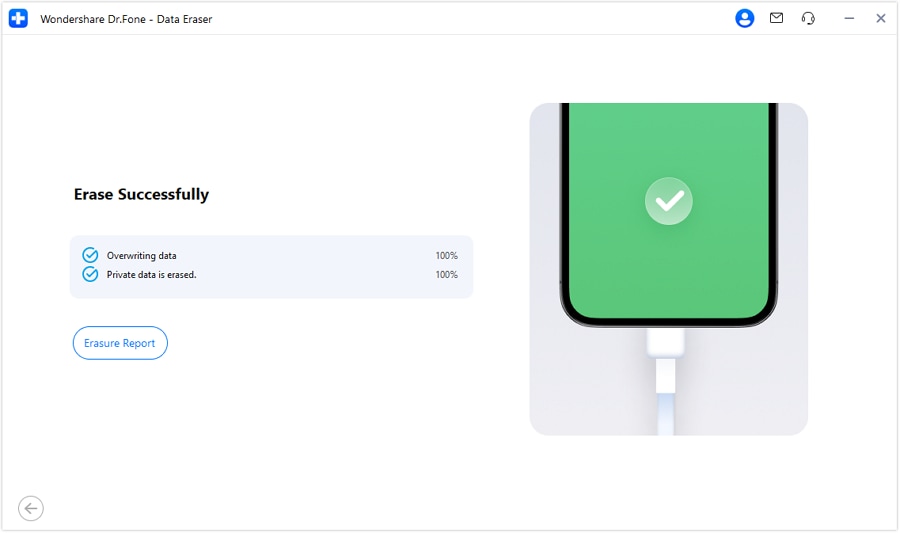
Step 3: Confirm and Execute Data Eraser
To remove all data, confirm with the given code. After inputting the code, select Erase Now. A message will appear upon erasure completion. Click Erasure Report to review the types of data erased.
This will protect your privacy as your Android device will reboot into default settings with all the data erased.
Since the erased data cannot be recovered, it is highly recommended to have all the personal data backed up before operating here using Dr.Fone.
And you could watch this YouTube video for an in-depth tutorial.
safe & secure
Conclusion
Hence, today we learned about wiping data and also factory reset. Well as per us, using Dr.Fone - Data Eraser is the best option as it is a simple and click-through process and helps you completely erase data from your Android. This toolkit also is the best as it supports all Android devices available in the market today.
safe & secure
Also read:
- Undelete lost music from Oppo Reno 11 Pro 5G
- Three Solutions to Hard Reset Oppo A1 5G? | Dr.fone
- Update your hardware drivers with Device Manager in Windows 10 & 7
- How To Recover Lost Data from Apple iPhone XS? | Dr.fone
- How to Easily Hard reset my Vivo Y77t | Dr.fone
- How to Perform Hard Reset on Infinix Note 30 VIP? | Dr.fone
- Three Solutions to Hard Reset Motorola Razr 40? | Dr.fone
- Unlock android phone if you forget the Samsung Galaxy S23 Tactical Edition password or pattern lock
- Three Solutions to Hard Reset Realme C67 4G? | Dr.fone
- Different Methods for Resetting Xiaomi Redmi 13C 5G Phones with Screen Locked and Not | Dr.fone
- Undeleted lost videos from Vivo S18 Pro
- The way to recover deleted contacts on Xiaomi Redmi 13C 5G without backup.
- Solutions to restore deleted files from Galaxy M14 5G
- How to Update Apple iPhone SE (2022) without Losing Data? | Dr.fone
- Simple ways to get lost messages back from Civi 3
- How To Repair Apple iPhone 12 Pro Max System Issues? | Dr.fone
- In 2024, How to Change Location on TikTok to See More Content On your Nokia XR21 | Dr.fone
- 5 Ways to Track Huawei P60 without App | Dr.fone
- In 2024, AddROM Bypass An Android Tool to Unlock FRP Lock Screen For your Motorola Moto G34 5G
- A Step-by-Step Guide on Using ADB and Fastboot to Remove FRP Lock from your Tecno Camon 20 Pro 5G
- In 2024, Ultimate Guide on Apple iPhone 12 Pro iCloud Activation Lock Bypass
- App Wont Open on Your Samsung Galaxy A15 4G? Here Are All Fixes | Dr.fone
- New 2024 Approved Adobe Premiere Elements Vs. The Rest Top Alternative Video Editors
- In 2024, Bypass iCloud Activation Lock with IMEI Code From your iPhone 13 Pro Max
- How to Fix the Soft Bricked Vivo Y36i? | Dr.fone
- Reasons for Motorola Moto G73 5G Stuck on Boot Screen and Ways To Fix Them | Dr.fone
- In 2024, Planning to Use a Pokemon Go Joystick on Motorola Razr 40 Ultra? | Dr.fone
- How To Repair iPhone 15 Plus iOS System Issues? | Dr.fone
- Title: How to Hard Reset Vivo Y100A Without Password | Dr.fone
- Author: Ian
- Created at : 2024-04-30 11:40:28
- Updated at : 2024-05-01 11:40:28
- Link: https://techidaily.com/how-to-hard-reset-vivo-y100a-without-password-drfone-by-drfone-reset-android-reset-android/
- License: This work is licensed under CC BY-NC-SA 4.0.
