
How to Factory Reset Vivo Y56 5G without Losing Data | Dr.fone
How to Reset Vivo Y56 5G without Losing Data
Nothing good lasts forever, not even your all-singing, all-dancing new Android smartphone. The warning signs are obvious, apps taking forever to load, constant force close notifications, and a battery life shorter than an episode of Westworld. If you recognize these symptoms then listen up, because your phone may be headed for a meltdown and there’s only one thing left to do. It’s time to reset your Android phone.
Before taking the plunge, there are a number of factors to consider. We’ve put together a quick guide to let you know what you need to know… and what you need to do. Before we start deleting stuff, however, it’s important to understand what a Factory reset is.
Part 1: What is Factory Reset?
There are two types of reset for every Android device, soft and hard resets. A soft reset is just a way to force the Android operating system to shut down in the event of a freeze and you only risk losing any data which wasn’t saved prior to the reset.
A hard reset, also known as a factory reset and a master reset, returns the Vivo Y56 5G device to the condition it was in when it left the factory. Performing a factory reset will permanently delete any and all personal data you have on your device. This includes any personal settings, apps, pictures, documents, and music stored on your device. A factory reset is irreversible, which means before considering taking this step, it is a good idea to back your data and settings up. A factory reset is a great way to purge buggy updates and other malfunctioning software and can give your phone a new lease of life.
Signs You Need to Reset Phone
You’ll probably already know if your phone needs a reset, but if you’re unsure, look for some of the following signs. If you recognize any of the following symptoms then a factory reset is probably a good idea.
- If your phone is running slowly and you’ve already tried deleting Apps and data, but it hasn’t resolved anything.
- If your Apps are crashing or you keep getting ‘force close’ notifications from your operating system.
- If your Apps are taking longer to load than usual, or your browser is running slow.
- If you find your battery life is worse than usual and you need to charge your phone more often.
- If you are selling, exchanging, or just giving your phone away. If you don’t reset it, the new user can gain access to cached passwords, personal details, and even your pictures and videos.
Remember factory resetting will erase everything on your device, so it’s essential that you back up anything you can’t afford to lose.
Part 2: Back Up Your Data Before Factory Reset
There are a number of Android data backup software for PC out there. Having a Google account will help you save your contacts and settings, but it won’t save your pictures, documents, or music. There are numerous cloud-based systems available like Dropbox and Onedrive where your data is saved onto a cloud-based server, but you’ll need a data connection or wi-fi to restore to your device and of course, you are trusting a third party with your data. We recommend Dr.Fone Basic . It’s easy to use and will save everything and best of all you know exactly where it is.
Dr.Fone - Phone Backup (Android) enables you to backup all your data, including contacts, messages, call history, calendar, video and audio files, etc. You can choose to individually back up data or everything directly to your computer and then restore it whenever you like.
Back up and restore data from your device to a computer with a single click. It’s a tried and tested program and compatible with over 8000+ devices. To use it, click the link, download it and follow these instructions.
![]()
Dr.Fone Basic
Backup & Restore Data Turns Flexible
- One-click to back up the whole iOS and Android device to your computer.
- Export what you want from the backup to your computer.
- Your device’s data remains intact during the restore process.
- Fully compatible with the latest iOS and Android version.
3,823,152 people have downloaded it
How to backup Android phone with Dr.Fone Basic
Step 1. Open Dr.Fone on your computer and connect your Android device. Go to My Backup > Back Up Now. Set the Dr.Fone Link app as your default SMS app on your Android device.

Step 2. Wait for the backup process to complete. A progress bar will show you how far along it is.

Step 3. Once the backup is done, it’ll show up in your window. To see the backup on your PC, click Open in Folder. If you want to see all backups, select View Backups.

Also, you can watch this video to learn more details.
 safe & secure
Part 3: How to Factory Reset Android Phone
After your data is safely tucked away, it’s time to tackle the reset itself. There are a few different ways to reset your device and we’ll look at them all in turn.
Method 1. Using the Settings Menu To Factory Reset Your Device
You can factory data reset your Android device via the settings menu by following these steps.
Step 1. Open your phone, drag down the ‘Options’ menu and select the ‘Settings’ menu. Look for the little cog in the top right of your screen.
Step 2. Find the option for ‘Back up and Restore’ (please note - using Google to back up your account is a good idea, but it won’t save your music, documents, or pictures.)
Step 3. Press the button for ‘Factory Data Reset’ (please note - this is irreversible)
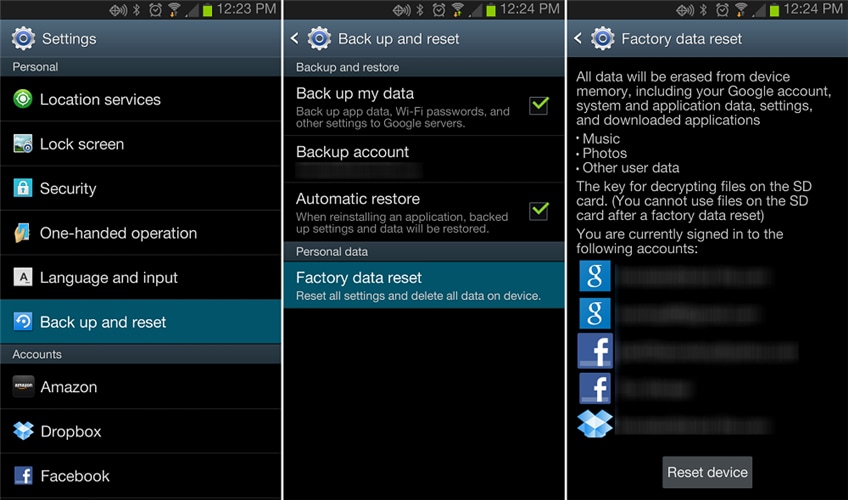
Step 4. If you have done this correctly a little Android robot will appear on your screen as the Vivo Y56 5G device resets itself.
Method 2. Resetting Your Phone in Recovery Mode
If your phone is misbehaving it might be easier to reset it via Recovery Mode. To do this you must turn your device off first.
Step 1. Press and hold the Volume up button and the Power button at the same time. The phone will now boot in Recovery Mode.
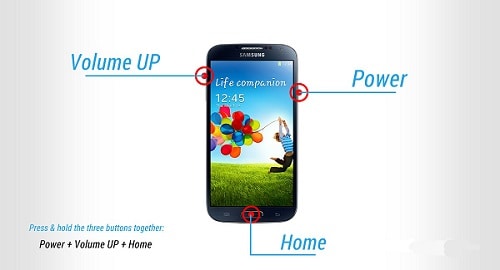
Step 2. Use the Volume down button to choose Recovery Mode. To navigate use the Volume up button to move the arrow and the Volume down button to select.

Step 3. If done correctly. You’ll find an image of an Android robot alongside a red exclamation mark and the words ‘No command’.
Step 4. Hold down the Power button and press the Volume up button then release it.
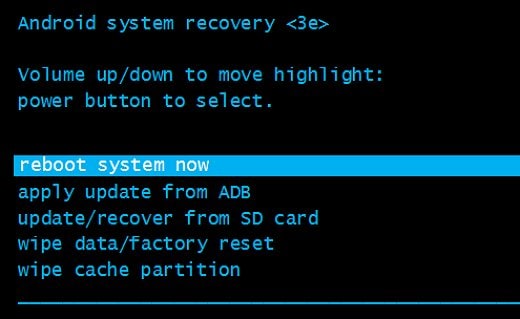
Step 5. Using the volume buttons scroll to ‘wipe data/factory reset’ and then press the Power button.
Step 6. Scroll to ‘Yes - erase all user data’ and to complete the process press the Power button.
Please note: Devices running Android 5.1 or above, will still require you to enter your Google Password to complete this reset.
Method 3. Resetting Your Phone Remotely With Android Device Manager
You can also perform a factory reset by using the Android Device manager App. Obviously, you’ll need to have Android Device Manager installed on your phone for which you’ll need a Google Account.
Step 1. Sign in to the App and locate your device on whatever medium you are currently using. With Android Device Manager it is possible to Factory Reset a device remotely by using a PC or other device, but your phone must be logged into your Google account and have an active internet connection.
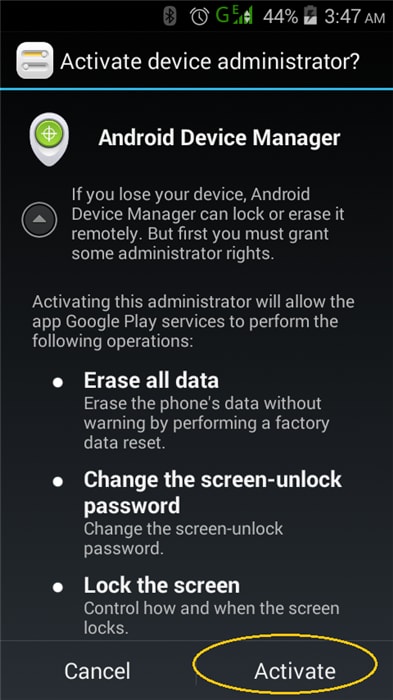
Step 2. Select erase all data. This is particularly effective if you have lost or had your phone stolen and your device is running Android 5.1 or higher as whoever has your phone will still need your Google Password to be able to reset the Phone.
Please note: this reset will also delete Android Device Manager and you will therefore be unable to locate or track your device.
Once you have successfully reset your Android device to its factory settings, all you need to do is restore your original data. After you’ve completed this step your device should be just like new.
Part 4: Restoring Your Phone After a Reset
It can be quick and scary seeing your phone return to its original state. But don’t panic. Your data is still safely tucked away on your computer. To restore your contacts and Apps just connect your Vivo Y56 5G to the Internet and login into your Google account when prompted.
Once you have restarted your mobile, connect it to your PC and open Dr.Fone on your computer. Select Phone Backup, and click on the Restore button to start restoring the data to your phone.
Dr.Fone will display all the backup files. Select the backup file you would like to restore and click View.
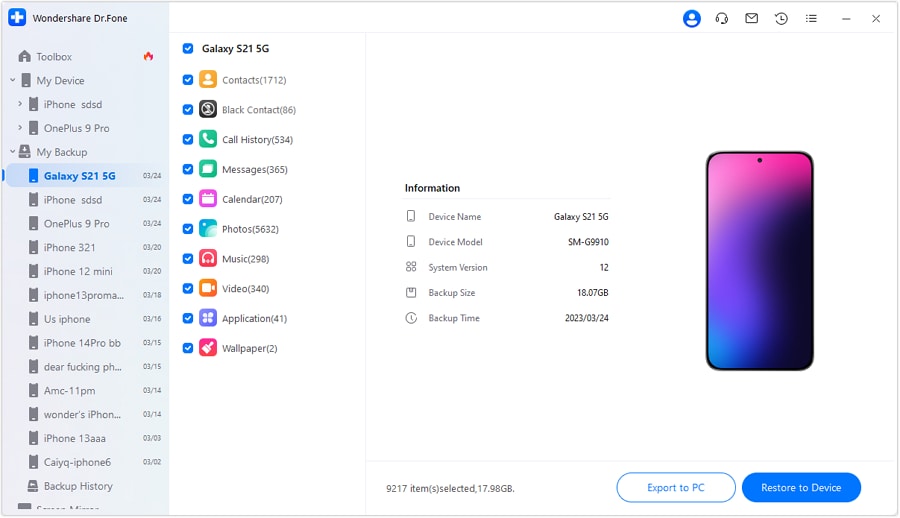
Then you will be able to select what files you want to restore. You can click Restore to Device to restore them all to your phone or just select individual data to restore.
Once you’ve successfully completed your first reset, you’ll realize how simple the whole process is and the next time you need to perform one, you’ll be able to do it with your eyes closed.
safe & secure
Bonus Tip: Are You Preparing to Exchange Your Phone?
After factory resetting your Android Phone, your phone should work smoothly. But what should we do if your phone is still not working as before? The App still crashes or your phone is still running slow, which may be caused by an old operating system or the phone is too old. It is time to change to a new phone. In this case, you may want to switch the data from the old phone to the new phone. How do achieve that? Dr.Fone - Phone Transfer is here. It is a dedicated tool to transfer everything from one old device to the new one! You can transfer data without any hassle because of user-friendly instructions.
![]()
Dr.Fone - Phone Transfer
Transfer Everything from Old Devices to New Devices in 1 Click!
- Works directly and transfer data between two cross-operating system devices in real-time.
- Works perfectly with Apple, Vivo Y56 5G, HTC, LG, Sony, Google, HUAWEI, Motorola, ZTE, Vivo Y56 5G, and more smartphones and tablets.
- Fully compatible with major providers like AT&T, Verizon, Sprint, and T-Mobile.
- Fully compatible with the latest iOS and Android.
3981454 people have downloaded it
Conclusion
Resetting your Android device can resolve performance issues and prepare it for resale or gifting. However, a factory reset erases all personal data, making it essential to back up your data before proceeding.
Tools like Dr.Fone Basic are recommended for this purpose. You can perform a factory reset using the settings menu, recovery mode, or Android Device Manager. Remember, a factory reset is irreversible, so take every precaution necessary to safeguard your important data.
Thank you for reading and if we’ve been of some help please take the time to bookmark our page.
How do I reset my Vivo Y56 5G Phone without technical knowledge?
Resetting a Vivo Y56 5G smartphone to factory settings could be necessary. You will probably need to do a hard reset if you want to unlock your smartphone or sell it to someone else. The majority of Vivo Y56 5G devices may be quickly reset simply by pushing the volume and power buttons together. However, hard resetting a Vivo Y56 5G sometimes is a whole other situation and may be much more difficult. That myth will be dispelled for you by us!
If the Vivo Y56 5G device is functioning properly, hard resetting a Vivo Y56 5G tablet without volume buttons won’t be too difficult and can be completed in a matter of taps. However, if the apparatus is broken, it may be an issue. Let’s have a look at all the possibilities.
Part 1: 4 Easy solutions to hard reset your Vivo Y56 5G
1. From recovery mode to delete all data
It’s not particularly difficult to reset a Vivo Y56 5G smartphone or tablet, especially if it has a home button. You can only do a hard reset on a Vivo Y56 5G tablet without volume buttons after entering recovery mode. Follow the procedures outlined below to learn how to reset a Vivo Y56 5G tablet without volume buttons.
Step 1: First, press the power off and home buttons.
Press the power button repeatedly until the Power off, Restart, and other choices are shown. Now, choose “Power Off” and hold it down while tapping your phone’s home button.
At the same time, the Vivo Y56 5G device.
Step 2: Verify the safe mode bootup.
The screen for restarting in safe mode will now show up. To switch to safe mode, select “Yes.”
Step 3: Switch to recovery mode
Your device’s power and home buttons must be pressed and held simultaneously until a new screen shows. Release the two buttons once it appears, then press the power button one more. Press and hold the home button for a moment. With that, recovery mode will start, and a new set of choices will show up on the screen.
Step 4: Select “Factory Reset” and navigate
Navigate down to the “Wipe data/factory reset” option using the home button. To choose the choice, press the power button.
2. Use the factory reset code to wipe data in Vivo Y56 5G
Step 1: Press the Volume Up + Power Keys at the same time as turning off your smartphone and removing the SIM card.
Step 2: The Vivo Y56 5G logo will appear when the phone boots. Keep none of the keys.
Step 3: Scroll down to the Wipe Data / Factory Reset option using the volume down key.
Step 4: If you want to say “OK” and reset, press the Power Key.
To delete all user data, click “Yes.”
Step 5: The factory data reset process will begin on the phone.
After formatting is finished, click “Reboot System Now.”
3. Google Find My Device
Finding My Device:
Go to www.google.com/android/find on your computer’s web browser and sign in with the same Google Account you used on your phone.
When your phone is located, Find My Device will provide specific location information.
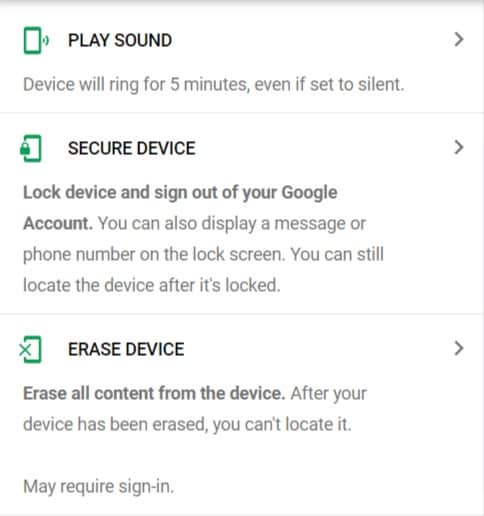
Do any of the following:
- If you’ve merely lost your phone, click Play sound to make it ring.
- If you’re using Find My Device for the first time, select Set up secure & erase to configure remote locking and erasing for your phone.
- To lock your phone and log out of your Google Account, click Secure device.
- If you wish to completely delete everything on your phone, choose Erase device.
The removal of all data from your phone’s storage, including applications, app data, and settings, will result from remotely wiping it. Personal information is one type of data that might not be completely removed. After doing this, you won’t be able to access your phone remotely.
4. Dr.Fone - Data Eraser
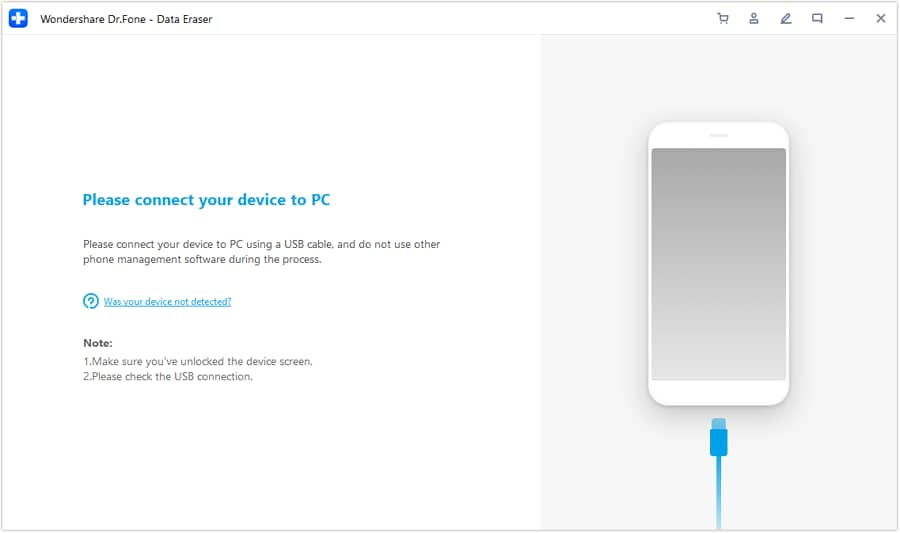
Step 1: Connect your Vivo Y56 5G phone to the desktop. Get Dr.Fone running on your PC. Choose “Data Eraser” from the list of tools.

Utilize a USB cord to link your Vivo Y56 5G phone to the PC. Make sure USB debugging is enabled on your phone. On your phone, there will be a pop-up window requesting you to authorize USB debugging if the Vivo Y56 5G OS version is higher than 4.2.2. Click “OK” to move forward.
Step 2: Start erasing your Vivo Y56 5G phone
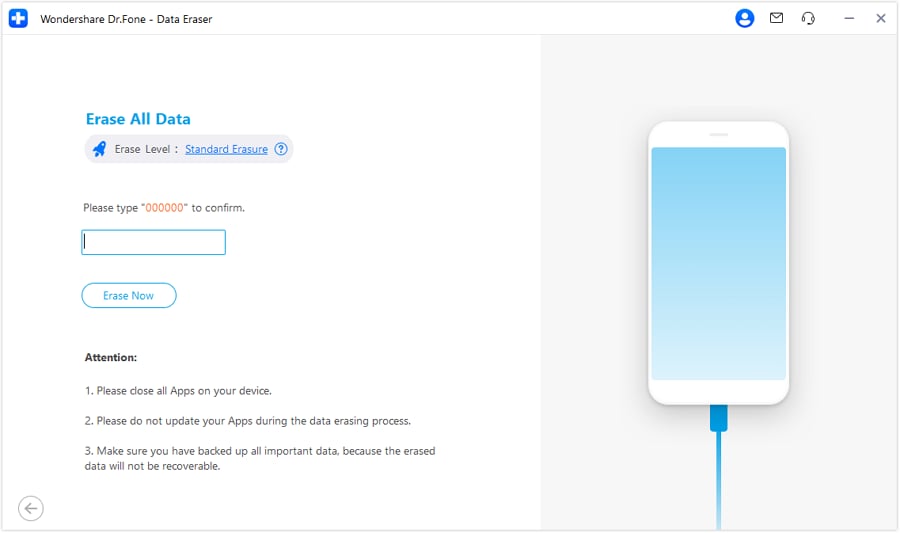
Your Vivo Y56 5G smartphone will then be immediately detected and connected by Dr.Fone. To begin wiping all of your data, click the “Erase All Data” option.
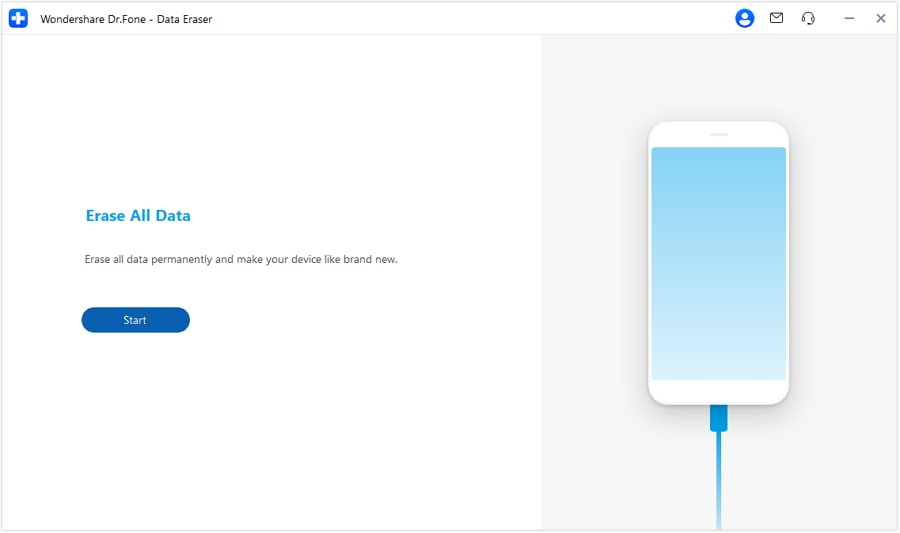
Make sure you have all the necessary data backed up before continuing because all wiped data cannot be recovered. After that, enter “000000” to verify your action.
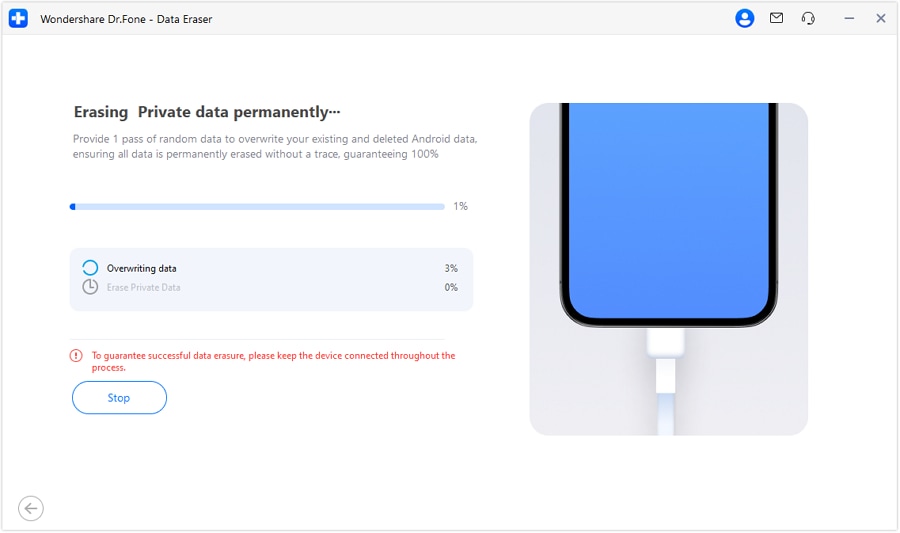
The data on your Vivo Y56 5G phone will then begin to be deleted by Dr. Fone. The entire process only requires a few minutes. Do not turn off the phone or launch any other phone management programs on the PC.
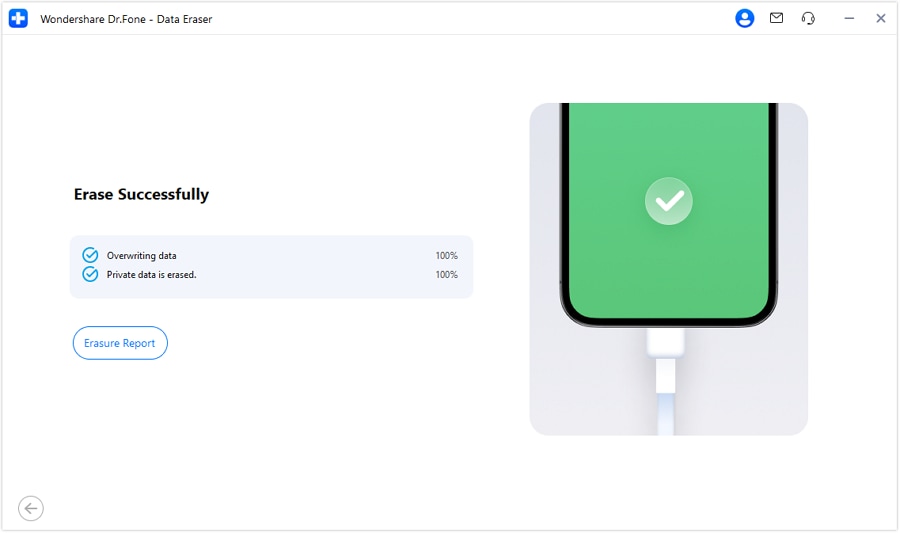
Step 3. Reset the factory data on your phone.
Dr.Fone will prompt you to tap on Factory Data Reset or Erase All Data on the phone once all app data, photographs, and other private data have been entirely removed. You may use this to entirely erase all of the phone’s settings.
safe & secure
Part 2: FAQs
1. Is there any simple tool to have my Vivo Y56 5G backup? (Dr.Fone - Phone Backup)
Yes, there are very few simple tools available that you can use to back up your Vivo Y56 5G phone. One such tool is Dr.Fone - Phone backup which is super simple to use and extremely beginner friendly and how you recover all of your lost data from your Vivo Y56 5G phone.
2. Do these solutions damage my Vivo Y56 5G?
Unfortunately, many of the solutions that you used to recover or back up your Vivo Y56 5G phone damage the quality of the information and also the hardware or software of your Vivo Y56 5G mobile however the best solution to this problem is using Dr.Fone - Phone backup which is a supplied tool which does not cause any problem during or after its usage and help you recover all kind of lost data.
The Bottom Line
Now that you know how to reset a Vivo Y56 5G phone that is locked and how to use Vivo Y56 5G hard reset code to reset Vivo Y56 5G, it is time to implement resolution though you can try, and among the ways given above, the best solution is to go with the Wondershare Dr.Fone - Phone Backup. It is a great tool that will immediately help you recover all of your lost information from your Vivo Y56 5G phone without causing any harm to your device.
safe & secure
4 Easy Ways for Your Vivo Y56 5G Hard Reset
Vivo Y56 5G is a popular smartphone brand that has a wide range of models. If you are a Vivo Y56 5G user, you might have to hard reset your phone for various reasons. A hard reset is a process that erases all data and settings from your phone, and it is the last resort to fix any software-related issues. If you are looking for ways to hard reset your Vivo Y56 5G phone, you are in the right place. In this guide, we will discuss four easy ways to hard reset your Vivo Y56 5G phone.
If your Vivo Y56 5G phone is very slow or hangs, and you cannot fix it even working with memory and other stuff, then you can solve this issue using Vivo Y56 5G hard reset. This also works if you have forgotten your PIN or password or you want to bypass the screen lock. So, how to hard reset a Vivo Y56 5G phone?
Part 1: 4 easy ways to hard reset your Vivo Y56 5G
Hard reset Vivo Y56 5G is an excellent solution for bypassing screen lock and recovering locked Vivo Y56 5G phone. It is also an option to format your Vivo Y56 5G phone if you are handing over or selling your phone and want to keep your data secure. So, what are the tools or techniques for Vivo Y56 5G hard reset?
1. Google Find My Device (data loss)
Google Find My Device is your best bet if you want to reset your Vivo Y56 5G phone hard remotely. So, here is the step-by-step guide for this method.
Launch Google Find My Device on your computer and sign in with your Google credentials.
You can choose three options, i.e., Play sound, Secure device, and Erase device.
Click the Erase Device link.
In the Erase all data menu, click the Erase option.
2. Gmail account
If you opt for a Vivo Y56 5G hard reset because of screen lock or phone locking issues, then your other option is to use the Gmail account to unlock it. If you are wondering how to use a Gmail account for unlocking, here is the step-by-step guide.
- Power On your Vivo Y56 5G Android phone.
- When you attempt your phone incorrectly multiple times, you will see the Forgot pattern option.
- Click the Forgot pattern option.
- Fill in your Google Account credentials to log in.
- Now, unlock your device and choose a new password.
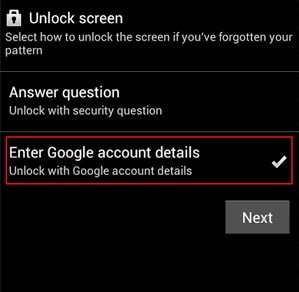
3. Answer security questions
Google security questions or your device company Security questions will help you to reset your phone password without data loss.
- When you attempt a wrong password multiple times, you will see options for recovering passwords.
- Click on the Forgot pattern option.
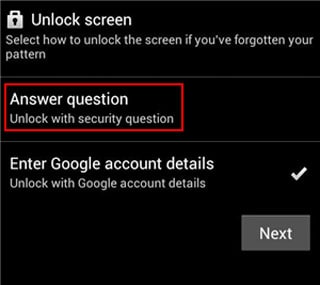
- Click on the “Answer question”.
- Answer the security questions correctly to unlock your phones and choose a new password or pattern lock.
4. Use Dr.Fone - Data Eraser
If the reason for hard resetting your phone is any issue with the deleting data of the phone, second-hand phone for sale, then your phone need to data erasing. Since it is a complicated technical procedure for a layman, we recommend using Dr.Fone - Data Eraser because of its ease of use and efficiency. You can erase all types of data using this software. Let us see how it works.
- Connect Your Android Phone
Launch Dr.Fone on your computer. Select “Data Eraser” among all the tools to resolve the Vivo Y56 5G hard reset.
Connect your Android phone to the computer using a USB cable. Make sure you have enabled USB debugging on your phone. If the Android os version is above 4.2.2, there will be a pop-up message on your phone asking you to allow USB debugging. Tap on “OK” to continue.
- Start Erasing Your Android Phone
Then Dr.Fone will automatically recognize and connect your Android device. Click on the “Erase All Data” button to start erasing all your data.
Since all the erased data are not recoverable, make sure you have backed up all the needed data before you proceed. Then key in “000000” into the box to confirm your operation.
Type in “000000” to confirm and move on. Since you may lose your data in system repair and in case of a Vivo Y56 5G hard reset, your phone’s memory is wiped, it is always important to keep a backup of your phone data. More on this in the next section.
Then Dr.Fone will start erasing all data on your Android phone. The whole process takes only a few minutes. Please don’t disconnect the phone or open any other phone management software on the computer.
- Perform Factory Data Reset on Your Phone
After all app data, photos, and all other private data have been completely erased, Dr.Fone will ask you to tap on Factory Data Reset or Erase All Data on the phone. This will help you completely wipe all the settings on the phone.
Now your Android phone has been completely wiped and it’s like a brand new one.
safe & secure
Part 2: How to keep my data safe?
The best thing you can do to keep your data secure, even in case of unwanted crashes and accidents, is to periodically back up your phone and computer. So, you might ask what the best way to back up my phone is. We recommend Dr.Fone - Phone Backup because it is part of your phone’s comprehensive suite of solutions and works efficiently without any technical input from you.
The Bottom Line
In the current digital age, part of our life depends on our gadgets, so keeping them updated and tuned in is the best strategy to function without unwanted bumps. Obviously, it takes some pre-planning like periodic data backup, memory refresh, optimum charging, and so on. Dr.Fone is a comprehensive suite of applications that help you maintain your devices and fix them in case of an accident. This article discusses the Dr.Fone - Data Eraser for Vivo Y56 5G hard reset.
- Title: How to Factory Reset Vivo Y56 5G without Losing Data | Dr.fone
- Author: Ian
- Created at : 2024-09-20 16:56:49
- Updated at : 2024-09-24 16:04:03
- Link: https://techidaily.com/how-to-factory-reset-vivo-y56-5g-without-losing-data-drfone-by-drfone-reset-android-reset-android/
- License: This work is licensed under CC BY-NC-SA 4.0.