
How to Easily Hard reset my Nokia G310 | Dr.fone
4 Easy Ways for Your Nokia G310 Hard Reset
Nokia G310 is a popular smartphone brand that has a wide range of models. If you are a Nokia G310 user, you might have to hard reset your phone for various reasons. A hard reset is a process that erases all data and settings from your phone, and it is the last resort to fix any software-related issues. If you are looking for ways to hard reset your Nokia G310 phone, you are in the right place. In this guide, we will discuss four easy ways to hard reset your Nokia G310 phone.
If your Nokia G310 phone is very slow or hangs, and you cannot fix it even working with memory and other stuff, then you can solve this issue using Nokia G310 hard reset. This also works if you have forgotten your PIN or password or you want to bypass the screen lock. So, how to hard reset a Nokia G310 phone?
Part 1: 4 easy ways to hard reset your Nokia G310
Hard reset Nokia G310 is an excellent solution for bypassing screen lock and recovering locked Nokia G310 phone. It is also an option to format your Nokia G310 phone if you are handing over or selling your phone and want to keep your data secure. So, what are the tools or techniques for Nokia G310 hard reset?
1. Google Find My Device (data loss)
Google Find My Device is your best bet if you want to reset your Nokia G310 phone hard remotely. So, here is the step-by-step guide for this method.
Launch Google Find My Device on your computer and sign in with your Google credentials.
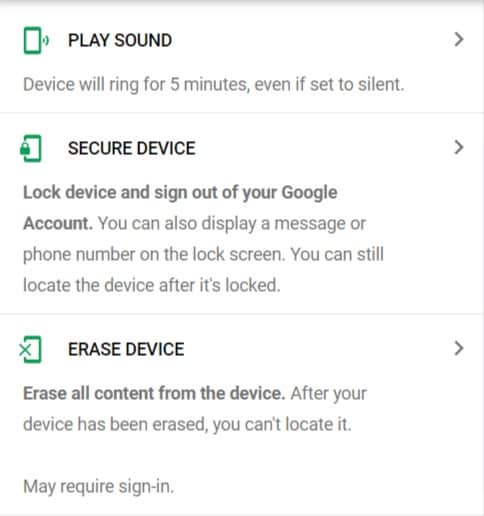
You can choose three options, i.e., Play sound, Secure device, and Erase device.
Click the Erase Device link.
In the Erase all data menu, click the Erase option.
2. Gmail account
If you opt for a Nokia G310 hard reset because of screen lock or phone locking issues, then your other option is to use the Gmail account to unlock it. If you are wondering how to use a Gmail account for unlocking, here is the step-by-step guide.
- Power On your Nokia G310 Android phone.
- When you attempt your phone incorrectly multiple times, you will see the Forgot pattern option.
- Click the Forgot pattern option.
- Fill in your Google Account credentials to log in.
- Now, unlock your device and choose a new password.
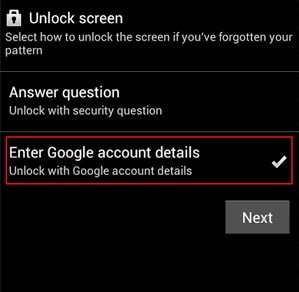
3. Answer security questions
Google security questions or your device company Security questions will help you to reset your phone password without data loss.
- When you attempt a wrong password multiple times, you will see options for recovering passwords.
- Click on the Forgot pattern option.
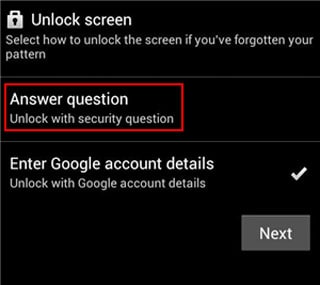
- Click on the “Answer question”.
- Answer the security questions correctly to unlock your phones and choose a new password or pattern lock.
4. Use Dr.Fone - Data Eraser
If the reason for hard resetting your phone is any issue with the deleting data of the phone, second-hand phone for sale, then your phone need to data erasing. Since it is a complicated technical procedure for a layman, we recommend using Dr.Fone - Data Eraser because of its ease of use and efficiency. You can erase all types of data using this software. Let us see how it works.
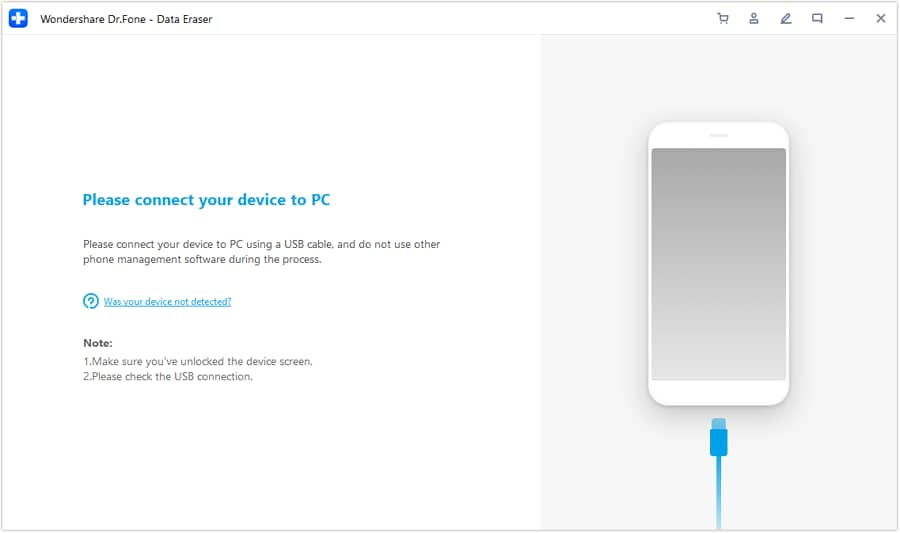
- Connect Your Android Phone
Launch Dr.Fone on your computer. Select “Data Eraser” among all the tools to resolve the Nokia G310 hard reset.


Connect your Android phone to the computer using a USB cable. Make sure you have enabled USB debugging on your phone. If the Android os version is above 4.2.2, there will be a pop-up message on your phone asking you to allow USB debugging. Tap on “OK” to continue.
- Start Erasing Your Android Phone
Then Dr.Fone will automatically recognize and connect your Android device. Click on the “Erase All Data” button to start erasing all your data.
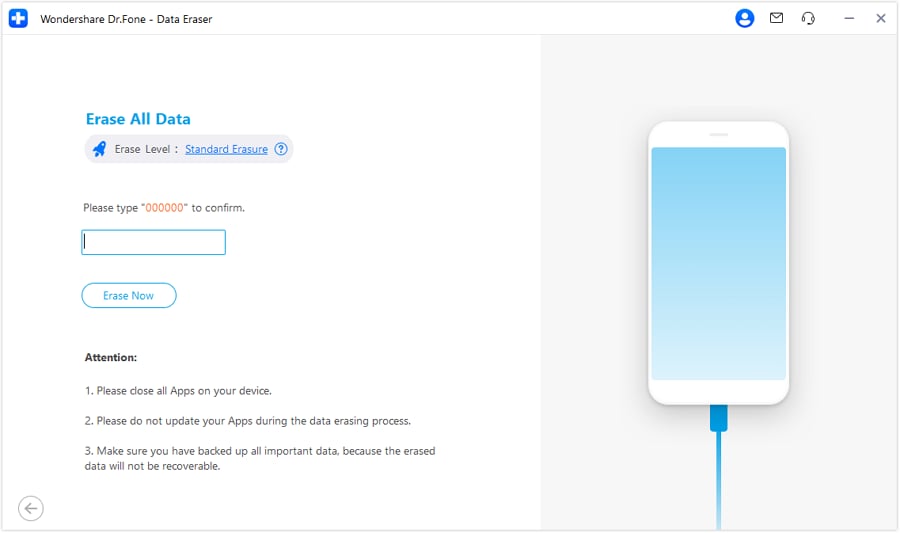
Since all the erased data are not recoverable, make sure you have backed up all the needed data before you proceed. Then key in “000000” into the box to confirm your operation.
Type in “000000” to confirm and move on. Since you may lose your data in system repair and in case of a Nokia G310 hard reset, your phone’s memory is wiped, it is always important to keep a backup of your phone data. More on this in the next section.
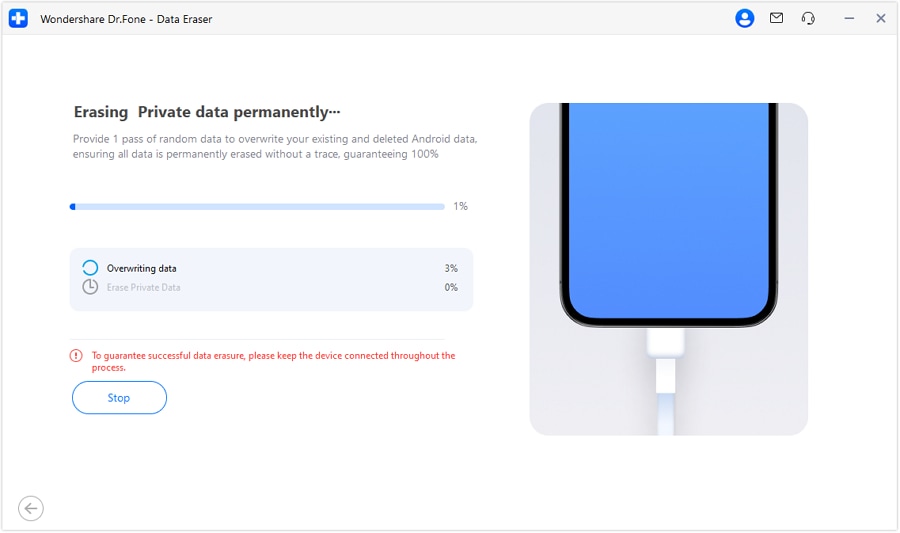
Then Dr.Fone will start erasing all data on your Android phone. The whole process takes only a few minutes. Please don’t disconnect the phone or open any other phone management software on the computer.
- Perform Factory Data Reset on Your Phone
After all app data, photos, and all other private data have been completely erased, Dr.Fone will ask you to tap on Factory Data Reset or Erase All Data on the phone. This will help you completely wipe all the settings on the phone.
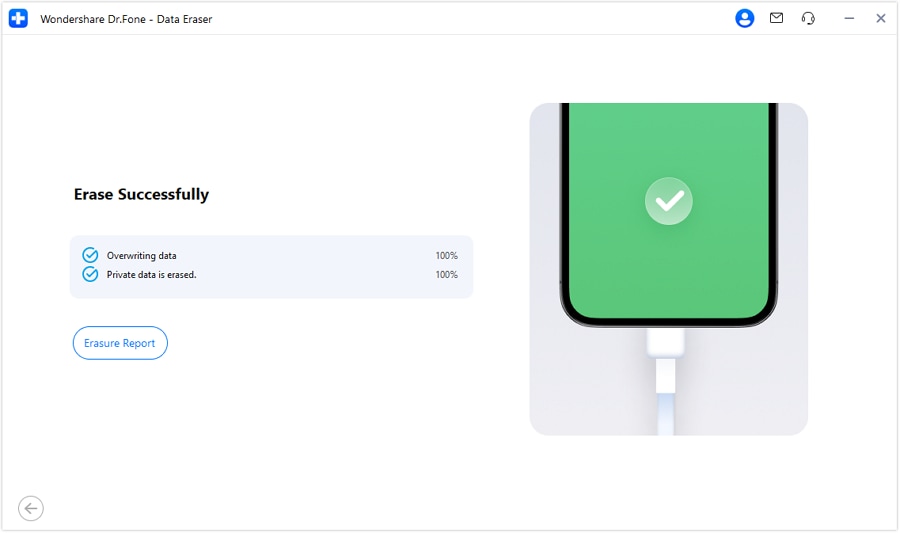
Now your Android phone has been completely wiped and it’s like a brand new one.
 safe & secure
Part 2: How to keep my data safe?
The best thing you can do to keep your data secure, even in case of unwanted crashes and accidents, is to periodically back up your phone and computer. So, you might ask what the best way to back up my phone is. We recommend Dr.Fone - Phone Backup because it is part of your phone’s comprehensive suite of solutions and works efficiently without any technical input from you.
The Bottom Line
In the current digital age, part of our life depends on our gadgets, so keeping them updated and tuned in is the best strategy to function without unwanted bumps. Obviously, it takes some pre-planning like periodic data backup, memory refresh, optimum charging, and so on. Dr.Fone is a comprehensive suite of applications that help you maintain your devices and fix them in case of an accident. This article discusses the Dr.Fone - Data Eraser for Nokia G310 hard reset.
4 Easy Ways for Your Nokia G310 Hard Reset
Nokia G310 is a popular smartphone brand that has a wide range of models. If you are a Nokia G310 user, you might have to hard reset your phone for various reasons. A hard reset is a process that erases all data and settings from your phone, and it is the last resort to fix any software-related issues. If you are looking for ways to hard reset your Nokia G310 phone, you are in the right place. In this guide, we will discuss four easy ways to hard reset your Nokia G310 phone.
If your Nokia G310 phone is very slow or hangs, and you cannot fix it even working with memory and other stuff, then you can solve this issue using Nokia G310 hard reset. This also works if you have forgotten your PIN or password or you want to bypass the screen lock. So, how to hard reset a Nokia G310 phone?
Part 1: 4 easy ways to hard reset your Nokia G310
Hard reset Nokia G310 is an excellent solution for bypassing screen lock and recovering locked Nokia G310 phone. It is also an option to format your Nokia G310 phone if you are handing over or selling your phone and want to keep your data secure. So, what are the tools or techniques for Nokia G310 hard reset?
1. Google Find My Device (data loss)
Google Find My Device is your best bet if you want to reset your Nokia G310 phone hard remotely. So, here is the step-by-step guide for this method.
Launch Google Find My Device on your computer and sign in with your Google credentials.
You can choose three options, i.e., Play sound, Secure device, and Erase device.
Click the Erase Device link.
In the Erase all data menu, click the Erase option.
2. Gmail account
If you opt for a Nokia G310 hard reset because of screen lock or phone locking issues, then your other option is to use the Gmail account to unlock it. If you are wondering how to use a Gmail account for unlocking, here is the step-by-step guide.
- Power On your Nokia G310 Android phone.
- When you attempt your phone incorrectly multiple times, you will see the Forgot pattern option.
- Click the Forgot pattern option.
- Fill in your Google Account credentials to log in.
- Now, unlock your device and choose a new password.
3. Answer security questions
Google security questions or your device company Security questions will help you to reset your phone password without data loss.
- When you attempt a wrong password multiple times, you will see options for recovering passwords.
- Click on the Forgot pattern option.
- Click on the “Answer question”.
- Answer the security questions correctly to unlock your phones and choose a new password or pattern lock.
4. Use Dr.Fone - Data Eraser
If the reason for hard resetting your phone is any issue with the deleting data of the phone, second-hand phone for sale, then your phone need to data erasing. Since it is a complicated technical procedure for a layman, we recommend using Dr.Fone - Data Eraser because of its ease of use and efficiency. You can erase all types of data using this software. Let us see how it works.
- Connect Your Android Phone
Launch Dr.Fone on your computer. Select “Data Eraser” among all the tools to resolve the Nokia G310 hard reset.
Connect your Android phone to the computer using a USB cable. Make sure you have enabled USB debugging on your phone. If the Android os version is above 4.2.2, there will be a pop-up message on your phone asking you to allow USB debugging. Tap on “OK” to continue.
- Start Erasing Your Android Phone
Then Dr.Fone will automatically recognize and connect your Android device. Click on the “Erase All Data” button to start erasing all your data.
Since all the erased data are not recoverable, make sure you have backed up all the needed data before you proceed. Then key in “000000” into the box to confirm your operation.
Type in “000000” to confirm and move on. Since you may lose your data in system repair and in case of a Nokia G310 hard reset, your phone’s memory is wiped, it is always important to keep a backup of your phone data. More on this in the next section.
Then Dr.Fone will start erasing all data on your Android phone. The whole process takes only a few minutes. Please don’t disconnect the phone or open any other phone management software on the computer.
- Perform Factory Data Reset on Your Phone
After all app data, photos, and all other private data have been completely erased, Dr.Fone will ask you to tap on Factory Data Reset or Erase All Data on the phone. This will help you completely wipe all the settings on the phone.
Now your Android phone has been completely wiped and it’s like a brand new one.
safe & secure
Part 2: How to keep my data safe?
The best thing you can do to keep your data secure, even in case of unwanted crashes and accidents, is to periodically back up your phone and computer. So, you might ask what the best way to back up my phone is. We recommend Dr.Fone - Phone Backup because it is part of your phone’s comprehensive suite of solutions and works efficiently without any technical input from you.
The Bottom Line
In the current digital age, part of our life depends on our gadgets, so keeping them updated and tuned in is the best strategy to function without unwanted bumps. Obviously, it takes some pre-planning like periodic data backup, memory refresh, optimum charging, and so on. Dr.Fone is a comprehensive suite of applications that help you maintain your devices and fix them in case of an accident. This article discusses the Dr.Fone - Data Eraser for Nokia G310 hard reset.
All Things You Need to Know about Wipe Data/Factoy Reset For Nokia G310
Wiping data or carrying out a factory reset on an Android device is an effective solution for various issues on your Android phone. Even if you are contemplating selling your phone and you need all your device data to be wiped out, you carry out a factory reset. But, before you proceed, what’s important is to understand about wipe data/ factory reset, because, if you don’t, you might end up losing all your important data before it is backed up, serving no purpose. So, before you wipe data/ factory reset Android, here’s what you should know about it.
Part 1: What data will be wiped by Wipe Data/Factory Reset?
Doing a factory reset on the Android device will remove all the applications installed on the Nokia G310 device along with the data associated with them. This brings back all the default settings of the Nokia G310 device as it was when the phone was new, giving you a clean slate to start all over again.

Since Wipe data/factory reset deletes all applications, app data, and information (documents, videos, images, music, etc) stored in the internal space, it is required for you to perform a data backup operation before you reset the Android device to factory settings. However, wipe data/factory reset does not affect the SD card in any way. So, even if you have the SD card inserted with videos, images, documents, and any other personal information in the Android device while carrying out a factory reset, everything will remain safe and intact.
Part 2: How to perform Wipe Data/ Factory Reset?
Performing wipe data/factory reset on your Android device e is very simple. It is a matter of time before you wipe out everything lying on the internal storage of your Android device. Here’s how you can perform Wipe data/ Factory Rest on your device:
Step 1: First of all, turn off the Nokia G310 device. Then, use the volume up button, volume down button, and Power button on your Android device simultaneously and hold on to the buttons until the phone turns on.
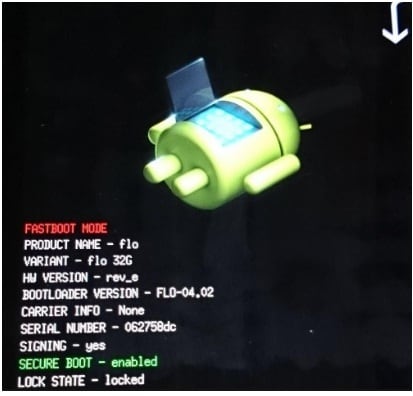
Step 2: Release the buttons when the Nokia G310 device is powered on. Now, use the volume up and down button to sift through the options given on the screen. Use the power button to select “Recovery Mode” on the screen. Your phone will restart into “Recovery Mode’ and you will find the below screen:
Step 3: Holding the power button down, use the volume up button, and the Android system recovery menu will pop up.
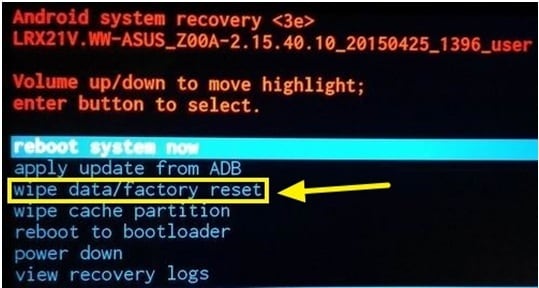
Now, scroll down to “wipe data/factory reset” option from the list of commands and use the Power button to select it.
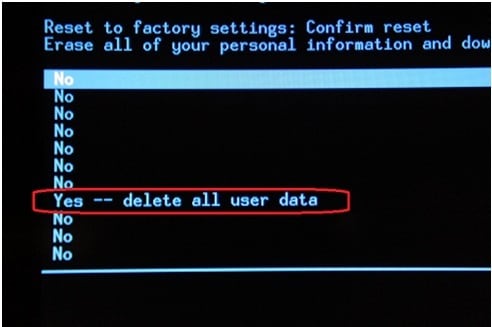
Now, scroll down to “Yes – delete all user data” using the volume button and then push the power button to select.
In some time your device will be reset into factory settings with all your data erased. The entire process will take a few minutes. Ensure that you have the phone at least 70% charged so that it does not run out of charge midway.
Part 3: Does Wipe Data/ Factory Reset wipe all your data?
There are various instances where you would require performing a wipe/factory reset on your device. It might be because of some glitch that you would like to troubleshoot on your Android device. Wiping data from the phone is a universal solution in such cases. Even in cases where you want to sell your device, performing a factory reset seems the best option. What’s important is to make sure you don’t leave a trace of your personal information on the Nokia G310 device. Therefore, wipe data/factory reset is never the ultimate solution to rely on. It is neither the best option anyway.
Contrary to conventional thought of relying on wipe data/factory reset Android believing it to be the best solution for wiping out complete data from the phone, all research outcomes have proved something different. It is easier to recover account tokens used to authenticate you when you enter a password for the first time, from service providers like Facebook, WhatsApp, and Google. Hence it is easier to restore the user’s credentials as well.
So, to protect your privacy and completely wipe data off the Nokia G310 device, you can use Dr.Fone - Data Eraser. This is an amazing tool that erases everything on the Nokia G310 device without leaving an ounce of data in it. Here’s how you can use Dr.Fone - Data Eraser to completely wipe the data and protect privacy:
![]()
Dr.Fone - Data Eraser
Fully Erase Everything on Android and Protect Your Privacy
- Simple, click-through process.
- Wipe your Android completely and permanently.
- Erase photos, contacts, messages, call logs, and all private data.
- Supports all Android devices available in the market.
4,683,556 people have downloaded it
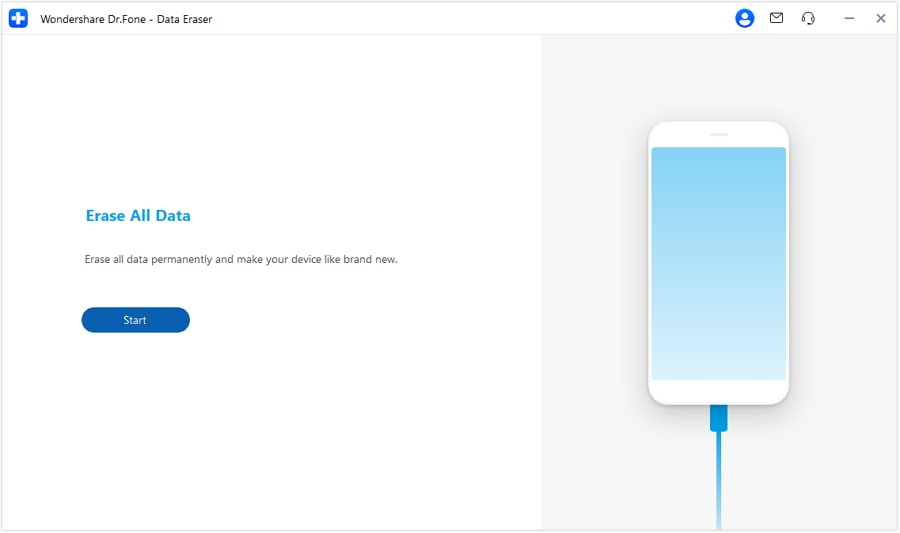
Step 1: Install and launch Dr.Fone - Data Eraser
First of all, install Dr.Fone on your computer and launch it by double-clicking on the icon. You will find the below window. You will find various toolkits on the interface. Select Erase from various toolkits.
Step 2: Initiate the Process
When the tool’s window opens, click Start to trigger the operation.
Step 3: Confirm and Execute Data Eraser
To remove all data, confirm with the given code. After inputting the code, select Erase Now. A message will appear upon erasure completion. Click Erasure Report to review the types of data erased.
This will protect your privacy as your Android device will reboot into default settings with all the data erased.
Since the erased data cannot be recovered, it is highly recommended to have all the personal data backed up before operating here using Dr.Fone.
And you could watch this YouTube video for an in-depth tutorial.
safe & secure
Conclusion
Hence, today we learned about wiping data and also factory reset. Well as per us, using Dr.Fone - Data Eraser is the best option as it is a simple and click-through process and helps you completely erase data from your Android. This toolkit also is the best as it supports all Android devices available in the market today.
safe & secure
- Title: How to Easily Hard reset my Nokia G310 | Dr.fone
- Author: Ian
- Created at : 2024-09-18 16:20:52
- Updated at : 2024-09-24 17:23:41
- Link: https://techidaily.com/how-to-easily-hard-reset-my-nokia-g310-drfone-by-drfone-reset-android-reset-android/
- License: This work is licensed under CC BY-NC-SA 4.0.