
How to Downgrade Apple iPhone 8 Plus without Losing Data? | Dr.fone
How To Upgrade or Downgrade Apple iPhone 8 Plus Without iTunes?
Apple devices come with the option of upgrading their operating system now and then. While you may receive timely updates of iOS or iPadOS on your Apple iPhone 8 Plus there are several others that are practiced updating the OS. One such method involves iTunes, which can be a risky process. As an alternative, Dr.Fone comes with an option to update iPhone/iPad/iPod Touch without iTunes and even downgrade iOS.
Upgrade to the Newest Dr.Fone Manage Your Phone Wherever You Go
Part 1: How To Update iOS or iPadOS to the Latest Version?
Wondershare Dr.Fone - System Repair (iOS) provides a comprehensive set of options to update iOS devices without iTunes. While the process retains data for you, it upgrades your iOS without jailbreaking the Apple iPhone 8 Plus device. Neither is the device put at risk, nor does Dr.Fone allow such procedures to compromise the quality of the Apple iPhone 8 Plus device.
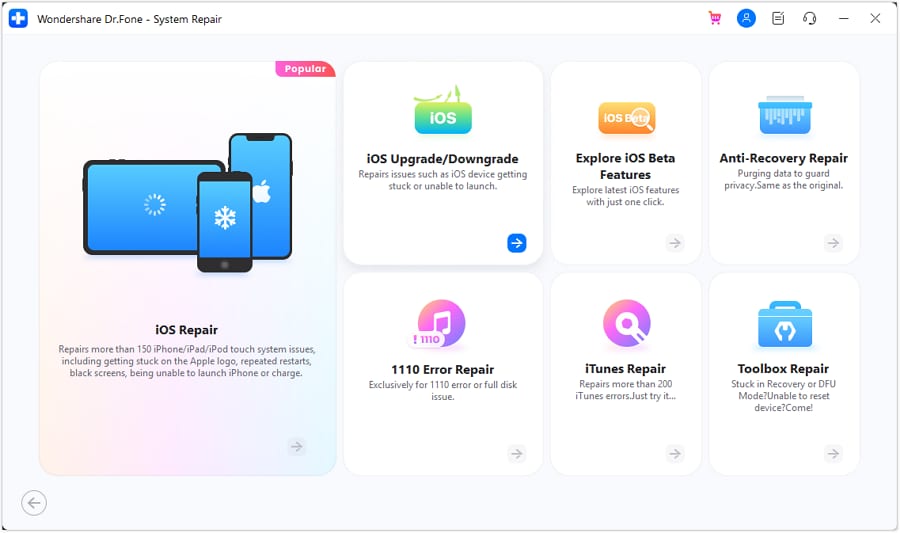
- Step 1: Launch Dr.Fone and Select System Repair
Download and install the latest version of Wondershare Dr.Fone on your computer and continue to launch it. Proceed to the Toolbox section from the left panel and select System Repair from the options.

Dr.Fone Mac version still has the old interface, but it does not affect the use of Dr.Fone function, we will update it as soon as possible.
- Step 2: Select the Device Type to Repair
Continue to select iOS on the next screen to define the nature of the Apple iPhone 8 Plus device that is to be repaired.

- Step 3: Proceed with the Right Method
As you are redirected to the next screen, look for the iOS Upgrade/Downgrade option to lead to the required set of options.
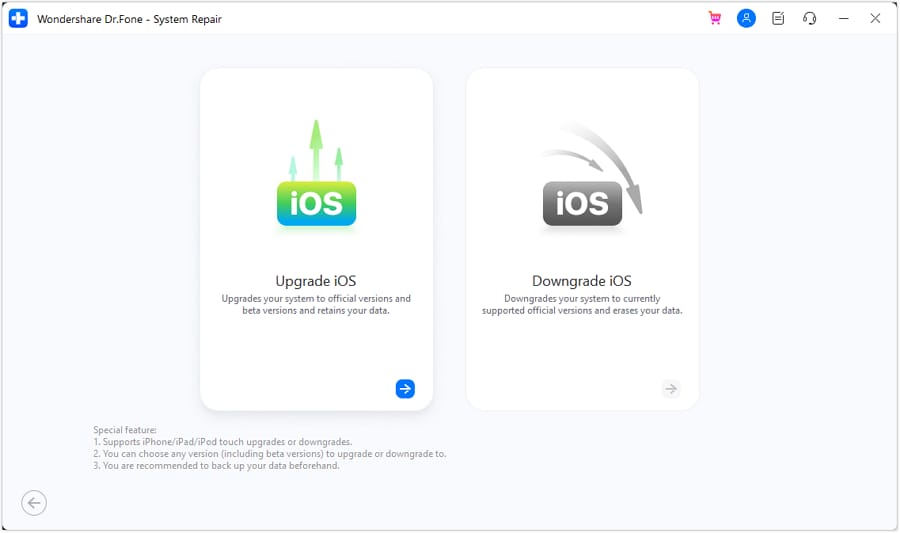
- Step 4: Select the Option to Upgrade iOS
For upgrading your iOS, you are advised to continue with the Upgrade iOS option on the next screen.
- Step 5: Attach iDevice to Establish the Connection
The platform prompts for connecting the Apple iPhone 8 Plus with the computer that is to be processed with a USB connection.
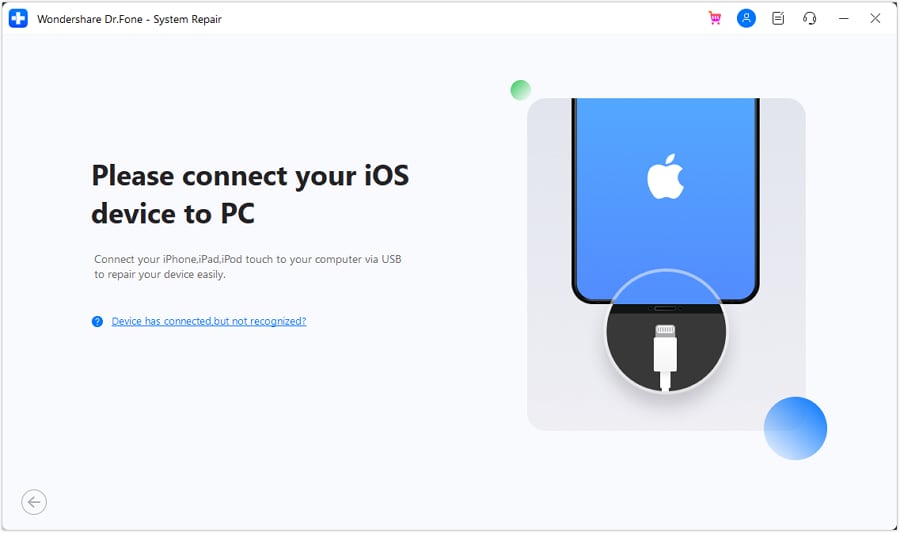
As you attach the Apple iPhone 8 Plus device with a proper USB cable, the platform detects the Apple iPhone 8 Plus device and continues to establish a proper connection.

- Step 6: Select iOS Firmware and Download
On a successful connection, a list of upgrading options appears on the next screen, where the user can select any option to continue with the process. Click Download against the iOS version that you want to upgrade to.

Note: For updating iOS, you are provided with the options of a flat flash and upgrade flash, which come in both official and beta versions.
- Step 7: Initiate Download of iOS Firmware
The firmware starts to download on the platform and is verified before it is made ready for installation on the Apple iPhone 8 Plus.

- Step 8: Repair iOS Device with Installed Firmware
Once the iOS firmware downloads successfully, click Repair Now on the platform to initiate the process.

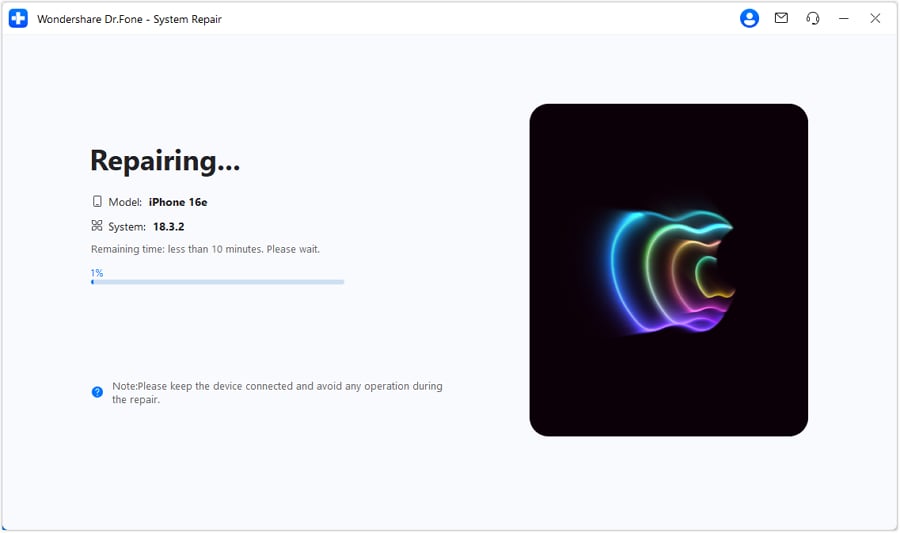
- Step 9: Observe the Completion of the Process
You can analyze the completion of the process through the progress bar appearing on the next screen.
- Step 10: Conclude Upgrading iOS/iPadOS
As the operating system is upgraded on your iDevice, continue to click Done to conclude the entire process.

Part 2: How to Downgrade iOS or iPadOS to an Older Version?
When it comes to downgrading your iOS or iPadOS to an older version, Wondershare Dr.Fone provides a comprehensive set of functions within its tool. You can select the most appropriate version according to the available options. Find out how you can downgrade Apple iOS with the help of Dr.Fone:
- Step 1: Select Downgrade iOS/iPadOS
As you progress into the right menu, select Downgrade from the two options for the execution of the required process.

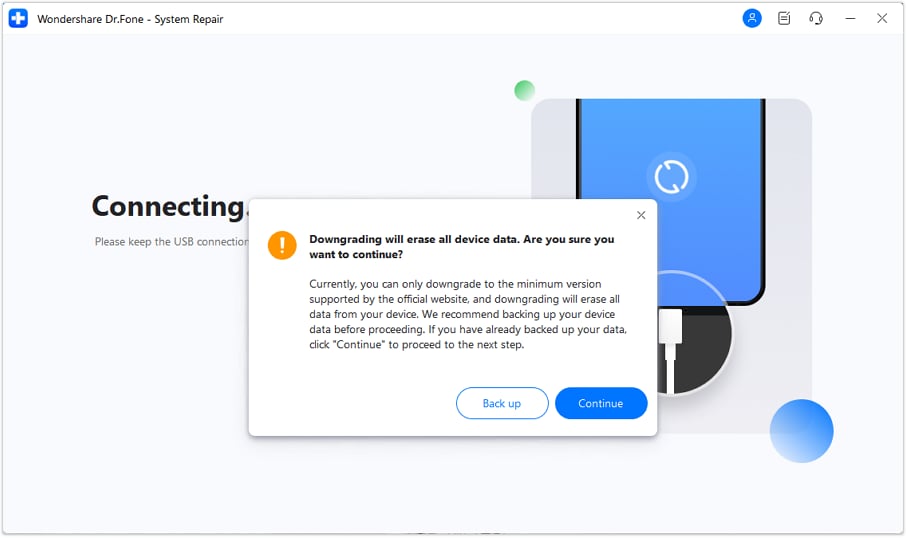
- Step 2: Backup iDevice If Needed
A prompt will appear asking you to back up your iOS device data before executing this process, as the process normally erases the data of the Apple iPhone 8 Plus device. Click Continue if you do not bother with the erasing of your data.
Note: For example, if you are downgrading from iOS version iOS 16.4.1 to version iOS 16.4 the data within the Apple iPhone 8 Plus will be retained. Conversely, if the Apple iPhone 8 Plus is downgraded from iOS 16.4 to iOS 16.3.1, the data will be erased from the Apple iPhone 8 Plus device. Thus, it is best to back up your device before performing such an operation.
- Step 3: Connect your iDevice with USB Cable
You will then be asked to connect your iDevice with a USB connection.

As the Apple iPhone 8 Plus device is attached, it will be automatically detected, and the platform will continue with the particular method.
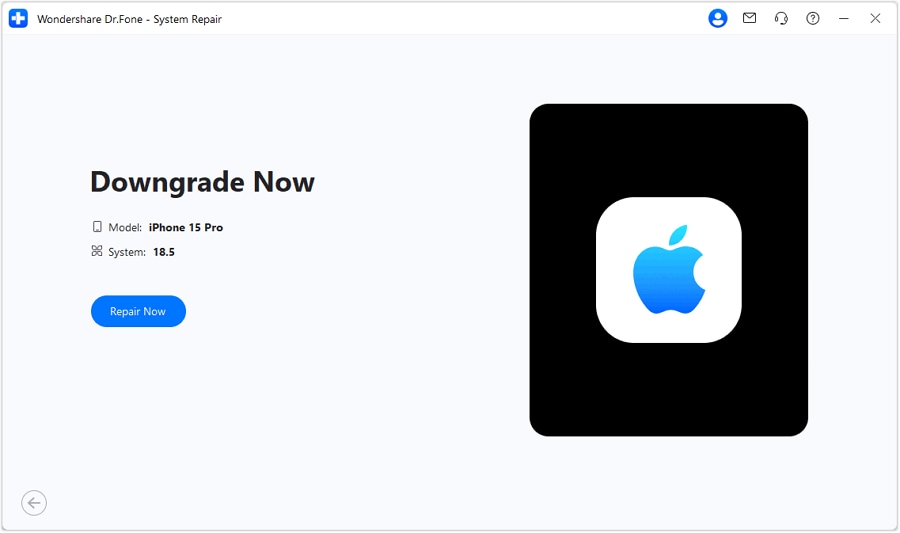
- Step 4: Select iOS Firmware to Downgrade
Select the best iOS firmware option from the options on the next screen, which will act as the version to which the Apple iPhone 8 Plus will be downgraded. As you tap Download, you will be redirected to a new screen.
Note: For example, if you are downgrading from iOS version iOS 16.4.1 to version iOS 16.4 the data within the Apple iPhone 8 Plus will be retained. Conversely, if the Apple iPhone 8 Plus is downgraded from iOS 16.4 to iOS 16.3.1, the data will be erased from the Apple iPhone 8 Plus device. Thus, it is best to back up your iOS device before performing such an operation.
- Step 5: Download iOS Firmware on Platform
The respective iOS firmware will start downloading on the platform. Before it is used to downgrade the iOS across the Apple iPhone 8 Plus, the platform will verify the process.

- Step 6: Perform the Downgrade Process on the Apple iPhone 8 Plus
Click Repair Now to redirect toward installing the iOS firmware on your device.
- Step 7: Conclude iOS Downgrade
The progress bar displays the completion of the process.

As the iOS is successfully downgraded on your iPhone, iPad or iPod Touch, continue to click Done to execute the entire process.
How To Repair Apple iPhone 8 Plus iOS System Issues?
Dr.Fone - System Repair (iOS) comes with a unique and effective solution for system repairing for its iPhone/iPad/iPod users. Regardless of the nature of the error, this repairing tool repairs more than 150+ problems involving iOS/iPadOS. If you have been facing software issues with your iOS device, this iOS system repair tool is an effective solution.
Note: After using this function, your iOS device will be updated to the latest iOS version. And if your iOS device has been jailbroken, it will be updated to a non-jailbroken version. If you have unlocked your iOS device before, it will be re-locked.
Upgrade to the Newest Dr.Fone Manage Your Phone Wherever You Go
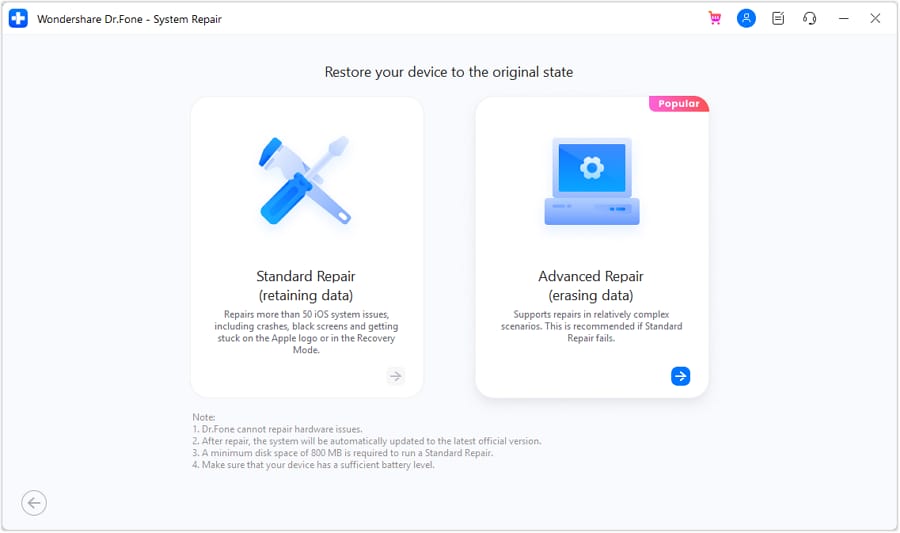
Part 1: iOS Standard Repair
The first method involves a standard repair against a problematic iDevice. If you are facing issues in managing the system problem within the iOS device, you can try this particular feature which retains the data completely. No data loss is recorded against iOS Standard Repair. To know how it is done, follow the steps described below:
- Step 1: Open System Repair Tool
Launch Wondershare Dr.Fone after successfully downloading the tool on your computer. Continue to the Toolbox section from the top-left section of the screen. Select System Repair from the list of options appearing on the home screen.
Dr.Fone Mac version still has the old interface, but it does not affect the use of Dr.Fone function, we will update it as soon as possible.
- Step 2: Lead to Select Device
As you connect your iOS device with a cable connection, you will be redirected to a new window where you will have to select the nature of the Apple iPhone 8 Plus device. Since you are practicing iOS system repair, go for iOS in the window that opens.
- Step 3: Continue With iOS Repair
The window that opens presents a set of options you can work on for the system repair of your iOS device. Select iOS Repair to continue for a system repair of your iOS device.

- Step 4: Select Standard Mode
The next window demands you select the repair mode for your iOS device. Select Standard Repair from the two options as you look forward to retaining the data during the process.

- Step 5: Put iOS Device in Recovery Mode
For the next step, you are advised to put your iOS device into Recovery Mode. By following the on-screen instructions, you can easily put your iDevice into Recovery Mode. Once done, tap Enter Recovery Mode to lead next. If not, click the Guide button to follow the instructions to put an unresponsive or abnormal device into Recovery Mode.

- Step 6: Download the Appropriate iOS Firmware
Once the Apple iPhone 8 Plus device is in Recovery Mode, the platform will automatically detect the respective iOS firmware that can be installed in the Apple iPhone 8 Plus device. Click Download against the iOS firmware you wish to install in your problematic device.
- Step 7: Start Downloading iOS Firmware
The device will automatically start downloading the iOS firmware on the platform. Once it downloads, it is verified by the platform before being made available for updating the iOS device.
- Step 8: Continue to Install on iOS Device
Continue to click Repair Now to proceed with repairing your iOS device.
- Step 9: Observe the Installation Progress
The progress bar on the next screen shows the completion of the process. Wait until the process concludes, and make sure to keep the Apple iPhone 8 Plus connected to the computer.
- Step 10: Repair iOS Device With Standard Repair
The following screen shows the completion of the process. Choose the Done option to conclude the entire repair process and use your iOS device easily.
Part 2: iOS Advanced Repair
If Standard Repair does not work for you and you cannot repair your iOS decvice with it, Dr.Fone - System Repair (iOS) provides the unique functionality of Advanced Repair. This particular mode gives an in-depth check on the Apple iPhone 8 Plus. It covers more serious issues involving the Apple iPhone 8 Plus device’s system, but please note that it also erases all the data within it. Thus, it is best to back up your iDevice’s data before you consider practicing an iOS Advanced Repair.
- Step 1: Select Advanced Repair
Proceed to select Advanced Repair from the options; however, make sure to perform a complete backup of your device’s data before performing the operation on it.
- Step 2: Put Device in Recovery Mode
On the next screen, you will find a guide explaining how to put your iOS device in Recovery Mode. Select the Enter Recovery Mode option if you have successfully been able to do it. However, if you find the screen to be unresponsive, click Guide to lead to another page that will provide you with comprehensive instructions on how to put the Apple iPhone 8 Plus device in Recovery Mode.
- Step 3: Select iOS Firmware and Download
Once done, you will be prompted to another screen where you have to select the respective iOS firmware you want to download on your iDevice. Select Download adjacent to the respective iOS firmware to initiate the process.
- Step 4: Start Downloading the Selected iOS Firmware
The iOS firmware starts downloading on the platform, which will be verified before installation on the Apple iPhone 8 Plus device.
- Step 5: Proceed to Install iOS Firmware on Device
As the firmware is ready for installation, click Repair Now to execute the process.
- Step 6: View the Installation Progress of the Firmware
You can view the completion of the installation through a progress bar.
- Step 7: Successfully Perform Advanced Repair
As the process concludes, a prompt window appears on the front showing a completion message. Click Done and check if your iOS device has been repaired.
How To Upgrade or Downgrade Apple iPhone 8 Plus Without iTunes?
Apple devices come with the option of upgrading their operating system now and then. While you may receive timely updates of iOS or iPadOS on your Apple iPhone 8 Plus there are several others that are practiced updating the OS. One such method involves iTunes, which can be a risky process. As an alternative, Dr.Fone comes with an option to update iPhone/iPad/iPod Touch without iTunes and even downgrade iOS.
Upgrade to the Newest Dr.Fone Manage Your Phone Wherever You Go
Part 1: How To Update iOS or iPadOS to the Latest Version?
Wondershare Dr.Fone - System Repair (iOS) provides a comprehensive set of options to update iOS devices without iTunes. While the process retains data for you, it upgrades your iOS without jailbreaking the Apple iPhone 8 Plus device. Neither is the device put at risk, nor does Dr.Fone allow such procedures to compromise the quality of the Apple iPhone 8 Plus device.
- Step 1: Launch Dr.Fone and Select System Repair
Download and install the latest version of Wondershare Dr.Fone on your computer and continue to launch it. Proceed to the Toolbox section from the left panel and select System Repair from the options.
Dr.Fone Mac version still has the old interface, but it does not affect the use of Dr.Fone function, we will update it as soon as possible.
- Step 2: Select the Device Type to Repair
Continue to select iOS on the next screen to define the nature of the Apple iPhone 8 Plus device that is to be repaired.
- Step 3: Proceed with the Right Method
As you are redirected to the next screen, look for the iOS Upgrade/Downgrade option to lead to the required set of options.
- Step 4: Select the Option to Upgrade iOS
For upgrading your iOS, you are advised to continue with the Upgrade iOS option on the next screen.
- Step 5: Attach iDevice to Establish the Connection
The platform prompts for connecting the Apple iPhone 8 Plus with the computer that is to be processed with a USB connection.
As you attach the Apple iPhone 8 Plus device with a proper USB cable, the platform detects the Apple iPhone 8 Plus device and continues to establish a proper connection.
- Step 6: Select iOS Firmware and Download
On a successful connection, a list of upgrading options appears on the next screen, where the user can select any option to continue with the process. Click Download against the iOS version that you want to upgrade to.
Note: For updating iOS, you are provided with the options of a flat flash and upgrade flash, which come in both official and beta versions.
- Step 7: Initiate Download of iOS Firmware
The firmware starts to download on the platform and is verified before it is made ready for installation on the Apple iPhone 8 Plus.
- Step 8: Repair iOS Device with Installed Firmware
Once the iOS firmware downloads successfully, click Repair Now on the platform to initiate the process.
- Step 9: Observe the Completion of the Process
You can analyze the completion of the process through the progress bar appearing on the next screen.
- Step 10: Conclude Upgrading iOS/iPadOS
As the operating system is upgraded on your iDevice, continue to click Done to conclude the entire process.
Part 2: How to Downgrade iOS or iPadOS to an Older Version?
When it comes to downgrading your iOS or iPadOS to an older version, Wondershare Dr.Fone provides a comprehensive set of functions within its tool. You can select the most appropriate version according to the available options. Find out how you can downgrade Apple iOS with the help of Dr.Fone:
- Step 1: Select Downgrade iOS/iPadOS
As you progress into the right menu, select Downgrade from the two options for the execution of the required process.
- Step 2: Backup iDevice If Needed
A prompt will appear asking you to back up your iOS device data before executing this process, as the process normally erases the data of the Apple iPhone 8 Plus device. Click Continue if you do not bother with the erasing of your data.
Note: For example, if you are downgrading from iOS version iOS 16.4.1 to version iOS 16.4 the data within the Apple iPhone 8 Plus will be retained. Conversely, if the Apple iPhone 8 Plus is downgraded from iOS 16.4 to iOS 16.3.1, the data will be erased from the Apple iPhone 8 Plus device. Thus, it is best to back up your device before performing such an operation.
- Step 3: Connect your iDevice with USB Cable
You will then be asked to connect your iDevice with a USB connection.
As the Apple iPhone 8 Plus device is attached, it will be automatically detected, and the platform will continue with the particular method.
- Step 4: Select iOS Firmware to Downgrade
Select the best iOS firmware option from the options on the next screen, which will act as the version to which the Apple iPhone 8 Plus will be downgraded. As you tap Download, you will be redirected to a new screen.
Note: For example, if you are downgrading from iOS version iOS 16.4.1 to version iOS 16.4 the data within the Apple iPhone 8 Plus will be retained. Conversely, if the Apple iPhone 8 Plus is downgraded from iOS 16.4 to iOS 16.3.1, the data will be erased from the Apple iPhone 8 Plus device. Thus, it is best to back up your iOS device before performing such an operation.
- Step 5: Download iOS Firmware on Platform
The respective iOS firmware will start downloading on the platform. Before it is used to downgrade the iOS across the Apple iPhone 8 Plus, the platform will verify the process.
- Step 6: Perform the Downgrade Process on the Apple iPhone 8 Plus
Click Repair Now to redirect toward installing the iOS firmware on your device.
- Step 7: Conclude iOS Downgrade
The progress bar displays the completion of the process.
As the iOS is successfully downgraded on your iPhone, iPad or iPod Touch, continue to click Done to execute the entire process.
- Title: How to Downgrade Apple iPhone 8 Plus without Losing Data? | Dr.fone
- Author: Ian
- Created at : 2024-09-18 16:17:43
- Updated at : 2024-09-24 17:38:04
- Link: https://techidaily.com/how-to-downgrade-apple-iphone-8-plus-without-losing-data-drfone-by-drfone-ios-system-repair-ios-system-repair/
- License: This work is licensed under CC BY-NC-SA 4.0.