
How do I reset my Nokia G310 Phone without technical knowledge? | Dr.fone
How do I reset my Nokia G310 Phone without technical knowledge?
Resetting a Nokia G310 smartphone to factory settings could be necessary. You will probably need to do a hard reset if you want to unlock your smartphone or sell it to someone else. The majority of Nokia G310 devices may be quickly reset simply by pushing the volume and power buttons together. However, hard resetting a Nokia G310 sometimes is a whole other situation and may be much more difficult. That myth will be dispelled for you by us!
If the Nokia G310 device is functioning properly, hard resetting a Nokia G310 tablet without volume buttons won’t be too difficult and can be completed in a matter of taps. However, if the apparatus is broken, it may be an issue. Let’s have a look at all the possibilities.
Part 1: 4 Easy solutions to hard reset your Nokia G310
1. From recovery mode to delete all data
It’s not particularly difficult to reset a Nokia G310 smartphone or tablet, especially if it has a home button. You can only do a hard reset on a Nokia G310 tablet without volume buttons after entering recovery mode. Follow the procedures outlined below to learn how to reset a Nokia G310 tablet without volume buttons.
Step 1: First, press the power off and home buttons.
Press the power button repeatedly until the Power off, Restart, and other choices are shown. Now, choose “Power Off” and hold it down while tapping your phone’s home button.
At the same time, the Nokia G310 device.
Step 2: Verify the safe mode bootup.
The screen for restarting in safe mode will now show up. To switch to safe mode, select “Yes.”
Step 3: Switch to recovery mode
Your device’s power and home buttons must be pressed and held simultaneously until a new screen shows. Release the two buttons once it appears, then press the power button one more. Press and hold the home button for a moment. With that, recovery mode will start, and a new set of choices will show up on the screen.
Step 4: Select “Factory Reset” and navigate
Navigate down to the “Wipe data/factory reset” option using the home button. To choose the choice, press the power button.
2. Use the factory reset code to wipe data in Nokia G310
Step 1: Press the Volume Up + Power Keys at the same time as turning off your smartphone and removing the SIM card.
Step 2: The Nokia G310 logo will appear when the phone boots. Keep none of the keys.
Step 3: Scroll down to the Wipe Data / Factory Reset option using the volume down key.
Step 4: If you want to say “OK” and reset, press the Power Key.
To delete all user data, click “Yes.”
Step 5: The factory data reset process will begin on the phone.
After formatting is finished, click “Reboot System Now.”
3. Google Find My Device
Finding My Device:
Go to www.google.com/android/find on your computer’s web browser and sign in with the same Google Account you used on your phone.
When your phone is located, Find My Device will provide specific location information.
Do any of the following:
- If you’ve merely lost your phone, click Play sound to make it ring.
- If you’re using Find My Device for the first time, select Set up secure & erase to configure remote locking and erasing for your phone.
- To lock your phone and log out of your Google Account, click Secure device.
- If you wish to completely delete everything on your phone, choose Erase device.
The removal of all data from your phone’s storage, including applications, app data, and settings, will result from remotely wiping it. Personal information is one type of data that might not be completely removed. After doing this, you won’t be able to access your phone remotely.
4. Dr.Fone - Data Eraser
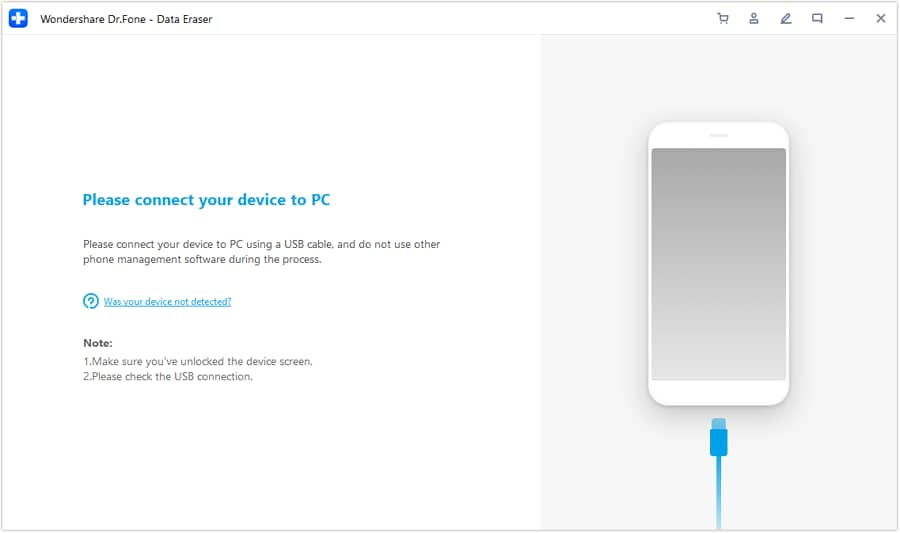
Step 1: Connect your Nokia G310 phone to the desktop. Get Dr.Fone running on your PC. Choose “Data Eraser” from the list of tools.

Utilize a USB cord to link your Nokia G310 phone to the PC. Make sure USB debugging is enabled on your phone. On your phone, there will be a pop-up window requesting you to authorize USB debugging if the Nokia G310 OS version is higher than 4.2.2. Click “OK” to move forward.

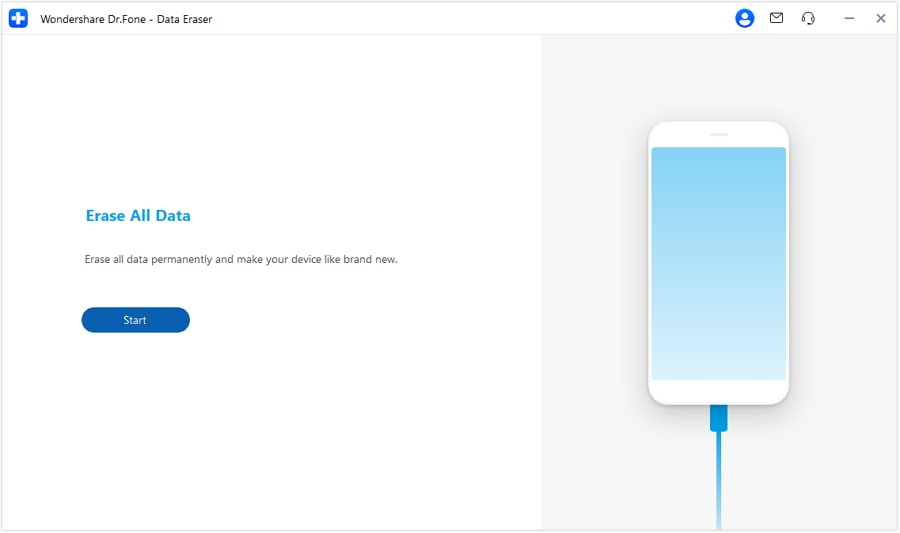
Step 2: Start erasing your Nokia G310 phone
Your Nokia G310 smartphone will then be immediately detected and connected by Dr.Fone. To begin wiping all of your data, click the “Erase All Data” option.
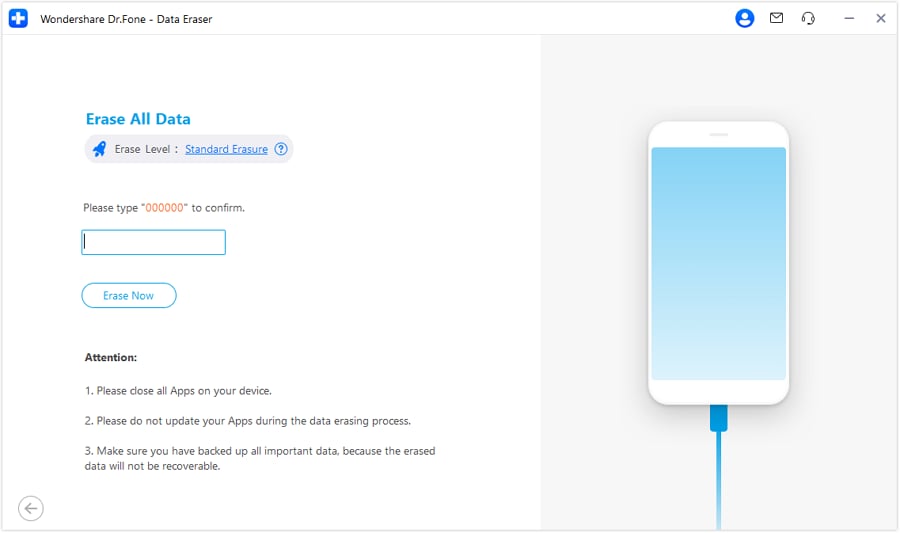
Make sure you have all the necessary data backed up before continuing because all wiped data cannot be recovered. After that, enter “000000” to verify your action.
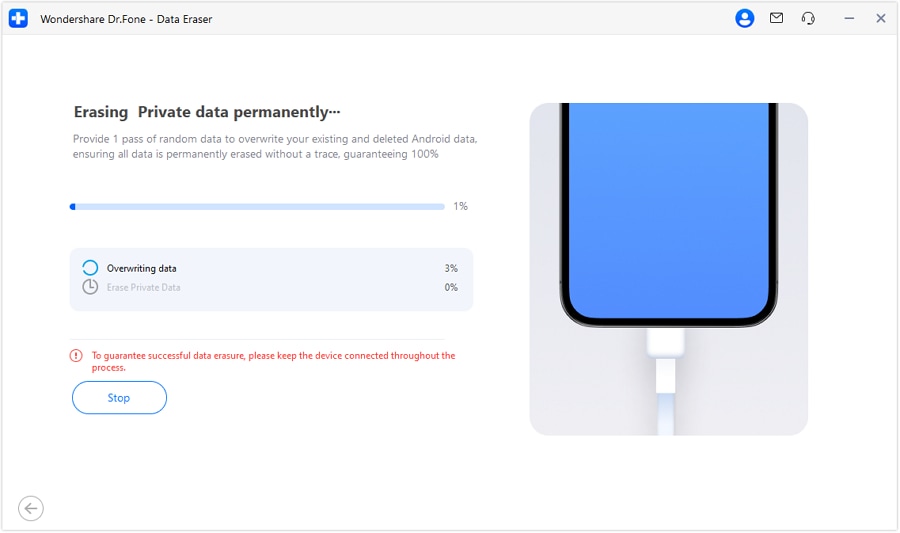
The data on your Nokia G310 phone will then begin to be deleted by Dr. Fone. The entire process only requires a few minutes. Do not turn off the phone or launch any other phone management programs on the PC.
Step 3. Reset the factory data on your phone.
Dr.Fone will prompt you to tap on Factory Data Reset or Erase All Data on the phone once all app data, photographs, and other private data have been entirely removed. You may use this to entirely erase all of the phone’s settings.
 safe & secure
Part 2: FAQs
1. Is there any simple tool to have my Nokia G310 backup? (Dr.Fone - Phone Backup)
Yes, there are very few simple tools available that you can use to back up your Nokia G310 phone. One such tool is Dr.Fone - Phone backup which is super simple to use and extremely beginner friendly and how you recover all of your lost data from your Nokia G310 phone.
2. Do these solutions damage my Nokia G310?
Unfortunately, many of the solutions that you used to recover or back up your Nokia G310 phone damage the quality of the information and also the hardware or software of your Nokia G310 mobile however the best solution to this problem is using Dr.Fone - Phone backup which is a supplied tool which does not cause any problem during or after its usage and help you recover all kind of lost data.
The Bottom Line
Now that you know how to reset a Nokia G310 phone that is locked and how to use Nokia G310 hard reset code to reset Nokia G310, it is time to implement resolution though you can try, and among the ways given above, the best solution is to go with the Wondershare Dr.Fone - Phone Backup. It is a great tool that will immediately help you recover all of your lost information from your Nokia G310 phone without causing any harm to your device.
safe & secure
How do I reset my Nokia G310 Phone without technical knowledge?
Resetting a Nokia G310 smartphone to factory settings could be necessary. You will probably need to do a hard reset if you want to unlock your smartphone or sell it to someone else. The majority of Nokia G310 devices may be quickly reset simply by pushing the volume and power buttons together. However, hard resetting a Nokia G310 sometimes is a whole other situation and may be much more difficult. That myth will be dispelled for you by us!
If the Nokia G310 device is functioning properly, hard resetting a Nokia G310 tablet without volume buttons won’t be too difficult and can be completed in a matter of taps. However, if the apparatus is broken, it may be an issue. Let’s have a look at all the possibilities.
Part 1: 4 Easy solutions to hard reset your Nokia G310
1. From recovery mode to delete all data
It’s not particularly difficult to reset a Nokia G310 smartphone or tablet, especially if it has a home button. You can only do a hard reset on a Nokia G310 tablet without volume buttons after entering recovery mode. Follow the procedures outlined below to learn how to reset a Nokia G310 tablet without volume buttons.
Step 1: First, press the power off and home buttons.
Press the power button repeatedly until the Power off, Restart, and other choices are shown. Now, choose “Power Off” and hold it down while tapping your phone’s home button.
At the same time, the Nokia G310 device.
Step 2: Verify the safe mode bootup.
The screen for restarting in safe mode will now show up. To switch to safe mode, select “Yes.”
Step 3: Switch to recovery mode
Your device’s power and home buttons must be pressed and held simultaneously until a new screen shows. Release the two buttons once it appears, then press the power button one more. Press and hold the home button for a moment. With that, recovery mode will start, and a new set of choices will show up on the screen.
Step 4: Select “Factory Reset” and navigate
Navigate down to the “Wipe data/factory reset” option using the home button. To choose the choice, press the power button.
2. Use the factory reset code to wipe data in Nokia G310
Step 1: Press the Volume Up + Power Keys at the same time as turning off your smartphone and removing the SIM card.
Step 2: The Nokia G310 logo will appear when the phone boots. Keep none of the keys.
Step 3: Scroll down to the Wipe Data / Factory Reset option using the volume down key.
Step 4: If you want to say “OK” and reset, press the Power Key.
To delete all user data, click “Yes.”
Step 5: The factory data reset process will begin on the phone.
After formatting is finished, click “Reboot System Now.”
3. Google Find My Device
Finding My Device:
Go to www.google.com/android/find on your computer’s web browser and sign in with the same Google Account you used on your phone.
When your phone is located, Find My Device will provide specific location information.
Do any of the following:
- If you’ve merely lost your phone, click Play sound to make it ring.
- If you’re using Find My Device for the first time, select Set up secure & erase to configure remote locking and erasing for your phone.
- To lock your phone and log out of your Google Account, click Secure device.
- If you wish to completely delete everything on your phone, choose Erase device.
The removal of all data from your phone’s storage, including applications, app data, and settings, will result from remotely wiping it. Personal information is one type of data that might not be completely removed. After doing this, you won’t be able to access your phone remotely.
4. Dr.Fone - Data Eraser
Step 1: Connect your Nokia G310 phone to the desktop. Get Dr.Fone running on your PC. Choose “Data Eraser” from the list of tools.
Utilize a USB cord to link your Nokia G310 phone to the PC. Make sure USB debugging is enabled on your phone. On your phone, there will be a pop-up window requesting you to authorize USB debugging if the Nokia G310 OS version is higher than 4.2.2. Click “OK” to move forward.
Step 2: Start erasing your Nokia G310 phone
Your Nokia G310 smartphone will then be immediately detected and connected by Dr.Fone. To begin wiping all of your data, click the “Erase All Data” option.
Make sure you have all the necessary data backed up before continuing because all wiped data cannot be recovered. After that, enter “000000” to verify your action.
The data on your Nokia G310 phone will then begin to be deleted by Dr. Fone. The entire process only requires a few minutes. Do not turn off the phone or launch any other phone management programs on the PC.
Step 3. Reset the factory data on your phone.
Dr.Fone will prompt you to tap on Factory Data Reset or Erase All Data on the phone once all app data, photographs, and other private data have been entirely removed. You may use this to entirely erase all of the phone’s settings.
safe & secure
Part 2: FAQs
1. Is there any simple tool to have my Nokia G310 backup? (Dr.Fone - Phone Backup)
Yes, there are very few simple tools available that you can use to back up your Nokia G310 phone. One such tool is Dr.Fone - Phone backup which is super simple to use and extremely beginner friendly and how you recover all of your lost data from your Nokia G310 phone.
2. Do these solutions damage my Nokia G310?
Unfortunately, many of the solutions that you used to recover or back up your Nokia G310 phone damage the quality of the information and also the hardware or software of your Nokia G310 mobile however the best solution to this problem is using Dr.Fone - Phone backup which is a supplied tool which does not cause any problem during or after its usage and help you recover all kind of lost data.
The Bottom Line
Now that you know how to reset a Nokia G310 phone that is locked and how to use Nokia G310 hard reset code to reset Nokia G310, it is time to implement resolution though you can try, and among the ways given above, the best solution is to go with the Wondershare Dr.Fone - Phone Backup. It is a great tool that will immediately help you recover all of your lost information from your Nokia G310 phone without causing any harm to your device.
safe & secure
All Things You Need to Know about Wipe Data/Factoy Reset For Nokia G310
Wiping data or carrying out a factory reset on an Android device is an effective solution for various issues on your Android phone. Even if you are contemplating selling your phone and you need all your device data to be wiped out, you carry out a factory reset. But, before you proceed, what’s important is to understand about wipe data/ factory reset, because, if you don’t, you might end up losing all your important data before it is backed up, serving no purpose. So, before you wipe data/ factory reset Android, here’s what you should know about it.
Part 1: What data will be wiped by Wipe Data/Factory Reset?
Doing a factory reset on the Android device will remove all the applications installed on the Nokia G310 device along with the data associated with them. This brings back all the default settings of the Nokia G310 device as it was when the phone was new, giving you a clean slate to start all over again.

Since Wipe data/factory reset deletes all applications, app data, and information (documents, videos, images, music, etc) stored in the internal space, it is required for you to perform a data backup operation before you reset the Android device to factory settings. However, wipe data/factory reset does not affect the SD card in any way. So, even if you have the SD card inserted with videos, images, documents, and any other personal information in the Android device while carrying out a factory reset, everything will remain safe and intact.
Part 2: How to perform Wipe Data/ Factory Reset?
Performing wipe data/factory reset on your Android device e is very simple. It is a matter of time before you wipe out everything lying on the internal storage of your Android device. Here’s how you can perform Wipe data/ Factory Rest on your device:
Step 1: First of all, turn off the Nokia G310 device. Then, use the volume up button, volume down button, and Power button on your Android device simultaneously and hold on to the buttons until the phone turns on.
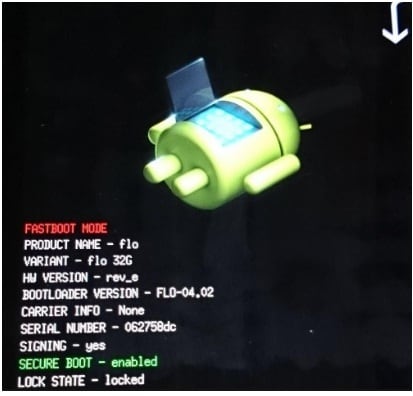
Step 2: Release the buttons when the Nokia G310 device is powered on. Now, use the volume up and down button to sift through the options given on the screen. Use the power button to select “Recovery Mode” on the screen. Your phone will restart into “Recovery Mode’ and you will find the below screen:
Step 3: Holding the power button down, use the volume up button, and the Android system recovery menu will pop up.
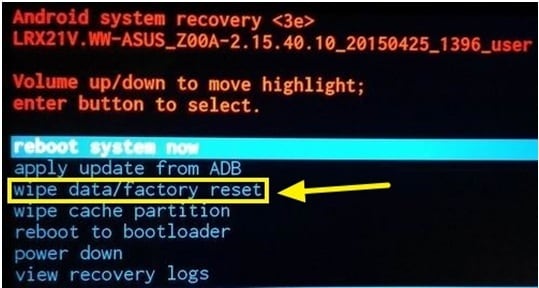
Now, scroll down to “wipe data/factory reset” option from the list of commands and use the Power button to select it.
Now, scroll down to “Yes – delete all user data” using the volume button and then push the power button to select.
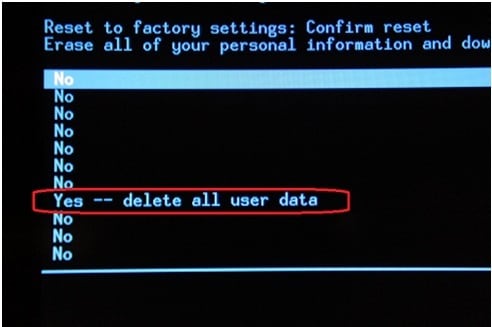
In some time your device will be reset into factory settings with all your data erased. The entire process will take a few minutes. Ensure that you have the phone at least 70% charged so that it does not run out of charge midway.
Part 3: Does Wipe Data/ Factory Reset wipe all your data?
There are various instances where you would require performing a wipe/factory reset on your device. It might be because of some glitch that you would like to troubleshoot on your Android device. Wiping data from the phone is a universal solution in such cases. Even in cases where you want to sell your device, performing a factory reset seems the best option. What’s important is to make sure you don’t leave a trace of your personal information on the Nokia G310 device. Therefore, wipe data/factory reset is never the ultimate solution to rely on. It is neither the best option anyway.
Contrary to conventional thought of relying on wipe data/factory reset Android believing it to be the best solution for wiping out complete data from the phone, all research outcomes have proved something different. It is easier to recover account tokens used to authenticate you when you enter a password for the first time, from service providers like Facebook, WhatsApp, and Google. Hence it is easier to restore the user’s credentials as well.
So, to protect your privacy and completely wipe data off the Nokia G310 device, you can use Dr.Fone - Data Eraser. This is an amazing tool that erases everything on the Nokia G310 device without leaving an ounce of data in it. Here’s how you can use Dr.Fone - Data Eraser to completely wipe the data and protect privacy:
![]()
Dr.Fone - Data Eraser
Fully Erase Everything on Android and Protect Your Privacy
- Simple, click-through process.
- Wipe your Android completely and permanently.
- Erase photos, contacts, messages, call logs, and all private data.
- Supports all Android devices available in the market.
4,683,556 people have downloaded it
Step 1: Install and launch Dr.Fone - Data Eraser
First of all, install Dr.Fone on your computer and launch it by double-clicking on the icon. You will find the below window. You will find various toolkits on the interface. Select Erase from various toolkits.
Step 2: Initiate the Process
When the tool’s window opens, click Start to trigger the operation.
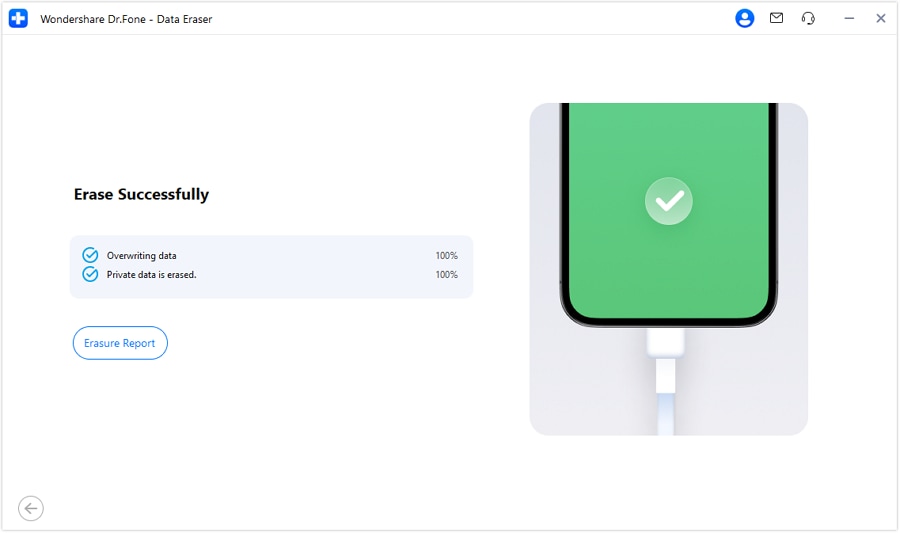
Step 3: Confirm and Execute Data Eraser
To remove all data, confirm with the given code. After inputting the code, select Erase Now. A message will appear upon erasure completion. Click Erasure Report to review the types of data erased.
This will protect your privacy as your Android device will reboot into default settings with all the data erased.
Since the erased data cannot be recovered, it is highly recommended to have all the personal data backed up before operating here using Dr.Fone.
And you could watch this YouTube video for an in-depth tutorial.
safe & secure
Conclusion
Hence, today we learned about wiping data and also factory reset. Well as per us, using Dr.Fone - Data Eraser is the best option as it is a simple and click-through process and helps you completely erase data from your Android. This toolkit also is the best as it supports all Android devices available in the market today.
safe & secure
- Title: How do I reset my Nokia G310 Phone without technical knowledge? | Dr.fone
- Author: Ian
- Created at : 2024-09-23 16:46:22
- Updated at : 2024-09-24 17:49:16
- Link: https://techidaily.com/how-do-i-reset-my-nokia-g310-phone-without-technical-knowledge-drfone-by-drfone-reset-android-reset-android/
- License: This work is licensed under CC BY-NC-SA 4.0.