
Hard Resetting an Nokia C210 Device Made Easy | Dr.fone
Hard Resetting an Nokia C210 Device Made Easy
If you have owned any Nokia C210 smartphone, you should know about the UI features these handsets offer. The new age of Color OS has been giving the best client experience. Moreover, it is easier to hard reset your Nokia C210 phone if you need to sell a phone. This article will guide you on resetting Nokia C210 phone with simple steps.
We have shared a step-by-step manual on how you can perform Nokia C210 hard reset. Several methods are mentioned in this article, and all of them are tested. Resetting any Nokia C210 phone is not a hard task. You should know about the right steps. However, we suggest you use Dr.Fone - Data Eraser for better results and more commands. It is hassle-free software and lets you selectively delete the desired data from your phone.
Part 1: Some Common Causes of Nokia C210 Hard Reset
There are many occasions when a person may want to hard reset their Nokia C210 phone. Some of these are:
- If your Nokia C210 runs too slowly, you may need to reset it to clear some space.
- When you lose your password or pattern, you will need to reset your device hard to remove the screen lock.
- You can repair a frozen or stuck screen using a hard reset.
- If your phone is constantly crashing, and you want to make your experience smoother, a hard reset may help.
- Lastly, you need to remove everything from your phone when you are looking to sell your phone. In such cases, a hard reset will do your work quickly.
Part 2: 2 simple ways to hard reset your Nokia C210
1. Hard Reset from Settings
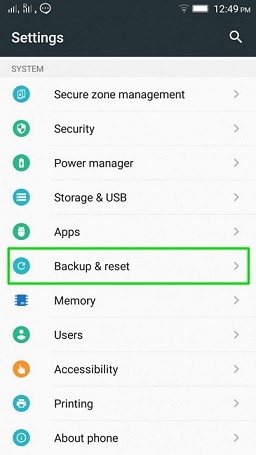
- Step 1. Go to the Settings application on your Nokia C210 phone and open System Settings.
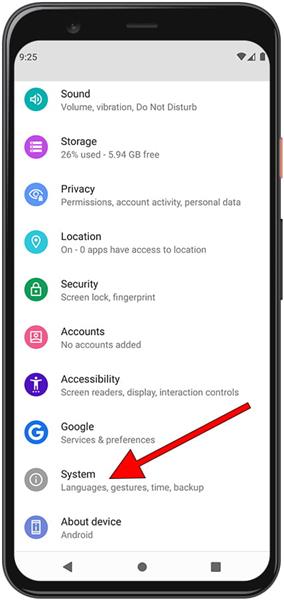
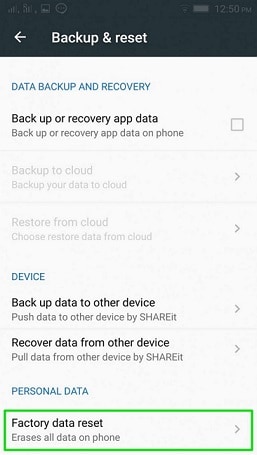
- Step 2. Go to the “Backup and Reset” menu and click the “Reset Phone” option.
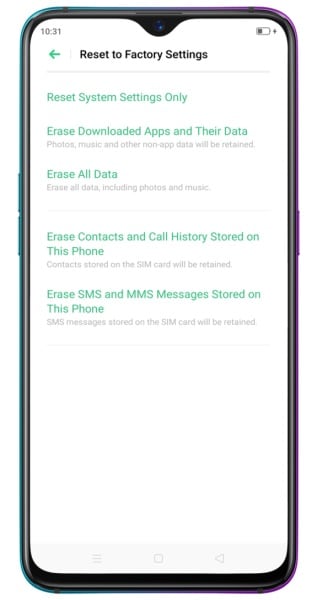
- Step 3. The phone will show numerous choices to reset. It includes resetting network settings, system settings only, contacts, call logs, messages, etc. Moreover, there will be the “Erase All Data” option too.
- Step 4. To hard reset Nokia C210, pick the Erase All Data option to reset your device and bring it to factory settings.

2. From Recovery Mode (By Hardware Keys)
Hard resetting Nokia C210 smartphones is also simple, assuming you know the right steps. The following are the steps to get to the recovery mode on Nokia C210 smartphones and do an Oppo hard reset. This method is quite helpful when you don’t remember your phone’s screen lock.
- Step 1: Make sure to power off your Nokia C210 smartphone to get started. Press and hold the power key on your Nokia C210 phone for about 10 seconds.
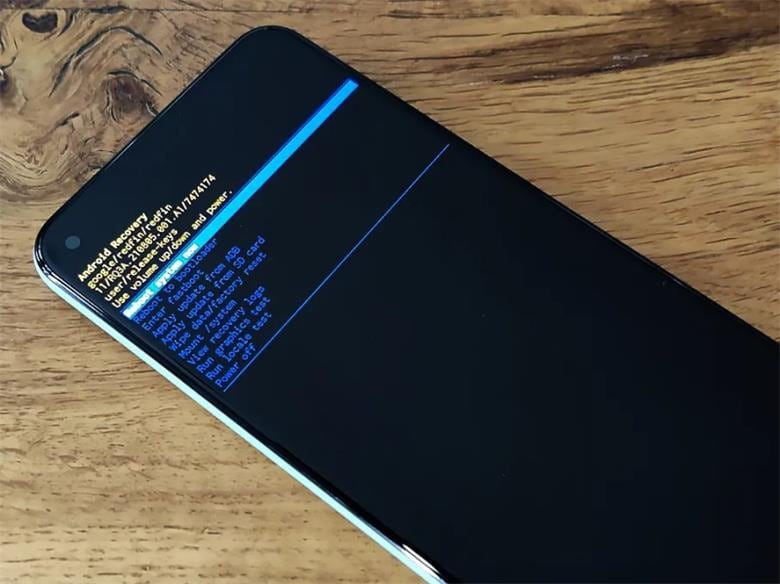
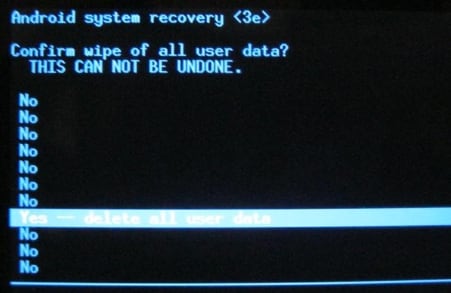
- Step 2: Simultaneously, press and hold the power and Volume down keys until the Nokia C210 logo springs up on the screen. This will bring the Recovery mode screen.
- Step 3: Select your preferred language using the Volume and Power buttons, and then tap on “Wipe Data”.
- Step 4: You will be approached to enter the confirmation code (screen lock PIN).
- Step 5: Complete step 4 and afterward select the Format data choice.
- Step 6: Select OK to finish the hard reset strategy on your Oppo device.
Part 3: Best Tools to Make your Nokia C210 Hard Reset Easier
To make your Oppo hard reset experience easier, you need to look for an expert service. We would suggest you use Wondershare Dr.Fone. Dr.Fone is an all-in-one professional software for screen unlock, data erasure, data recovery, system repair, and more. In case of a hard reset, if you have forgotten the screen lock, you can use their Screen Unlock feature. Interestingly, their Data Erasure software provides the full command to its users. You can use it to delete the desired files or fully reset your phone. Overall, it is a safe tool with an almost 100% access rate. It works with almost 99% of the Android phones available in the market and has great customer support service. Therefore, download it right away and make your hard reset experience smoother.
Steps to Use Dr.Fone - Screen Unlock (Android)
- Step 1: After launching Dr.Fone, please use a USB cable to connect your Nokia C210 phone. And tap the “Screen Unlock” option.
- Step 2: Please select the left part with 3 phones, “Unlock Android Screen” to proceed.

- Step 3: To unlock Nokia C210 phone, the left “100% Remove Screen Lock” is the only feasible way. In this interface, we include most android brands. And as Nokia C210 user, it’s also in the list we offered.

- Step 4: Recovery mode is the key step for the whole process. Here is a simple guide to help you hard reset your Nokia C210 device.
- Congrats! You’re able to access your Nokia C210 phone without hassle and it’s already hard reset!

 safe & secure
Steps to Use Dr.Fone - Data Eraser (Android)
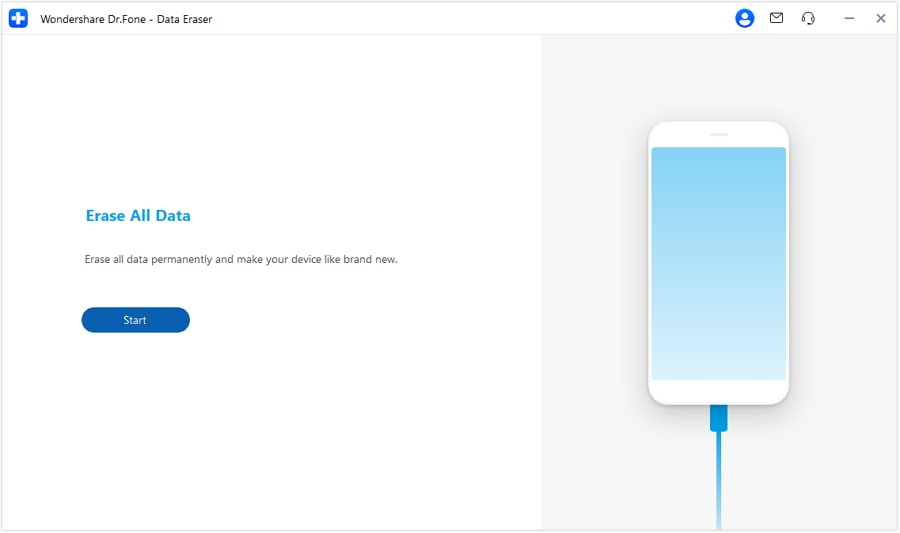
- Step 1: Open Dr.Fone’s program and select the “Data Eraser” tool.
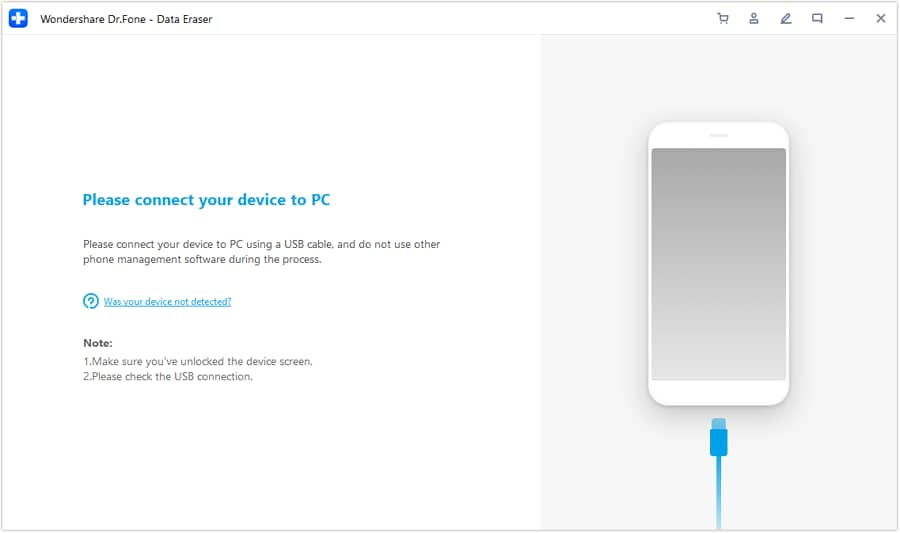
- Step 2: Connect your Nokia C210 phone to the PC through a USB connector.
- Step 3: Click on the “Erase All Data” button to begin. Ensure you have backed up your important files before you continue.
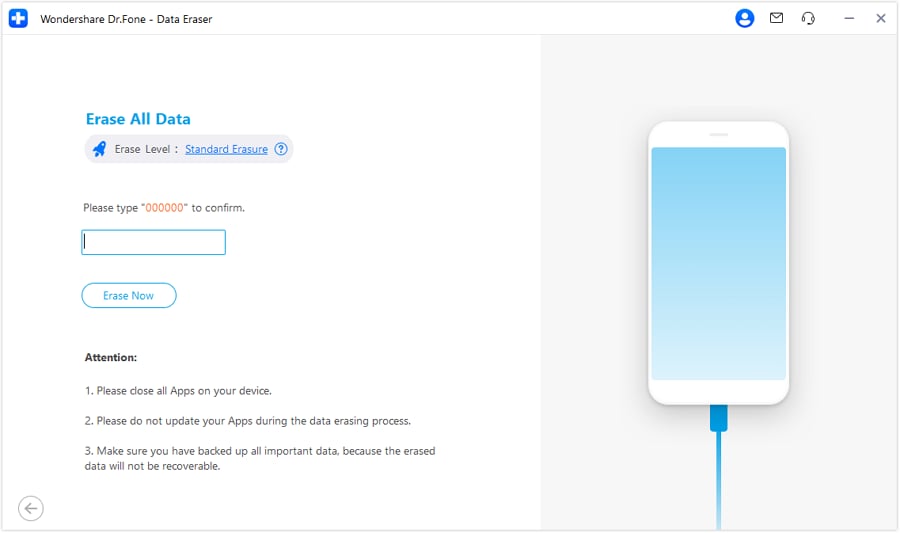
- Step 4: Then type in “000000” to affirm your action. Then Dr.Fone will begin deleting all data on your phone.
- Step 5: Tap on Factory Data Reset or Erase All Data on the phone. This will assist you with totally cleaning up the settings on the phone.
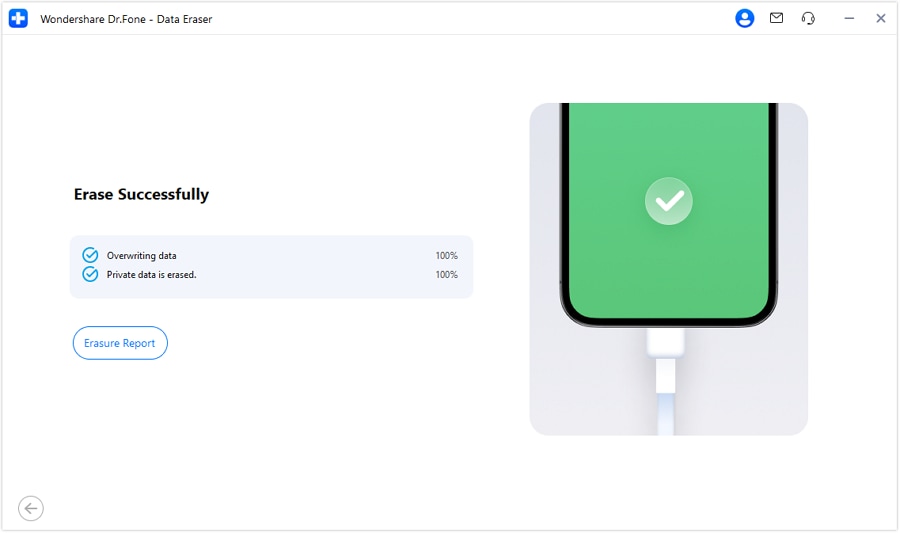
- Presently, your Android phone has been wiped, and it can be used as a new one.
safe & secure
Conclusion
Resetting an Nokia C210 phone can be tricky sometimes; therefore, it should be finished with the right tools and strategies. Above, we have listed multiple ways to hard reset Nokia C210. You need to pick the best strategy according to your situation. However, for an easy, solid, protected, and speedy technique, we recommend Dr.Fone by Wondershare . It provides multiple tools in a single program and has a higher success ratio compared to the other methods. So install it right away for a speedy hard reset of your Nokia C210 device.
You Might Also Like
All About Factory Reset, What Is It and What It Does to Your Nokia C210?
I bought a new phone and want to sell my old Nokia C210 3, so I need to clear my data off it. Can someone guide me on how to factory reset the Nokia C210 3 so I can sell it?
As we all know, force restart and even factory reset can resolve many problems on our phones. Sometimes when you want to sell your old phone, you need to factory reset it to clear your data off it. Also, if there is some issue like a screen lock, you can factory reset it to unlock your phone. But do you know how to do a factory reset Nokia C210 3 correctly?
Therefore, we have gathered all that you need to know about a factory reset. After going through this article, you can factory reset Nokia C210 phones. So, keep following to resolve your Nokia C210 issues.
Part 1: What is Nokia C210 Factory Reset?
Principles of Nokia C210 Factory Reset
Before you reset your Nokia C210 phone, you must ensure your data is all backed up someplace. It can be either on another device or transferred to the cloud. While changing your phone, you can exchange data from your old Nokia C210 without much stretch. If you own a Nokia C210, a large portion of your data is put away securely in servers.
One way or another, you must twofold check these things before a factory reset:
- Google ID
- Contacts
- Pictures Gallery
- Passwords
- Music
Steps to Start Nokia C210 Factory Reset
Now is the right time to factory reset Nokia C210 when you have everything backed up. The following steps will help you factory reset your Nokia C210:
- On your Nokia C210, head into the settings application. Look over right down and search for System and click it. Look down and search for Reset options.
![]()
- Go to System and tap the “Erase all data” option.
![]()
![]()
- Note: After tapping this, the following page will allow you to see what will be cleaned from the Nokia C210 device. Make sure everything is covered in your backup.
- Pick whether you need to delete any downloaded SIMs and tap Erase all data.
![]()
- You might need to enter your password to complete the reset.
Differences Between Hard Reset and Factory Reset
A factory reset deletes everything from your Nokia C210 device. You might utilize a factory reset when your phone could have a virus or when it is seriously breaking down. A factory reset returns your Nokia C210 to its factory settings, driving you to set it up again as a new phone.
A hard reset is a basic rebooting of your cell phone. It doesn’t influence the data on your Nokia C210. You might utilize a hard reset when your Nokia C210 is acting slow. However, it is different from a standard reboot of your Nokia C210.
Part 2: What can Nokia C210 Factory Reset do?
A factory reset deletes every user information, application, related application data, and settings on your pixel phone. It is like hard drive reformatting in a PC. However, a factory reset fixes different hardware and software-related issues. It also unlocks your phone in case you forget your lock screen password, or you need to factory reset Nokia C210 before selling it to protect your privacy.
Part 3: 2 Easy Ways to improve your Nokia C210 Factory Reset
1. Dr.Fone - Data Eraser
You can use Dr.Fone Data Eraser to reset your Nokia C210 phone within minutes. Whether you need to sell your old Nokia C210 or want to make it look like a new one, you can delete its files with Dr.Fone - Data Eraser. All private data and downloads are taken out. Moreover, you can delete your Nokia C210 even if its software is corrupted. Additionally, you can erase specific documents on your Nokia C210 also. The other Nokia C210 data and settings will be protected in this case. So, here is the Wondershare Dr.Fone step-by-step guide to doing so:
safe & secure
- Launch the Wondershare Dr.Fone software and click the “Data Eraser” from the main window.

- Connect your Nokia C210 and PC using a connector. Please make sure that USB Debugging is on in your Nokia C210.
- The software will automatically read your Nokia C210 phone and start to erase your files. Click “Erase All Data.”
- Type in “000000” to affirm your activity and continue.
- Then, at that point, Dr.Fone will ask you to click the Factory Reset option on your Nokia C210. You can also select “Erase All Data” to reset your Nokia C210.
2. Dr.Fone - Phone Backup
As we mentioned before, we recommend you back up your files before a factory reset. You can use Dr.Fone - Phone Backup (Android) to back up data without any hassle and data loss. With this tool, backing up your Nokia C210 has never been simpler. The program makes it simple to back up your Nokia C210 data to the PC and recover supporting data for your Android gadget. Now let’s find out how you can back up and upload your Nokia C210 files.
safe & secure
- Open Dr.Fone Phone Backup on your PC, and select the “Phone Backup” option.
- Connect your Nokia C210 and PC through a USB connector. However, make sure to permit USB Debugging on your Nokia C210.

- Click “Backup” to begin the backup of Nokia C210 data.
- After the connection, select the File types you need to upload. Of course, Dr.Fone has checked all the document types for you. Then click on backup to begin the process. It will require a short time. Kindly don’t detach your Nokia C210 nor use it during the backup.

- After the backup is finished, you can tap on the “View the Backup” button to see what’s in the document.

The Bottom Line
Factory resetting is not ideal for some problems, but sometimes it becomes the only possible solution. So, if you have your phone stuck or want to sell your old phone, you need to factory reset Nokia C210. But make sure to back up your phone before going for a reset. You can back up your files before a factory reset using Dr.Fone - Phone Backup (Android).
safe & secure
5 Ways to Reset Nokia C210 Without Volume Buttons
Sometimes, there may be a necessity to reset an Android device to its factory settings. Whether you wish to sell your device to someone else or unlock your device, you will most likely have to do a hard reset. Most Android devices can be reset easily by pressing a combination of volume and power buttons. But to hard reset Android tablet without volume buttons is a different ball game altogether and perhaps a lot more cumbersome. We are here to break that myth for you!
If the Android device is working well, to hard reset Android tablet without using the volume buttons won’t be much of a problem and can be done within just a few taps. But if the Nokia C210 device is not functioning, it may pose a problem. That said, there are several methods to hard reset Android tablets without volume buttons. We have been able to list some of the easiest methods and describe them for you in the sections that follow. So read on to learn how to hard reset your Android device without volume buttons.
safe & secure
Part 1: Reset Android without volume buttons using Dr.Fone - Data Eraser (Android)
If you need to reset an Android device that doesn’t have functional volume buttons, Dr.Fone - Data Eraser (Android) can assist you in securely erasing all data and performing a reset. This software provides a reliable solution that doesn’t require volume buttons.
Before proceeding with the reset using Dr.Fone - Data Eraser (Android), carefully consider whether you still want to delete all data from your phone. Resetting will permanently erase all files, settings, and personal information on your device, and it cannot be undone. Therefore, it is important to back up any important data before performing the reset. If you are certain that you want to proceed with the reset using Dr.Fone, follow the steps below:
safe & secure
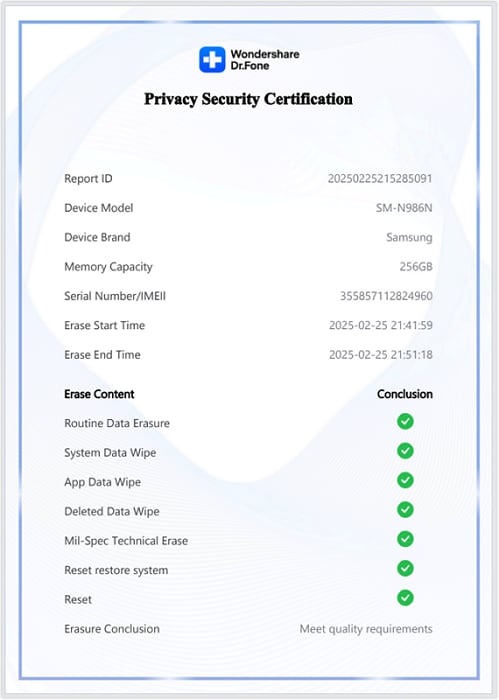
- Step 1: Download Wondershare Dr.Fone on your computer. Open the “Data Eraser” tool and connect your android device to the computer.
- Step 2: Click “Erase” to start erasing all data on the Android device. Think again about whether you want to delete all data and type “000000” to confirm.
- Step 3: Wait for the erase process to end, and you can view the erasure report to check the data type erased after erasing completes.
safe & secure
Part 2: Reset Android without volume button in recovery mode (need home button)
Resetting an Android smartphone or a tablet is not very hard, especially, if there is a home button on your device. A combination of few button presses including the home button will be the first step to the factory data resetting process. But if there are no physical volume buttons, the process may be quite different from the normal tablets. Only after booting your Android tablet into recovery mode, you will be able to hard reset Android tablet without volume buttons. To know how to reset an Android tablet without volume buttons, follow the steps described below. Remember that this method would only work if your Android device has a home button.
- Step 1: Press Power off + home button.
Press the power button until the options for Power off, Restart, and others appear. Now, tap on the “Power off” option and hold on to it while pressing the home button of your android device at the same time.
- Step 2: Confirm boot into safe mode.
Now, the screen for rebooting into safe mode will appear. Tap on “Yes” to enter the safe mode.
- Step 3: Enter recovery mode.
Press and hold the power button as well as the home button of your device simultaneously until a new screen appears. After it appears, release the two buttons and press the power button one more time. Now, press and hold down the home button. With that, you will enter into recovery mode and a new set of options will appear on the screen.
- Step 4: Navigate and do Factory Reset.
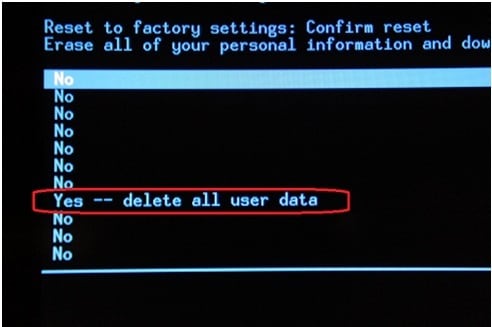
Using the home button to navigate, move down to the “Wipe data/factory reset” option. Press the power button to select the option.
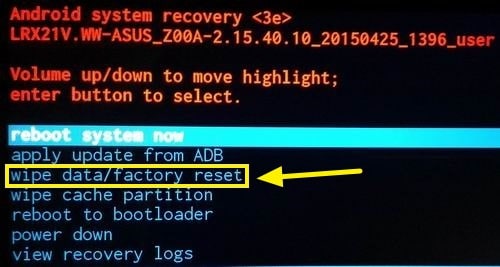
You may have to confirm your choice by selecting “Yes”.
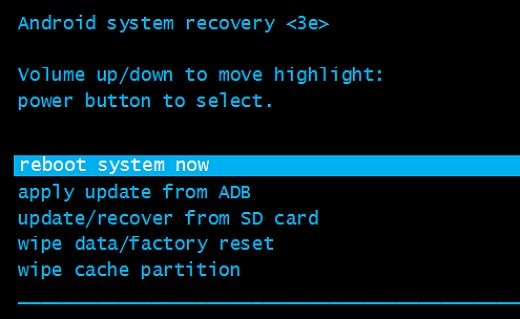
- Step 5: Reboot your device.
After the reset is complete, navigate to the “reboot system now” option and select it to reboot your device. At the end of this process, your device will be reset.
Part 3: Reset Android with the reset pinhole
There are many reasons for opting to reset an Android smartphone or tablet. Sometimes, a forgotten password might get your tablet locked. At times, the screen of your smartphone or tablet might get stuck and fail to respond. Or your device might come with a non-removable battery to make matters worse. For all these problems and many others, you might want to reset your device. But if your device does not come with a home button or volume buttons, you might want to use a different method. Generally, such devices come with a reset pinhole on the Nokia C210 device which can be used to reset the Nokia C210 device. To perform a tablet hard reset without the volume button, follow the simple steps described below.
- Step 1: Find the Reset pinhole.
Look for a very small opening on the back panel or the bezels of a smartphone. Usually, such pinholes are marked “Reset” or “Reboot” and are available on the top left side of the back panel. But be careful not to mistake it with the microphone as using it for resetting your gadget may damage the small microphone permanently and lead to other complications.
- Step 2: Insert a pin into the hole.
After locating it, insert a stretched paperclip or a small pin into the hole and press it for a few seconds.
Now all the data in your Android device will be reset. After this, you can continue to use your device normally without any problem.
Part 4: Reset Android from Settings (phone works normally)
If your Android tablet or smartphone is functioning normally, your device can be reset to the factory settings using just your device itself. Even if your device does not have a home button or volume control buttons, this method will be applicable and can be used to reset the Nokia C210 device. But before using this method to reset your Android device, make sure to back up all the necessary information that you have on your device. You can also sync all the important files to the cloud using your Google account. Also, it is necessary to keep in mind that this procedure will remove all the accounts into which your device is signed in. To know how to reset an Android tablet without volume button, read on.
- Step 1: Open the Settings app.
Tap on the Settings app in the app section of your device to open it.
- Step 2: Select the Data Reset folder.
After that, navigate or scroll down until you can find the “Backup and Reset” option. Tap on it to open the folder.
- Step 3: Tap on Factory data reset.
Now swipe down to find the “Factory data reset” option and tap on it. A new screen will appear, requesting you for confirmation to proceed with the process. Tap on “Reset device” to start the process.
At the end of the process, your device will be reset and ready to use after it completes the mandatory reboot.
Part 5: Reset Android tablet to unlock Android using Dr.Fone - Screen Unlock (Android)
If you are facing the challenge of resetting an Android tablet to unlock the lock screen, the easiest way is to use a dedicated tool. Dr.Fone - Screen Unlock (Android) is recommended in this case. It is a helpful software that provides a solution to bypass screen lock and perform a reset on your Android tablet.
![]()
Dr.Fone - Screen Unlock (Android)
The Best Tool to Reset Android and Solve Your Screen Locks
- Reset Android tablets or phones when the Nokia C210 device is locked or without a volume button.
- Bypass the FRP lock of Nokia C210 without a PIN or Google account.
- Support most mainstream Android models like Nokia C210, Nokia C210, Xiaomi, etc.
- Everyone can handle the lock screen without any tech knowledge.
3,724,689 people have downloaded it
Here are the steps about how to reset Android to unlock lock screen.
- Step 1: Launch Dr.Fone - Screen Unlock (Android) and connect your Android device.
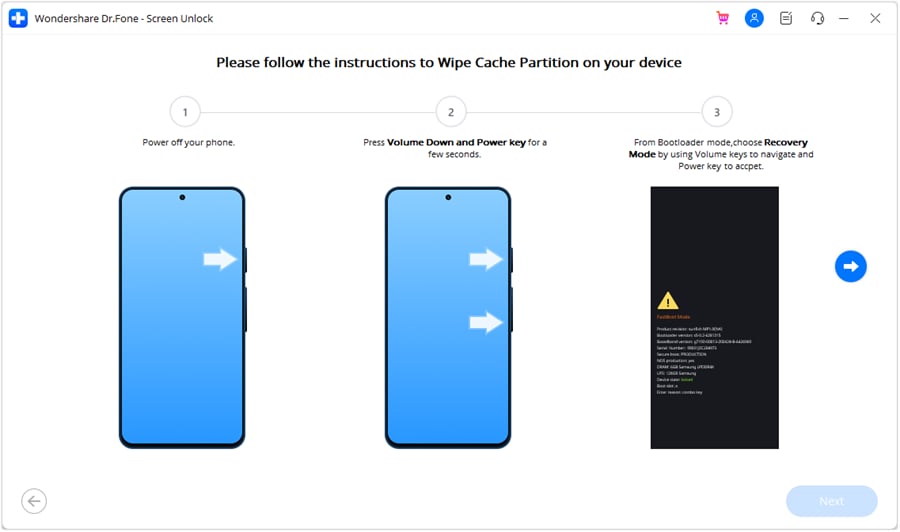
First, install and launch Wondershare Dr.Fone on your computer. Select the “Screen Unlock” option from the main interface and then click “Android” > “Unlock Android Screen”. Using a USB cable, connect your Android tablet to the computer.
- Step 2: Select your device brand and follow the guide to restart your device.
Dr.Fone will ask you to select your device brand and display the specific way to restart the Nokia C210 device. You need to select your device brand in this step because the unlock way of different device brands is different. And then follow the instructions to restart your device.
- Step 3: The lock screen of your device is removed.
Wait for the reboot process to complete, and then you can access the phone or tablet without the password.

Conclusion
So these are the methods with which you can do a reset without using volume buttons. The difficulty level of the methods depends on the type and brand of the Android device. The first two parts can be performed easily by anyone, and that too in a matter of a few minutes. However, the third method may pose some difficulty, particularly because manufacturers set different key combinations for rebooting the Nokia C210 device into recovery. Nevertheless, once it is figured out, the rest is easy. Hence, it is up to you to decide on the method to be adopted for hard resetting your Android device.
safe & secure
- Title: Hard Resetting an Nokia C210 Device Made Easy | Dr.fone
- Author: Ian
- Created at : 2024-09-22 16:26:22
- Updated at : 2024-09-24 16:10:26
- Link: https://techidaily.com/hard-resetting-an-nokia-c210-device-made-easy-drfone-by-drfone-reset-android-reset-android/
- License: This work is licensed under CC BY-NC-SA 4.0.