Enhance Your Mac Experience with Our Top 7 Accessibility Features Designed for All Users

Enhance Your Mac Experience with Our Top 7 Accessibility Features Designed for All Users
Quick Links
- Customize the Font Size
- Customize the Pointer Size
- Reduce Motion
- Zoom on Everything
- VoiceOver
- Increase the Contrast
- Reduce Transparency
Your Mac comes packed with a long list of accessibility features that support your vision, mobility, hearing, and speech. Accessibility benefits everyone, and I’ve found that this rings true with these top features that make the Mac feel like a dream to use.
1 Customize the Font Size
Have you ever felt that the font size on your Mac’s apps and elements is just too small? If you want to increase this without wanting to zoom in, there’s an easy fix.
Go to Settings > Accessibility > Vision > Display > Text > Text Size. Now, you can customize your Mac’s font as you want. This also lets you set different font sizes for different apps, including Notes, Calendar, and Messages.
Close
2 Customize the Pointer Size
One more element on your Mac screen that you can customize is your pointer. I prefer to increase it from the default size to make navigation easier, especially when dragging and dropping elements on my screen.
To customize your pointer size, go to Settings > Accessibility > Vision > Display > Pointer. Increase your pointer size by dragging the slide bar towards “Large,” and decrease the size by dragging the bar towards “Normal.”
Close
3 Reduce Motion
You might have noticed the quick, sideways/diagonal motion that flashes on your screen when switching between apps or changing desktops. If this is something that you’re not a huge fan of, there’s an accessibility feature that converts this movement into a mellow fade, or in some cases, decreases the speed at which the switch between elements happens.
To reduce on-screen motion, go to Settings > Accessibility > Vision > Display, scroll to Reduce Motion, and turn it on.
Close
4 Zoom on Everything
One of my favorite accessibility features is Zoom, which you can use to magnify everything: from the text on your screen to the Touch Bar (if you have a MacBook with one). Zoom also lets you use certain keyboard commands or the trackpad for a quick shortcut to zoom on your screen.
To turn on Zoom, go to Settings > Accessibility > Vision > Zoom, and choose from three options (or turn on all, if you want to use them at your convenience):
- If you turn on “Use keyboard shortcuts to Zoom”, you can press Command+Option+8 to toggle zoom, or Command+Option+= (equal sign) to zoom in and Command+Option+- (dash) to zoom out.
- If you turn on “Use trackpad gestures to zoom,” you can zoom in by triple-tapping your Mac’s trackpad three times. Drag your fingers across the trackpad to adjust the zoom. Repeat the triple-tap gesture to zoom out to your default screen.
- You can also customize how you want to zoom in by turning on “Use scroll gesture with modifier key to zoom.’” Then, select a modifier key from Control, Command, and Option. Now you can press down on your chosen modifier key while scrolling on your trackpad to zoom in and out.
Close
If your MacBook has a Touch Bar , you can enable Zoom on it. To do so, go to Settings > Accessibility > Zoom, then turn “Touch Bar Zoom” on. Toggle it the same way when you want to turn Zoom off.
Another thing that Zoom lets you do is display a larger version of specific text that you want to read, with “Hover Text.” I use “Hover Text” to read the fine print on web pages and documents, specifically late at night to avoid eyestrain.
Go to Settings > Accessibility > Vision > Zoom and switch on “Hover Text.” Customize the font, size, and style of “Hover Text” by clicking the information button next to the toggle button. To enable it, hold down the Command key and hover your pointer over the text you want to zoom into.
Close
5 VoiceOver
VoiceOver is your Mac’s built-in screen reader that converts text into speech. This can be useful even if you are not someone who might require it to navigate every element on your Mac. I find that it comes in handy when I wish to listen to things on my screen rather than read them, which is especially useful for intimidating, long documents and text-heavy websites. I simply enable VoiceOver (which works in all your apps and browsers) and let it read to me. This works wonders for productivity if you are someone who experiences fatigue from staring at your screen too long, like I do.
To turn on VoiceOver, go to Settings > Accessibility > Vision > VoiceOver and switch it on. Now, you can enable VoiceOver when you want by holding down the Command Key while triple-tapping the Touch ID. Repeat the same to toggle VoiceOver and disable it.
Close
VoiceOver is also highly customizable. VoiceOver Utility, which you can access by clicking the “Open VoiceOver Utility” button under VoiceOver, is the tool that will help you change the voice, rate, and pronunciation used, how you navigate VoiceOver on your Mac, sound effects, and even how you wish to use VoiceOver on the internet (for instance, you can set VoiceOver to read out image descriptions or give you a web page summary).
Close
6 Increase the Contrast
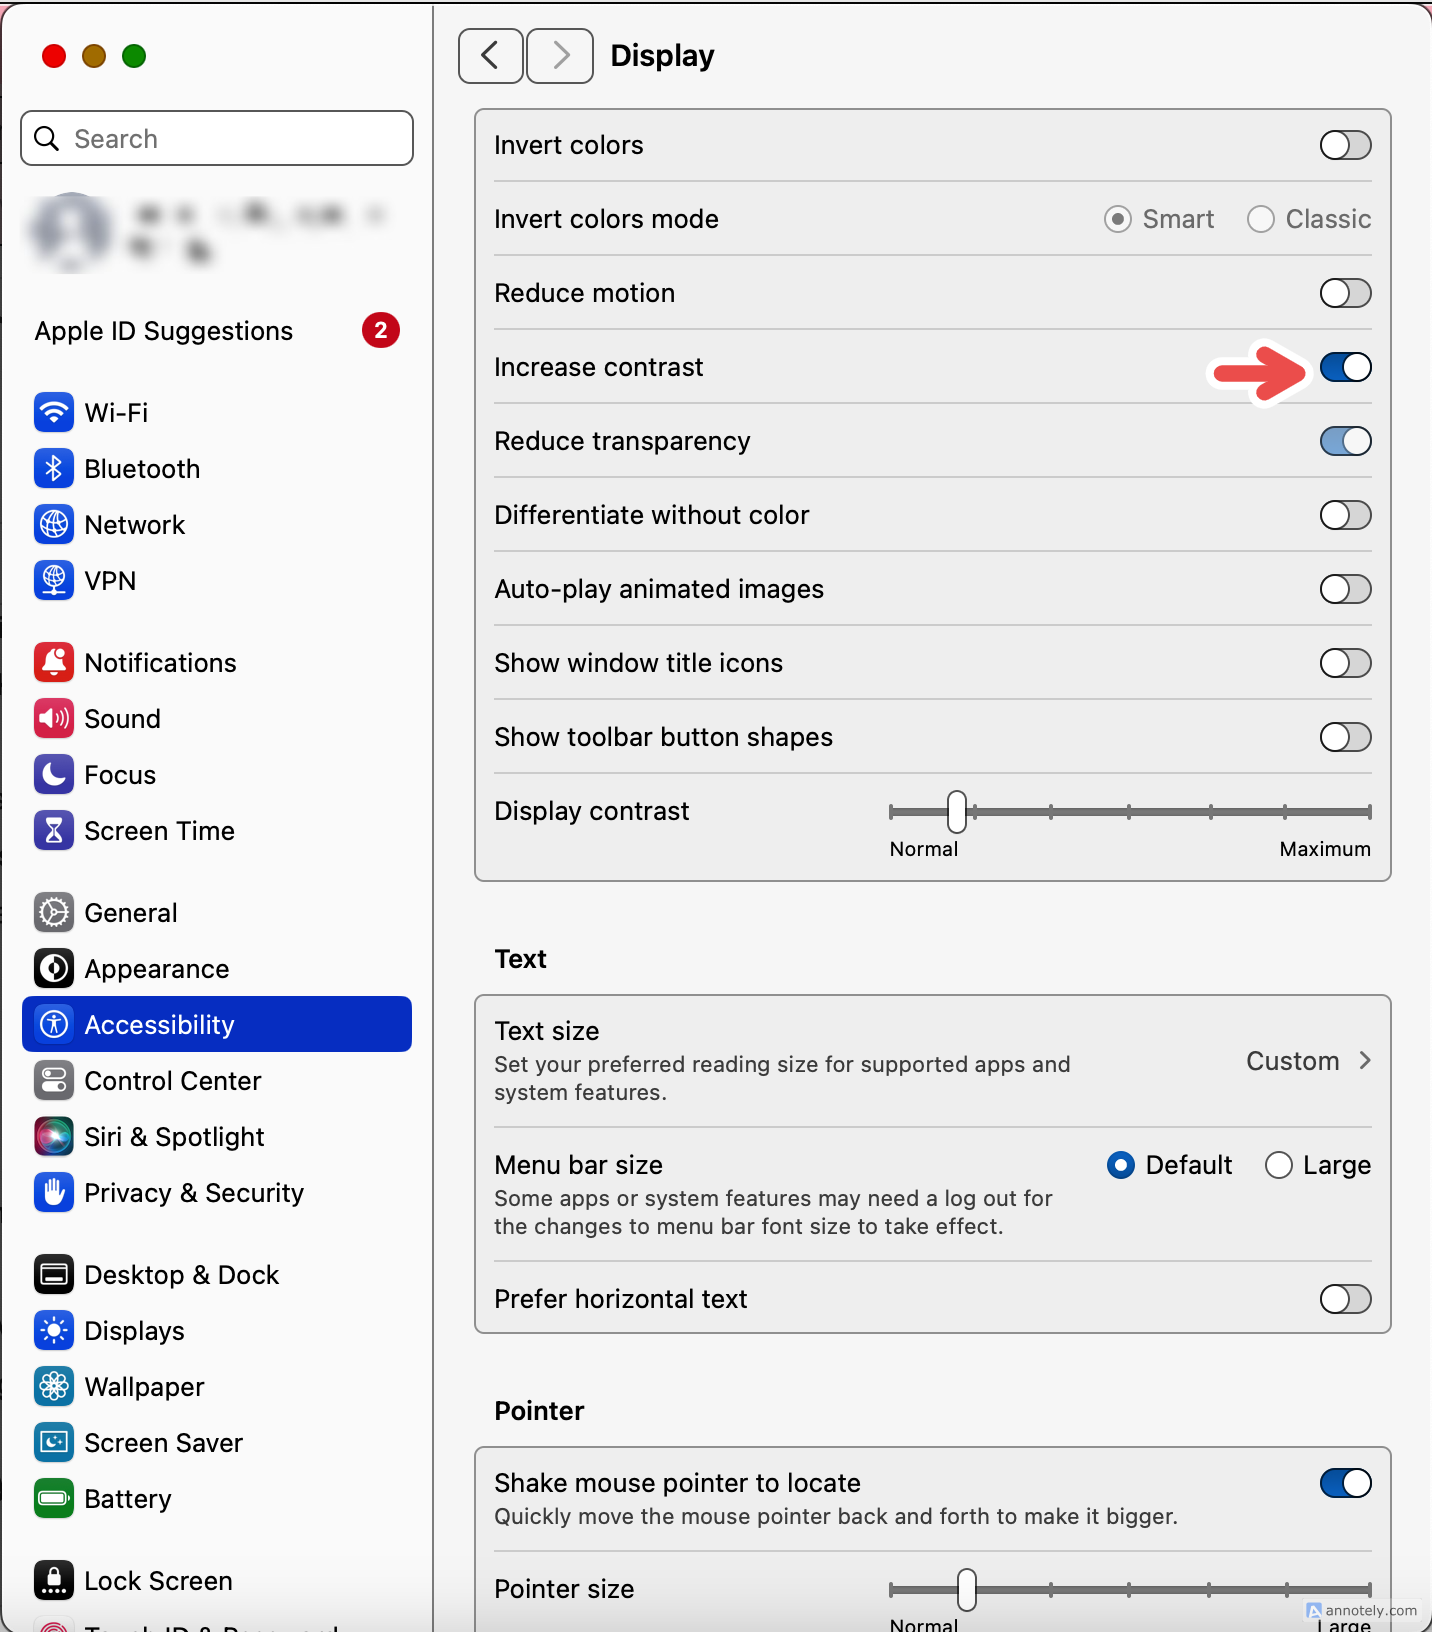
Don’t like the default contrast on your Mac’s display? An accessibility feature that solves this is Increase Contrast, which changes the way items like borders around boxes and buttons look while keeping the contrast of your screen the same.
Go to Settings > Accessibility > Vision > Display and turn on “Increase contrast.” The difference is immediate (and easy on the eyes, if that’s the display you’re going for).
Close
Here’s what your Mac’s menu would look like with an increased contrast.

7 Reduce Transparency
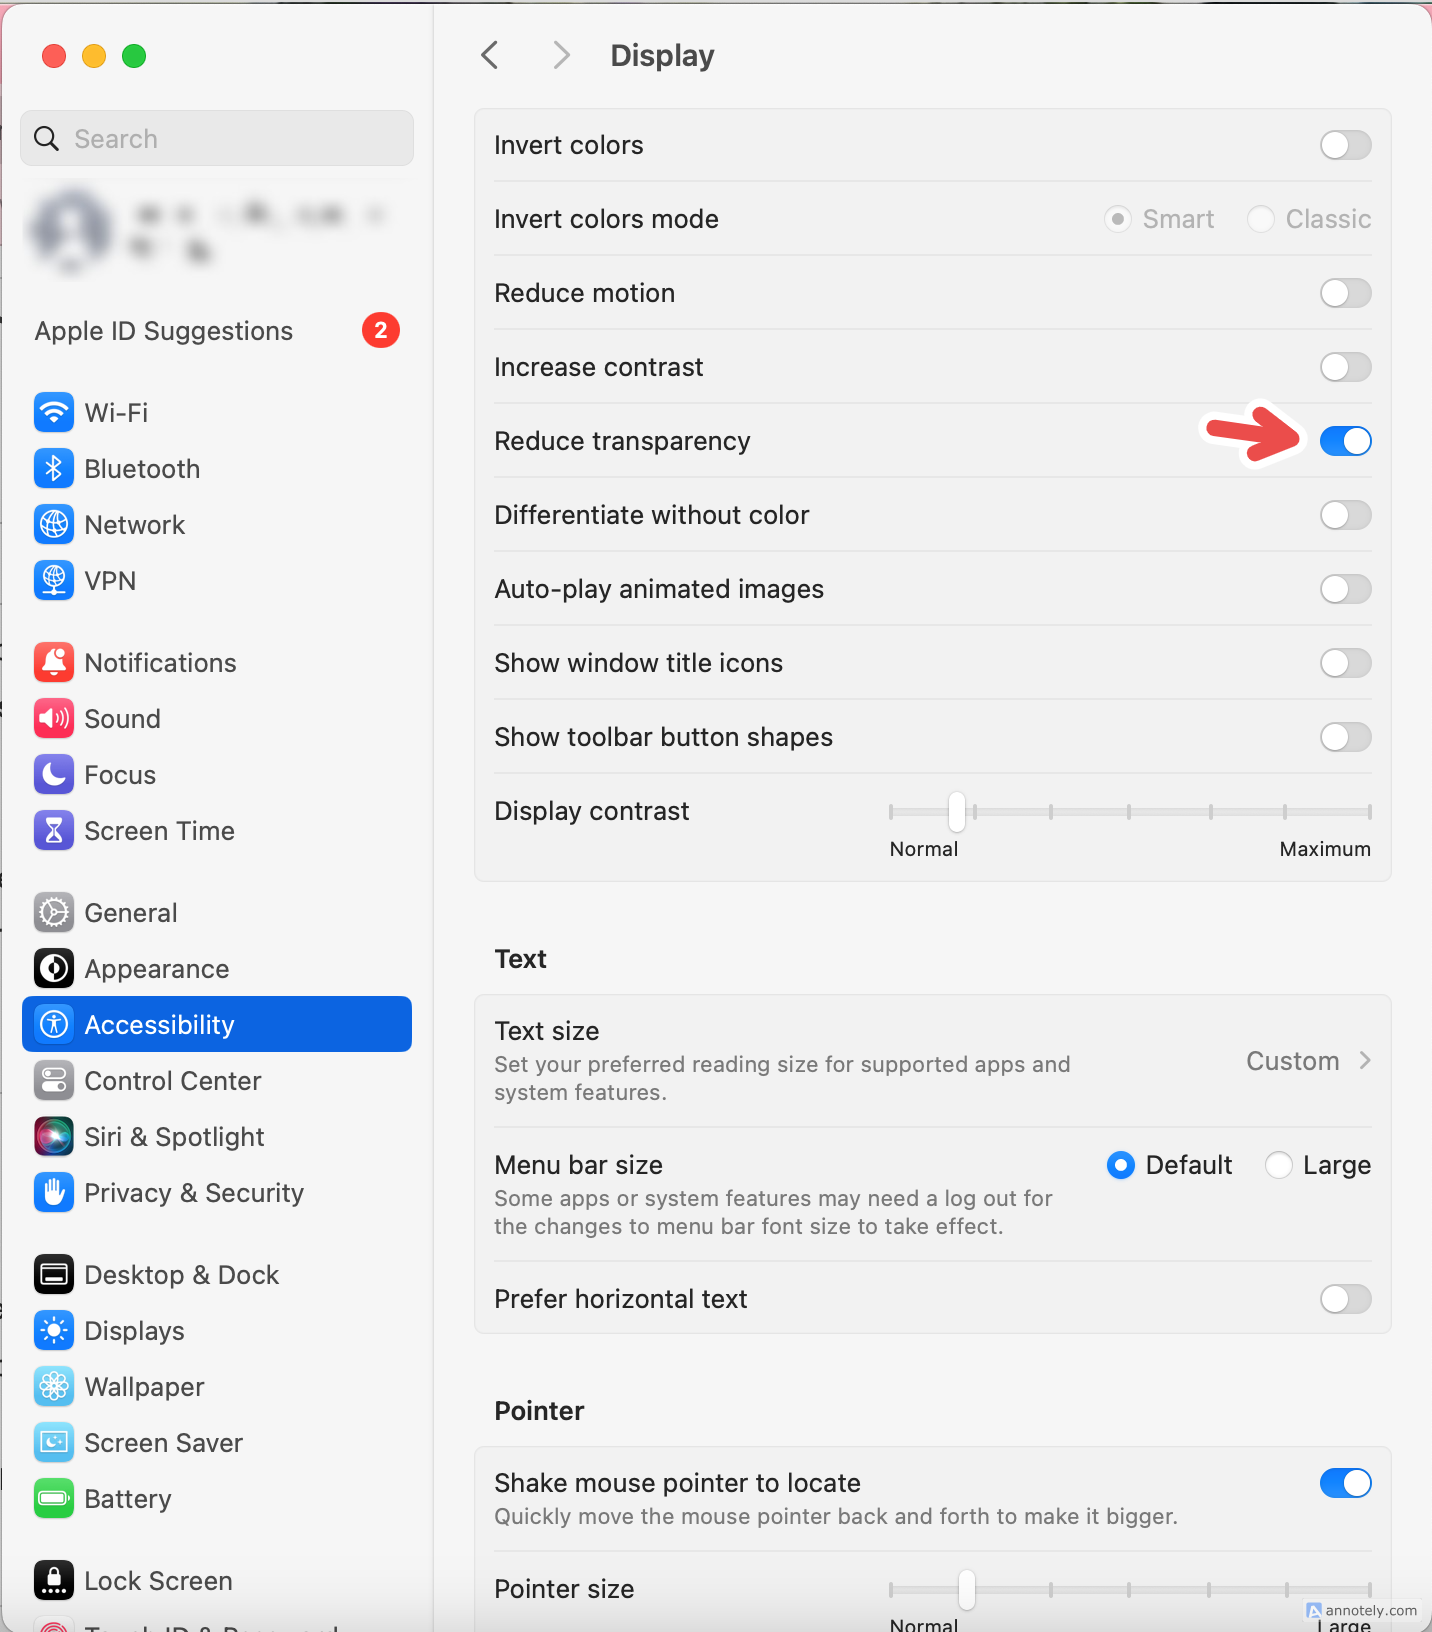
If you are someone like me and have a hard time reading text on the Mac’s menu or dock (especially when you have an app or web page open in the background), or just do not like the look and feel of the contrast between solid backgrounds and a semi-transparent menu/dock, your best bet is reducing transparency. You can change these default transparent elements into a solid gray color in a few clicks.
To reduce transparency, go to Settings > Accessibility > Vision > Display, scroll down, and turn on “Reduce Transparency.”
Close
You can always toggle and switch this off to your liking. I find that reducing transparency is also easier on the eyes, especially when I’m on my MacBook at night.
Here’s what your Mac’s menu would look like with reduced transparency.

If your Mac uses macOS Sonoma 14 , you can access all these accessibility features (and more) easily by turning on Accessibility Shortcuts. To do this, press down on the Touch ID button thrice, or use the keyboard shortcut of Option+Command+F5. Go to Settings > Accessibility > General > Shortcut and tick which accessibility feature you want displayed when the shortcut menu pops up.
Close
Now that you have your hands (and eyes) on the starter pack, you can now explore more accessibility features on your Mac, and make your navigation smoother.
Also read:
- [New] 7 Best NFT Generators to Turn Your Artwork Into NFTs
- [Updated] Expert Tips on Controlling Timeline Pace in Videos
- [Updated] In 2024, Android/Mac Apps to Lock in Your Snaps
- Banish Coffee Stains Free iPhone App to Remove Red Eyes for 2024
- Best Fixes For Lava Yuva 2 Hard Reset | Dr.fone
- Different Methods for Resetting Honor 100 Phones with Screen Locked and Not | Dr.fone
- Effektivt Bearbetar Audiofilmer - Ivån Med Movavi: Din Gamla Ljudbittarrat Rätt Utanför Tiden
- How TikTok's Monumental $1. 5B Bet on E-Commerce Is Transforming Indonesia's Digital Marketplace - Analysis by ZDNet
- How to Factory Reset Honor X9b without Losing Data | Dr.fone
- How to Fix Life360 Shows Wrong Location On Realme C55? | Dr.fone
- How To Transfer WhatsApp From Apple iPhone 15 Pro Max to Android? | Dr.fone
- Reset pattern lock Tutorial for Motorola Edge 40 Pro
- Resolving the Issue of Inadequate Space During iPhone Restoration in iTunes
- Stellar Data Recovery for iPhone 8 failed to recognize my iPhone. How to fix it? | Stellar
- Ultimate Selection of High-Performance Inverters - Buyer's Best Picks
- Unlock iPhone 12 screen lock without data loss
- Title: Enhance Your Mac Experience with Our Top 7 Accessibility Features Designed for All Users
- Author: Ian
- Created at : 2025-02-16 19:54:19
- Updated at : 2025-02-19 16:55:18
- Link: https://techidaily.com/enhance-your-mac-experience-with-our-top-7-accessibility-features-designed-for-all-users/
- License: This work is licensed under CC BY-NC-SA 4.0.