Discover a More Private Web Experience with My Effortless Switch to Brave Browser

Discover a More Private Web Experience with My Effortless Switch to Brave Browser
Key Takeaways
- Brave is a privacy-focused alternative to Chrome, with strong anti-tracking features.
- Brave is monetized through an optional blockchain network to reward ad companies and users, while keeping typical ad networks at bay.
- Brave can be easily set up on the desktop and mobile, with sync features similar to Chrome but without linking to a Google account.
You might already know that Chrome is a resource hog. But it’s also a terrible choice for privacy, especially on the default settings. That’s why I switched to Brave, a Chrome alternative with all of its features and none of the privacy vulnerabilities.
Why Switch to Brave Browser
Chrome is a platform for ads. That’s how it’s monetized. The browser has a system that tracks every page you visit to build a list of personalized ad topics. Ironically, it’s called the “Privacy Sandbox .” It’s built into the browser and enabled by default. Third-party cookies (which follow you around websites, tracking whatever you click on) are also enabled by default.
Brave isn’t monetized the same way. It uses the blockchain to reward ad companies and its users. Brave has its own unique ad network (which isn’t enabled by default and you have to opt-in) that shows you banner ads and push notifications. It has an incentive to keep you out of typical ad networks. Of course, you can just leave it disabled and use the browser as usual.
Where Google Chrome provides little to no tracking protection , Brave has some of the strongest anti-tracking features in a mainstream browser. It even randomizes your browser fingerprint . I tested Chrome against Brave on CoverMyTracks . Both browsers are running on default settings.
Close
Chrome’s performance doesn’t impress me either. Chrome and Brave take up almost the same amount of memory on launch. But once you’ve opened a few tabs, Chrome starts to really eat into the RAM. With the same 10 tabs open and no extensions, Brave consumes roughly 1/3rd of the memory Chrome needs. Chrome only gets worse when you load more tabs and more extensions.
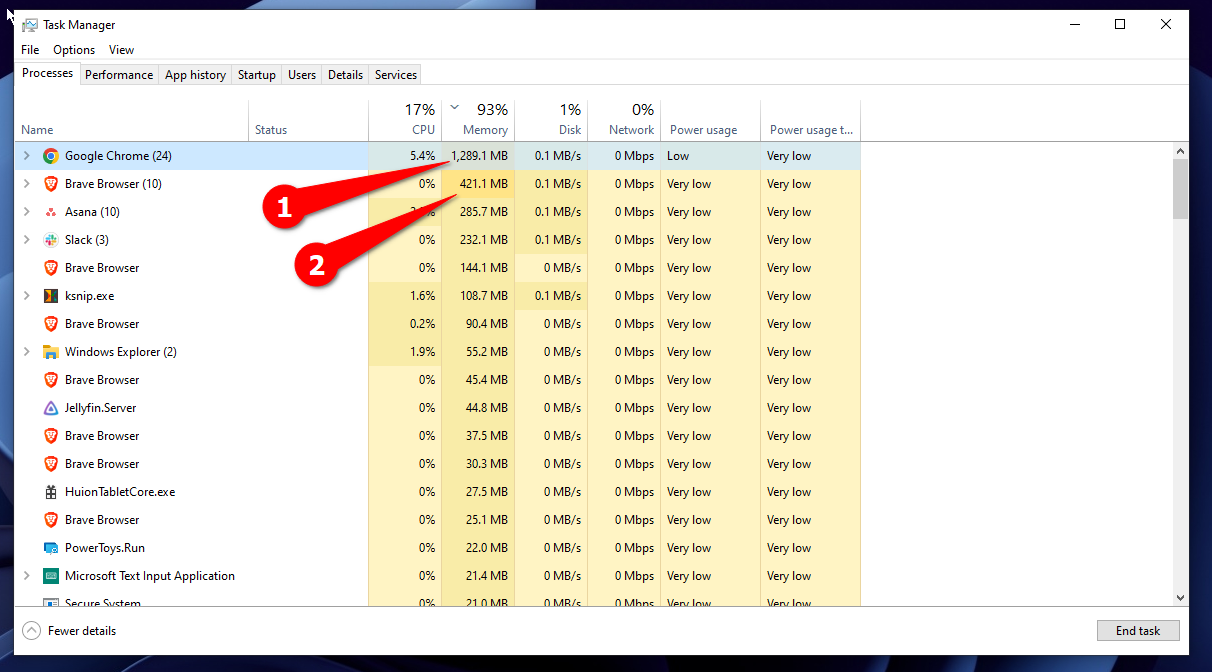
Brave respects your privacy, and it’s lighter on your resources. But is that enough to bother with browser migration? It should be when you consider that Brave runs on the same engine as Google Chrome—they’re both Chromium-based . That means you can use all your Chrome extensions on Brave too.
Plus, Brave has a sync feature just like Chrome’s that lets you sync browser data and preferences across different devices. Even if you don’t want to ditch Chrome completely, it can be a good idea to use multiple browsers .
Switching to Brave On Desktop
Whether you’re on Windows or MacOS, you can grab the installer for the Brave browser from the official website . Brave is also available on Linux. Open the Brave download page and click “Get Brave.”
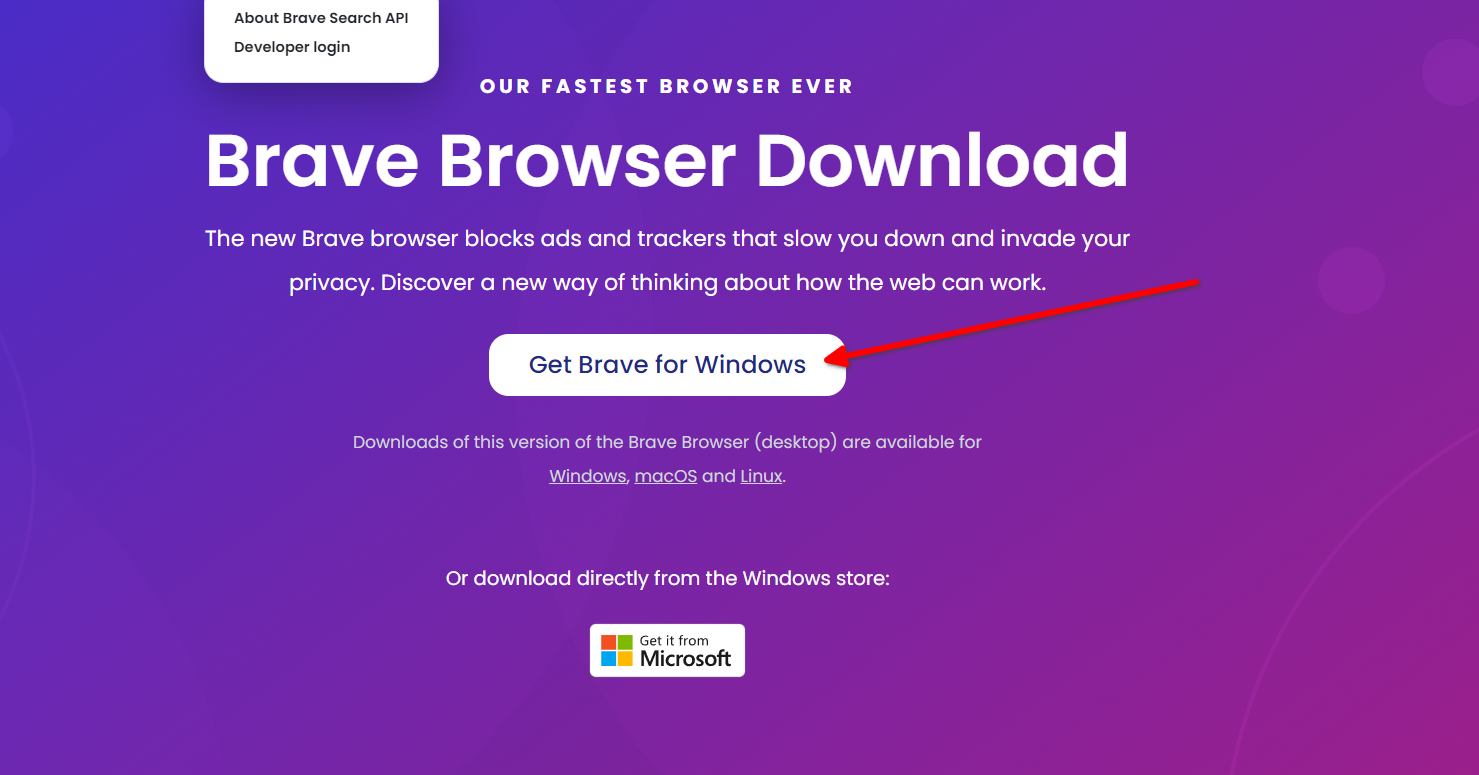
Double-click the setup file to launch the installer. It’ll automatically download, install, and launch the browser.
Close
On the first launch, Brave will greet you with a Welcome screen. The setup is effortless. Here you can make Brave your default browser with a single click. On the next screen, you can import all your Chrome bookmarks and passwords. Just select Chrome and click “Import.”
Close
Brave has its own dedicated search engine that you can use. I use DuckDuckGo so I’ll be skipping Brave Search. I also don’t want to send my usage information to Brave. Just click “Finish.” to complete the first setup.
Close
Brave will open the dashboard with all your bookmarks, browsing history, and saved passwords imported from Chrome. It’s still missing extensions though. You’ll have to reinstall those manually. Head to the Chrome Webstore and install your extensions with a single click (just like you would on Chrome).
Google Chrome has a sync feature that links with your Google account to create a profile. With sync enabled, you can open Chrome on any device and have your preferences, browser data, bookmarks, passwords, and extensions ready to go. Brave also has sync, but it’s not linked to your Google account. Sync works through a “chain” of devices. You can simply enter a code phrase or scan a QR code to add a new device to the sync chain. You can then manage the synced devices and choose what gets synced and how.
To keep your synced data safe, Brave encrypts the synced items (passwords, bookmarks, and so on) on the client-side. In simpler words, all your data is locally encrypted on the device before it’s sent to Brave servers. Brave servers only send and receive the encryption version, and it’s decrypted on your device locally. At no point does Brave have access to your content or the encryption keys.
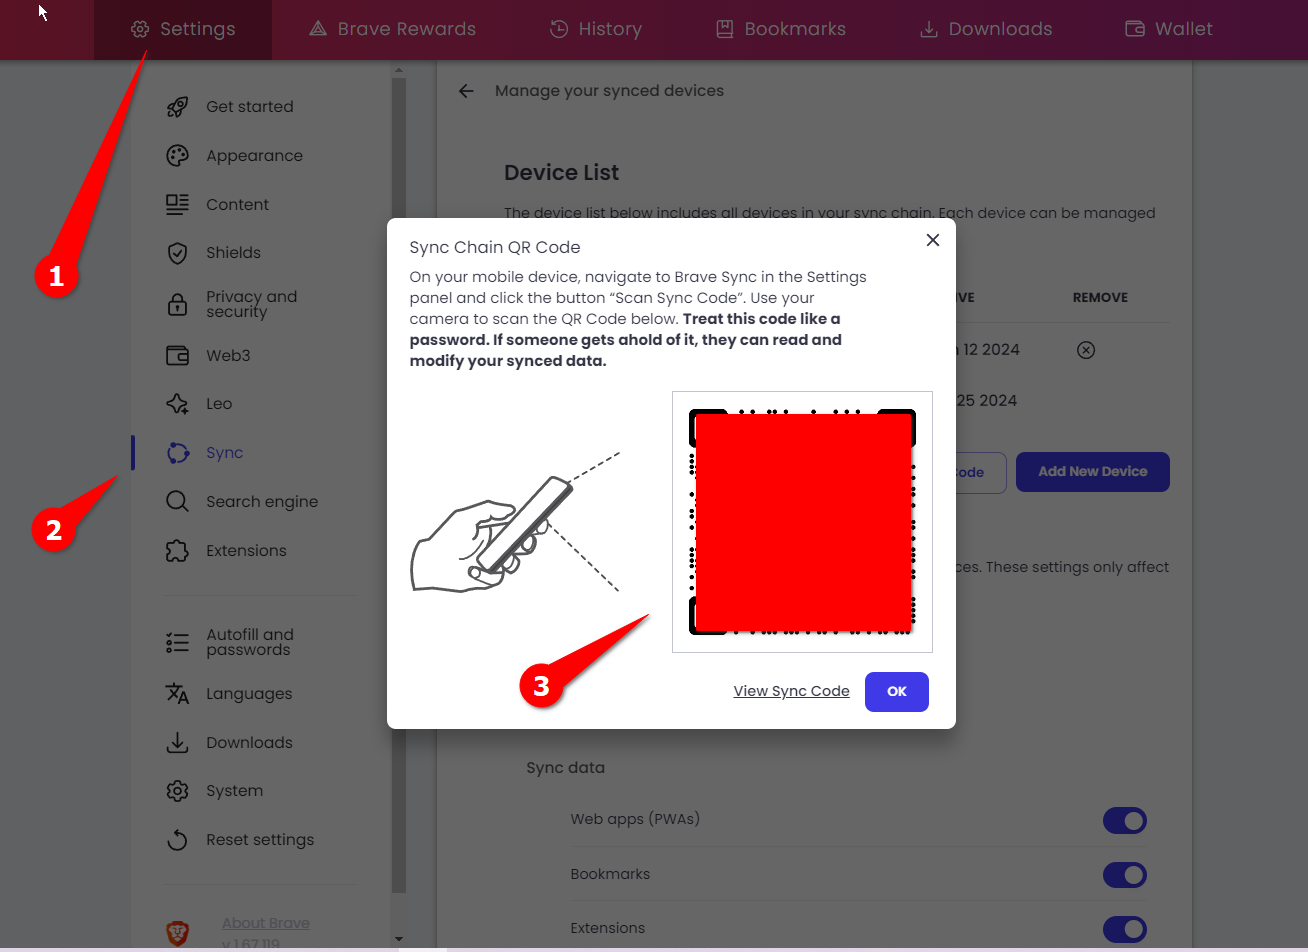
If you install Brave on another computer, you can sync it on the chain by heading over to Settings > Sync > “I Have a Sync Code.” Just enter the code and you’re good to go.
I also like to tweak a few settings before I start using the Brave:
- Reduce Clutter: The dashboard on Brave is pretty cluttered. Just click the three dots on every widget and hide it.
- Change the Default Search Engine: Brave browser defaults to Brave Search, which you can change in the settings. I picked DuckDuckGo for normal and incognito windows.
- Fix Common Streaming Problems: Also, open Settings > Extensions and enable Widevine support. It’s turned off by default, and can cause streaming platforms like Netflix to misbehave.
- Disable the AI: Lastly, go to Settings > Leo and disable it. It is Brave’s own generative AI assistant which I don’t need.
Close
Switching to Brave On Mobile
Once you’ve set up Brave on your desktop, installing it on mobile is a lot easier because the sync feature is already active.
Install Brave from the Google Play Store and open it. Brave on Android also gives you a Welcome screen that you can use to set Brave as the default browser and turn off usage reporting.
Close
To import your bookmarks, passwords, and history into the Brave browser on your phone, go to Settings > Sync and tap “Scan or Sync Code.” The QR code we need to scan is on the desktop version of Brave (which we’re trying to sync to). So open Brave on the desktop and go to Settings > Sync > Manage Your Synced. Click “Add New Device” and select “Phone/Tablet.” You’ll get the QR code you can scan.
Close
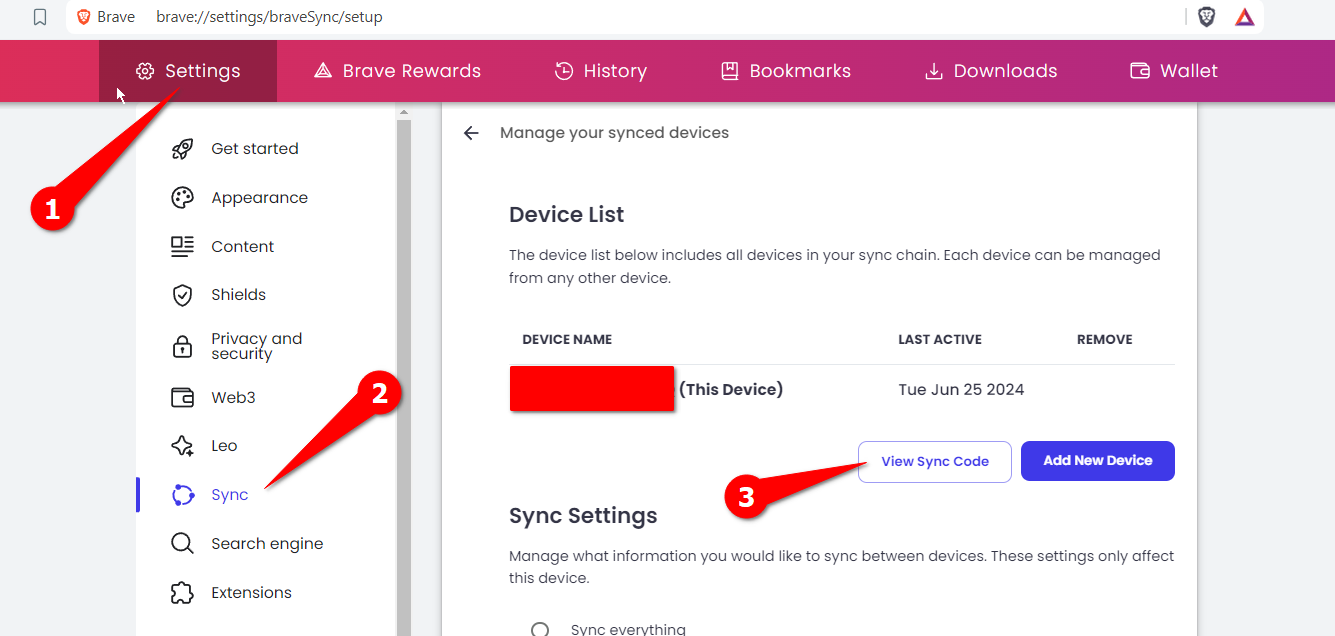
Alternatively, you can click View Sync Code and enter that manually on your phone. On the desktop, you can also “customize” the sync. It lets you sync everything or select data as you need it.
You can manually load the passwords and bookmarks from Chrome mobile. Open Chrome on your phone or tablet and go to Settings > Google Password Manager > Export Passwords. Copy the file anywhere on your computer.
Close
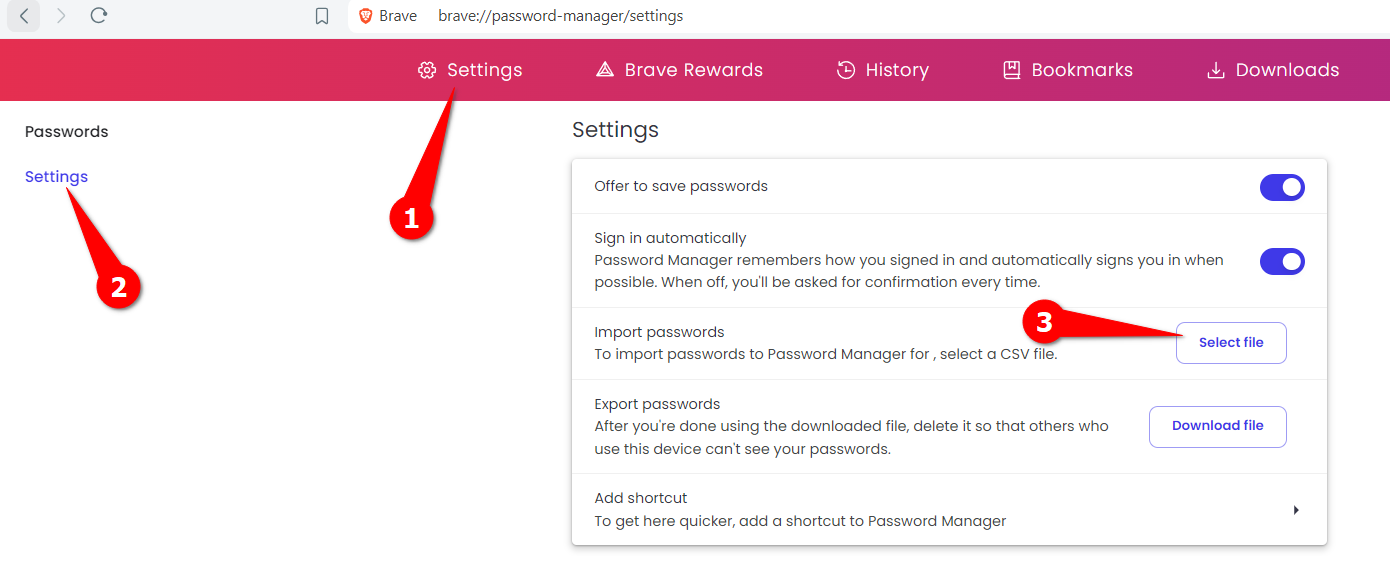
Then you just have to import this file into Brave desktop (which is synced to your Android) and all your passwords will sync. Open Brave > Settings > Brave Password Manager and hit “Select File.”
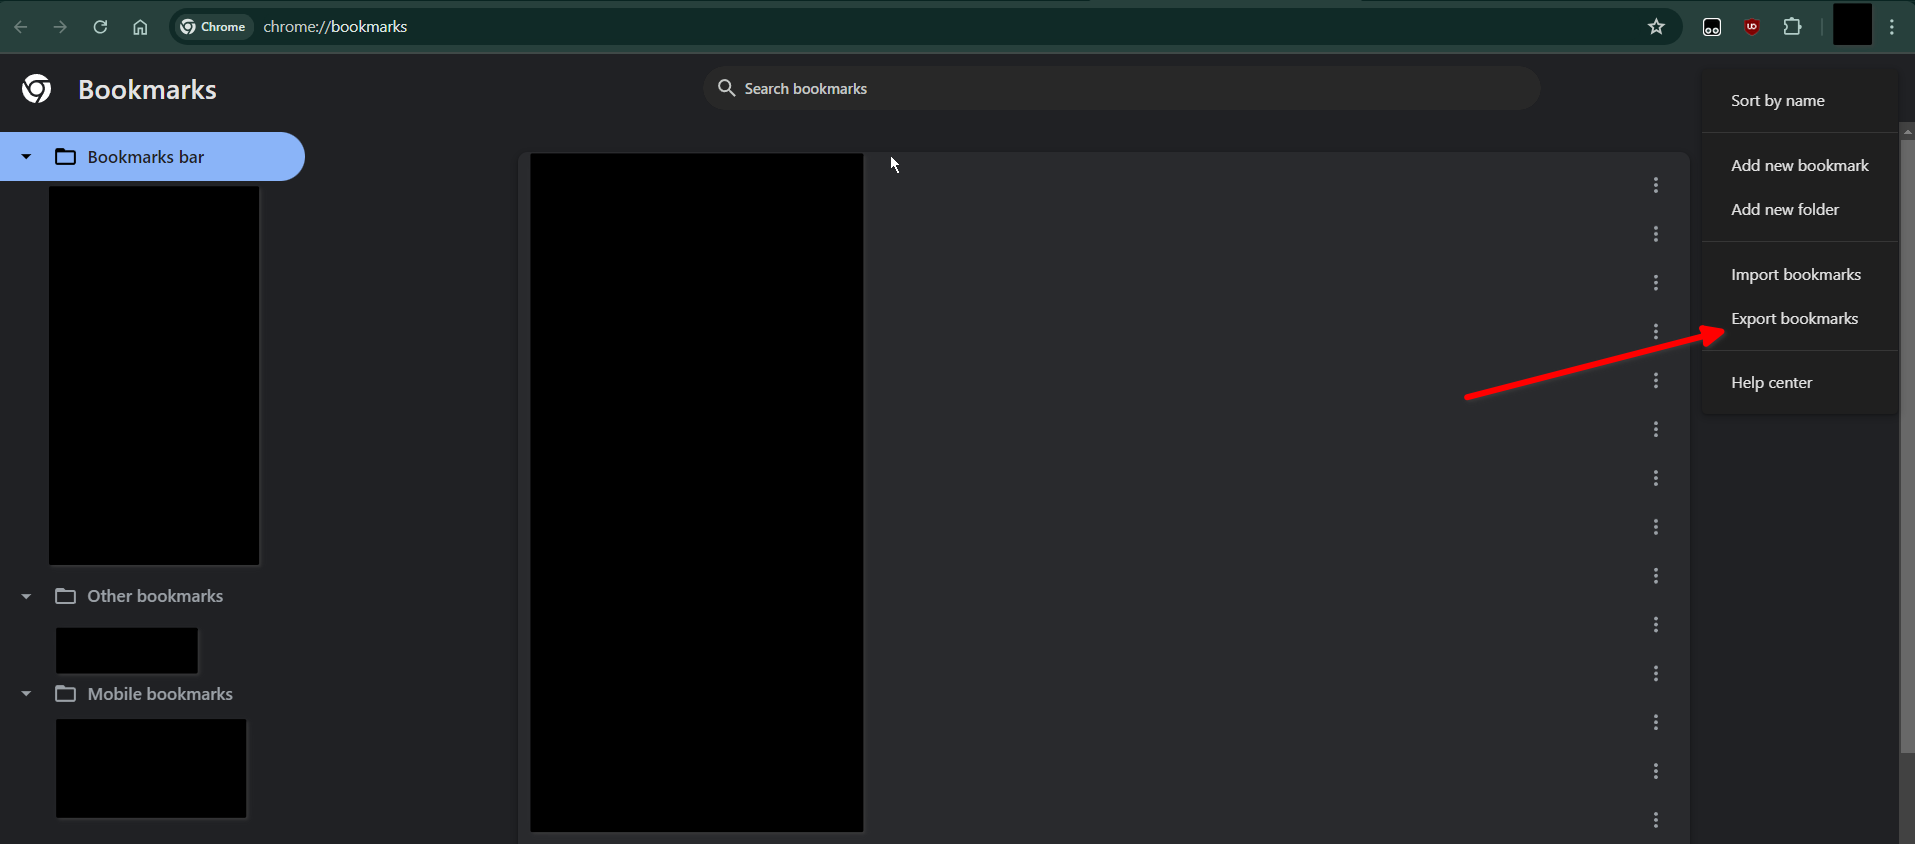
There’s no way to export Google Chrome bookmarks on the mobile version of the app. You’ll have to use Chrome on your desktop to move synced bookmarks. Click the three dots menu, then select Bookmarks and Lists > Bookmarks Manager. On the bookmarks page, click the three dots and select “Export Bookmarks.” Save the HTML file anywhere and move it to your phone’s storage.
On your phone, open Brave browser, tap the three dots and select “Bookmarks.” Tap the three dots again and select “Import Bookmarks.” Find the file you just moved from your PC and select it. That’s it!
Close
The Brave setup on iOS is almost identical to Android. You get the app from the AppStore, tap “Set as Default” and it takes you to Settings where you can switch the defaults. To set up sync on iOS, open Brave settings, tap Sync, then “I Have a Sync Code” and scan the QR code on your desktop.
Close
That’s all you need to kick Google Chrome out of your life without losing its features or functionality thanks to Brave. Happy browsing!
Also read:
- [New] 2024 Approved Focused Communication Tips for Virtual Teams
- [New] 2024 Approved Unleash YouTube Potential with Smart Tags and Titles
- [Updated] 2024 Approved The MacBook-Mixer Dynamic Perfect Streams in 5 Steps
- 如何在不丢失文件的前提下,重置和重组 Windows 10系统
- Best Fixes For Infinix Note 30 VIP Hard Reset | Dr.fone
- Eliminating Freeze Frames at Game's Start
- Factory Reset Apple iPhone 11 | Dr.fone
- Hard Resetting an Honor 90 Pro Device Made Easy | Dr.fone
- How To Repair iOS of Apple iPhone 6? | Dr.fone
- How To Reset Apple iPhone 6 Plus Without iTunes? | Dr.fone
- How To Transfer Data From Apple iPhone 12 Pro To Other iPhone 11 devices? | Dr.fone
- How To Transfer Data From Apple iPhone 15 To Other iPhone 13 Pro Max devices? | Dr.fone
- In 2024, Your Ultimate iPhone Podcast Downloading Manual
- The Comprehensive List of Point-of-Sale Solutions Excluding GPT
- Top 5 Vivo S17t Bypass FRP Tools for PC That Actually Work
- Turn Off Screen Lock - OnePlus 11R
- Unmatched Durability Meets Personalization: Inside the Ultimate Laptop Experience Beyond Getac | Tech Insights
- Title: Discover a More Private Web Experience with My Effortless Switch to Brave Browser
- Author: Ian
- Created at : 2025-02-17 23:30:32
- Updated at : 2025-02-19 17:15:06
- Link: https://techidaily.com/discover-a-more-private-web-experience-with-my-effortless-switch-to-brave-browser/
- License: This work is licensed under CC BY-NC-SA 4.0.